
The CSS selector priority relationship is:
##!important>inline>ID selector>class selector> Tag selector.
Add the strings of numbers bit by bit according to these rules to get the final weight, and then follow the order from left to right when comparing and choosing. Compare.
1. The style priority within the text is 1,0,0,0, so it is always higher than the external definition.The browser also has a priority algorithmThe priority in the browser is determined by the values of A, B, C, and D. The calculation rules are as follows:2. The rules declared with
!important are above all else. 3. If the !important declaration conflicts, the priority will be compared.
4. If the priorities are the same, they will be determined in the order they appear in the source code, with the later ones taking precedence.
5. The style obtained by inheritance has no specificity calculation, and it is lower than all other rules (such as the rules defined by the global selector *).
li                                  /* (0, 0, 0, 1) */
ul li                               /* (0, 0, 0, 2) */
ul ol+li                            /* (0, 0, 0, 3) */
ul ol+li                            /* (0, 0, 0, 3) */
h1 + *[REL=up]                      /* (0, 0, 1, 1) */
ul ol li.red                        /* (0, 0, 1, 3) */
li.red.level                        /* (0, 0, 2, 1) */
a1.a2.a3.a4.a5.a6.a7.a8.a9.a10.a11  /* (0, 0, 11,0) */
#x34y                               /* (0, 1, 0, 0) */
li:first-child h2 .title            /* (0, 0, 2, 2) */
#nav .selected > a:hover            /* (0, 1, 2, 1) */
html body #nav .selected > a:hover  /* (0, 1, 2, 3) */
The comparison rule is: from Comparisons are performed from left to right, and the larger one wins. If they are equal, continue to move one position to the right for comparison. If all 4 bits are equal, the latter one will overwrite the previous
Inline style has the highest priority, but external style can also override inline style, just ! important, if it is not for Override inline styles and use them sparingly! ! !css basic selector

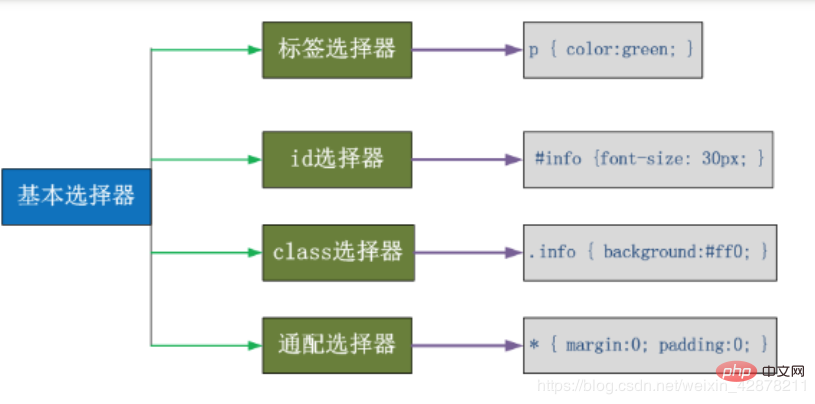
2. ID selector: Match the specified tag #p2{color:red}3. Class selector: Whoever specifies the class will change the color. Multiple options are available, such as .info{color: red}, p.info{color:red}4. Universal selector: all tags are changedCombined selector
<!DOCTYPE html>
<html>
	<head>
		<meta charset="UTF-8">
		<title></title>
		<style type="text/css">
			/*后代选择器,选择所有class为div1后的p标签*/
			.div1 p{
				background-color: red;
			}
			/*子代选择器*/
			.div3>p{
				color:#0000FF;
			}

			/*相邻选择器*/
			.div2+p{
				background-color: #008000;
			}

			/*兄弟选择器*/
			.div2~p{
				background-color: hotpink;
			}

			/*多元素选择器*/
			.div2,p{
				background-color: #7FFFD4;
			}
			.div1 .div2,.div1~p{
				background-color: blueviolet;
				font-size: 20px;
			}
		</style>

	</head>
	<body>
		<!--
			1.后代选择器:.div1 p
			2.子代选择器:.div3>p
			3.多元素选择器:同时匹配所有指定元素   .div1 .div2,.div1~p
		    4.相邻选择器(紧挨着找相邻的,只找下面不找上面).div2+p
		    5.兄弟选择器   .div2~p

		-->
		<p>你好我是p</p>
		<div class="div1">
			<div class="div2">
				<p>我是div2下p1</p>
				<div class="div3">
					<p>div3</p>
				</div>
			</div>
			<p>我是div2相邻的元素p</p>
			<h1 class="h1">h1</h1>
			<h2>h2</h2>
		</div>

		<div class="div1">
			<em>hello world</em>
			<div class="div2">
				<p>hello world div2</p>

				<br/>
				<b>hello hello</b>
			</div>
		</div>
		<h3>h3</h3>
	    <p>最后一个p</p>

	</body>

</html><!DOCTYPE html>
<html>
<head>
<meta charset="UTF-8">
<title></title>
<style type="text/css">
/*1.匹配所有A属性,并且在div中*/
div[A]{
color: aquamarine;
}
/*2.匹配所有A=a1的并且只是在div标签中的*/
div[A=a1]{
color: blueviolet;
/*
* 这个和第一个优先级是相同的
* 应该显示下面的,但是第一个查找的范围广
* 所以也会显示第一个的样式
*/
/*3.匹配所有属性为A,并且具有多个空格分隔的值,其中一个只等于a1的*/
div[A~=a1]{
background-color: darkkhaki;
}
/*4.匹配属性值以指定值开头的每个元素,并且在div标签中*/
div[A^=a]{
background-color: antiquewhite
}
/*5.匹配属性值以指定值结尾的每个元素*/
div[A$=1]{
background-color: blue;
}
/*6.匹配属性值中包含指定值的每个元素 */
div[A*=a] {
background-color: saddlebrown;
}
}
</style>
</head>
<body>
<div>
<div A=" a1 ">1111</div>
<div A="a1">2222</div>
<div A="a2">3333</div>
<div B="a1">4444</div>
</div>
</body>
</html>anchor pseudo class: specially used to control the display effect of links
    a:link(没有接触过的链接),用于定义了链接的常规状态。

    a:hover(鼠标放在链接上的状态),用于产生视觉效果。

    a:visited(访问过的链接),用于阅读文章,能清楚的判断已经访问过的链接。

    a:active(在链接上按下鼠标时的状态),用于表现鼠标按下时的链接状态。

    伪类选择器 : 伪类指的是标签的不同状态:

               a ==> 点过状态 没有点过的状态 鼠标悬浮状态 激活状态

    a:link {color: #FF0000} /* 未访问的链接 */

    a:visited {color: #00FF00} /* 已访问的链接 */

    a:hover {color: #FF00FF} /* 鼠标移动到链接上 */

a:active {color: #0000FF} /* 选定的链接 */ 格式: 标签:伪类名称{ css代码; }before after pseudo class
:before p:before Insert content before eachInheritance of cssInheritance is a mechanism that allows styles to be applied not only For a specific element, it can also be applied to its descendantselement
:after p:after Insert content after eachelement
Example :p:before{content:"hello";color:red;display: block;}
body{color:blue;}Any rule that displays declarations can override its inherited style.
CSS inheritance also has some restrictions. Some propertiescannot be inherited, such as: border, margin, padding, background. Wait
Related tutorial recommendations:CSS video tutorial, CSS3 video tutorial
The above is the detailed content of Detailed explanation of selectors and priorities in CSS. For more information, please follow other related articles on the PHP Chinese website!