Found a total of 10000 related content
jQuery plug-in to realize large picture full screen picture album_jquery
Article Introduction:This article mainly introduces the methods and examples of the jQuery plug-in to implement large-picture full-screen photo albums. It is implemented based on the jQuery plug-in jQuery.album.js. The effect is very good. I recommend it to everyone. I hope you will like it.
2016-05-16
comment 0
1275

How to quickly import PPT images in batches
Article Introduction:(1) Click [Insert]-[Album] in the menu bar, and select the [New Album] command in the pop-up drop-down menu. (2) Open the [Album] dialog box, select the source of the inserted pictures from [File/Disk], press Ctrl+A, select all the pictures you want to insert, click the [Insert] button, return to the [Album] dialog box, Note: After adding pictures in the [Album] dialog box, you can also adjust the picture position, picture display mode, picture layout, photo frame shape, theme and other parameters. You can set them according to your needs. Among them, the [Picture Layout] drop-down list contains four options that are particularly important, reflecting the layout style of the picture after it is imported into PPT, as shown in the figure: Specific meaning: Adapt to slide layout: This is the default layout, the picture will be enlarged in equal proportions, the maximum of account
2024-04-17
comment 0
886

How to insert different pictures into each PPT at the same time? These 2 methods work!
Article Introduction:Sometimes when creating PPT, we need to insert dozens of pictures into PowerPoint, and each picture serves as a slide. If we manually operate one by one, it will take too much time. Today I will share 2 methods that allow you to quickly insert different pictures into each PPT. Method 1. Use "Create Album" 1. Put all the pictures that need to be inserted into PowerPoint in a folder; 2. Open PowerPoint, and then click the menu tab [Insert] → [Album] - [New Album]; 3. .In the pop-up "Album" interface, click [File/Disk]; 4. Then the "Insert New Picture" interface will pop up, find and select all the pictures that need to be inserted into PowerPoint
2024-02-18
comment 0
1163
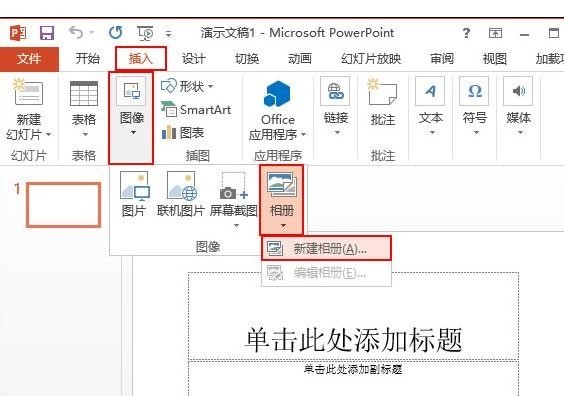
How to insert multiple pictures in ppt2013
Article Introduction:1. Open a blank document with ppt2013, switch to the [Insert] tab, and click the [New Album] function under [Album] in the [Image] group. 2. A [Album] dialog box will pop up. We click the [File/Disk] button and select the pictures stored in the disk. 3. In the pop-up [Insert New Picture] window, select the picture you need, and then click the [Insert] button. 4. Return to the [Album] dialog box and follow the steps 2 and 3 to insert the pictures you need at one time. Only two pictures will be inserted here. 5. When you return to the [Album] dialog box again, modify the album layout, click the drop-down button on the right side of the [Picture Layout] drop-down box, and select the layout you need here. Now select [2 pictures (with labels)
2024-03-26
comment 0
1298

Create image magnification effects using PHP and Highslide
Article Introduction:With the continuous development of network technology, pictures, as an important visual material, have attracted more and more attention. In order to better display pictures and allow users to view picture details more conveniently, many websites have added picture enlargement functions. This article will introduce how to use PHP and Highslide to create a simple image magnification effect. First, we need to download the Highslide plugin. Highslide is a JavaScript plug-in that creates pop-up images and HTML content on the page.
2023-05-11
comment 0
1398

fancybox is an excellent jquery pop-up layer display plug-in
Article Introduction:Today I would like to share with you an excellent jquery pop-up layer display plug-in fancybox. In addition to displaying images, it can also display flash, iframe content, html text and ajax calls. We can customize the appearance through css. Features of fancybox: can support images, html text, flash animation, iframe and ajax support; can customize the css style of the player; can play in the form of groups; if
2016-05-16
comment 0
1433

How to add photos to WPS mobile version of PPT. Teach you how to add pictures quickly.
Article Introduction:As more and more users use WPS mobile version for office work, creating or editing PPT slideshows on mobile phones has become a common operation. It is indispensable to add various pictures to make PPT, so how to add photos to WPS mobile version PPT, here is Let’s teach new users. [Add method] First, we create a new PPT page, and then click [Insert] - [Picture] above. Then in the picture options that pop up, select [Photo] or [System Album]. Taking the system photo album as an example, we can insert photos from our mobile phones and then insert them. After inserting, we can crop or resize the pictures. The operation is the same as on the PC.
2024-02-13
comment 0
1706
jQuery picture special effects plug-in Revealing realizes stretching and magnification_jquery
Article Introduction:This article shares with you the jQuery image display effect. It uses the jQuery Revealing plug-in. Without clicking, the images are neatly arranged in a row. When any image thumbnail is clicked, the image will be enlarged and displayed. When clicked, it will be closed. Click the button and the image returns to thumbnail mode.
2016-05-16
comment 0
1251
How to batch convert PPT 16:9 format pictures into PDF documents
Article Introduction:Open the PPT, require the use of office 2010 and above, and create a new blank presentation. After opening the document, click the Insert tab, find the Album command, and click New Album. In the new album, we click to find disk files and import the pictures we need to convert. After importing the pictures, we can adjust the order or simply modify the pictures and click the Create button. At this time, all the pictures will be imported. Click the File tab, find Export, and select the pdf format to convert.
2024-04-17
comment 0
1144

How to add handwritten signature to word document
Article Introduction:Word documents are widely used due to their powerful functions. Not only can various formats be inserted into Word, such as pictures and tables, etc., but now for the integrity and authenticity of the files, many files require a manual signature at the end of the document. It sounds like this How to solve complex problems? Today I will teach you how to add a handwritten signature to a word document. Use a scanner, camera or mobile phone to scan or photograph the handwritten signature, and then use PS or other image editing software to perform necessary cropping on the image. 2. Select "Insert - Picture - From File" in the Word document where you want to insert the handwritten signature, and select the cropped handwritten signature. 3. Double-click the handwritten signature picture (or right-click the picture and select "Set Picture Format"), and the "Set Picture Format" pops up.
2024-03-20
comment 0
1531

How to change photo size on computer to 50k
Article Introduction:How to resize photo to 20-45kb first. Open the folder where the image is saved on your computer, right-click the image, and select the edit option from the pop-up options. This will quickly enter the drawing software interface, click on the home page, and then choose to resize. First, install the HiFormat Picture Lossless Amplifier software on the computer. After installation, double-click the software icon and run HiFormat Picture Lossless Amplifier. Select the functions you need in the software display interface according to your needs. Create a new document. The document size is 25 mm wide and 35 mm high. The resolution is as needed. File--Place--Place photo--Adjust size and position. Merge layers and save. Adjust the file size. Note: The file size is directly related to the quality of the photo, so
2024-03-28
comment 0
1479

How to make a magnifying glass effect in PPT_This skill is left to you
Article Introduction:First, we insert a picture into the PPT and adjust the position and size. Press Ctrl+C, then press Ctrl+V to copy and paste another picture, then enlarge it and then enlarge it again, then click [Picture Tool Format] above, select [Correction]-[Brightness and Contrast], according to the actual picture to choose. Then insert a circle where you want to show the details. Finally, select the enlarged picture first, then press CTRL to select the circle, and click [Drawing Tool Format] - [Merge Shapes] - [Intersect] above. In this way, the effect of a picture magnifying glass is created. We add a border to the circle and it will be perfect.
2024-04-24
comment 0
1583

How to change mac file format?
Article Introduction:Introduction: Many friends have asked related questions about how to change the mac file format. This text site will give you a detailed answer for your reference. I hope it will be helpful to you! Let’s take a look! How to change the png image format to jpg format on Apple Mac system? The first step is to click on the jpeg image pointed by the arrow in the figure below. In the second step, right-click the image and select it, and an option box will pop up. Step 3: Click the arrow next to [Open with] in the options box, and then select the [Preview] option. First, put the picture that needs to be converted into a format on the desktop, then right-click the picture and select "Open with". In the pop-up options, select "Preview". First, turn on your computer and find the picture you want to convert, then open the picture. Next, click
2024-02-14
comment 0
1456

How to make honeycomb puzzle in ppt2013
Article Introduction:Open ppt2013, insert a hexagon, click the menu bar--Insert--Shape, and select the hexagon. Draw a hexagon, select the graphic, click the Color Fill button under the Format tab, and change the fill color. Use the copy-paste method or hold down the Ctrl key and drag to create multiple hexagons and arrange them. Select one of the hexagons, click the fill button, and select the image. A local dialog box pops up, select a few beautiful pictures to insert. Don’t put the pictures all together, coordinate them. Increase the scale and fill the hexagons with multiple colors to make them more beautiful.
2024-04-17
comment 0
483
Detailed method of inserting logo as header in word
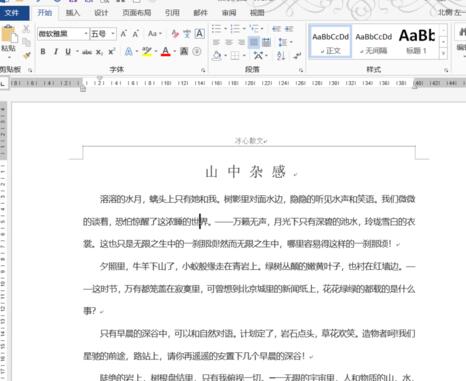
Article Introduction:Open the Word document where you want to add the logo to the header. Switch to the [Insert] tab, find [Header] below, and select [Edit Header] in the drop-down menu. Then you will enter the header and footer editing and filling, place the cursor at the header position, and click [Picture] under the [Insert] tab. Select the inserted logo in the pop-up dialog box and click Insert. Under normal circumstances, when the image is inserted into the document, the logo will be a bit large. The size of the image can be adjusted through the buttons in the four corners of the image. Select the picture, switch to the picture tool [Format], find [Position], and select [Top Right] in the drop-down menu. Then drag the logo to the appropriate position to exit the [Header and Footer Editing State]. As shown in the picture, this logo has also been added to other pages.
2024-04-26
comment 0
882
How to quickly insert AI object files in word
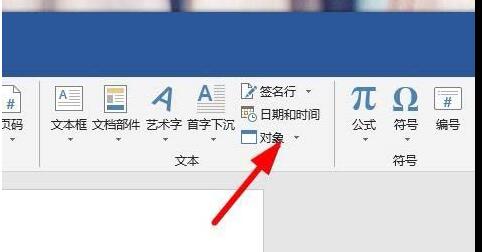
Article Introduction:1. Click the button of this object to pull down and expand it. 2. Click the object button in the drop-down menu. 3. Next you will see a setting box like this. 4. Click the AI Object File option here. 5. You can also view instructions here. 6. Then click the OK button to successfully insert the AI file. 2. Insert ai vector graphics. Open the word software, click Insert>Picture in the menu bar, and select the emf file saved in the previous step in the pop-up dialog box. Just adjust the position and size after inserting the image. You can see that the vector graphic has been successfully placed in word, and the graphic details can be retained when you enlarge it at will.
2024-04-26
comment 0
786

How to delete photos from Miaoya Camera How to delete photos
Article Introduction:How to delete photos in "Miaoya Camera" is a powerful mobile phone photo editing software that is very popular among users. So how should you delete photos with this camera? Let’s take a look below! Open the Miaoya Camera App: Find the Miaoya Camera App icon on the home screen of your phone and tap it to open the app. Navigate to the photo album: On the main interface of the Miaoya Camera App, look for an option called "Album" or similar, and tap it. On the album interface, you will see all the photos saved in the Miaoya Camera App. Browse the photo album to find the photo you want to delete and tap it to select. Enter deletion options: After you select the photos you want to delete, a bottom toolbar or pop-up menu will usually appear.
2024-06-11
comment 0
877

Drag mac photos to hard drive?
Article Introduction:Many friends ask about dragging Mac photos to the hard drive. This article will provide you with detailed answers. I hope it will be helpful to you! Please read on. How to set up the hard drive to import photos from Apple computer? First, find the photos on your Apple computer that you want to copy to the hard drive. For example, let's say these photos are stored on your desktop. Place the mouse within the image range, right-click, and select "Copy Image.JPG" in the pop-up option box. On your Mac desktop, click the rocket icon to open Launchpad. Then download and open the mounty software. Insert the mobile hard drive into your Mac and click "Yes" on the pop-up software interface. After completing the above steps, just thank you. Log in to Baidu Netdisk on your Mac computer and copy the photos to the mobile hard drive.
2024-01-11
comment 0
857

How to modify text in p-pictures every day How to add text in p-pictures every day
Article Introduction:Open the mobile phone photo editing software and edit photos every day. Click [Decoration and Beautification]. Select a picture from the album and click [Text]. By default, * text template is used. Select the second text template to add a background color to the text. Then click the button in the lower left corner of the text. The keyboard page pops up and click [Clear] to clear the text. Use the keyboard to re-enter "hello". Click the button in the lower right corner of the text to zoom in and out. Click the button in the lower right corner to confirm that the modification is completed. Click the button in the upper right corner to save the image, as shown.
2024-06-21
comment 0
1081

How to solve the problem that the background is black when printing contract photos in Word?
Article Introduction:At work, many of the contract documents we obtain are often sent by users taking photos, and most of these contracts are in the form of photos, and the printed effect is not as good as the original document! Take the picture above as an example. The effect of taking a photo to print the contract is very poor. The background is all black. It is very different from the original document. Many people may use it reluctantly. Today, we will teach you how to solve this problem and ensure that the printed effect is exactly the same as the original document! 01. Remove the black background 1. First insert the photo into Word, "Insert" - "Illustration" - "Picture", then select the photo and set a wrapping method. Here I choose "Float above the text" ”. 2. Select the photo and enter "Format" - "Adjustment" - "Correction" - "Picture Correction"
2023-11-13
comment 0
2118


