Difference: 1. "v-if" and "v-show" are used in vue to control the display and hiding of elements, while "wx-if" and "hidden" are used in mini programs; 2. vue Use "v-on:event" to bind events, while the mini program uses "bindtap(bind event)" to bind events.

The operating environment of this tutorial: windows7 system, vue2.9.6 version, DELL G3 computer.
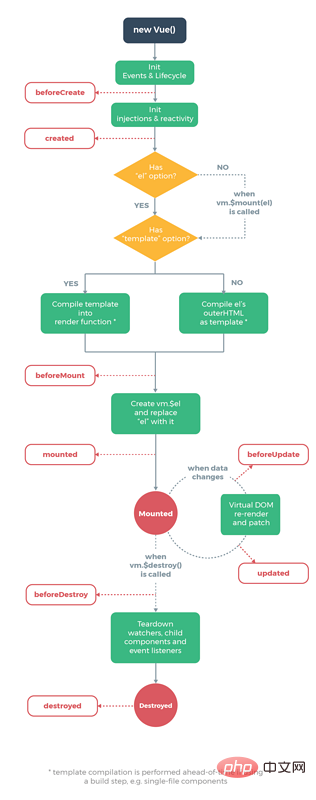
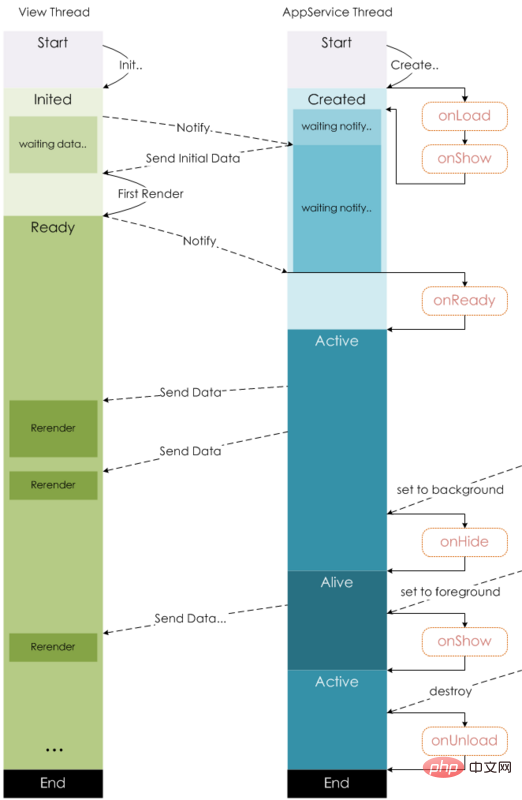
First post two pictures:
vue life cycle

mini program life cycle

#In comparison, the hook function of mini program is much simpler. The hook function of
vue will be triggered when jumping to a new page, but the hook function of 小program will be triggered in different jump methods of the page. Hooks are not the same.
onLoad: Page loadingquery called to open the current page in onLoad Parameters. onShow: Page displayonReady: The initial rendering of the page is completedwx.setNavigationBarTitle after onReady. For details, see Life Cycle onHide: Page HidenavigateTo or the bottom tab is switched. onUnload: Page unloadingredirectTo or navigateBack. Data request
When the page is loaded to request data, the use of the two hooks is somewhat similar, vue will generally be in ## Data is requested in #created or mounted, while in miniprogram, data will be requested in onLoad or onShow.
VUE: When Vue dynamically binds a variable whose value is an attribute of an element, it will add a colon in front of the variable: , Example:
<img :src="imgSrc"/>
小program: When the value of a variable is bound to an element attribute, it will be enclosed in two curly brackets. If there are no brackets, it will be considered a character. string. Example:
<image src="{{imgSrc}}"></image>vue:
<ul id="example-1">
<li v-for="item in items">
{{ item.message }} </li></ul>var example1 = new Vue({
el: '#example-1',
data: {
items: [
{ message: 'Foo' },
{ message: 'Bar' }
]
}
})Mini program:
Page({
  data: {
    items: [
      { message: 'Foo' },
      { message: 'Bar' }
    ]
  }
})<text wx:for="{{items}}">{{item}}</text>vue, use v-if and v-show control the display and hiding of elements
In applet, use wx-if andhiddenControl the display and hiding of elements
vue: Use v-on:event Bind the event, or use @event to bind the event, for example:
<button v-on:click="counter += 1">Add 1</button>
<button v-on:click.stop="counter+=1">Add1</button>  //阻止事件冒泡
In the applet, use bindtap(bind event) , or catchtap(catch event)binding event, for example:
<button bindtap="noWork">明天不上班</button>
<button catchtap="noWork">明天不上班</button>  //阻止事件冒泡
is in
vue, you only need to add v-model to the form element, and then bind ## A corresponding value in #data, when the content of the form element changes, the corresponding value in data will also change accordingly. This is a very nice point in vue.
<div id="app">
<input v-model="reason" placeholder="填写理由" class='reason'/>
</div>
new Vue({
el: '#app',
data: {
reason:''
}
})But in 小program, there is no such function. then what should we do? When the content of the form changes, the method bound to the form element will be triggered, and then in this method, the value on the form will be assigned through this.setData({key:value}) Give the corresponding value in
data. The following is the code, you can feel it:<div class="code" style="position:relative; padding:0px; margin:0px;"><pre class="brush:js;toolbar:false;"><input bindinput="bindReason" placeholder="填写理由" class=&#39;reason&#39; value=&#39;{{reason}}&#39; name="reason" />
Page({
data:{
reason:&#39;&#39;
},
bindReason(e) {
this.setData({
reason: e.detail.value
})
}
})</pre><div class="contentsignin">Copy after login</div></div>When there are many form elements on the page, changing the value is a physical job. Compared with
小program
vue’s v-model is so cool. 2. In the value
vue
, usethis.reason to get the valueIn the applet
this.data.reason7. Binding event parameters passing
<button @click="say('明天不上班')"></button>
new Vue({
el: '#app',
methods:{
say(arg){
consloe.log(arg)
}
}
})InIn the applet, parameters cannot be passed directly in the method of binding events. The parameters need to be used as attribute values, bound to the
attribute on the element, and then in the method , obtained through e.currentTarget.dataset.*, so as to complete the transfer of parameters. It is very troublesome. Is there any...<div class="code" style="position:relative; padding:0px; margin:0px;"><pre class="brush:js;toolbar:false;"><view class=&#39;tr&#39; bindtap=&#39;toApprove&#39; data-id="{{item.id}}"></view>
Page({
data:{
reason:&#39;&#39;
},
toApprove(e) {
let id = e.currentTarget.dataset.id;
}
})</pre><div class="contentsignin">Copy after login</div></div><h2><strong>八、父子组件通信</strong></h2><p><strong><span style="font-size: 16px;">1.子组件的使用</span></strong></p><p>在<code>vue中,需要:
编写子组件
在需要使用的父组件中通过import引入
在vue的components中注册
在模板中使用
//子组件 bar.vue
<template>
<div class="search-box">
<div @click="say" :title="title" class="icon-dismiss"></div>
</div>
</template>
<script>
export default{
props:{
title:{
type:String,
default:''
}
}
},
methods:{
say(){
console.log('明天不上班');
this.$emit('helloWorld')
}
}
</script>
// 父组件 foo.vue
<template>
<div class="container">
<bar :title="title" @helloWorld="helloWorld"></bar>
</div>
</template>
<script>
import Bar from './bar.vue'
export default{
data:{
title:"我是标题"
},
methods:{
helloWorld(){
console.log('我接收到子组件传递的事件了')
}
},
components:{
Bar
}
</script>在小程序中,需要:
编写子组件
在子组件的json文件中,将该文件声明为组件
{
  "component": true
}在需要引入的父组件的json文件中,在usingComponents填写引入组件的组件名以及路径
"usingComponents": {
    "tab-bar": "../../components/tabBar/tabBar"
}在父组件中,直接引入即可
<tab-bar currentpage="index"></tab-bar>
具体代码:
// 子组件
<!--components/tabBar/tabBar.wxml-->
<view class='tabbar-wrapper'>
<view class='left-bar {{currentpage==="index"?"active":""}}' bindtap='jumpToIndex'>
<text class='iconfont icon-shouye'></text>
<view>首页</view>
</view>
<view class='right-bar {{currentpage==="setting"?"active":""}}' bindtap='jumpToSetting'>
<text class='iconfont icon-shezhi'></text>
<view>设置</view>
</view>
</view>2.父子组件间通信
在vue中
父组件向子组件传递数据,只需要在子组件通过v-bind传入一个值,在子组件中,通过props接收,即可完成数据的传递,示例:
// 父组件 foo.vue
<template>
<div class="container">
<bar :title="title"></bar>
</div>
</template>
<script>
import Bar from './bar.vue'
export default{
data:{
title:"我是标题"
},
components:{
Bar
}
</script>
// 子组件bar.vue
<template>
<div class="search-box">
<div :title="title" ></div>
</div>
</template>
<script>
export default{
props:{
title:{
type:String,
default:''
}
}
}
</script>子组件和父组件通信可以通过this.$emit将方法和数据传递给父组件。
在小程序中
父组件向子组件通信和vue类似,但是小程序没有通过v-bind,而是直接将值赋值给一个变量,如下:
<tab-bar currentpage="index"></tab-bar>
此处, “index”就是要向子组件传递的值
在子组件properties中,接收传递的值
properties: {
    // 弹窗标题
    currentpage: {            // 属性名
      type: String,     // 类型(必填),目前接受的类型包括:String, Number, Boolean, Object, Array, null(表示任意类型)
      value: 'index'     // 属性初始值(可选),如果未指定则会根据类型选择一个
    }
}子组件向父组件通信和vue也很类似,代码如下:
//子组件中
methods: {
    // 传递给父组件
    cancelBut: function (e) {
      var that = this;
      var myEventDetail = { pickerShow: false, type: 'cancel' } // detail对象,提供给事件监听函数
      this.triggerEvent('myevent', myEventDetail) //myevent自定义名称事件,父组件中使用
    },
}

//父组件中
<bar bind:myevent="toggleToast"></bar>

// 获取子组件信息
toggleToast(e){
    console.log(e.detail)
}vue会给子组件添加一个ref属性,通过this.$refs.ref的值便可以获取到该子组件,然后便可以调用子组件中的任意方法,例如:
//子组件
<bar ref="bar"></bar>

//父组件
this.$ref.bar.子组件的方法
小程序是给子组件添加id或者class,然后通过this.selectComponent找到子组件,然后再调用子组件的方法,示例:
//子组件 <bar id="bar"></bar> // 父组件 this.selectComponent('#id').syaHello()
【相关推荐:《vue.js教程》】
The above is the detailed content of What are the differences between vue and WeChat mini programs?. For more information, please follow other related articles on the PHP Chinese website!