
This article will introduce you how to use event emitters to pass data and its state from child components to its parent component in vue.js. This article is suitable for developers of all stages, including beginners.
Before you start...
We can use props in Vue.js to pass data to child components See in the article In Vue Method in .js to pass data from parent component to child component.
Before reading this article, you should have the following points: node.js 10.x and above has been installed. You can verify this by running the following command in Terminal/Command Prompt:node -v
npm uninstall -g vue-cli
npm install -g @vue/cli
npm install
Passing data through components
In order to pass data values from the application Parent components in components (such as app.vue) are passed to child components (such as nested components), and Vue.js provides us with a platform called props. Props can be called custom properties that you can register on a component that allows you to define data in the parent component, assign a value to it, and then pass the value to a prop property that can be Referenced in child components. This article will show you the flip side of this process. In order to pass and update the data values in the parent component from the child component so that all other nested components will also be updated, we use the emit construct to handle event emission and data updates.Example:
starter project in vs code. This project is complete with complete code as of this article.
The reason for making this a starter project is so you can try out the prop concept before introducing the reversal process.Start
In that folder you will find two sub-components:test.vue and test2.vue, its parent component is the app.vue file. We will use the headers of the two child components to illustrate this event emitting method. Your Test.vue file should look like this:
<template>
<div>
<h1>Vue Top 20 Artists</h1>
<ul>
<li v-for="(artist, x) in artists" :key="x">
<h3>{{artist.name}}</h3>
</li>
</ul>
</div>
</template>
<script>
export default {
name: 'Test',
props: {
artists: {
type: Array
}
}
}
</script>
<!-- Add "scoped" attribute to limit CSS to this component only -->
<style scoped>
li{
height: 40px;
width: 100%;
padding: 15px;
border: 1px solid saddlebrown;
display: flex;
justify-content: center;
align-items: center;
}
a {
color: #42b983;
}
</style><template>
<div>
<h1>{{header}}</h1>
<ul>
<li v-for="(artist, x) in artists" :key="x">
<h3>{{artist.name}}</h3>
</li>
</ul>
</div>
</template>
<script>
export default {
name: 'Test',
props: {
artists: {
type: Array
}
},
data() {
return {
header: 'Vue Top Artists'
}
}
}
</script>click.
Toggle Title
To toggle the title you must add an event listener to the title when clicked and specify that the containing A function for the logic that occurs when clicked.<template>
<div>
<h1 v-on:click="callingFunction">{{header}}</h1>
<ul>
<li v-for="(artist, x) in artists" :key="x">
<h3>{{artist.name}}</h3>
</li>
</ul>
</div>
</template>
<script>
export default {
name: 'Test',
props: {
artists: {
type: Array
}
},
data() {
return {
header: 'Vue Top Artists'
}
},
methods: {
callingFunction(){
this.header = "You clicked on header 1";
}
}
}
</script>Set up the emitter
At this stage you want to pass the same behavior to the parent component so that when clicked, each title nested in the parent component will change. To do this, you will create an emitter that will emit an event in the child component that the parent component can listen to and respond to (this is the same logic as the component's event listener). Change the script part in the test. vue file to the following code block:<script>
export default {
name: 'Test',
props: {
artists: {
type: Array
},
header: {
type: String
}
},
data() {
return {
// header: 'Vue Top Artists'
}
},
methods: {
callingFunction(){
// this.header = "You clicked on header 1"
this.$emit('toggle', 'You clicked header 1');
}
}
}
</script>Listen for emitted events
Now, the next thing to do after creating the event is to listen for and respond to it. Copy this code block into your app.vue file:<template>
<div id="app">
<img alt="Vue logo" src="./assets/logo.png">
<Test v-bind:header="header" v-on:toggle="toggleHeader($event)" />
<Test v-bind:artists="artists" />
<test2 v-bind:header="header"/>
<test2 v-bind:artists="artists" />
</div>
</template>
<script>
import Test from './components/Test.vue'
import Test2 from './components/Test2'
export default {
name: 'app',
components: {
Test, Test2
},
data (){
return {
artists: [
{name: 'Davido', genre: 'afrobeats', country: 'Nigeria'},
{name: 'Burna Boy', genre: 'afrobeats', country: 'Nigeria'},
{name: 'AKA', genre: 'hiphop', country: 'South-Africa'}
],
header: 'Vue Top Artists'
}
},
methods: {
toggleHeader(x){
this.header = x;
}
}
}
</script>
<style>
#app {
font-family: 'Avenir', Helvetica, Arial, sans-serif;
-webkit-font-smoothing: antialiased;
-moz-osx-font-smoothing: grayscale;
text-align: center;
color: #2c3e50;
margin-top: 60px;
}
</style>在模板部分,您可以看到第一个组件test上有两个vue指令。第一个是v-bind,它将initial header属性绑定到artists数组下的数据对象中的隐式定义;初始化时,将显示字符串vue top artists。
第二个指令是v-on,它用于监听事件;要监听的事件是toggle(记住,您已经在测试组件中定义了它),它的调用函数是toggleheader。此函数已创建,子组件中的字符串将通过$event参数传递到此处显示。
含义
这会将数据通过发射器传递到父组件,因此由于其他组件嵌套在父组件中,因此每个嵌套组件中的数据都会重新呈现和更新。进入test2.vue文件并将此代码块复制到其中:
<template>
<div>
<h1>{{header}}</h1>
<ul>
<li v-for="(artist, x) in artists" :key="x">
<h3>{{artist.name}} from {{artist.country}}</h3>
</li>
</ul>
</div>
</template>
<script>
export default {
name: 'Test2',
props: {
artists: {
type: Array
},
header: {
type: String
}
}
}
</script>
<!-- Add "scoped" attribute to limit CSS to this component only -->
<style scoped>
li{
height: 40px;
width: 100%;
padding: 15px;
border: 1px solid saddlebrown;
display: flex;
justify-content: center;
align-items: center;
}
a {
color: #42b983;
}
</style>这里,数据插值被设置并指定为道具对象中的一个字符串。在你的开发服务器上运行应用程序:
npm run serve

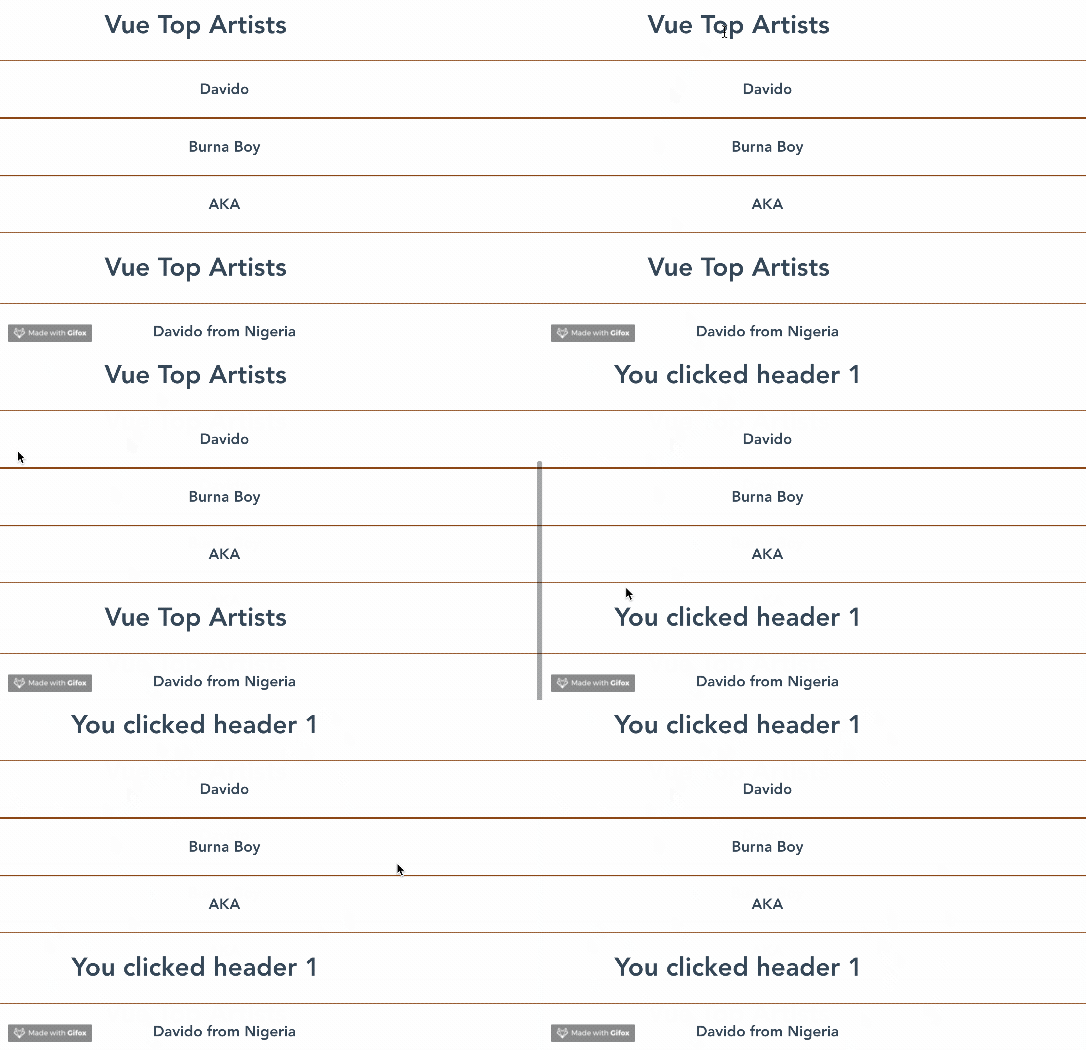
可以看到,一旦事件在父组件中被响应,所有组件都会更新它们的报头,即使仅在一个子组件中指定了定义。
您可以在github上找到本教程的完整代码。
结论
您可以看到在Vue中使用事件和发射器的另一个有趣的方面:您现在可以在一个组件中创建事件,并在另一个组件中监听它并对它作出反应。
相关推荐:
更多编程相关知识,请访问:编程入门!!
The above is the detailed content of How to use event emitters to modify component data in Vue.js. For more information, please follow other related articles on the PHP Chinese website!