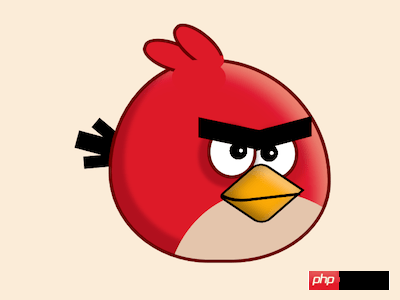
The content of this article is about how to use pure CSS to implement a red angry bird (with code). It has certain reference value. Friends in need can refer to it. I hope it will be helpful to you. You helped.

https://github.com/comehope/front- end-daily-challenges
Define dom, the container contains 6 elements, representing the head, eyes, eyebrows, mouth, crown feathers, and tail:
<div>
    <span></span>
    <span></span>
    <span></span>
    <span></span>
    <span></span>
    <span></span>
</div>
Centered display:
body {
    margin: 0;
    height: 100vh;
    display: flex;
    align-items: center;
    justify-content: center;
    background-color: antiquewhite;
}Set the common attributes of child elements:
.red * {
    position: absolute;
}

.red *::before,
.red *::after {
    content: '';
    position: absolute;
}Define the container size:
.red {
    width: 12em;
    height: 11em;
    font-size: 16px;
    position: relative;
}Draw the outline of the head and define the stroke parameters as variables. Because it will be used later:
.red {
    --border: 0.2em solid #6a0306;
}

.head {
    width: inherit;
    height: inherit;
    background-color: #dc002d;
    border-radius: 45% 55% 45% 45% / 55% 60% 40% 45%;
    border: var(--border);
}Use pseudo elements to draw the outline of the eyes:
.eyes::before,
.eyes::after {
    width: 2.4em;
    height: 2.6em;
    background: white;
    border-radius: 50%;
    border: var(--border);
}

.eyes::before {
    top: 3.7em;
    left: 5.5em;
    z-index: 1;
}

.eyes::after {
    top: 3.8em;
    left: 7.8em;
}Use radial gradient to draw the eyeballs and pupils:
.eyes::before,
.eyes::after {
    background:
        radial-gradient(
            circle at calc(var(--eyeball-left) + 6%) 48%,
            white 0.1em,
            transparent 0.1em
        ),
        radial-gradient(
            circle at var(--eyeball-left) 48%,
            black 0.5em,
            transparent 0.5em
        ),
        white;
}

.eyes::before {
    --eyeball-left: 65%;
}

.eyes::after {
    --eyeball-left: 41%;
}Use pseudo elements Use elements to draw the eyebrows:
.eyebrows::before,
.eyebrows::after {
    height: 1.1em;
    background-color: black;
    top: 3.6em;
    z-index: 2;
}

.eyebrows::before {
    left: 5em;
    transform: skewY(12deg);
    width: 3.4em;
}

.eyebrows::after {
    left: 8.2em;
    transform: skewY(-15deg);
    width: 3.1em;
}Draw the outline of the mouth:
.mouth {
    width: 2.8em;
    height: 2.8em;
    background-color: #fca90d;
    top: 6em;
    left: 7em;
    z-index: 3;
    border-radius: 20% 0 20% 10%;
    transform: rotate(34deg) skewX(-15deg);
    border: 0.1em solid black;
}Use pseudo elements to draw the dividing line between the upper and lower jaw:
.mouth::before {
    width: 3.4em;
    height: 4em;
    border: 0.2em solid;
    top: -1.6em;
    left: -1.8em;
    border-radius: 0 0 40% 0;
    transform: rotate(42deg);
    border-color: transparent black transparent transparent;
}Draw the left side of the crown feathers :
.hair {
    width: 1.2em;
    height: 3em;
    background-color: #dc002d;
    border-radius: 50%;
    border: var(--border);
    top: -1.8em;
    left: 2.8em;
    transform: rotate(-70deg);
    border-bottom-color: transparent;
}Use pseudo elements to draw the right side of the crest feathers:
.hair::before {
    width: inherit;
    height: inherit;
    background-color: inherit;
    border-radius: inherit;
    border: inherit;
    top: 1em;
    left: 0.8em;
    transform: rotate(20deg);
}Use pseudo elements to cover the excess edges of the crest feathers:
.hair::after {
    width: 3em;
    height: 2em;
    background-color: #dc002d;
    border-radius: 50%;
    top: 2.3em;
    left: -1.5em;
    transform: rotate(70deg);
}Draw the center of the tail The longest feather:
.tail {
    width: 3em;
    height: 1em;
    background-color: black;
    top: 40%;
    left: -1.8em;
    z-index: -1;
    transform: rotate(15deg);
}Use pseudo elements to draw the two shorter feathers in the tail:
.tail::before,
.tail::after {
    width: inherit;
    height: 70%;
    background-color: black;
    left: 0.6em;
}

.tail::before {
    transform: rotate(25deg);
    top: -0.4em;
}

.tail::after {
    transform: rotate(-20deg);
    top: 0.8em;
}Use pseudo elements to draw the feathers on the chest:
.head {
    overflow: hidden;
}

.head::before {
    width: inherit;
    height: inherit;
    background-color: #e3c4ab;
    border-radius: inherit;
    top: 65%;
    left: 25%;
}Next draw shadows to enhance the three-dimensional effect.
Add shadows to the head:
.head {
    box-shadow:
      inset 0.5em -0.5em 0.3em 0.2em rgba(0, 0, 0, 0.2),
      inset -1em 0.8em 1.5em -0.5em rgba(237, 178, 144, 0.7);
}Add shadows to the eyes:
.eyes::before {
    box-shadow: -0.2em 0.2em 0.2em 0.3em rgba(0, 0, 0, 0.2);
}

.eyes::after {
    box-shadow: 0.2em 0.2em 0.4em 0.3em rgba(0, 0, 0, 0.1);
}Add shadows to the mouth:
.mouth {
    box-shadow:
      inset 0.2em -0.4em 1em rgba(0, 0, 0, 0.4),
      inset 0 0.5em 0.5em rgba(255, 255, 255, 0.3);
}Done!
Related recommendations:
How to use pure CSS to implement the loader animation effect of the racing car (with code)
How to use pure CSS to implement the popsicle Animation effect (with code)
The above is the detailed content of How to use pure CSS to implement a red angry bird (with code). For more information, please follow other related articles on the PHP Chinese website!