Found a total of 10000 related content

Illustration of how to create a circular progress bar using CSS3
Article Introduction:The basic idea of making a donut-shaped progress bar is to draw a basic arc shape, and then in CSS3 we can control its rotation to connect the basic shapes in series and create the effect of partially disappearing. Let's learn how to make a donut shape with diagrams in CSS3. Example tutorial of progress bar
2017-03-09
comment 0
1986

How to draw a gradient color ring in InDesign Tutorial on how to draw a gradient color ring in InDesign
Article Introduction:1. First, after opening the InDesign interface, click the Ellipse Tool to draw a circle. 2. Then, select the circle, change the fill color to transparent, and add a line outline with a width of 3. 3. Then, click the mouse to open the Gradient Tool and apply it to the ellipse. 4. Finally, open the color picker panel and select the desired gradient color effect to fill and add.
2024-05-09
comment 0
381

js plug-in YprogressBar achieves beautiful progress bar effect_javascript skills
Article Introduction:ProgressBar.js is a beautiful, responsive progress bar effect using dynamic SVG paths. Progress bars of any shape can be easily created using ProgressBar.js. This JavaScript library provides several built-in shapes such as lines, circles, and squares, but you can create your own progress bar effects using Illustrator or any other vector graphics editor.
2016-05-16
comment 0
1512

ProgressBar.js – Beautiful responsive SVG progress bar
Article Introduction:ProgressBar.js is a beautiful, responsive progress bar effect using dynamic SVG paths. Progress bars of any shape can be easily created using ProgressBar.js. This JavaScript library provides several built-in shapes such as lines, circles, and squares, but you can create your own progress bar effects using Illustrator or any other vector graphics editor.
2016-12-16
comment 0
1756

js progress bar example code
Article Introduction:Share an example code of a js progress bar. The js implementation of the progress bar mostly uses setInterval to control the time progress, thereby completing the implementation of the progress bar effect. Friends who are interested can study it.
2016-12-16
comment 0
1225

How to create circular wipe video transition effects using Premiere
Article Introduction:1. Create a new Premiere project, execute the import command in the file menu bar, and import two or more different video materials. 2. Create a sequence based on the imported video material, and position the two videos end to end on the same timeline of the sequence. 3. Search for premiere video transition effects, find the [Circular Wipe] video transition in PR, and apply this circular wipe effect between the two videos. 4. Click the mouse to select the added circular wipe video transition, and open the effect control to set the circular wipe transition effect, such as transition time, etc. 5. Press the I key at the position before the transition to set the in point, and then press the O key at the position after the transition to set the out point. 6. Render the set in-point and out-point time periods of the circular wipe transition.
2024-06-02
comment 0
1069

How to adjust the fast forward time for perfect decoding_set the time span
Article Introduction:1. First open the player, right-click on the interface - [Options], or directly use the shortcut key [F5] to open the settings menu. 2. Click [Play] - [Time Span] in the menu, and then you can You can adjust the time span of the shortcut keys to control the progress bar in [Set as Time Settings]. Generally, by default: the left and right arrow keys control the progress bar position to forward/backward for 10 seconds; CTRL+left and right arrow keys control the progress bar position to forward/backward. 30 seconds SHIFT + left and right direction keys to control the position of the progress bar forward/back 60 seconds CTRL + ALT + left and right direction keys to control the position of the progress bar forward/back 300 seconds There are four adjustments for you to choose from. You can customize the settings at will. Fast forward second by second or
2024-06-07
comment 0
470

WPS sector directory design method
Article Introduction:1. Click Shape in the Insert tab, select the isosceles triangle, and draw the shape on the page. 2. Select the isosceles triangle, hold down the ctrl key, and drag the mouse to copy a few and place them in the position as shown in the picture. 3. Then insert a circle and place it under the fan shape. 4. Fill the triangles and circles with different colors and set them to have no lines. 5. Enter the word [Directory] in the middle of the circle, and enter the small and directory title on the triangle. 6. Select all the shapes, right-click [Format Object], in the property settings pane that pops up on the right, select the shape option, click Effect, add a suitable shadow in the shadow, and the fan-shaped directory is created.
2024-03-27
comment 0
1050
How to draw a gradient arc in wps_How to draw a gradient arc in wps
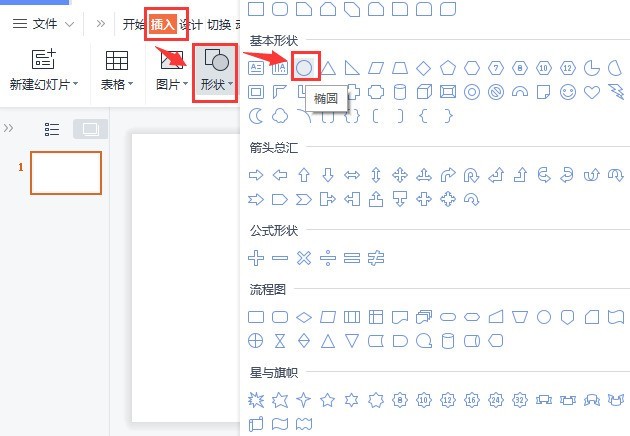
Article Introduction:1. After opening the interface, click the shape option in the insert menu and select the ellipse style. 2. Drag the mouse to draw a 15*15 cm circle, change the color fill to orange, and set the no-outline effect. 3. Copy the circle. And modify the height and width to 16.5*16.5 cm 4. Open the object properties panel of the copied circle, modify the no fill and gradient line effects 5. Adjust the gradient color, position and transparency of the arc according to the parameters shown in the figure 6. Finally: Align the arc and circle settings in the center to complete the arc drawing of the circle.
2024-04-25
comment 0
795

How to draw an umbrella advertisement in CorelDRAW CorelDRAW method to draw an umbrella advertisement
Article Introduction:1. First, after opening the CorelDRAW interface, draw a straight line, find the Rotation column in the Transform menu, and change the angle to -45 degrees. 2. Then, draw a circle with the intersection of the straight line as the center, and click the Trim button to delete the excess lines. Part 3. Next, retain the shape of the umbrella and rotate it 22.7 degrees to add a vertical mirror effect to the graphic. 4. Finally, after filling the graphic with color and text, click with the mouse to select all groups, and press alt+F8 on the keyboard to open the transformation panel. After setting the parameters as shown in the figure below, click the Apply to Copy button 8 times in a row.
2024-06-06
comment 0
799


The operation process of making a quartered template using PPT
Article Introduction:1. Draw a square. Method: Insert - Shape - Rounded Rectangle, hold down Shift, and release after the rounded rectangle changes to a square. 2. Select the rounded square and adjust the arc of the rounded corners. Method: Move the small yellow box in the corner. 3. Adjust the position of the rounded rectangle and align it up, down, left, right, and center on the slide. Method: Format - Align - Center left and right - Align - Center top and bottom. 4. Adjust the rounded rectangle outline to None and set the gradient fill color. Method: Format - Shape Outline - No Outline; Format - Shape Fill - Select Color - Gradient - Select Gradient Effect. 5. Draw a straight line inclined at 45°. Method: Insert - Line - Hold down Shift + click the mouse. 6. Move the straight line so that it is right with the rounded corner.
2024-03-26
comment 0
1109
Complete example of javascript mouse sliding scoring control_javascript skills
Article Introduction:This article mainly introduces the implementation method of javascript mouse sliding scoring control, and analyzes in detail the method of javascript operating mouse events and page element styles to achieve scoring effect in the form of a complete example. Friends in need can refer to the following
2016-05-16
comment 0
1191
How to draw a hollow ball with colored stripes using AI - Tutorial on drawing a hollow ball with colored stripes using AI
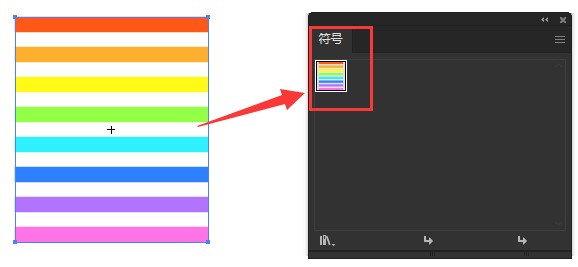
Article Introduction:1. First, in the ai software, use the shape tool to draw bar graphics of different colors, select them all with the mouse and drag them to the symbol panel 2. Then, click the ellipse tool to draw a semicircle graphic 3. Next, select the semicircle , click the 3D rotation option in the effect menu above, and modify the parameter information as shown below 4. Then, click the map button, select the definition symbol in step 2, click the Scale to fit button in the lower left corner, and check the 3D model Invisible option 5. Finally, click OK to return to the 3D rotation options menu, set the surface to no shading effect, and the tutorial for drawing colorful hollow balls with AI is shared here. I hope it will be useful to everyone.
2024-05-06
comment 0
752

How to use JavaScript to slide images up and down and add zoom effects while limiting them to the container?
Article Introduction:How to use JavaScript to slide images up and down and add zoom effects while limiting them to the container? In modern web design, it is often necessary to perform interactive operations and effect enhancement on images. Among them, the up and down sliding and zooming effects of pictures are common requirements. This article will introduce how to use JavaScript to achieve these effects, and limit it within the container. 1. Implementation of the up-and-down sliding effect The up-and-down sliding effect of a picture mainly relies on mouse or touch events, and the position of the picture needs to be controlled. First, in the HTML department
2023-10-16
comment 0
1560
Steps to set the size of SmartArt graphics in word2010
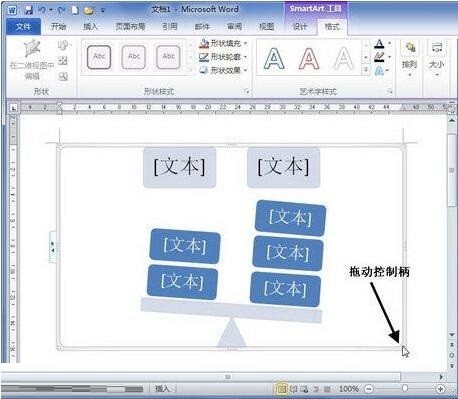
Article Introduction:Click to select the SmartArt graphic, and six control handles will appear on the upper, lower, left, right and four corners of the graphic border. Point the mouse to these control handles, and when the mouse pointer changes to a double-headed arrow shape, drag the mouse to change the size of the SmartArt graphic. If you press the Shift key during dragging, you can lock the aspect ratio. If you want to set the size of the SmartArt graphic more accurately, you can do so by specifying a specific value. Select the SmartArt graphic and enter the width and height respectively in the [Size] group of the [SmartArt Tools/Format] ribbon. In addition, you can also specify the height and width of SmartArt graphics in the [Layout] dialog box. The specific operations are as follows: In wor
2024-04-26
comment 0
728

How to implement a circular loop progress bar in css
Article Introduction:How to implement a circular loop progress bar in css: 1. Create an outermost parent ring; 2. Draw two semicircles through "clip-path" and absolutely position them to cover the parent ring; 3. Less than 50 When , slowly reveal the color of the parent ring by rotating the right semicircle; 4. When it is greater than 50, set the rotation degree of the right semicircle to 0, modify its border color to achieve the effect of the first 50, and then rotate the left semicircle, that is The effect can be achieved.
2023-01-31
comment 0
2428


