When using a Word document, inserting a table is a common and practical operation. Tables can make document content clearer and more organized, making it easier to view and edit. By inserting tables, data can be displayed in a structured manner by rows and columns, improving the overall beauty and readability of the document. PHP editor Youzi will introduce you how to quickly and easily insert tables in Word to make your document production more efficient and convenient.
Method 1: 1. We create a new word document and open it.
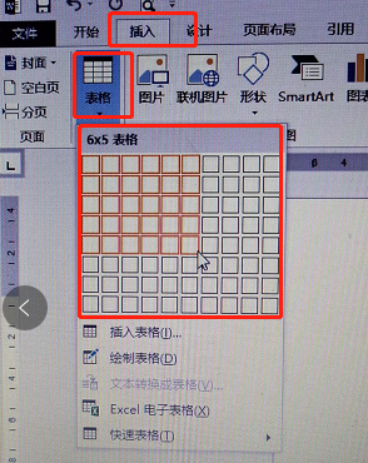
2. We place the cursor at the position where we want to insert the table, then click the [Insert] option in the menu bar, click [Table], in the expanded list, we can see the table, if the table The number of rows and columns is within the range of this table. We drag the mouse to select the number of rows and columns of the table. After selecting, press the left mouse button to complete the insertion.

#3. In this way, the maximum number of rows and columns inserted into the table is 10*8. If the number of table rows and rows that need to be inserted exceeds this value, we need to choose another method.
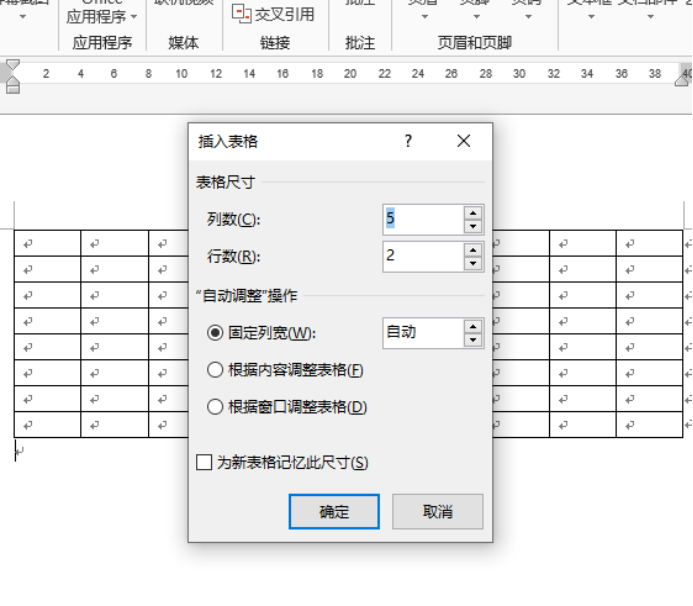
Method 2: 1. Still keeping the cursor at the table insertion point, click the [Insert] option in the menu bar, click [Table], and scroll down to find the [Insert Table] option.

#2. Enter the number of rows and columns of the table in the window that pops up to insert the table. After the settings are completed, click [OK] to complete the insertion of the table.

#Word ways to insert tables are shared with the above two methods. If you have memorized the steps, why don’t you practice it quickly? See if it’s not complicated!
The above is the detailed content of word insert table. For more information, please follow other related articles on the PHP Chinese website!
 How to change word background color to white
 How to delete the last blank page in word
 Why can't I delete the last blank page in word?
 Word single page changes paper orientation
 word to ppt
 Word page number starts from the third page as 1 tutorial
 Tutorial on merging multiple words into one word
 word insert table


