


How to use Node for image compression? The following article uses PNG images as an example to introduce how to compress images. I hope it will be helpful to you!

#Recently, I want to provide image processing services, one of which is to implement image compression function. In the past, when developing the front-end, I could just use the ready-made API of canvas to process it. The back-end may also have a ready-made API, but I don't know. Thinking about it carefully, I have never understood the principle of image compression in detail, so I just took this opportunity to do some research and study, so I wrote this article to record it. As always, if something is wrong, DDDD (take your brother with you).
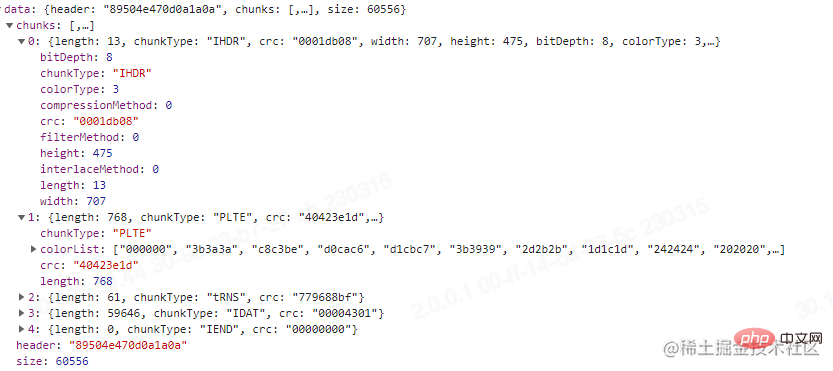
We first upload the image to the backend and see what parameters the backend receives. I use Node.js (Nest) as the backend here, and I use PNG images as an example.
The interface and parameters are printed as follows:
@Post('/compression')<br/>@UseInterceptors(FileInterceptor('file'))<br/>async imageCompression(@UploadedFile() file: Express.Multer.File) {<br/> <br/> return {<br/> file<br/> }<br/>}<br/>
To compress, we need to get the image data. As you can see, the only thing that can hide image data is this buffer. So what does this string of buffers describe? You need to first figure out what PNG is. [Related tutorial recommendations: nodejs video tutorial, Programming teaching]
Here is the of PNG WIKI address.
After reading, I learned that PNG is composed of an 8-byte file header plus multiple chunks. The schematic diagram is as follows:
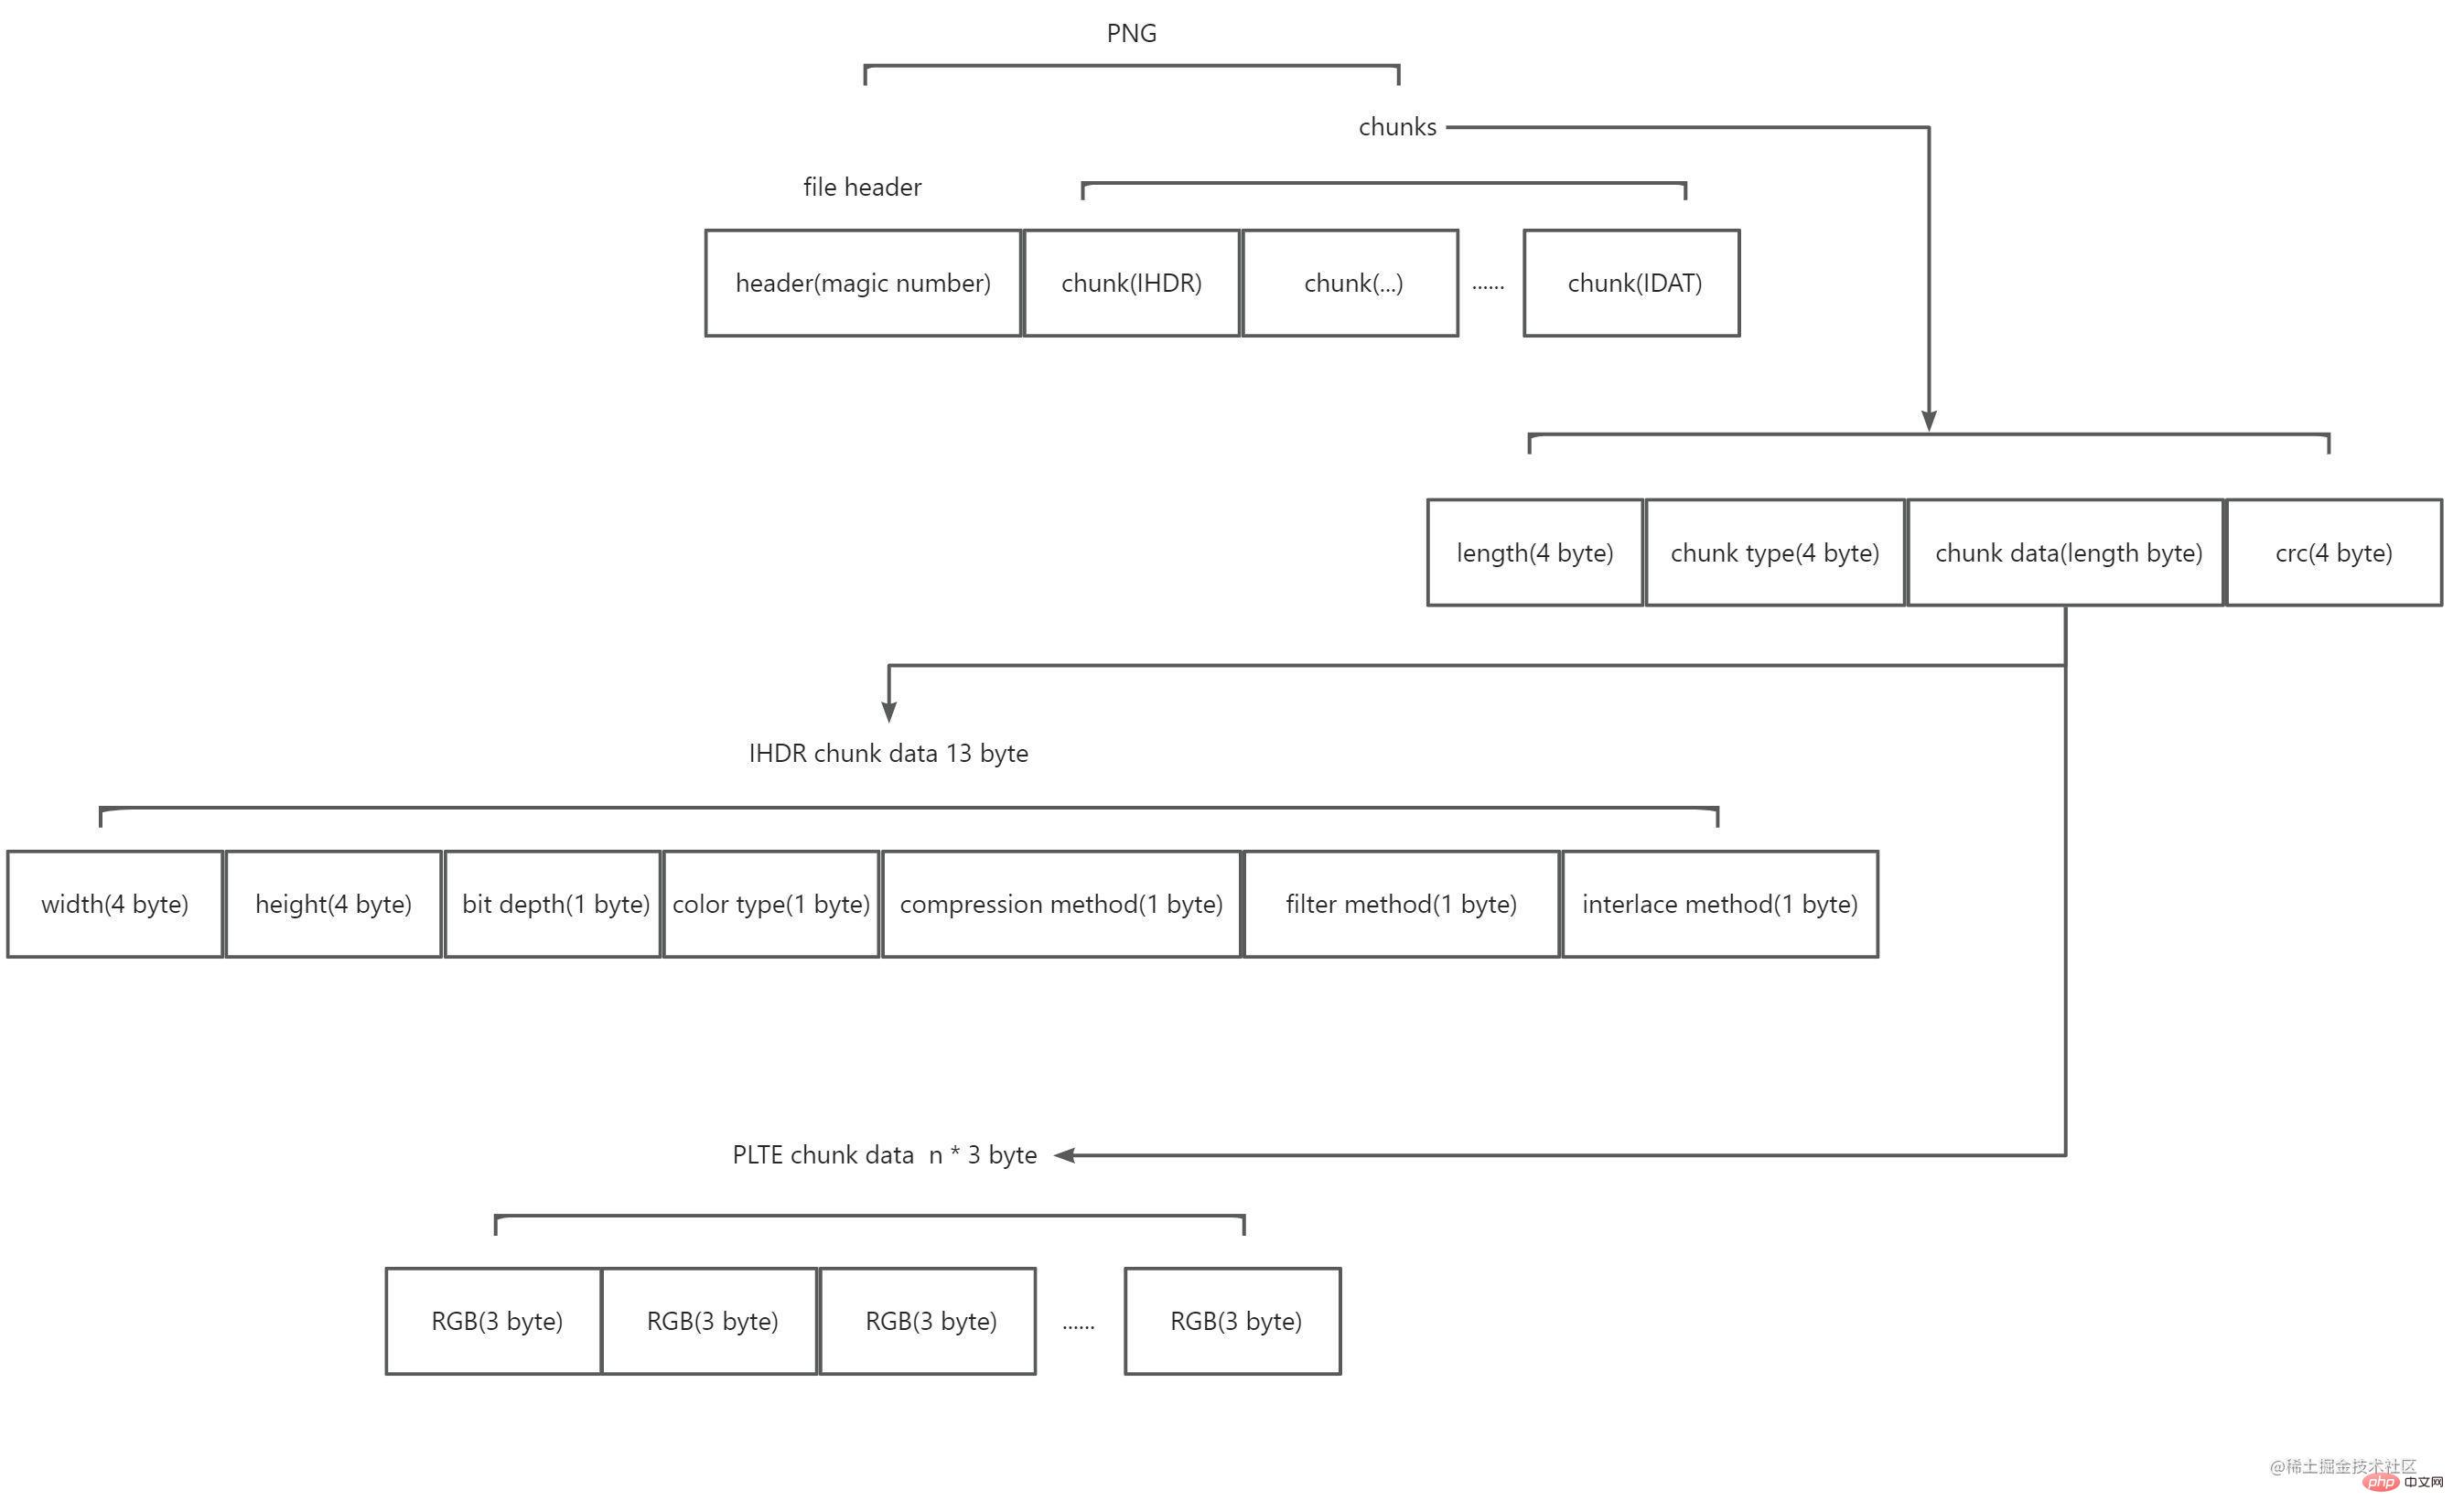
Among them:
The file header is composed of what is called a magic number. The value is 89 50 4e 47 0d 0a 1a 0a (hexadecimal). It marks this string of data as PNG format.
Chunks are divided into two types, one is called critical chunks (Critical chunks), and the other is called auxiliary chunks (Ancillary chunks). The key block is essential. Without the key block, the decoder will not be able to correctly identify and display the picture. The auxiliary block is optional, and some software may carry the auxiliary block after processing the image. Each block is composed of four parts: 4 byte describes how long the content of this block is, 4 byte describes the type of this block, and n byte describes the content of the block (n is the size of the previous 4 byte value, that is, The maximum length of a block is 28*4), and the 4-byte CRC check checks the data of the block and marks the end of a block. Among them, the value of 4 bytes of the block type is 4 acsii codes. The first letter in upper case means it is the key block , and in lower case means it is the auxiliary block ; the second letter Uppercase means public , lowercase means private ; the third letter must be uppercase , which is used for subsequent expansion of PNG; the fourth letter means when the block is not recognized , whether it can be copied safely, uppercase means it can be copied safely only when the key block has not been modified, lowercase means it can be copied safely. PNG officially provides many defined block types. Here you only need to know the key block types, which are IHDR, PLTE, IDAT, and IEND.
PNG requires that the first block must be IHDR. The block content of IHDR is fixed at 13 bytes and contains the following information of the image:
width (4 byte) & height (4 byte)
bit depth (1 byte, The value is 1, 2, 4, 8 or 16) & color type color type (1 byte, the value is 0, 2, 3, 4 or 6)
Compression method compression method (1 byte, the value is 0 ) & filter method filter method (1 byte, the value is 0)
Interlace method interlace method (1 byte, the value is 0 or 1)
The width and height are easy to understand, and the rest Several of them seem unfamiliar, so I will explain them next.
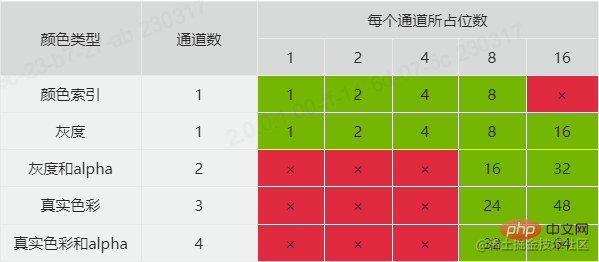
Before explaining the bit depth, let’s first look at the color type. The color type has 5 values:
0 means grayscale (grayscale) which has only one channel ( channel), if viewed as rgb, you can understand that its three-color channel values are equal, so there is no need for more than two channels to represent it.
2 represents real color (rgb). It has three channels, namely R (red), G (green), and B (blue).
3 represents the color index (indexed). It also has only one channel, representing the index value of the color. This type is often equipped with a set of color lists, and the specific color is obtained based on the index value and color list query.
4 represents grayscale and alpha. It has two channels. In addition to the grayscale channel, there is an additional alpha channel to control transparency.
6 represents real color and alpha which has four channels.
The reason why we talk about channel is because it is related to the bit depth here. The bit depth value defines the number of bits occupied by each channel. By combining the bit depth and color type, you can know the color format type of the image and the memory size occupied by each pixel. The combinations officially supported by PNG are as follows:
Filtering and compression are because what is stored in PNG is not the original data of the image, but the processed data, which is why PNG images due to the smaller memory footprint. PNG uses two steps to compress and convert image data.
The first step is to filter. The purpose of filtering is to allow the original image data to achieve a greater compression ratio after passing the rules. For example, if there is a gradient picture, from left to right, the colors are [#000000, #000001, #000002, ..., #ffffff], then we can agree on a rule that the pixels on the right are always the same as Compare it with the previous left pixel, then the processed data becomes [1, 1, 1, ..., 1], will this allow for better compression? PNG currently only has one filtering method, which is based on adjacent pixels as predicted values and subtracting the predicted values from the current pixel. There are five types of filtering. (Currently, I don’t know where this type of value is stored. It may be in IDAT. If you find it, delete the in this bracket. It has been determined that this type of value is stored in the IDAT data) As shown in the following table:
| Type byte | Filter name | Predicted value |
|---|---|---|
| 0 | None | No processing |
| 1 | Sub | Neighboring pixels on the left |
| 2 | Up | Adjacent pixels above |
| 3 | Average | Math.floor((the adjacent pixel above the left adjacent pixel) / 2) |
| 4 | Paeth | Get the closest value to (the adjacent pixel above the left adjacent pixel - the upper left pixel) |
第二步,压缩。PNG也只有一种压缩算法,使用的是DEFLATE算法。这里不细说,具体看下面的章节。
交错方式,有两种值。0表示不处理,1表示使用Adam7 算法进行处理。我没有去详细了解该算法,简单来说,当值为0时,图片需要所有数据都加载完毕时,图片才会显示。而值为1时,Adam7会把图片划分多个区域,每个区域逐级加载,显示效果会有所优化,但通常会降低压缩效率。加载过程可以看下面这张gif图。
PLTE的块内容为一组颜色列表,当颜色类型为颜色索引时需要配置。值得注意的是,颜色列表中的颜色一定是每个通道8bit,每个像素24bit的真实色彩列表。列表的长度,可以比位深约定的少,但不能多。比如位深是2,那么22,最多4种颜色,列表长度可以为3,但不能为5。
IDAT的块内容是图片原始数据经过PNG压缩转换后的数据,它可能有多个重复的块,但必须是连续的,并且只有当上一个块填充满时,才会有下一个块。
IEND的块内容为0 byte,它表示图片的结束。
阅读到这里,我们把上面的接口改造一下,解析这串buffer。
@Post('/compression')<br/>@UseInterceptors(FileInterceptor('file'))<br/>async imageCompression(@UploadedFile() file: Express.Multer.File) {<br/> const buffer = file.buffer;<br/><br/> const result = {<br/> header: buffer.subarray(0, 8).toString('hex'),<br/> chunks: [],<br/> size: file.size,<br/> };<br/><br/> let pointer = 8;<br/> while (pointer < buffer.length) {<br/> let chunk = {};<br/> const length = parseInt(buffer.subarray(pointer, pointer + 4).toString('hex'), 16);<br/> const chunkType = buffer.subarray(pointer + 4, pointer + 8).toString('ascii');<br/> const crc = buffer.subarray(pointer + length, pointer + length + 4).toString('hex');<br/> chunk = {<br/> ...chunk,<br/> length,<br/> chunkType,<br/> crc,<br/> };<br/><br/> switch (chunkType) {<br/> case 'IHDR':<br/> const width = parseInt(buffer.subarray(pointer + 8, pointer + 12).toString('hex'), 16);<br/> const height = parseInt(buffer.subarray(pointer + 12, pointer + 16).toString('hex'), 16);<br/> const bitDepth = parseInt(<br/> buffer.subarray(pointer + 16, pointer + 17).toString('hex'),<br/> 16,<br/> );<br/> const colorType = parseInt(<br/> buffer.subarray(pointer + 17, pointer + 18).toString('hex'),<br/> 16,<br/> );<br/> const compressionMethod = parseInt(<br/> buffer.subarray(pointer + 18, pointer + 19).toString('hex'),<br/> 16,<br/> );<br/> const filterMethod = parseInt(<br/> buffer.subarray(pointer + 19, pointer + 20).toString('hex'),<br/> 16,<br/> );<br/> const interlaceMethod = parseInt(<br/> buffer.subarray(pointer + 20, pointer + 21).toString('hex'),<br/> 16,<br/> );<br/><br/> chunk = {<br/> ...chunk,<br/> width,<br/> height,<br/> bitDepth,<br/> colorType,<br/> compressionMethod,<br/> filterMethod,<br/> interlaceMethod,<br/> };<br/> break;<br/> case 'PLTE':<br/> const colorList = [];<br/> const colorListStr = buffer.subarray(pointer + 8, pointer + 8 + length).toString('hex');<br/> for (let i = 0; i < colorListStr.length; i += 6) {<br/> colorList.push(colorListStr.slice(i, i + 6));<br/> }<br/> chunk = {<br/> ...chunk,<br/> colorList,<br/> };<br/> break;<br/> default:<br/> break;<br/> }<br/> result.chunks.push(chunk);<br/> pointer = pointer + 4 + 4 + length + 4;<br/> }<br/><br/> return result;<br/>}<br/>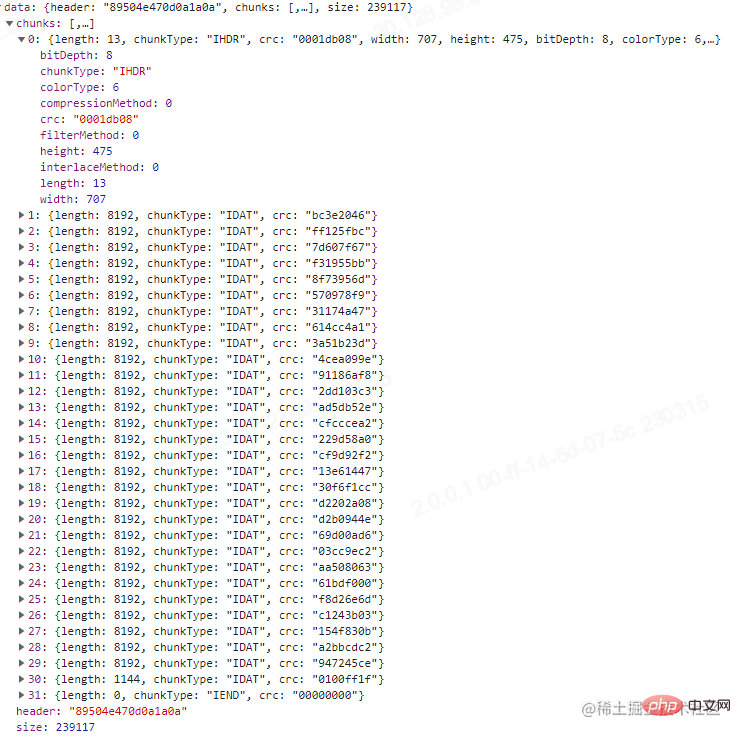
这里我测试用的图没有PLTE,刚好我去TinyPNG压缩我那张测试图之后进行上传,发现有PLTE块,可以看一下,结果如下图。
通过比对这两张图,压缩图片的方式我们也能窥探一二。
前面说过,PNG使用的是一种叫DEFLATE的无损压缩算法,它是Huffman Coding跟LZ77的结合。除了PNG,我们经常使用的压缩文件,.zip,.gzip也是使用的这种算法(7zip算法有更高的压缩比,也可以了解下)。要了解DEFLATE,我们首先要了解Huffman Coding和LZ77。
哈夫曼编码忘记在大学的哪门课接触过了,它是一种根据字符出现频率,用最少的字符替换出现频率最高的字符,最终降低平均字符长度的算法。
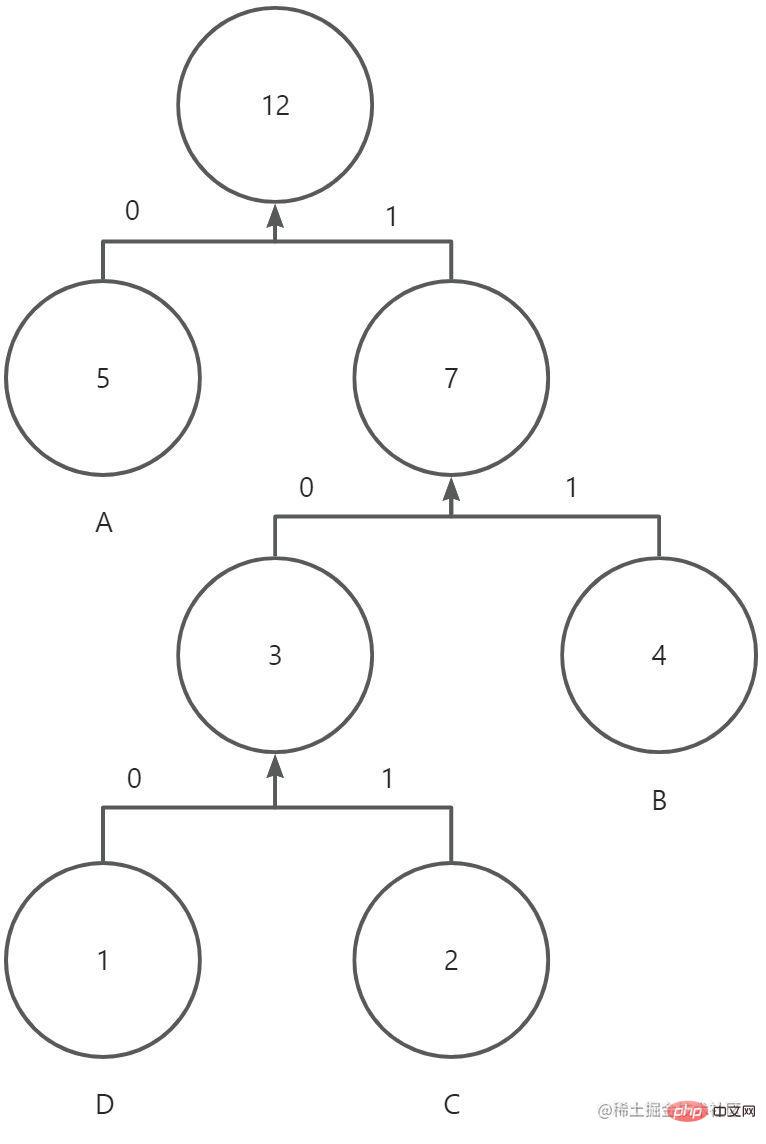
举个例子,有字符串"ABCBCABABADA",如果按照正常空间存储,所占内存大小为12 * 8bit = 96bit,现对它进行哈夫曼编码。
1.统计每个字符出现的频率,得到A 5次 B 4次 C 2次 D 1次
2.对字符按照频率从小到大排序,将得到一个队列D1,C2,B4,A5
3.按顺序构造哈夫曼树,先构造一个空节点,最小频率的字符分给该节点的左侧,倒数第二频率的字符分给右侧,然后将频率相加的值赋值给该节点。接着用赋值后节点的值和倒数第三频率的字符进行比较,较小的值总是分配在左侧,较大的值总是分配在右侧,依次类推,直到队列结束,最后把最大频率和前面的所有值相加赋值给根节点,得到一棵完整的哈夫曼树。
4.对每条路径进行赋值,左侧路径赋值为0,右侧路径赋值为1。从根节点到叶子节点,进行遍历,遍历的结果就是该字符编码后的二进制表示,得到:A(0)B(11)C(101)D(100)。
完整的哈夫曼树如下(忽略箭头,没找到连线- -!):
压缩后的字符串,所占内存大小为5 * 1bit + 4 * 2bit + 2 * 3bit + 1 * 3bit = 22bit。当然在实际传输过程中,还需要把编码表的信息(原始字符和出现频率)带上。因此最终占比大小为 4 * 8bit + 4 * 3bit(频率最大值为5,3bit可以表示)+ 22bit = 66bit(理想状态),小于原有的96bit。
LZ77算法还是第一次知道,查了一下是一种基于字典和滑动窗的无所压缩算法。(题外话:因为Lempel和Ziv在1977年提出的算法,所以叫LZ77,哈哈哈?)
我们还是以上面这个字符串"ABCBCABABADA"为例,现假设有一个4 byte的动态窗口和一个2byte的预读缓冲区,然后对它进行LZ77算法压缩,过程顺序从上往下,示意图如下:
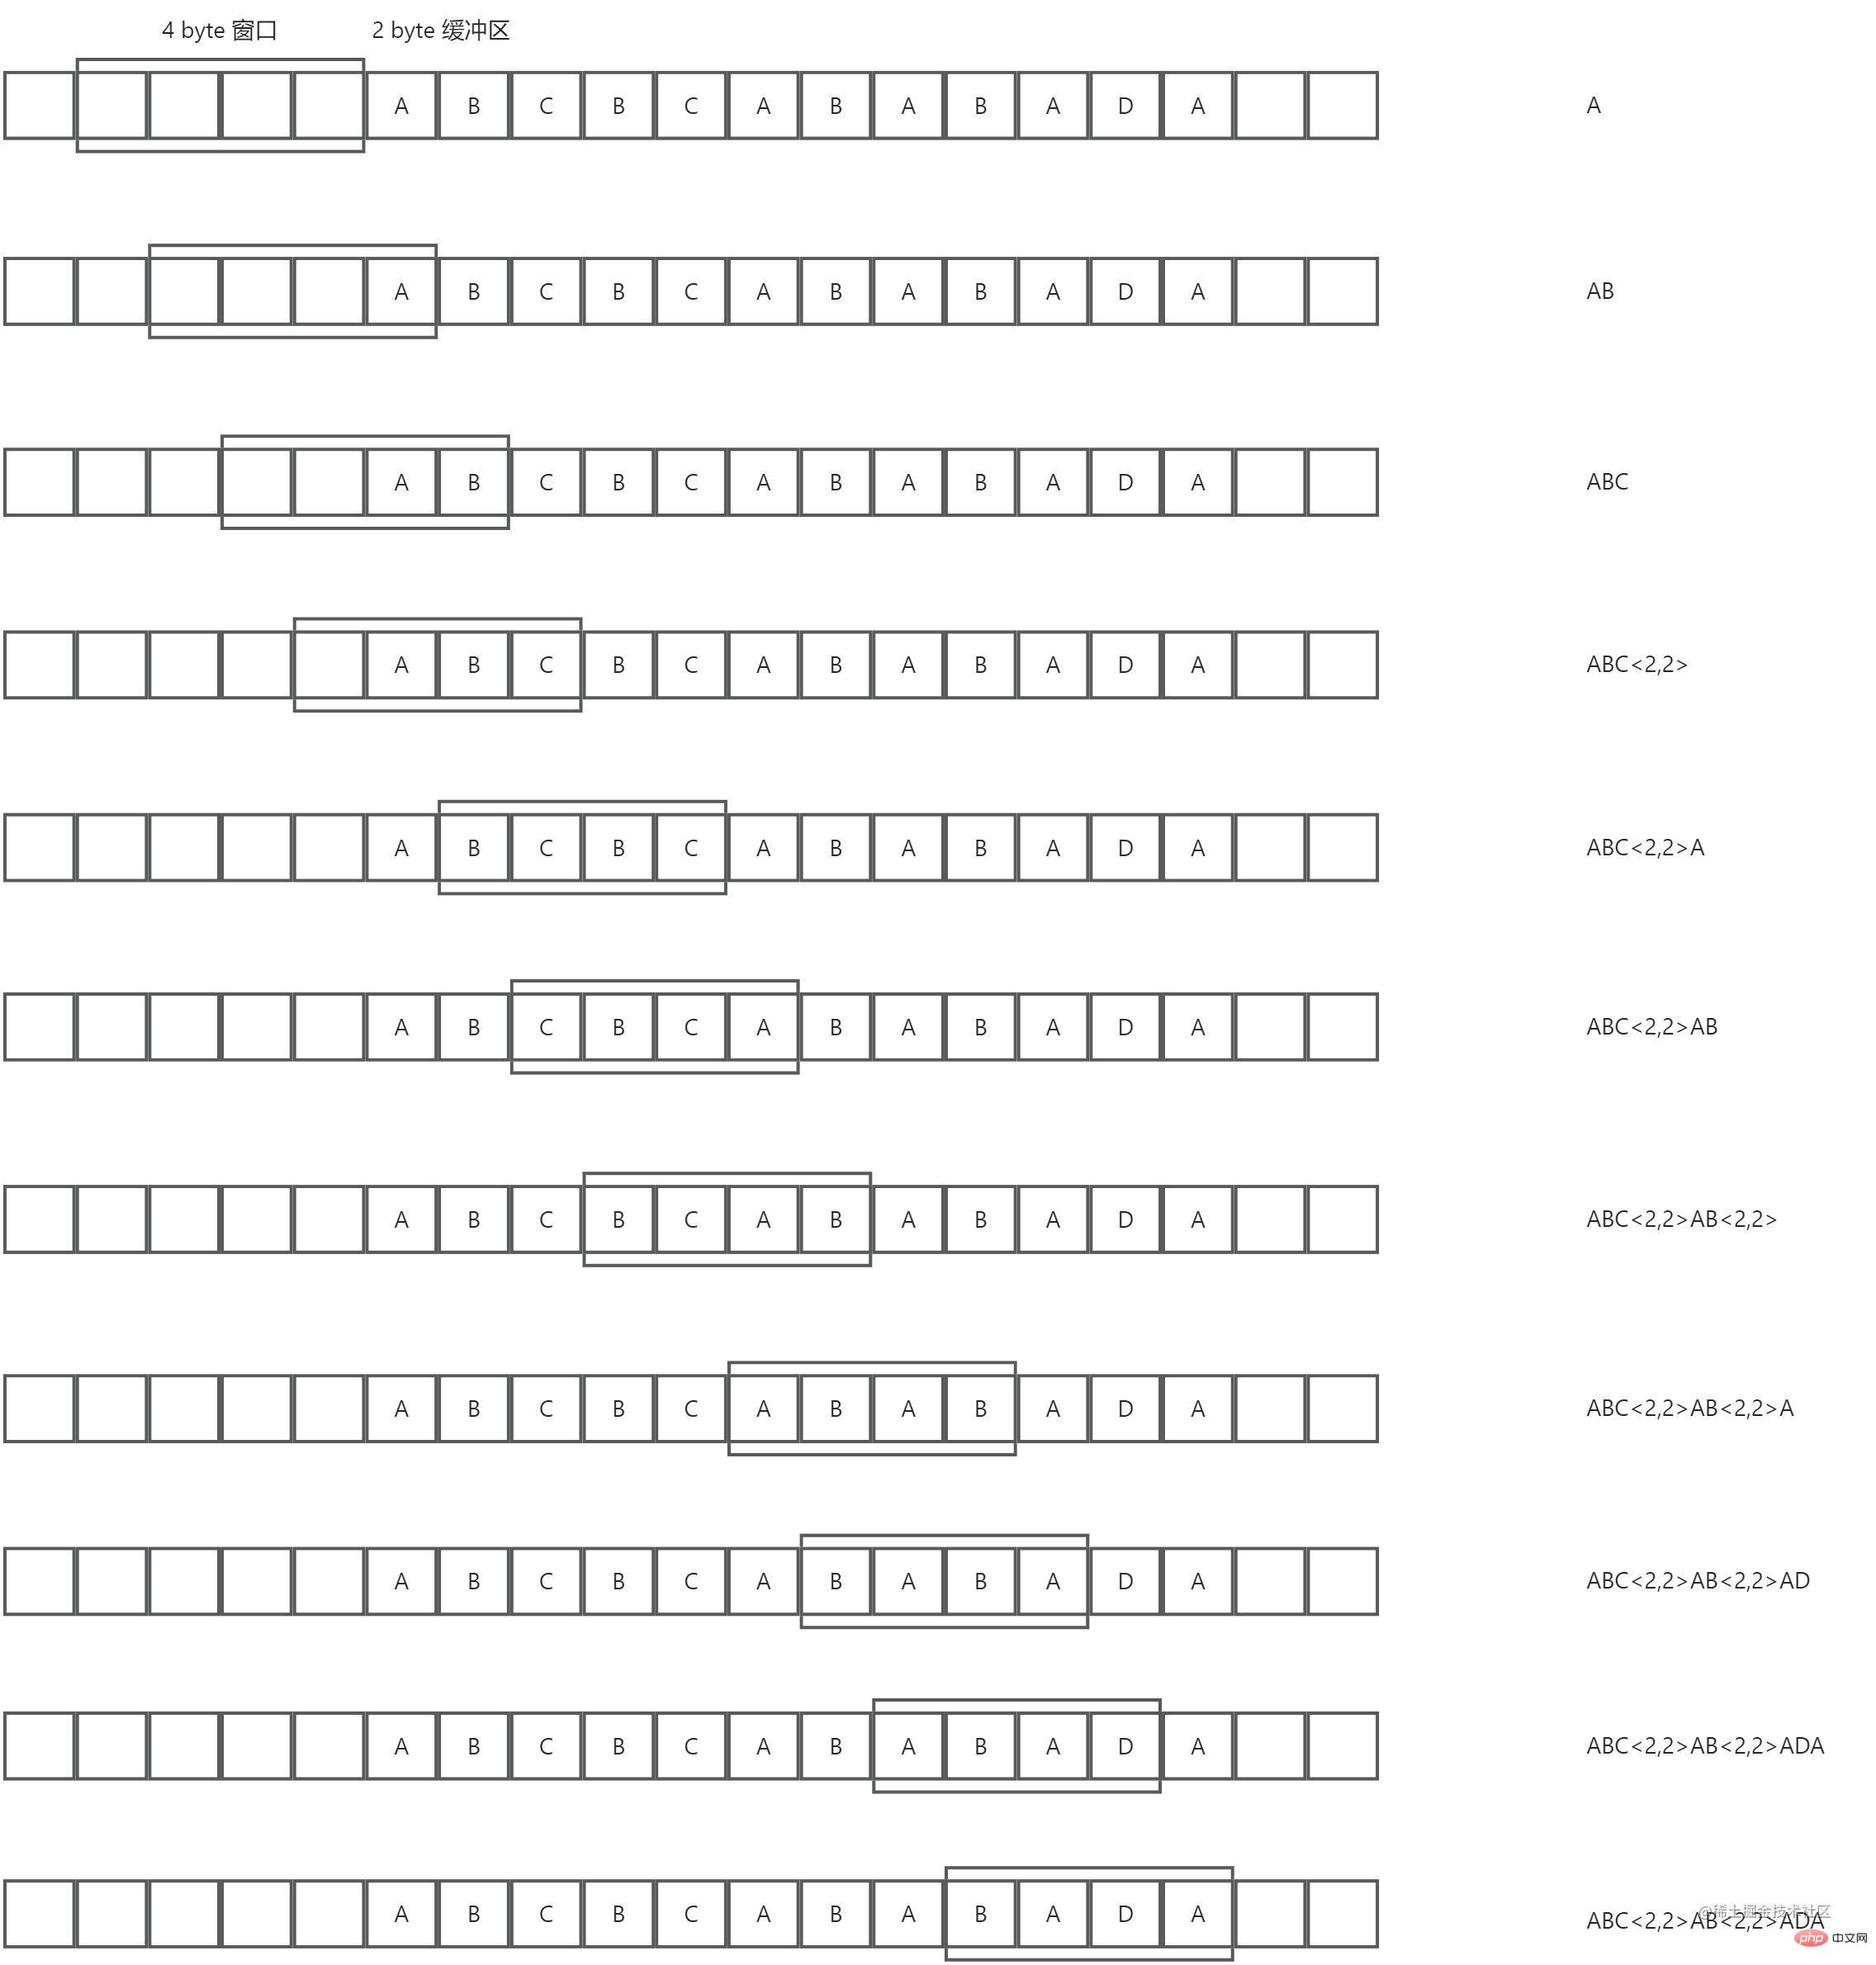
总结下来,就是预读缓冲区在动态窗口中找到最长相同项,然后用长度较短的标记来替代这个相同项,从而实现压缩。从上图也可以看出,压缩比跟动态窗口的大小,预读缓冲区的大小和被压缩数据的重复度有关。
DEFLATE【RFC 1951】是先使用LZ77编码,对编码后的结果在进行哈夫曼编码。我们这里不去讨论具体的实现方法,直接使用其推荐库Zlib,刚好Node.js内置了对Zlib的支持。接下来我们继续改造上面那个接口,如下:
import * as zlib from 'zlib';<br/><br/>@Post('/compression')<br/>@UseInterceptors(FileInterceptor('file'))<br/>async imageCompression(@UploadedFile() file: Express.Multer.File) {<br/> const buffer = file.buffer;<br/><br/> const result = {<br/> header: buffer.subarray(0, 8).toString('hex'),<br/> chunks: [],<br/> size: file.size,<br/> };<br/><br/> // 因为可能有多个IDAT的块 需要个数组缓存最后拼接起来<br/> const fileChunkDatas = [];<br/> let pointer = 8;<br/> while (pointer < buffer.length) {<br/> let chunk = {};<br/> const length = parseInt(buffer.subarray(pointer, pointer + 4).toString('hex'), 16);<br/> const chunkType = buffer.subarray(pointer + 4, pointer + 8).toString('ascii');<br/> const crc = buffer.subarray(pointer + length, pointer + length + 4).toString('hex');<br/> chunk = {<br/> ...chunk,<br/> length,<br/> chunkType,<br/> crc,<br/> };<br/><br/> switch (chunkType) {<br/> case 'IHDR':<br/> const width = parseInt(buffer.subarray(pointer + 8, pointer + 12).toString('hex'), 16);<br/> const height = parseInt(buffer.subarray(pointer + 12, pointer + 16).toString('hex'), 16);<br/> const bitDepth = parseInt(<br/> buffer.subarray(pointer + 16, pointer + 17).toString('hex'),<br/> 16,<br/> );<br/> const colorType = parseInt(<br/> buffer.subarray(pointer + 17, pointer + 18).toString('hex'),<br/> 16,<br/> );<br/> const compressionMethod = parseInt(<br/> buffer.subarray(pointer + 18, pointer + 19).toString('hex'),<br/> 16,<br/> );<br/> const filterMethod = parseInt(<br/> buffer.subarray(pointer + 19, pointer + 20).toString('hex'),<br/> 16,<br/> );<br/> const interlaceMethod = parseInt(<br/> buffer.subarray(pointer + 20, pointer + 21).toString('hex'),<br/> 16,<br/> );<br/><br/> chunk = {<br/> ...chunk,<br/> width,<br/> height,<br/> bitDepth,<br/> colorType,<br/> compressionMethod,<br/> filterMethod,<br/> interlaceMethod,<br/> };<br/> break;<br/> case 'PLTE':<br/> const colorList = [];<br/> const colorListStr = buffer.subarray(pointer + 8, pointer + 8 + length).toString('hex');<br/> for (let i = 0; i < colorListStr.length; i += 6) {<br/> colorList.push(colorListStr.slice(i, i + 6));<br/> }<br/> chunk = {<br/> ...chunk,<br/> colorList,<br/> };<br/> break;<br/> case 'IDAT':<br/> fileChunkDatas.push(buffer.subarray(pointer + 8, pointer + 8 + length));<br/> break;<br/> default:<br/> break;<br/> }<br/> result.chunks.push(chunk);<br/> pointer = pointer + 4 + 4 + length + 4;<br/> }<br/><br/> const originFileData = zlib.unzipSync(Buffer.concat(fileChunkDatas));<br/><br/> // 这里原图片数据太长了 我就只打印了长度<br/> return {<br/> ...result,<br/> originFileData: originFileData.length,<br/> };<br/>}<br/>
最终打印的结果,我们需要注意红框的那几个部分。可以看到上图,位深和颜色类型决定了每个像素由4 byte组成,然后由于过滤方式的存在,会在每行的第一个字节进行标记。因此该图的原始数据所占大小为:707 * 475 * 4 byte + 475 * 1 byte = 1343775 byte。正好是我们打印的结果。
我们也可以试试之前TinyPNG压缩后的图,如下:
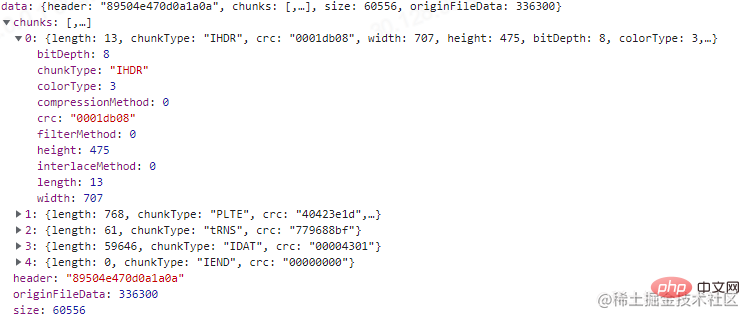
可以看到位深为8,索引颜色类型的图每像素占1 byte。计算得到:707 * 475 * 1 byte + 475 * 1 byte = 336300 byte。结果也正确。
现在再看如何进行图片压缩,你可能很容易得到下面几个结论:
1.减少不必要的辅助块信息,因为辅助块对PNG图片而言并不是必须的。
2.减少IDAT的块数,因为每多一个IDAT的块,就多余了12 byte。
3.降低每个像素所占的内存大小,比如当前是4通道8位深的图片,可以统计整个图片色域,得到色阶表,设置索引颜色类型,降低通道从而降低每个像素的内存大小。
4.等等....
至于JPEG,WEBP等等格式图片,有机会再看。溜了溜了~(还是使用现成的库处理压缩吧)。
好久没写文章,写完才发现语雀不能免费共享,发在这里吧。
更多node相关知识,请访问:nodejs 教程!
The above is the detailed content of How to use Node for image compression. For more information, please follow other related articles on the PHP Chinese website!


![Node.js complete introductory tutorial [es6+npm+express+webpack+promise]](https://img.php.cn/upload/course/000/000/068/6242b4c8f1a39624.png)


![[Web front-end] Node.js quick start](https://img.php.cn/upload/course/000/000/067/662b5d34ba7c0227.png)


