


{msg[1]}
} else if (msg[0] === 1) { return (


What is JSX in Vue? The following article will introduce you to JSX in Vue, introduce when to use JSX, and its basic use in Vue2. I hope it will be helpful to you!

JSX is a syntax extension of Javascript, which has all the features ofJavascriptFunction, while also having the semantics and intuitiveness ofhtml. It allows us to write template syntax in JS:
const el =Vue 2;
The above code is neither HTML nor a string. It is called JSX, which is an extended syntax of JavaScript. JSX may remind you of template syntax, but it has the full programming power of Javascript. [Related recommendations:vuejs video tutorial,web front-end development]
When to start writing a When the heading component can only be dynamically generated throughlevelprop, you may quickly think of implementing it like this:
Using a template here is not the best choice. Part of the code is repeated in the level title, which is not concise and elegant enough. If you try to write it in JSX, the code will become much simpler:
const App = { render() { const tag = `h${this.level}` return {this.$slots.default} } }
Or if you write a lot ofrenderfunctions, you may find the following code very painful to write:
createElement( 'anchored-heading', { props: { level: 1 } }, [ createElement('span', 'Hello'), ' world!' ] )
Especially when the corresponding template is so simple:
Hello world!
At this time, JSX syntax can be used in Vue, which allows us to return to a syntax closer to the template:
import AnchoredHeading from './AnchoredHeading.vue' new Vue({ el: '#demo', render: function (h) { return ( Hello world! ) } })
During the development process, the message prompt component Message is often used. One possible way to write it is like this:
Message.alert({ messge: '确定要删除?', type: 'warning' })
But I hopemessagecan customize some styles , at this time you may need to makeMessage.alertsupportJSX(of course you can also use slot/htmland other methods to solve it)
Message.alert({ messge: 确定要删除xxx的笔记?, type: 'warning' })
In addition, only one component can be written in a.vuefile. This may not be convenient in some scenarios. In many cases, when writing a page, you may actually need to split some small node fragments. Reuse them in small components. These small components can actually be solved by writing simple function components. Usually, due to the limitations of SFC, we may be accustomed to writing everything in one file, but I have to say that we can try this method.
// 一个文件写多个组件 const Input = (props) => export const Textarea = (props) => export const Password = (props) => export default Input
For example, an Input component is encapsulated here. We hope to export the Password component and Textarea component at the same time to facilitate users to use them according to actual needs. These two components themselves use the Input component internally, but some props are customized. . It is very convenient in JSX. It is basically enough to write a simple function component, and just declare props through interface. But if it is written using a template, it may be split into three files, and perhaps an entry file ofindex.jswill be added to export the three components.
Since the essence of JSX is JavaScript, it has the full programming capabilities of JavaScript. For another example, we need to use a piece of logic to reverse a set of DOM nodes. If we write it in the template, we will probably need to write two pieces of code.
Although this example may not be common, we have to admit that in some scenarios, JSX is still easier to write than templates.
Starting from Vue 2, template will be compiled into JavaScript'srender functionbefore running.
#Vue recommends using templates to create your HTML in most cases. However, in some scenarios, you need to use the render function, which is more flexible than template. Theserender functionare the legendaryVirtual DOMin the runtime stage.
In Vue 2 , JSX compilation needs to rely on the two packages@vue/babel-preset-jsxand@vue/babel-helper-vue-jsx-merge-props. The former package is responsible for compiling the syntax of JSX, and the latter package is used to introduce the runtimemergePropsfunction.
npm install @vue/babel-preset-jsx @vue/babel-helper-vue-jsx-merge-props
And add configuration in babel.config.js:
module.exports = { presets: ['@vue/babel-preset-jsx'], }
The text interpolation in the template code defaults to double braces :
{{ msg }}
In JSX, you need to use single curly braces:
const name = 'Vue' const element =Hello, { name }
Like text interpolation in template syntax, any valid JS expression is supported within curly braces, such as:2 2,user.firstName,formatName(user), etc.
在模板代码里面我们通过v-for去遍历元素,通过v-if去判断是否渲染元素,在JSX中,对于v-for,可以使用for循环或者array.map来代替,对于v-if,可以使用if-else语句,三元表达式等来代替
使用if-else语句
const element = (name) => { if (name) { return Hello, { name }
} else { return Hello, Stranger
} }
使用三元表达式
const element = icon ? : null;
使用数组的map方法
const list = ['java', 'c++', 'javascript', 'c#', 'php'] return (
在模板代码中,一般通过v-bind:prop="value"或:prop="value"来给组件绑定属性,在JSX里面就不能继续使用v-bind指令了,而是通过单大括号的形式进行绑定:
const href = 'https://xxx.com' const element = xxx
const properties = {a: 1, b: 2}
此外,模板代码中能通过批量绑定标签属性。
在JSX中也有相应的替换方案:。
class绑定同样也是使用单大括号的形式
const element = const element =Item
style绑定需要使用双大括号
const width = '100px' const element =
在模板代码中通过v-on指令监听事件,在JSX中通过on+ 事件名称的大驼峰写法来监听,且绑定事件也是用大括号,比如click事件要写成onClick,mouseenter事件要写成onMouseenter
const confirm = () => { // 确认提交 }
有时候我们希望可以监听一个组件根元素上面的原生事件,这时候会用到.native修饰符,但是在JSX中同样也不能使用,不过也有替代方案,监听原生事件的规则与普通事件是一样的,只需要将前面的on替换为nativeOn,如下
render() { // 监听下拉框根元素的click事件 return
除了上面的监听事件的方式之外,我们还可以使用对象的方式去监听事件
render() { return (
对于.passive、.capture和.once这些事件修饰符,Vue 提供了相应的前缀可以用于on:
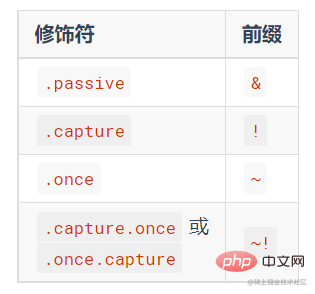
例如:
on: { '!click': this.doThisInCapturingMode, '~keyup': this.doThisOnce, '~!mouseover': this.doThisOnceInCapturingMode }
对于所有其它的修饰符,私有前缀都不是必须的,因为你可以在事件处理函数中使用事件方法: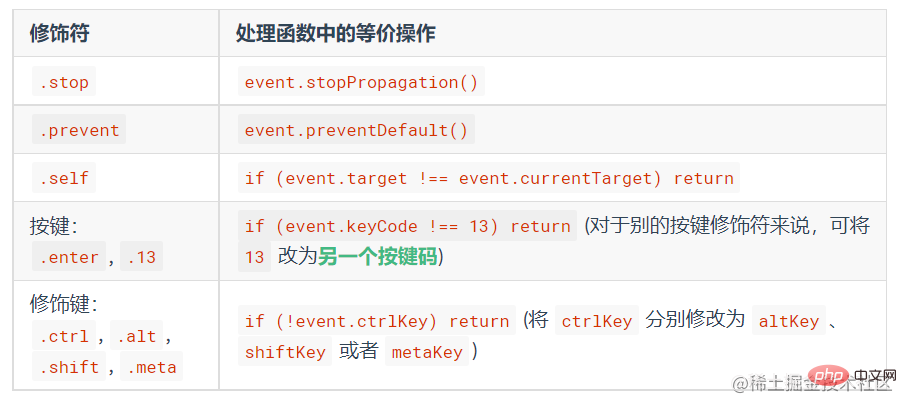 具体可查阅Vue规范文档。
大多数指令并不能在JSX中使用,对于原生指令,只有v-show是支持的。
而v-model是Vue提供的一个语法糖,它本质上是由value属性(默认) +input事件(默认)组成的,所以,在JSX中,我们便可以回归本质,通过传递value属性并监听input事件来手动实现数据的双向绑定:
export default { data() { return { name: '' } }, methods: { // 监听 onInput 事件进行赋值操作 handleInput(e) { this.name = e.target.value } }, render() { // 传递 value 属性 并监听 onInput事件 return } }
此外,在脚手架vue-cli4中,已经默认集成了对v-model的支持,可以直接使用,如果项目比较老,也可以安装插件babel-plugin-jsx-v-model来进行支持。
同样的,在JSX中,对于.sync也需要用属性+事件来实现,如下代码所示:
export default { methods: { handleChangeVisible(value) { this.visible = value } }, render() { return (
(1)默认插槽:
使用element-ui的Dialog时,弹框内容就使用了默认插槽,在JSX中使用默认插槽的用法与普通插槽的用法基本是一致的,如下
render() { return ( {/*这里就是默认插槽*/} 这里是弹框内容 ) }
自定义默认插槽:
在Vue的实例this上面有一个属性$slots,这个上面就挂载了一个这个组件内部的所有插槽,使用this.$slots.default就可以将默认插槽加入到组件内部
export default { props: { visible: { type: Boolean, default: false } }, render() { return ( {/**通过this.$slots.default定义默认插槽*/} {this.$slots.default} ) } }
(2)具名插槽
有时候我们一个组件需要多个插槽,这时候就需要为每一个插槽起一个名字,比如element-ui的弹框可以定义底部按钮区的内容,就是用了名字为footer的插槽
render() { return ( 这里是弹框内容 {/** 具名插槽 */} 确定 取消 ) }
自定义具名插槽: 在上节自定义默认插槽时提到了$slots,对于默认插槽使用this.$slots.default,而对于具名插槽,可以使用this.$slots.footer进行自定义
render() { return ( {this.$slots.default} {/**自定义具名插槽*/} {this.$slots.footer} ) }
(3)作用域插槽
有时让插槽内容能够访问子组件中才有的数据是很有用的,这时候就需要用到作用域插槽,在JSX中,因为没有v-slot指令,所以作用域插槽的使用方式就与模板代码里面的方式有所不同了。比如在element-ui中,我们使用el-table的时候可以自定义表格单元格的内容,这时候就需要用到作用域插槽
data() { return { data: [ { name: 'xxx' } ] } }, render() { return ( {/**scopedSlots即作用域插槽,default为默认插槽,如果是具名插槽,将default该为对应插槽名称即可*/} { return {row.name} } }} > ) }
自定义作用域插槽:
使用作用域插槽不同,定义作用域插槽也与模板代码里面有所不同。加入我们自定义了一个列表项组件,用户希望可以自定义列表项标题,这时候就需要将列表的数据通过作用域插槽传出来。
render() { const { data } = this // 获取标题作用域插槽 const titleSlot = this.$scopedSlots.title return ( {/** 如果有标题插槽,则使用标题插槽,否则使用默认标题 */} {titleSlot ? titleSlot(data) : {data.title}} ) }
只需要导入进来,不用再在components属性声明了,直接写在jsx中:
import MyComponent from './my-component' export default { render() { return hello }, }
我们可以定义method,然后在method里面返回JSX,然后在render函数里面调用这个方法,不仅如此,JSX还可以直接赋值给变量,比如:
methods: { renderFooter() { return ( 确定 取消 ) } }, render() { const buttons = this.renderFooter() return ( 内容 {buttons} ) }
假设该消息聊天记录的消息类型只有三种:文本,图片,引用。一条消息里面可以包括任意类型的内容,引用类型消息内部可以不断嵌套引用其他任意类型消息。效果图大致如下:
消息数据结构如下:
message: [ // 每个数组的第一个参数为消息类型:0:文本 1:图片 2:引用。第二个参数为具体内容 [ 0, '文本' ], [ 1, '图片链接xxx' ], [ 2, [ [ 0, '引用文本文本文本' ], [ 1, '引用图片链接xxx' ] ] ] ]
主要有两个思路:
1、思路一:在render里返回一段用array.map渲染的消息模板,对于三种消息类型,使用if-else进行判断分别渲染,对于引用类型的消息,可以封装一个方法进行渲染,方法里面如果还有引用类型消息就继续递归渲染。
methods: { // 展示引用消息 showQuote (msg) { return ( 引用: {msg.map(item => { if (item[0] === 0) { return {item[1]}
} else if (item[0] === 1) { return ( ) } else { return this.showQuote(item[1]) } })} ) } }, render (h) { return ( {msg[1]}
} else if (msg[0] === 1) { return (2、思路二:第一种思路中封装的showQuote里面的代码与render中渲染消息内容的代码基本相似,因此其实现方式不够优雅。其实可以将整个消息的渲染封装成一个组件,在该组件内引入自己,然后再渲染自己。由于具体细节代码与上述类似,这里只给出思路代码,具体细节请忽略
// 当前组件就是RecordMessage组件,自己引入自己 import RecordMessage from './RecordMessage.vue' export default { props: { message: { type: Array, default: () => [] } }, render () { const parseMessage = msg => { const type = msg[0] if (type === 0) { // 文本 } else if (type === 2) { // 图片 } else { // 引用类型 return ( 引用: { msg[1].map(subMsg => ( // 自己递归渲染自己 )) } ) } } return parseMessage(this.message) }
The above is the detailed content of What is JSX in Vue? When to use it? how to use?. For more information, please follow other related articles on the PHP Chinese website!


![Front-end Vue3 actual combat [handwritten vue project]](https://img.php.cn/upload/course/000/000/068/639b12e98e0b5441.png)


![[Web front-end] Node.js quick start](https://img.php.cn/upload/course/000/000/067/662b5d34ba7c0227.png)


