At work, we often need to collect statistics on employee data. For example: you need to use Excel to count the attendance and rating status of each employee, and the data of each employee is stored in a worksheet. At this time, if you manually create a named worksheet, it may take a lot of time. Today I will share with you two tips: batch creation/splitting of worksheets and batch renaming of worksheets.

1. Create/split worksheets in batches
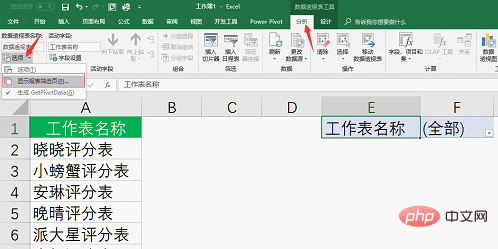
As shown below, first create the The worksheet name is entered in the cell of column A. The case is for 8 employees. A rating sheet and an attendance sheet are created for each employee.

Click on any cell in the data source and click the [Data] tab - [Pivot Table]


2. Batch rename the worksheet
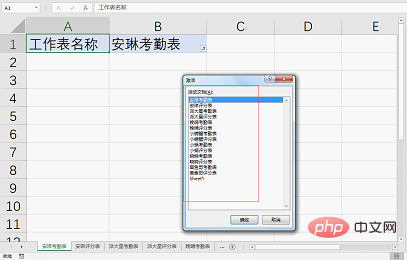
As shown below, you need to change the worksheet with the suffix name "Grade Sheet" to "Assessment" surface". (Right-click the lower left corner of the table to view all worksheet names)under [Edit]
In the pop-up dialog box, after searching for the content, enter "score table" and replace it with "evaluation table". Click the [Replace All] button on the right and close it. Press Ctrl s Save and close Notepad.
Drag the saved workbook.xml file back into the compressed package. When prompted, click OK as shown below.
#After clicking OK, you will be prompted that the following files already exist. Click "Replace" directly.
Close the open compressed package file, right-click the compressed package file, click "Rename", and change the extension back to xlsx to become an excel file Format.
Double-click to open the file. At this time, you can see that the name of the worksheet has been successfully changed from the original [Grade Sheet] to [Evaluation Sheet].
That’s it for today’s tutorial. Have you learned these two worksheet batch operation skills? Students, open excel and try it out!
Related learning recommendations: excel tutorial
The above is the detailed content of Practical Excel skills sharing: batch creation/splitting of worksheets, batch renaming of worksheets. For more information, please follow other related articles on the PHP Chinese website!
 Compare the similarities and differences between two columns of data in excel
 excel duplicate item filter color
 How to copy an Excel table to make it the same size as the original
 Excel table slash divided into two
 Excel diagonal header is divided into two
 Absolute reference input method
 java export excel
 Excel input value is illegal


