npm is the package management tool in the JavaScript world and is the default package management tool for the Node.js platform. Through npm, you can install, share, distribute code, and manage project dependencies. This article will take you through the principles of npm, I hope it will be helpful to you!

npm is said to be the world’s largest package manager? Is the reason really just user-friendliness?
is used to initialize a simple package.json file. The package.json file is used to define a package description file.
1. Default behavior of npm init execution
Execution npm init --yes, all use default values.
2. Customize npm initBehavior
npm initThe principle of the command is: call the script and output an initialized package.json file.
Get user input using prompt() method.
The core function of npm: dependency management. Execute npm i to install dependency packages from dependencies and devDependencies in package.json to the node_modules folder in the current directory.
2.1. Package definition
npm i can install a package. Usually package is the name of the package we need to install. Under the default configuration, npm will find the corresponding package address of the package name from the default source (Registry), and download and install it. Can also be a http url/git url/folder path pointing to a valid package name.
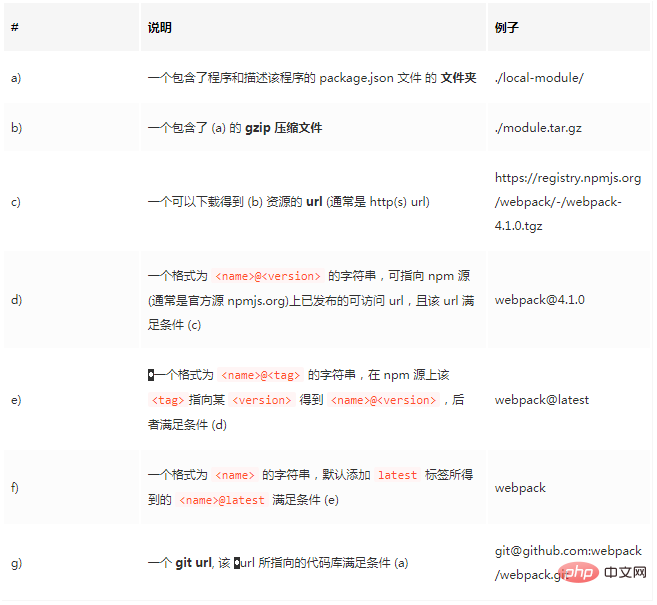
The accurate definition of package meets one of the following conditions a) to g), it is a package:

The accurate definition of package
2.2. Install local packages/remote git warehouse packages
Shared dependency packages do not have to be published to the npm source to be used.
1), Scenario 1: Local module reference
In development, calls between modules cannot be avoided. During development, we put frequently called configuration modules in the root directory, and then if there are many levels directory, and later reference
const config = require(''../../../../..config)
Such path references are not conducive to code refactoring. At this time we need to consider separating this module for other modules to share. For example, config.js can be encapsulated into a package and placed in the node_modules directory.
There is no need to manually copy or create soft connections to the node_modules directory. npm has its own solution:
Solution:
1. Add a new config folder and add config. js into the folder, change the name to index.js, create package.json to define the config package
{
    "name": "config",
    "main": "index.js",
    "version": "0.1.0"
}2. Add dependencies in the project's package.json, and then execute npm i.
{
  "dependencies": {
    "config":"file: ./config"
  }
}Looking at the node_modules directory, we will find an additional soft link named config, pointing to the upper config/ folder. This is because npm recognizes the URL of the file: protocol and learns that this package needs to be obtained directly from the file system. It will automatically create a soft link to node_modules to complete the "installation" process.
2), Scenario 2: Private git shared package
There will be some code/public libraries in the team that need to be shared between different projects in the team, but they may contain sensitive content.
We can simply host the dependent packages in a private git repository, and then save the git url to dependencies. npm will directly call the system's git command to pull the contents of the package from the git warehouse into node_modules.
Git url format supported by npm:
<protocol>://[<user>[:<password>]@]<hostname>[:<port>][:][/]<path>[#<commit-ish> | #semver:<semver>]
You can use # after the git path to specify a specific git branch/commit/tag, or #semver: to specify a specific semver range.
For example:
git+ssh://git@github.com:npm/npm.git#v1.0.27
git+ssh://git@github.com:npm/npm#semver:^5.0
git+https://isaacs@github.com/npm/npm.git
git://github.com/npm/npm.git#v1.0.27
3), Scenario 3: Open source package problem repair
At this time we can manually enter the node_modules directory to modify the corresponding package content, maybe modify a line of code to fix it problem. But this approach is very unwise!
Plan:
Fork the original author's git library, fix the problem in your own repo, and then change the corresponding dependencies in dependencies to your own repaired version git url can solve the problem.
After npm i is executed, all dependent packages are seen in node_modules. Developers do not pay attention to the structural details of the node_modules folder, but focus on the referenced dependency packages in the business code.
Understanding the node_modules structure helps us better understand how npm works. npm2 to npm5 changes and improvements.
3.1 npm2
npm2 uses a simple recursive installation method when installing dependent packages. Each package has its own dependency package, and the dependencies of each package are installed in its own node_modules. The dependency relationships progress layer by layer to form the entire dependency tree. This dependency tree corresponds one-to-one with the file structure tree in the file system.
The most convenient way to depend on the tree is to execute npm ls in the root directory.
Advantages:
The hierarchical structure is obvious and easy for fool-like management.
shortcoming:
For complex projects, the directory structure may be too deep, and the deep file path is too long, triggering that the file path in the window file system cannot exceed 260 characters.
Some packages that are dependent on multiple packages are installed repeatedly in many places, causing a lot of redundancy.
3.2 npm3
The node_modules directory of npm3 has been changed to a flatter hierarchical structure. npm3 traverses the entire dependency tree during installation and calculates the most reasonable folder installation method. All packages that are repeatedly dependent can be reinstalled.
For npm, packages with the same name and different versions are two independent packages.
The dependency tree structure of npm3 no longer corresponds to the folder hierarchy one-to-one.
3.3 npm5
Follow npm3’s flat dependency package installation method. The biggest change is the addition of the package-lock.json file.
Package-lock.json function: lock the dependency installation structure, and find that the node_modules directory file hierarchy is in one-to-one correspondence with the json structure.
npm5 will generate the package-lock.json file by default after executing npm i and submit it to the git/svn code base.
To upgrade, do not use version 5.0.
Note: In npm 5.0, if the package-lock file already exists, if you manually add a dependency to the package.json file and then execute npm install, the new dependency will not be installed in node_modules , package-lock.json will not be updated accordingly.
Introduces the knowledge related to dependency package upgrade management.
4.1 Semantic version semver
An important feature of npm dependency management adopts the semantic version (semver) specification as a version management solution.
The semantic version number must contain three numbers, in the format: major.minor.patch. It means: major version number. minor version number. modified version number.
We need to use the semver convention in dependencies to specify the version number or range of the required dependency package.
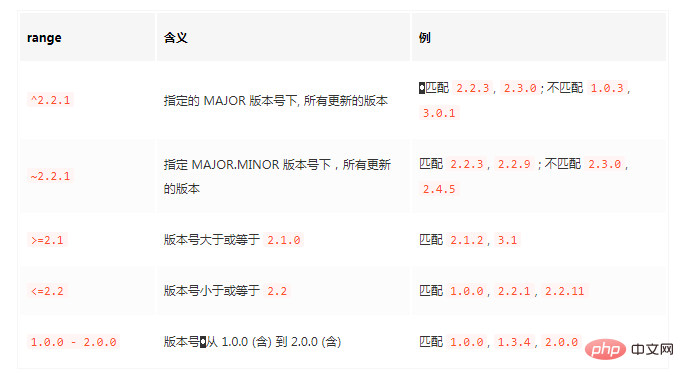
Commonly used rules are as follows:

#semver semantic version
1. Any two rules are connected with a space to represent "AND" logic is the intersection of two rules.
For example, >=2.3.1 <=2.8.0 can be interpreted as: >=2.3.1 and <=2.8.0
2. Any two rules are connected with || to express "OR" logic, which is two rules. Union of rules.
Such as ^2 >=2.3.1 || ^3 >3.2
3. A more intuitive way to express the version number range
4. Append after MAJOR.MINOR.PATCH - followed by dot-separated tags, which are usually regarded as pre-release version tags This version is unstable and not recommended for production use.
4.2 Dependency version upgrade
After installing a dependency package, a new version is released. How to use npm? What about version upgrade?
Conclusion of using npm3:
Conclusion of using npm5:
4.3 Best Practices
My commonly used node is 8.11.x, npm is 5.6.0.
升级依赖包:
降级依赖包:
删除依赖包:
5.1 基本使用
npm scripts是npm的一个重要的特性。在package.json中scripts字段定义一个脚本。
比如:
{
    "scripts": {
        "echo": "echo HELLO WORLD"
    }
}我们可以通过npm run echo 命令执行这段脚本,就像shell中执行echo HELLO WOLRD,终端是可以看到输出的。
总结如下:
5.2 node_modules/.bin目录
保存了依赖目录中所安装的可供调用的命令行包。本质是一个可执行文件到指定文件源的映射。
例如 webpack 就属于一个命令行包。如果我们在安装 webpack 时添加 --global 参数,就可以在终端直接输入 webpack 进行调用。
上一节所说,npm run 命令在执行时会把 ./node_modules/.bin 加入到 PATH 中,使我们可直接调用所有提供了命令行调用接口的依赖包。所以这里就引出了一个最佳实践:
•将项目依赖的命令行工具安装到项目依赖文件夹中,然后通过 npm scripts 调用;而非全局安装
于是 npm 从5.2 开始自带了一个新的工具 npx.
5.3 npx
npx 的使用很简单,就是执行 npx 即可,这里的 默认就是 ./node_modules 目录中安装的可执行脚本名。例如上面本地安装好的 webpack 包,我们可以直接使用 npx webpack 执行即可。
5.4 用法
1、传入参数
"scripts": {
  "serve": "vue-cli-service serve",
  "serve1": "vue-cli-service --serve1",
  "serve2": "vue-cli-service -serve2",
  "serve3": "vue-cli-service serve --mode=dev --mobile -config build/example.js"
}除了第一个可执行的命令,以空格分割的任何字符串都是参数,并且都能通过process.argv属性访问。
比如执行npm run serve3命令,process.argv的具体内容为:
[ '/usr/local/Cellar/node/7.7.1_1/bin/node',
  '/Users/mac/Vue-projects/hao-cli/node_modules/.bin/vue-cli-service',
  'serve',
  '--mode=dev',
  '--mobile',
  '-config',
  'build/example.js'
]
2、多命令运行 在启动时可能需要同时执行多个任务,多个任务的执行顺序决定了项目的表现。
1)串行执行
串行执行,要求前一个任务执行成功之后才能执行下一个任务。使用 && 服务来连接。
npm run scipt1 && npm run script2
串行执行命令,只要一个命令执行失败,整个脚本会中止的。
2)并行执行
并行执行,就是多个命令同时平行执行,使用 & 符号来连接。
npm run script1 & npm run script2
3、env 环境变量 在执行npm run脚本时,npm会设置一些特殊的env环境变量。其中package.json中的所有字段,都会被设置为以npm_package_ 开头的环境变量。
4、指令钩子 在执行npm scripts命令(无论是自定义还是内置)时,都经历了pre和post两个钩子,在这两个钩子中可以定义某个命令执行前后的命令。比如在执行npm run serve命令时,会依次执行npm run preserve、npm run serve、npm run postserve,所以可以在这两个钩子中自定义一些动作:
"scripts": {
  "preserve": "xxxxx",
  "serve": "cross-env NODE_ENV=production webpack",
  "postserve": "xxxxxx"
}5、常用脚本示例
// 删除目录
"clean": "rimraf dist/*",

// 本地搭建一个http服务
"server": "http-server -p 9090 dist/",

// 打开浏览器
"open:dev": "opener http://localhost:9090",

// 实时刷新
"livereload": "live-reload --port 9091 dist/",

// 构建 HTML 文件
"build:html": "jade index.jade > dist/index.html",

// 只要 CSS 文件有变动,就重新执行构建
"watch:css": "watch 'npm run build:css' assets/styles/",

// 只要 HTML 文件有变动,就重新执行构建
"watch:html": "watch 'npm run build:html' assets/html",

// 部署到 Amazon S3
"deploy:prod": "s3-cli sync ./dist/ s3://example-com/prod-site/",

// 构建 favicon
"build:favicon": "node scripts/favicon.js",
6.1 npm config
6.2 npmrc文件
可以通过删除npm config命令修改配置,还可以通过npmrc文件直接修改配置。
npmrc文件优先级由高到低,包括:
比如:我们在公司内网下需要代理才能访问默认源:https://registry.npmjs.org源;或者访问内网的registry,就可以在工作项目下新增.npmrc文件并提交代码库。
示例配置:
proxy = http://proxy.example.com/
https-proxy = http://proxy.example.com/
registry = http://registry.example.com/
这种在工程内配置文件的优先级最高,作用域在这个项目下,可以很好的隔离公司项目和学习研究的项目两种不同环境。
将这个功能与 ~/.npm-init.js 配置相结合,可以将特定配置的 .npmrc 跟 .gitignore, README 之类文件一起做到 npm init 脚手架中,进一步减少手动配置。
6.3 node版本约束
一个团队中共享了相同的代码,但是每个人开发机器不一致,使用的node版本也不一致,服务端可能与开发环境不一致。
{
  "engines": {"node": ">=7.6.0"}
}[1] node查阅兼容表格: https://node.green/
更多node相关知识,请访问:nodejs 教程!
The above is the detailed content of This article will help you understand the principles of npm. For more information, please follow other related articles on the PHP Chinese website!