psThe shortcut key for selecting and covering is: Alt Ctrl R. The principle of PS selection and masking: automatic identification of selected colors, retaining relevant colors, and automatically subtracting irrelevant colors.

Recommended: "PS Video Tutorial"
As a qualified UI designer, you must first start with Speaking of pictures, we all know that there are many ways to cut out pictures. We should choose the corresponding method for different pictures. However, the fact is that many beginners are often confused about pictures with hair texture, so today I will teach you a super practical method. Another simple cutout method - select and cover
Principle: Automatically identify the selected colors, retain relevant colors, and automatically subtract irrelevant colors.
Without further ado, let’s get started. Remember to ensure that the picture is clear. Think about it, if the picture itself is not clear, what is the point of cutting it out? Even if it is cut out, It's also blurry.
The steps are as follows:
1. Open the picture [Ctrl O]
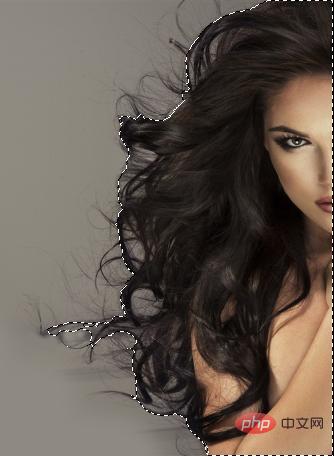
2. Use the quick selection tool Frame the rough outline of the hair. Note that it doesn't need to be very detailed, just a rough outline, so you don't need to waste too much time here. When we accidentally select too much when selecting, we can hold down the Alt key to subtract the overselected part of the selection.

#3. Once the selection is created, everyone should pay attention to the menu option bar. Is there a [Select and Cover]? Click to enter the adjustment interface, or use the shortcut keys directly. [Alt Ctrl R]
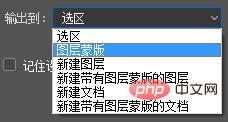
Let’s first select black and white from the view drop-down menu. There are many parameters in this interface, but when we clip pictures such as hair, we only need to adjust the edge detection You don’t need to go through the following radius (the default radius is 0px, observe the image while adjusting) and the layer mask

exported to the options. Never mind, when adjusting the radius, you just need to use the adjustment edge brush tool on the left side of the window according to the actual situation
This tool can be used for local adjustment, because we are adjusting the radius. Sometimes it is adjusted for the edge of the entire selection. The fact is that some pictures are almost perfect when adjusted, but the radius still needs to be adjusted at a certain local position on the edge. If you continue to adjust the radius at this time, , the result is that if you adjust this little bit, everything else will be ruined, so everyone must not lose the big for the small. Then at this time we need to use the Adjust Edge Brush Tool to lightly paint this part of the area to get a clear edge. As shown in the picture: Adjust the black and white contrast until it is clear and natural, and it cannot be adjusted too harshly.
Finally confirmed
4. Return to the interface and see the rendering:
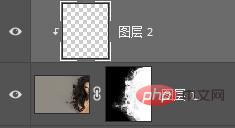
Picture Layer:
Have you seen the layer? To put it bluntly, the selection and mask just created a layer mask for the image. Now you know why It’s time to output to the layer mask!
#Because we can modify the mask repeatedly. Whether the hair is buttoned well or not depends on how well you adjust the mask. Now when you see the image, the hair is basically pulled out, but it is not as perfect as imagined. For example:
There is a white background in these places, which means that the background is not completely pulled out, so At this time, you need to return to the adjustment interface and adjust again. Select the layer, click [Select and Cover], or the shortcut key (as mentioned just now, Ctrl Alt R), remember the position you did not fasten just now:
Then use the [Adjust Edge Brush Tool] to paint this position again, you will find a surprise!
Is the hair separated from the background, and then make sure
The white background is gone. Isn’t it magical and surprising?
5. In order to let everyone see more clearly, we change the background color to another color, that is, change the layer hue Ctrl U, (see clearly that I am talking about changing the background, so everyone has to select the background Layer)
Everyone must pay attention here: If the layer you change is black, white, or gray, you must choose coloring. If the layer itself If it is black, then adjust the brightness to the white side. If the layer itself is white, then adjust the brightness to the black side (just adjust it a little), then adjust the hue, choose a color you like, and then adjust it according to the hair and For the contrast of the background, adjust the brightness a little.
Effect:
At this time you find that the background seems to be changed, and the hair seems to be wrong no matter how you look at it, don’t worry!
6. The next step is very crucial. It is simply the finishing touch. Add a transparent layer and make the clipping mask first.

7. Select the brush tool, hold down the Alt key, the mouse will turn into a straw, suck the hair color, experience tells me to choose the darkest hair color to suck. Color, then adjust the brush hardness to 0, and adjust the size as much as possible according to the actual situation, so that the edges are softer, and finally apply on the transparent layer along the edges of the hair, as shown in the picture:
Have you seen it? You have to apply it on the edges of your hair like this to make it natural and soft!
8. Finally see the result:
#Have the hair strands come out? At this time we can change the background color as just now, you will find that the hair strands have come out. Silk is still very natural!
9. If you are not satisfied with the above results and want to deal with the details, you can hold down Alt and click on the mask. At this time, you will be clear. See if the mask
is the adjustment interface we just used, haha, no, this is just a mask. Now we can use the burn and dodge tools to draw the red circle adjust the details. Try to remove the excess while retaining the hair. For example, if the white here is too redundant, we use the burn tool to apply it (burning makes the picture darker, and dodging makes the picture whiter. Secondly, The person can ensure the outline of the hair to a certain extent during use).
Have you seen it? The white one is gone, but the hair is still there.
Another example: Does this
look a little transparent? According to common sense, this place will not be transparent. At this time, you will be blinded. Bring up the board (hold down Alt and click on the mask), you will find that
is gray here, so you want to make it opaque, do you want to make it white? That's it (black and white but not transparent). At this time, you can choose the dodge tool and apply it. You will know after you try it!
10. Finally click on the layer to return to the image state
Not bad.
11. You can even change the background with an image, the effect may be better!
To sum up, there are actually three steps: load the selection area with the quick tool-select and cover-add a transparent layer of the clipping mask
This method is also quite practical for detaching animal hair. of!
The above is the detailed content of What is the shortcut key for selecting and covering in PS?. For more information, please follow other related articles on the PHP Chinese website!