
The purpose of this article is to review the historical background of CSS and introduce the evolution of some design patterns and tools in the development of CSS today in 2018. By understanding these backgrounds, you will more easily understand each design idea and apply what you have learned. Let’s get started!
CSS has always been considered by web developers to be the simplest and most difficult language. It's really easy to get started - you just need to define the style attributes and values for the elements, and that's all it seems like you need to do! However, in some large-scale projects, the organization of CSS is a complicated and messy matter. If you change a line of CSS style of any element on the page, it may affect elements on other pages.
We start with the simplest web page index.html. This file contains an independent style file index.css:
<!DOCTYPE html>
<html lang="en">
<head>
  <meta charset="UTF-8">
  <title>Modern CSS</title>
  <link rel="stylesheet" href="index.css">
</head>
<body>
  <header>This is the header.</header>
  <main>
    <h1>This is the main content.</h1>
    <p>...</p>
  </main>
  <nav>
    <h4>This is the navigation section.</h4>
    <p>...</p>
  </nav>
  <aside>
    <h4>This is an aside section.</h4>
    <p>...</p>
  </aside>
  <footer>This is the footer.</footer>
</body>
</html>
The above There is no need to use any class or id in the HTML tag.
Without any CSS styles, our website looks like this:
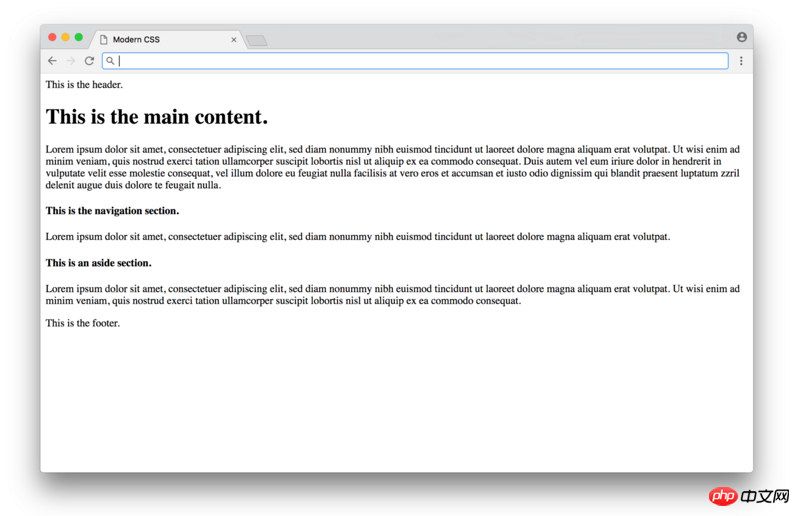
Click to view the online demo
Function It's available, but it doesn't look good. We can continue to add some CSS to beautify the layout in index.css:
/* BASIC TYPOGRAPHY                       */
/* from https://github.com/oxalorg/sakura */
html {
  font-size: 62.5%;
  font-family: serif;
}
body {
  font-size: 1.8rem;
  line-height: 1.618;
  max-width: 38em;
  margin: auto;
  color: #4a4a4a;
  background-color: #f9f9f9;
  padding: 13px;
}
@media (max-width: 684px) {
  body {
    font-size: 1.53rem;
  }
}
@media (max-width: 382px) {
  body {
    font-size: 1.35rem;
  }
}
h1, h2, h3, h4, h5, h6 {
  line-height: 1.1;
  font-family: Verdana, Geneva, sans-serif;
  font-weight: 700;
  overflow-wrap: break-word;
  word-wrap: break-word;
  -ms-word-break: break-all;
  word-break: break-word;
  -ms-hyphens: auto;
  -moz-hyphens: auto;
  -webkit-hyphens: auto;
  hyphens: auto;
}
h1 {
  font-size: 2.35em;
}
h2 {
  font-size: 2em;
}
h3 {
  font-size: 1.75em;
}
h4 {
  font-size: 1.5em;
}
h5 {
  font-size: 1.25em;
}
h6 {
  font-size: 1em;
}Most of this place is about the definition of layout (font, line height, etc.) style, and also includes some colors. and a layout centered setting. In order to give each attribute a reasonable value, you need to learn some design theory, but the CSS we use here is not complicated. You can define it directly. The result is as follows:
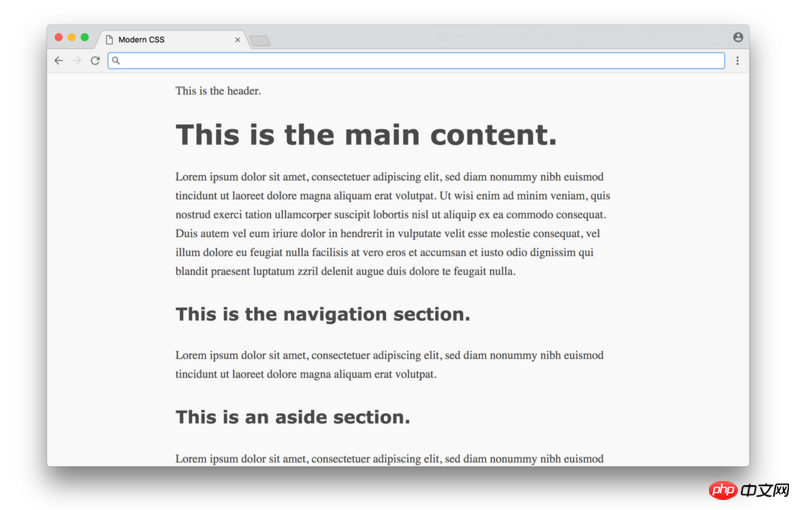
Click here to see a live example
Some changes! Just what CSS promises - a simple way to style your documents, without the need for programming or complex business logic. Unfortunately, the actual situation is much more complicated, and we are not just using simple style definitions such as CSS layout and color.
In the 1990s, before CSS was widely popularized, there were not many choices for page layout. HTML was originally designed as a language for creating plain text, not dynamic pages with layouts such as sidebars and columns. In the early days, page layouts usually used HTML tables to organize content in rows and columns. Although this method is effective, it mixes content and presentation. If you want to change the layout of the web page, you need to modify a lot of HTML code.
The emergence of CSS promoted the separation of content (written in HTML) and performance (written in CSS). People began to remove all layout code from HTML and put it into CSS. It should be noted that Yes, like HTML, CSS is not designed to layout web content, so it was very difficult to solve this separation design in the early days.
Let’s use a practical example to see how to implement layout. Before we define the CSS layout, reset the padding and margin (which will affect the calculation of the layout). We define different colors for different areas (don’t Don’t care too much about whether it looks good or not, as long as the different areas are eye-catching enough)
/* RESET LAYOUT AND ADD COLORS */
body {
  margin: 0;
  padding: 0;
  max-width: inherit;
  background: #fff;
  color: #4a4a4a;
}
header, footer {
  font-size: large;
  text-align: center;
  padding: 0.3em 0;
  background-color: #4a4a4a;
  color: #f9f9f9;
}
nav {
  background: #eee;
}
main {
  background: #f9f9f9;
}
aside {
  background: #eee;
}The page should now look like the following:
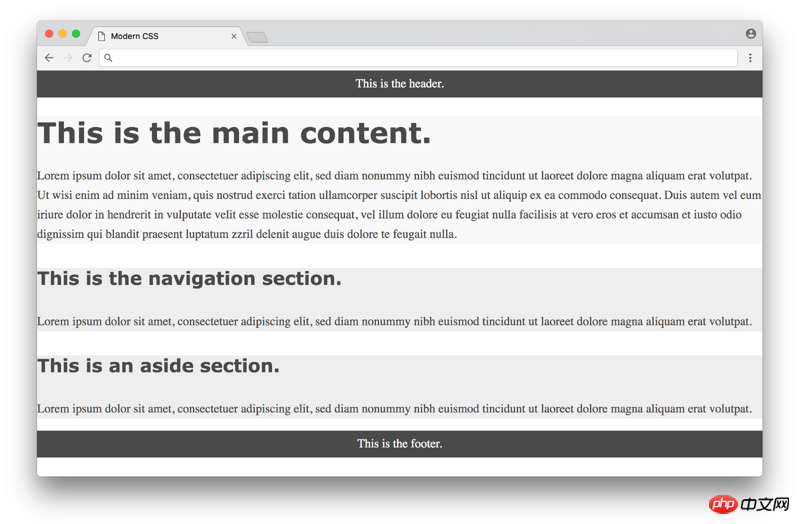
Click here to see a live example
Next we use CSS to lay out the page content. We will use three different methods in chronological order, starting with the most classic floating layout.
The CSS floating property was originally designed to float images to the left or right of a column of text (often seen in newspapers). Back in the early 2000s, web developers extended the benefits of this property to arbitrary elements, meaning you could create the illusion of rows and columns by floating the content of p. Similarly, floating is not designed for such a purpose, so there will be many problems with compatibility.
In 2006, A List Apart published a popular article, In Search of the Holy Grail, which outlined a detailed method for implementing the Holy Grail layout - a header, three columns of content and a bottom, and you must It seems crazy that a simple layout is called the Holy Grail layout, but it was really difficult to achieve in the era of pure CSS.
The following is an example based on floating layout, using some of the technical points mentioned in our article:
/* FLOAT-BASED LAYOUT */
body {
  padding-left: 200px;
  padding-right: 190px;
  min-width: 240px;
}
header, footer {
  margin-left: -200px;
  margin-right: -190px;
}
main, nav, aside {
  position: relative;
  float: left;
}
main {
  padding: 0 20px;
  width: 100%;
}
nav {
  width: 180px;
  padding: 0 10px;
  right: 240px;
  margin-left: -100%;
}
aside {
  width: 130px;
  padding: 0 10px;
  margin-right: -100%;
}
footer {
  clear: both;
}
* html nav {
  left: 150px;
}Look carefully at the CSS code, which contains some necessary things to make it work. Hack methods (negative margins, clear: both, hard-coded width calculation, etc.), we will explain these details in detail later. The final result is as follows:
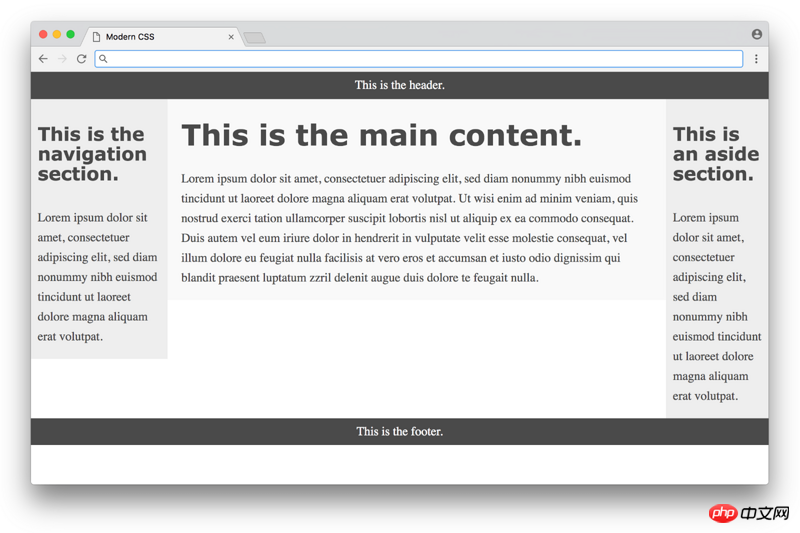
Click here to see a live example
看起来不错了,但是通过三列的颜色可以看出来他们的高度不一样,页面的高度也没有填充满屏幕。这些问题是浮动布局导致的,所有的浮动只是将内容放在某一区块的左边或者右边,但是没法知道其他区块的高度。这个问题一直没有个好的解决方案,直到Flexbox布局的出现。
flexbox CSS属性实在2009年第一次提出来的,但直到2015年才得到浏览器的广泛支持。Flexbox被设计为定义一个空间在行或者列上如何分布的,这让它比浮动更适合用来做布局,这意味在使用浮动布局十多年后,web开发者终于不再使用带有hack的浮动布局方式了。
下面是一个基于Flexbox布局的例子。注意为了让flexbox生效我们需要在三列的外面额外包装一个p:
<!DOCTYPE html>
<html lang="en">
<head>
  <meta charset="UTF-8">
  <title>Modern CSS</title>
  <link rel="stylesheet" href="index.css">
</head>
<body>
  <header>This is the header.</header>
  <p class="container">
    <main>
      <h1>This is the main content.</h1>
      <p>...</p>
    </main>
    <nav>
      <h4>This is the navigation section.</h4>
      <p>...</p>
    </nav>
    <aside>
      <h4>This is an aside section.</h4>
      <p>...</p>
    </aside>
  </p>
  <footer>This is the footer.</footer>
</body>
</html>
下面是flexbox布局的CSS代码:
/* FLEXBOX-BASED LAYOUT */
body {
  min-height: 100vh;
  display: flex;
  flex-direction: column;
}
.container {
  display: flex;
  flex: 1;
}
main {
  flex: 1;
  padding: 0 20px;
}
nav {
  flex: 0 0 180px;
  padding: 0 10px;
  order: -1;
}
aside {
  flex: 0 0 130px;
  padding: 0 10px;
}这种方式和浮动布局相比更加紧凑了,虽然flexbox一些属性和值初看起来有些困惑,但是好歹不需要像浮动布局那样负边距的hack方案了,这是个巨大的进步。最终结果如下:
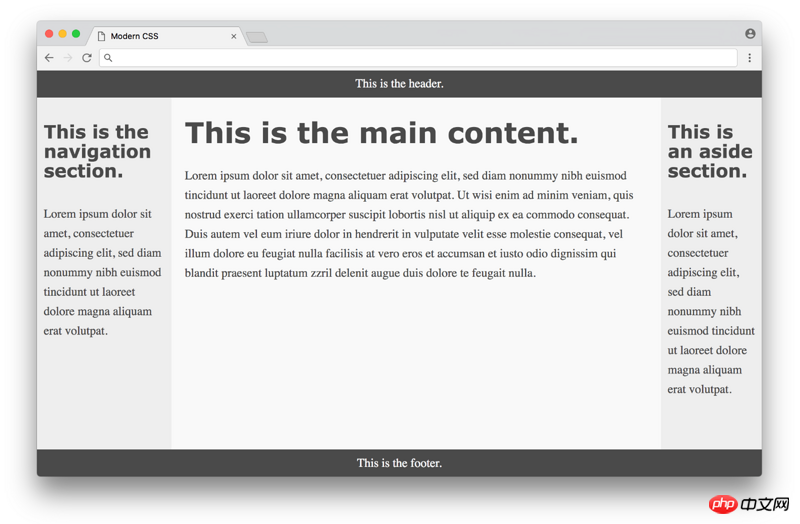
Click here for a live example
效果好多了!所有的列高度都相同,并且占据了整个页面的高度。从某种意义上来说这似乎是完美的了,但是这个方式也有些小问题,其中一个就是浏览器的兼容性——主流的现代浏览器都支持flexbox,但是一些旧的浏览器不兼容。幸运的是浏览器厂商也正在尽最大努力终止对旧版本浏览器的支持,为web开发者提供更一致的开发体验。另一个问题是我们需要<p class="container">包裹HTML内容标签,如果能避免会更完美。理想状态下,任何CSS布局都不需要改变HTML标签的。
最大的缺点是CSS代码本身——flexbox虽然去掉了浮动的Hack,但是代码的可读性上变得更差了。你很难去理解flexbox的CSS,并且不知道页面上是如何去布局所有元素的。在写flexbox布局代码的时,有很多时候靠的是大量的猜测和尝试。
特别需要注意的是,flexbox被设计用来在单行或者单列中分割元素的——它不是设计用来给整个页面做布局的!尽管它能很好的实现(相对于浮动布局好很多)。另一种不同的规范是用来处理多行或者多列布局的,我们称之为CSS 网格。
CSS网格最早在2011年提出的(比flexbox提案晚不了多久),但是花了好长时间才在浏览器上普及起来。截止2018年初,大多数现代浏览器都已经支持CSS grid(这比一两年前有巨大的进步了)
下面我们看一下基于网格布局的例子,注意在这个例子中我们摆脱了flexbox布局中必须使用<p class="container">的限制,我们可以简单的使用原始的HTML,先看下CSS文件:
/* GRID-BASED LAYOUT */
body {
  display: grid;
  min-height: 100vh;
  grid-template-columns: 200px 1fr 150px;
  grid-template-rows: min-content 1fr min-content;
}
header {
  grid-row: 1;
  grid-column: 1 / 4;
}
nav {
  grid-row: 2;
  grid-column: 1 / 2;
  padding: 0 10px;
}
main {
  grid-row: 2;
  grid-column: 2 / 3;
  padding: 0 20px;
}
aside {
  grid-row: 2;
  grid-column: 3 / 4;
  padding: 0 10px;
}
footer {
  grid-row: 3;
  grid-column: 1 / 4;
}虽然结果看起来和基于flexbox的布局一样,但是CSS在很大程度上得到了改进,它清晰地表达出了期望的布局方式。行和列的大小和形状在body选择器中定义,每一项item直接通过他们所在行和列的位置定义。
grid-column 这个属性你可能觉得不太好理解,它定义了列的起点和终点。这个地方让你觉得困惑的可能是明明有3列,却为什么定义的范围是1到4,通过下面的图片你就能理解了:
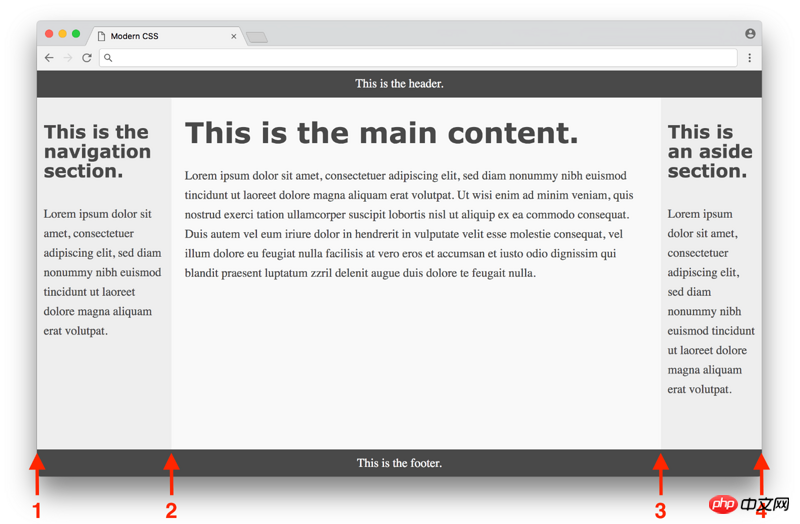
Click here to see a live example
第一列是从1到2,第二列是从2到3,第三列从3到4,所以头部的grid-column是从1到4占据整个页面,导航的grid-column是从1到2占据第一列等等
一旦你习惯了grid语法,你会觉得它是一种非常理想的CSS布局方式。唯一缺点就是浏览器支持,幸运的是过去一年中浏览器的支持又得到了进一步的提高。作为专为CSS设计的第一款真正的布局工具很难描绘它的重要性,从某种意义上来说,由于现有的工具需要太多的hack和变通方式去实现,因此web设计者过去对于布局的创意上一直很保守,CSS网格的出现有可能会激发出一批从未有过的创意布局设计——想想还是挺激动人心的!
到目前为止,我们介绍了CSS的基本样式和布局,现在我们再来看下那些帮助CSS提升语言本身体验的工具,先从CSS预处理器开始吧。
CSS预处理器允许你使用不同的语言来定义样式,最终会帮你转换为浏览器可以解释的CSS,这一点在当今浏览器对新特性支持缓慢的情况下很有价值。第一个主流的CSS预处理器是2006年发布的Sass,它提供了一个新的更简洁的语法(缩进代替大括号,没有分号等等),同时增加了一些CSS缺失的高级特性,像变量、工具方法还有计算。下面我们使用Sass变量实现下前面例子中带颜色的区域定义:
$dark-color: #4a4a4a
$light-color: #f9f9f9
$side-color: #eee
body
  color: $dark-color

header, footer
  background-color: $dark-color
  color: $light-color

main
  background: $light-color
nav, aside
  background: $side-color
注意我们用$定义了可复用的变量,省略了大括号和分号,语法看起来更加清晰了。简洁的语法让Sass看起来很棒,但变量这样的特性出现在当时来说意义更大,这为编写整洁可维护的CSS代码开辟了新的可能性。
使用Sass你需要安装Ruby(Ruby),这门语言主要是让Sass编译成正常的CSS,同时你需要安装Sass gem,之后你就可以通过命令行把你的.sass文件转成.css文件了,我们先看一个使用命令行的例子:
sass --watch index.sass index.css
这个命令定期把index.sass中的Sass代码转为CSS写入到index.css文件中(--watch参数设定后会实时监听.sass文件改动并执行编译,非常方便)
这个过程被称为构建步骤。这在2006年的时候是非常大的一个障碍,如果你对Ruby这样的编程语言熟悉的话,这个过程非常简单。但是当时很多前端开发者只用HTML和CSS,他们不需要类似这样的工具。因此,为了使用CSS预编译的功能而让一个人学习整个生态系统是很大的一个要求了。
2009年的时候,Less CSS预编译器发布。它也是Ruby写的,并且提供了类似于Sass的功能,关键不同点是它的语法设计上更接近CSS。这意味着任何CSS代码都是合法的Less代码,同样我们看一个用Less语法的例子:
@dark-color: #4a4a4a;
@light-color: #f9f9f9;
@side-color: #eee;
body {
  color: @dark-color;
}

header, footer {
  background-color: @dark-color;
  color: @light-color;
}

main {
  background: @light-color;
}
nav, aside {
  background: @side-color;
}语法上几乎是相同的(变量的定义使用@替代了$),但是Less和CSS一样带有大括号和分号,没有Sass例子的代码看起来漂亮。然而,和CSS相近的特性反而让开发者更容易接受它,在2012年,Less使用了JavaScript(Node.js)重写了替换了Ruby,性能上比Ruby编译更快了,并且很多在工作中使用了Node.js的人更容易上手了。
把这段代码转化为标准的CSS,你需要安装Node.js 和 Less,执行的命令行如下:
lessc index.less index.css
这个命令把index.less文件中的Lessz代码转化为标准的CSS代码写入到index.css文件中,注意lessc命令不能监听文件的变化(和sass不一样),这意味着你需要安装其他自动监听和编译的组件来实现该功能,增加了流程的复杂性。同样,对于程序员来说使用命令行的方式并不难,但是对于其他只想使用CSS预编译器的人来说还是个非常大的障碍。
汲取了Less的经验,Sass开发者在2010年发布了一个新的语法叫SCSS(与Less类似的一个CSS超集),同时发布了LibSass,一个基于C++扩展的Ruby引擎,让编译更快并且适配于多种语言。
另外一个CSS预处理器是2010年发布的Stylus,使用Node.js编写,和Sass或者Less相比更注重于清晰的语法。通常主流的CSS预编译器就这三种(Sass,Less,Stylus),他们在功能方面非常相似,所以你不必担心选择哪一个会是错误的。
然而,有些人认为使用CSS预处理器开始变得越来越没必要,因为浏览器最终会慢慢实现这些功能(像变量和计算)。此外,还有一种称为CSS后处理器的方法,有可能会让CSS预处理器过时(显然这存在些争议),我们在后面会详细介绍下。
CSS后处理器使用JavaScript分析并转换你的CSS为合法CSS,从这方面来看和CSS预处理器很相似,你可以认为是解决同一个问题的不同方式。关键的不同点是CSS预处理器使用特殊的语法来标记需要转换的地方,而CSS后处理器可以解析转换标准的CSS,并不需要任何特殊的语法。举一个例子来说明下,我们用最初定义的header标签样式来看一下吧:
h1, h2, h3, h4, h5, h6 {
  **-ms-hyphens: auto;
  -moz-hyphens: auto;
  -webkit-hyphens: auto;**
  hyphens: auto;
}粗体部分的属性成为厂商前缀,厂商前缀是浏览器厂商对CSS新功能的实验和测试使用的,在正式实现前提供给开发者使用CSS新属性的一种方式。-ms代表IE浏览器,-moz是火狐浏览器,-webkit是基于webkit内核的浏览器。
定义这些不同浏览器厂商的前缀属性是非常烦人的,尽量使用生成工具自动添加厂商前缀。我们可以使用CSS预处理器来完成这个功能,例如,我们可以用SCSS来实现:
@mixin hyphens($value) {
  -ms-hyphens: $value;
  -moz-hyphens: $value;
  -webkit-hyphens: $value;
  hyphens: $value;
}
h1, h2, h3, h4, h5, h6 {
  @include hyphens(auto);
}这个地方使用了Sass的 mixin 功能,你可以定义一个CSS代码块然后在其他任何地方重用,当这个文件被编译成标准的CSS的时候,所有的@include语句都被替换成与之匹配的@mixin中的CSS。总体来说,这个解决方案也不差,但是你仍然要为每个需要厂商前缀的的CSS属性定义一个mixin,这些mixin的定义将需要不断的维护,比如当浏览器支持了某个CSS属性后你就要在你的定义中移除掉该属性。
比起写mixin的方式,直接正常写CSS然后由工具自动识别添加需要厂商前缀的属性的方式显然更优雅些。CSS后处理器就恰好能完成这样的功能。比如,如果你使用 PostCSS 和 autoprefixer 插件,你就可以直接写正常的CSS并不需要指定浏览器厂商前缀,剩下的工作全交给后置处理器去处理:
h1, h2, h3, h4, h5, h6 {
  hyphens: auto;
}当你使用CSS后处理器运行这段代码的时候hyphens: auto; 将被替换成包含所有浏览器厂商前缀的属性,这意味着你可以正常写CSS不用担心各种浏览器兼容性问题,岂不是很棒!
除了PostCSS的autoprefixer插件还有很多有意思的插件,cssnext 插件可以让你体验下一些实验性质的CSS新功能,CSS modules 可以自动改变class的名字避免名称冲突,stylelint 能检查出你CSS代码中一些定义错误和不符合规范的写法。这些工具在过去一两年里开始流行起来,给开发者提供了从未有过的工程化流程。
然而,进程的发展总是有代价的,安装和使用CSS后处理比CSS预处理器更复杂。你不仅要安装、执行命令行,还需要安装配置各个插件并且定义好各种复杂的规则(比如你的目标浏览器等)。很多开发者不再直接使用命令行运行PostCSS了,而是通过配置一些构建系统,像Grunt 、Gulp 、webpack,他们可以帮助你管理前端开发工作中需要的各种构建工具。
值得注意的是对于CSS后处理器存在些争议,有人认为这个术语有些让人迷惑(一种说法是建议都应该叫CSS预处理器,还有一种说法是应该都简称CSS处理器,等等),有人认为有了CSS后处理器完全可以不需要CSS预处理器,有人则主张两者一起使用。不管怎么说,去了解下CSS后处理器的使用还是非常值得的。
CSS预处理器和CSS后处理器让CSS开发体验有了巨大的提升,但是单靠这些工具还不足以解决维护大型项目CSS代码的问题。为了解决这个问题,人们编写了一些关于如何写CSS的指导方针,通常被称为CSS规范。
在我们深入分析CSS规范前,首先要搞清楚是什么让CSS随着时间推移变得更加难维护,关键点是CSS是全局性的——你定义的每个样式都会全局应用到页面的每个部分,用一个命名约定来保证class名称的唯一性或者有特殊的规则来决定指定样式应用到指定元素。CSS规范提供了一个有组织性的方式来避免大量代码时出现的这些问题,让我们按照时间顺序来看看主流的一些规范吧
OOCSS(面向对象的CSS)是在2009年首次提出的,它是围绕两个原则建立的规范。第一个原则是结构和样式分离,这意味着定义结构(布局)的CSS不应该和定义样式(颜色、字体等)的CSS混杂在一起,这样我们就可以很简单的为一个应用定义新的皮肤了;第二个原则是容器和内容分离,把元素看成是一个可重用的对象,关键核心点是一个对象不管用在页面的任何位置都应该看起来是相同的。
OOCSS提供了成熟的指导规范,但是对于具体的执行规范并没有明确指出。后来出现的SMACSS采用了它的核心概念,并且添加了更多的细节,使用起来更简单了。
SMACSS(可扩展模块化架构的CSS)是在2011年出现的一种设计模式,它将CSS分为5个不同的类别——基本规范、布局规范、模块、状态规范和样式规范。SMACSS也有一些推荐的命名规则,对于布局规范使用l- 或者layout- 作为前缀;对于状态规范,使用is-hidden 或者is-collapsed 作为前缀。
相比OOCSS,SMACSS有了更多细节上的规范,但是CSS规则该划分为哪一类别的规范中,这是个需要仔细考虑的问题。后来出现的BEM对这一方面进行了改进,让它更易使用了。
BEM (block, element, modifier) is a specification that appeared in 2010. Its idea mainly revolves around dividing the user interface into independent blocks. A block is a reusable component (for example, a form search can be defined like this <form class="search-form"></form>). Elements are part of a block and cannot be separated. Reuse (such as buttons in form search, <button class="search-form__button">Search</button>), modifiers are entities that define the appearance, state, or behavior of a block or element ( For example, to disable the search button, it is defined as <button class="search-form__button search-form__button--disabled">Search</button>).
BEM's specifications are easy to understand, and the naming rules are also friendly to novices. The disadvantage is that the class name may be very long, and it does not follow traditional naming conventions. The later emergence of Atomic CSS took this unconventional approach to a new level.
Atomic CSS (also known as functional CSS) is a specification that emerged in 2014. Its idea is to create small classes with single functions based on visual methods. This specification is completely opposite to OOCSS, SMACSS and BEM - it does not regard the elements on the page as reusable objects. Atomic CSS ignores these objects and each element uses a reusable single-function class style. gather. Therefore, something like <button class="search-form__button">Search</button> is replaced with this writing <button class="f6 br3 ph3 pv2 white bg-purple hover-bg-light-purple">Search</button>
If your first reaction when you see this example is to recoil in fear, it doesn't matter. You are not the only one who thinks this way. ——Many people believe that this approach completely violates CSS best practices, but there has also been a series of fascinating discussions about the application of this controversial specification in different scenarios. This article clearly analyzes the traditional separation idea that CSS depends on HTML creation (even using specifications like BEM), while the Atomic approach is that HTML depends on CSS creation. Both are correct, but think about it carefully. You will find that the idea of complete separation of CSS and HTML cannot be realized.
Other CSS design patterns, such as CSS in JS, actually include the idea of interdependence between CSS and HTML, which has also become one of the most controversial design specifications.
CSS in JS is a design pattern launched in 2014. Its core idea is to write CSS directly into the respective components instead of separate style files. This method was introduced in the React framework, first using inline styles, and later evolved into using JavaScript to generate CSS and then inserting it into the style tag of the page.
CSS in JS once again violates the best practices of separation in CSS, mainly because the web has changed a lot over time. Originally the web was mostly static sites - where it made sense to separate HTML content and CSS presentation - but now most applications are built for the dynamic web - where reusable components make even more sense .
The goal of CSS in JS design is to define independent components with clear boundaries that contain their own HTML/CSS/JS and are not affected by other components. React was the first framework to adopt this idea, and it later influenced other frameworks such as Angular, Ember and Vue.js. It should be noted that the CSS in JS pattern is relatively new, and developers are constantly experimenting with CSS best practices when developing web application components.
The variety of design patterns can easily overwhelm you, but the most important thing to remember is that there is no silver bullet.
This is modern CSS in a nutshell. We introduced the basic CSS layout styles, floating layout, flexbox and grid layout, learned about the new syntax provided by the CSS preprocessor for CSS, such as variables and mixins, and also learned about the conversion functions of the CSS postprocessor, such as adding vendors to CSS. prefix, and use some design patterns of CSS to overcome some of the problems of global CSS. We don’t have time to dig into more other features of CSS here. CSS coverage is too broad – anyone who says it’s simple probably only knows a little about it!
Related recommendations:
Detailed explanation of new usage of CSS selector
[Course]CSS 4.2.4 Reference Manual
Han Shunping div css basic video tutorial courseware source code
The above is the detailed content of CSS change history. For more information, please follow other related articles on the PHP Chinese website!


