The following article provides an outline for Drag and Drop in HTML. Drag and Drop is the latest feature well-known for manually providing input in web pages due to its convenient functional pattern. The drag and drop method can be described as the process when a user selects a specific data/ option from the list of items in the source field, drag the same, and drop it in the destination field. It is implemented using Document Object Model, along with multiple mouse events from the HTML web page. The various events used in this feature are a drag, dragstart, dragleave, dragenter, dragover, drop, dragend and drag exit.
There are multiple events included in the latest drag and drop (dnd) functionality; let’s see one by one as follows:
| Sr. No | Events | Details Description |
| 1 | Drag | To drag entity(element or text) when the mouse is moved with the element to be dragged. |
| 2 | Dragstart | The very first step in drag and drop is dragstart. It gets executed when the user is going to start with dragging the object to the required location. |
| 3 | Dragenter | Dragenter event is used when the mouse is getting hover on the target element. |
| 4 | Dragleave | This event is used when the user releases a mouse from an element. |
| 5 | Dragover | This event occurs when a mouse is used to over an element. |
| 6 | Drop | This event is used at the end of the drag and drop process for drop element operation. |
| 7 | Dragend | This is one of the most important event in this process for releasing the mouse button from the element to complete the drag procedure. |
| 8 | Dragexit | This event status that the element is no longer in the drag process of urgent target selection of element. |
ドラッグ アンド ドロップ操作が行われるデータ属性をいくつか見てみましょう:
ドラッグ アンド ドロップの構文を定義するいくつかの手順を次に示します。
ドラッグするオブジェクトを選択します: 属性を true に設定します。
<element draggable="true">
オブジェクトのドラッグ開始:
function dragStart(ev){}オブジェクトをドロップします:
function dragDrop(ev){}次の例は、ドラッグ アンド ドロップ操作が HTML でどのように正確に実行されるかを示します。
コード:
<html>
<head>
<title>Drag and Drop Demo</title>
<script>
function allowDrop(ev) {
ev.preventDefault();
}
function dragStart(ev) {
ev.dataTransfer.setData("text", ev.target.id);
}
function dragDrop(ev) {
ev.preventDefault();
var data = ev.dataTransfer.getData("text");
ev.target.appendChild(document.getElementById(data));
}
</script>
<style>
#box {
margin: auto;
width: 30%;
width: 21%;
height:150px;
border: 2px solid blue;
padding: 2px;
}
#square1, #square2, #square3 {
float: left;
margin: 5px;
padding: 10px;
}
#square1 {
width: 30px;
height: 30px;
background-color: #BEA7CC;
}
#square2 {
width: 60px;
height: 60px;
background-color: #B5D5F5;
}
#square3 {
width: 90px;
height: 90px;
background-color:#F5B5C5 ;
}
h2 {
font-size:20px;
font-weight:bold;
text-align:center;
}
</style>
</head>
<body>
<h2>HTML DRAG AND DROP DEMO</h2>
<div id = "box">
<div id="square1" draggable="true"ondragstart="dragStart(event)"></div>
<div id="square2" draggable="true"ondragstart="dragStart(event)"></div>
<div id="square3" ondrop="dragDrop(event)" ondragover="allowDrop(event)"></div>
</div>
</body>
</html>出力:
ドラッグ アンド ドロップする前、オプションの出力は次のようになります:

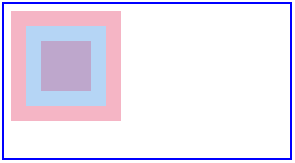
ドラッグ アンド ドロップ操作を実行すると、出力は次のようになります:

ここでは、以下のコードに示すように、画像をある場所から別の指定された場所に移動する別の例を見ていきます。
コード:
<!DOCTYPE HTML>
<html>
<head>
<script>
function allowDrop(ev) {
ev.preventDefault();
}
function dragStart(ev) {
ev.dataTransfer.setData("text", ev.target.id);
}
function dragDrop(ev) {
ev.preventDefault();
var data = ev.dataTransfer.getData("text");
ev.target.appendChild(document.getElementById(data));
}
</script>
<style>
.divfirst {
width: 250px;
height: 150px;
padding: 10px;
border: 1px solid black;
background-color: #F5F5F5;
}
p {
font-size:20px;
font-weight:bold;
}
</style>
</head>
<body>
<p>Image Drag and Drop Demo</p>
<div class="divfirst" ondrop="dragDrop(event)" ondragover="allowDrop(event)">
<img id="drag1"
src="Jerry.jpeg" draggable="true"
ondragstart="dragStart(event)" width="250" height="150"></div>
<br>
<div     class= "divfirst"ondrop="dragDrop(event)"
ondragover="allowDrop(event)"></div>
</body>
</html>出力:
ドラッグ アンド ドロップ操作前の出力は次のとおりです:

ドラッグ アンド ドロップ操作が完了すると、次のようになります。

この例では、指定した場所にファイルをドラッグ アンド ドロップする方法を見ていきます。
コード:
<body>
<div id="filedemo" style="min-height: 150px; border: 1px solid black;"
ondragenter="document.getElementById('output').textContent = ''; event.stopPropagation(); event.preventDefault();"
ondragover="event.stopPropagation(); event.preventDefault();"
ondrop="event.stopPropagation(); event.preventDefault();
dodrop(event);">
DROP FILES HERE...
</div>
<script>
function dodrop(event)
{
var dt = event.dataTransfer;
var files = dt.files;
for (var i = 0; i < files.length; i++) {
output(" File " + i + ":\n(" + (typeof files[i]) + ") : <" + files[i] + " > " +
files[i].name + " " );
}
}
function output(text)
{
document.getElementById("filedemo").textContent += text;
}
</script>
</body>出力:

HTML ドラッグ アンド ドロップは、コピー、削除、記録などのさまざまな目的に使用される最も重要なユーザー インターフェイス エンティティの 1 つです。上記のように、さまざまなイベントや属性に対して機能します。オブジェクトを選択し、指定された場所にドロップすると、操作が実行されます。
The above is the detailed content of Drag and Drop in HTML. For more information, please follow other related articles on the PHP Chinese website!


