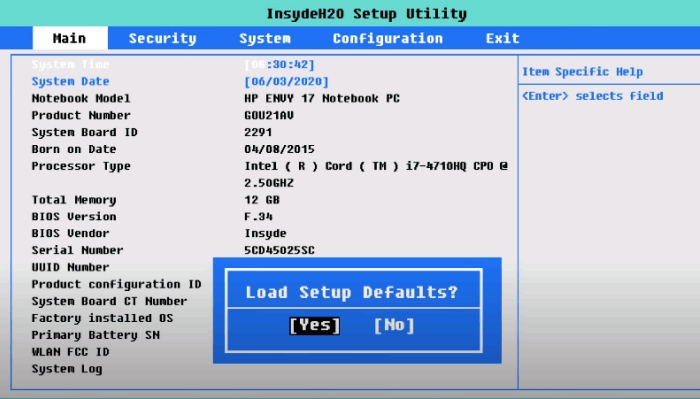
Want to reset BIOS password or remove the forgotten BIOS password on HP? Resetting the BIOS settings is a good way to solve these problems. In this guide, we will show you how to reset all BIOS settings (including the BIOS admin/user password) and remove the forggten BIOS password.
At certain times, you may find it necessary to reset your BIOS settings. The procedure can also be used to diagnose or address other hardware issues and to perform a BIOS password reset when you're having trouble booting up.
We assume that you have the BIOS administrator password and can enter the BIOS setup, then do the following:
Turn on the computer and immediately press the ESC key to display the Startup Menu, and then press the F10 to enter BIOS Setup. If the system has a BIOS administrator password, enter the password at the prompt.
On the BIOS Setup screen, press the F9 to load Setup Defaults. Then select Yes to restore the default settings.

Different motherboards have varying options. You can also reset BIOS in the Security tab. To do like this: Select the Security menu, select Restore Security Settings to Factory Defaults, and then select Yes to restore security level defaults. The computer will reboot.

Don't forget to Save and Exit when you're finished.
All UEFI-based HP laptops are a built-in utility called HP SpareKey that can help you recover lost system passwords, such as power-on, drive lock, or BIOS passwords. When setting up SpareKey, you will be prompted to provide answers to three personal identification questions.

If you've set up the SpareKey, you can follow these simple steps to remove HP Elitebook BIOS password.
Step 1: Turn on your computer and immediately press the ESC key to display the Startup Menu, and then press F10 to enter BIOS Setup. This should prompt for BIOS password. Type the password that you might have set and press Enter key.

Step 2: After typing the incorrect BIOS password three times, you'll be presented with the screen prompting you to press F7 for HP SpareKey Recovery. Press F7 key, the HP SpareKey wizard pops up and prompts you for the answers to the three personal identification questions.

If you successfully answer the questions, you are granted access and you can reset the BIOS password.
If you do not answer the questions correctly in the three attempts, you will be locked out of your computer. And then you can try the following solution, followed by contacting HP for assistance.
Temporarily remove the CMOS battery will be able to reset the BIOS and BIOS password will be removed. To reset the CMOS on the mainboard, do the following:
Step 1: Turn off the computer, and then unplug the power cable from your computer.
Step 2: Remove the laptop casing. Flip the laptop over. Use the screwdriver to remove the screws holding the laptop casing in place. Remove the casing once you've unscrewed it.
Step 3: Remove the removable battery.
Step 4: Remove the the CMOS battery.
The CMOS battery is shiny and round. It looks like a button or coin, and it's usually placed within a small holding socket. Before removing the CMOS battery, make sure to take note of the battery's orientation so you know which way to put in the new one.

Step 5: After removing the battery, wait several minutes (at least five minutes).
Step 6: Reconnect or reinstall the CMOS battery, and then re-assemble the computer. Plug in the power cable as needed, and then turn on the computer. The computer resets and allows access to the BIOS.
If you forget the original BIOS password, try to restore BIOS by below steps:
Step 1: Turn off the computer. Unplug the power cable and remove all connections.
Step 2: With your computer still turned off and unplugged, remove your computer's cover.
Step 3: Locate the password jumper on the motherboard, look for the letters PWD, PSWD, PSWDCLR, CLEAR CMOS, CLEAR, CLR, JCMOS1 or PASSWORD. The jumper is typically located on the edge of the motherboard or physically near the CMOS battery.
Step 4: To remove the BIOS password, you will need to change the jumper settings.
If there are 3 pins under the jumper, change CLRTC jumper from default value [2-3] to [1-2] for aorund 5-10 seconds. Then, switch jumper back to [2-3].

If there are only 2 pins pins are on CLRTC, please touch two pin feet for around 5-10 seconds by conductor like screwdriver at the status of shutdown with power cable removed.
Step 5: Put the CMOS battery back in and close the case.
Step 6: Re-connect the power and boot the device, press Delete to enter BIOS for setting. The BIOS password should be cleared.
The above is the detailed content of How to Reset or Remove BIOS Password on HP Notebook. For more information, please follow other related articles on the PHP Chinese website!


