How to Enable or Disable the SmartScreen Filter in Windows 10 & 11

WBOY
Release: 2024-06-14 12:49:17
Original
463 people have browsed it

Microsoft Defender SmartScreen is part of the Windows Security solution. It helps you protect against common threats by warning against downloading or installing potentially malicious files from other computers.

SmartScreen is enabled by default in Windows. However, sometimes, you may want to disable the feature if it identifies and blocks genuine apps and files as malicious. Fortunately, you can disable SmartScreen easily. Here, we show you how to disable the SmartScreen filter in Windows.

How Does Windows SmartScreen Filter Work?

SmartScreen relies on reputation-based protection to protect your device from malicious or potentially unwanted apps and websites.

When enabled, SmartScreen screens your downloads against known suspicious sites and developers. When a match is found, it blocks the download or site access and warns the user about the action taken.

You can configure it to block apps and files by checking unrecognized apps and files from the web. It can also protect you from Microsoft Store and third-party sourced apps that are low on reputation and known to cause unexpected behavior.

SmartScreen is also part of Microsoft Edge's security settings. When enabled, it helps protect your computer against malicious and phishing sites and block downloads.

SmartScreen is enabled by default on all the Windows OS running systems. However, some experienced users may find the feature annoying as it can block safe apps, requiring additional steps to run the setup.

While we recommend you always turn the SmartScreen filter on, you can disable it easily from the Windows Security settings. Here's how to do it.

1. How to Turn Off SmartScreen Using Windows' Security Settings

The easiest way to turn off SmartScreen is via the Windows Settings panel. You can configure all the aspects of your system security from the Windows Security panel. Here's how to do it.

  1. Press Win + I to open Settings.
  2. Open the Privacy and Security tab in the left pane.
  3. Click on Windows Security.How to Enable or Disable the SmartScreen Filter in Windows 10 & 11
  4. Next, click on Open Windows Security.How to Enable or Disable the SmartScreen Filter in Windows 10 & 11
  5. Open the App & browser control tab in the left pane.
  6. Click on Reputation-based protection settings under Reputation-based protection.How to Enable or Disable the SmartScreen Filter in Windows 10 & 11
  7. Here, you'll find four different SmartScreen filters you can individually enable or disable. If you want to turn off the filter for files and executables, turn off Check apps and files and Potentially unwanted app blocking filters. The other two filters are for Microsoft Edge and Microsoft Store apps.How to Enable or Disable the SmartScreen Filter in Windows 10 & 11
  8. If you want to turn off SmartScreen completely, disable all four filters.

When you have difficulty accessing the Windows Security window, refer to our troubleshooting guide to fix a blank Windows security screen.

If any of the SmartScreen filters are grayed out with the message "this setting is managed by your administrator," you must contact your administrator or try another method.

2. How to Disable SmartScreen for Microsoft Edge

How to Enable or Disable the SmartScreen Filter in Windows 10 & 11

Microsoft Edge has a built-in option to enable and disable Microsoft Defender SmartScreen. Here's how to access it:

  1. Launch Microsoft Edge and click the three-dots menu icon in the top right corner.
  2. Click on Settings.
  3. Open the Privacy, search, and services tab in the left pane.
  4. Scroll down to the Security section.
  5. Toggle the switch for Microsoft Defender SmartScreen to turn it off. This will disable the Block potentially unwanted apps option as well.
  6. If you choose to enable SmartScreen again, you must manually enable the Block potentially unwanted apps feature.

Additionally, you can disable SmartScreen for Microsoft Edge using the Windows Security app and Registry Editor. Here’s how to do it.

Disable Microsoft Edge SmartScreen Using Windows Security

Microsoft Edge SmartScreen is for your browsing safety against phishing and malware sites and software you download. Unless an administrator manages it, you can turn it off.

  1. Press Win + R to open Run.
  2. Type windowsdefender:// and click OK to open the Windows Security app.How to Enable or Disable the SmartScreen Filter in Windows 10 & 11
  3. Open the App & browser control tab in the left pane.
  4. Next, click the Reputation-based protection settings link under Reputation-based protection.How to Enable or Disable the SmartScreen Filter in Windows 10 & 11
  5. Toggle the switch for SmartScreen for Microsoft Edge to turn off Microsoft Defender SmartScreen for the Edge browser.

Disable SmartScreen for Microsoft Edge Using Registry Editor

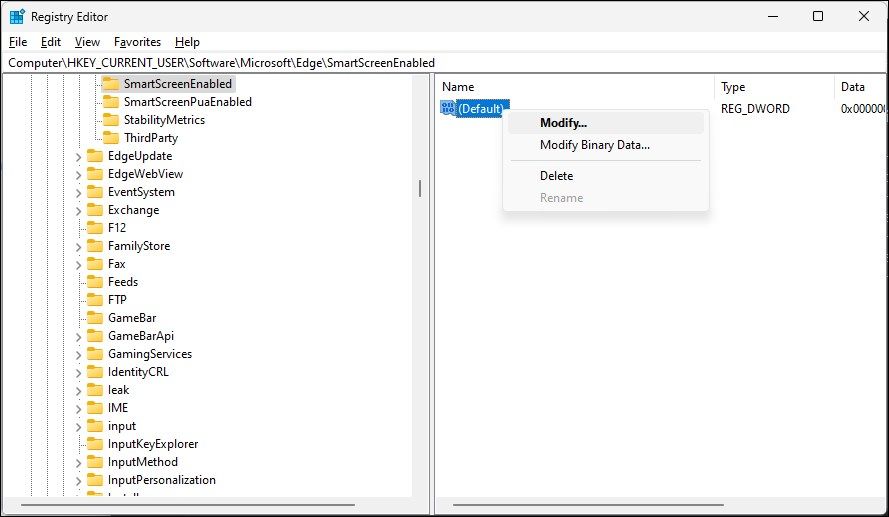
Editing the registry entry is an alternative (but more complicated) method to disable the SmartScreen for the Edge browser permanently.

  1. Press Win + R to open Run.
  2. Type regedit and click OK to open Registry Editor.
  3. Next, navigate to the following location:
    HKEY_CURRENT_USER\Software\Microsoft\Edge\SmartScreenEnabled 
    Copy after login
  4. In the right pane, right-click on the Default value and select Modify.How to Enable or Disable the SmartScreen Filter in Windows 10 & 11
  5. Type 1 in the Value data field and click OK to save the changes.How to Enable or Disable the SmartScreen Filter in Windows 10 & 11
  6. You may need to restart your computer to see the changes live.

3. How to Turn Off Windows Defender SmartScreen Using Internet Properties

You can turn on or off Windows Defender SmartScreen using the Internet Properties dialog in Windows 10. Also known as Internet Options, it lets you configure security and access settings, add-ons, Active-X controls, and more.

Follow these steps to turn off SmartScreen using Internet Options:

  1. Press Win + R to open Run.
  2. Type control and click OK to open the Control Panel.
  3. Click on Network and Internet.How to Enable or Disable the SmartScreen Filter in Windows 10 & 11
  4. Next, click on Internet Options.
  5. In the Internet Properties window, open the Advanced tab.How to Enable or Disable the SmartScreen Filter in Windows 10 & 11
  6. Scroll down to the Security section.How to Enable or Disable the SmartScreen Filter in Windows 10 & 11
  7. Uncheck the Enable Windows Defender SmartScreen option.
  8. Click Apply and OK to save the changes.

On a newer version of Windows, including Windows 11, you may not find any option to enable or disable Windows Defender SmartScreen in Internet Properties.

4. How to Enable or Disable SmartScreen Using Registry Editor

You can also turn the Windows Defender SmartScreen on or off using the Registry Editor. Useful if you cannot access it from the Settings app or Internet Properties.

Note that incorrect modification to the registry entries can cause system malfunction. Therefore, create a restore point before proceeding with the steps below.

  1. Press Win + R to open Run.
  2. Type regedit and click OK to open the Registry Editor. Click Yes if prompted by UAC to grant administrative privilege.
  3. In the Registry Editor, navigate to the following location:
    HKEY_LOCAL_MACHINE\SOFTWARE\Policies\Microsoft\Windows\System
    Copy after login
  4. In the right pane, locate the EnableSmartScreen filter value. You will need to create a new value if no value is found.How to Enable or Disable the SmartScreen Filter in Windows 10 & 11
  5. To create a new value, right-click on the System key and select New > DWORD (32-bit) Value.
  1. Rename the value as EnableSmartScreen.
  2. Next, right-click on the EnableSmartScreen value and select Modify.How to Enable or Disable the SmartScreen Filter in Windows 10 & 11
  3. Type 0 in the Value data field and click OK to save the changes.
  4. To enable the SmartScreen filter, type 1 in the Value data field and click OK.
  5. Close the Registry Editor and restart your PC to apply the changes.

You can further tweak the registry to create a new String Value to set the blocking level to Warn or Block. Using Warn will show a SmartScreen warning with an option to proceed. In contrast, the Block option will show a warning and block the app from running on your computer.

To set a new ShellSmartScreenLevel String Value in Registry Editor:

  1. Right-click on the System subkey and select New > String Value. Rename the value as ShellSmartScreenLevel. How to Enable or Disable the SmartScreen Filter in Windows 10 & 11
  2. Next, right-click on ShellSmartScreenLevel and select Modify.;How to Enable or Disable the SmartScreen Filter in Windows 10 & 11
  3. Type Warn or Block depending on what you want the SmartScreen Level to do. Click OK to save the changes and exit Registry Editor.

5. How to Turn the SmartScreen Filter On or Off Using the Group Policy Editor

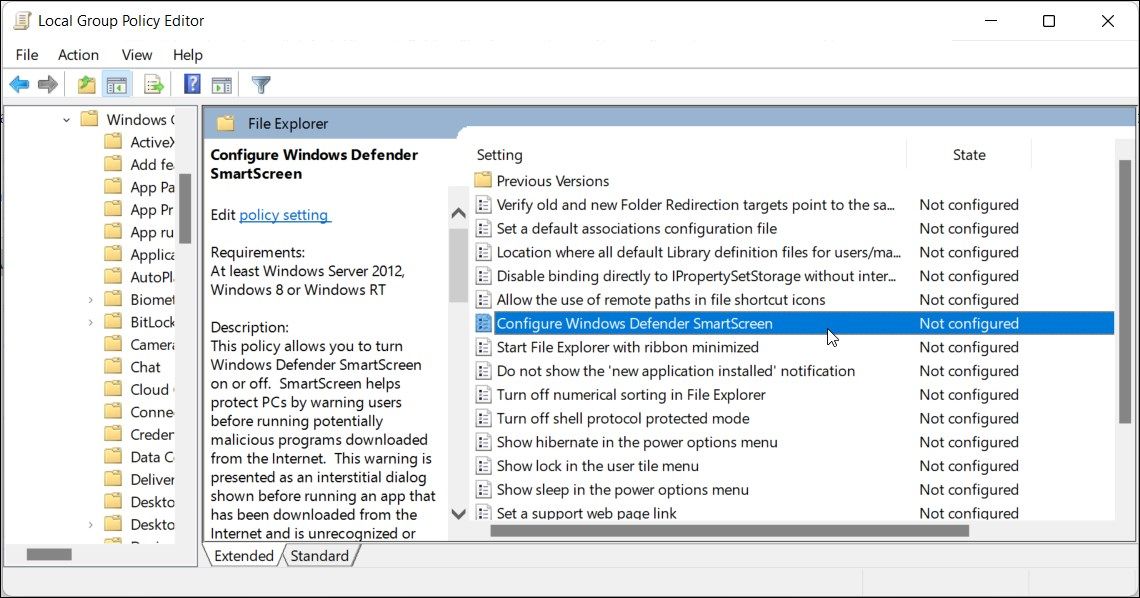
If you want to manage the SmartScreen filter for multiple computers at your organization, you can use the Group Policy Editor to do this task.

Note that Group Policy Editor is only available on Windows Pro, Edu, and Enterprise editions of the OS. If you are using Home, explore our guide to enable Group Policy Editor on the Windows Home edition.

To configure the SmartScreen filter using GPEdit:

  1. Press Win + R to open Run.
  2. Type gpedit.msc and click OK to open the Group Policy Editor.
  3. Next, navigate to the following location in Group Policy Editor:
    Computer Configuration > Administrative Templates > Windows Components > File Explorer. 
    Copy after login
  4. In the right pane, right-click on Configure Windows Defender SmartScreen policy and select Edit.How to Enable or Disable the SmartScreen Filter in Windows 10 & 11
  5. To disable SmartScreen, select Disabled.
  6. If you want to enable SmartScreen, select Not Configured or Enabled.How to Enable or Disable the SmartScreen Filter in Windows 10 & 11
  7. Click Apply and OK to save the changes.
  8. Close Group Policy Editor and restart your PC.

Manage the SmartScreen Filter in Windows

While you can easily disable the SmartScreen filter in Windows, it is an extremely useful security tool. It can protect you against malicious files and programs and screen and block suspicious sites. It's an added layer of protection to Windows Defender and helps keep your PC safe. Make sure to enable the SmartScreen filter once the task is finished.

The above is the detailed content of How to Enable or Disable the SmartScreen Filter in Windows 10 & 11. For more information, please follow other related articles on the PHP Chinese website!

source:makeuseof.com
Statement of this Website
The content of this article is voluntarily contributed by netizens, and the copyright belongs to the original author. This site does not assume corresponding legal responsibility. If you find any content suspected of plagiarism or infringement, please contact admin@php.cn
Popular Tutorials
More>
Latest Downloads
More>
Web Effects
Website Source Code
Website Materials
Front End Template
About us Disclaimer Sitemap
php.cn:Public welfare online PHP training,Help PHP learners grow quickly!