Found a total of 63 related content
How to solve the problem that the system installed from USB disk cannot enter the boot interface. How to enter the boot interface after installing the system from USB disk
Article Introduction:Nowadays, many users use USB flash drives to install the system. We need to enter the boot interface to install normally, but many people cannot enter or do not know how to enter. In response to this situation, many users do not know how to operate. , this software tutorial will share the specific operation steps with the majority of users. Users in need can come to the PHP Chinese website to get the complete method. How to solve the problem that the U disk cannot enter the boot interface when installing the system: Note: If you want to enter the PE interface when booting, you must first set the U disk as the first startup item. 1. Use the corresponding shortcut keys to enter the BIOS interface when turning on the computer. 2. Under the BOOT menu of BIO, change Secure Boot to Disabled. 3. Continue
2024-09-09
comment 0
528

How to delete WPS network disk in win10 How to delete WPS network disk in win10
Article Introduction:Many friends have WPS installed on their computers, and then they will see the WPS network disk. Many people want to delete this thing, but don't know how to fix it. In fact, we can use software or registry to delete it. This Win10 tutorial will share with you the specific steps on how to delete the WPS network disk. I hope this article on the PHP Chinese website can help more people solve the problem. How to delete WPS network disk in win10 Method 1: 1. Right-click the WPS network disk icon in the taskbar below and select "Settings" in the upper option to open it. 2. Click "WPS Network Disk" on the left side of the interface, find the "Show WPS Network Disk Entry on My Computer" option, and turn on the switch on the right side of it. Method two: 1. Shortcut key "win R", while running
2024-09-12
comment 0
605
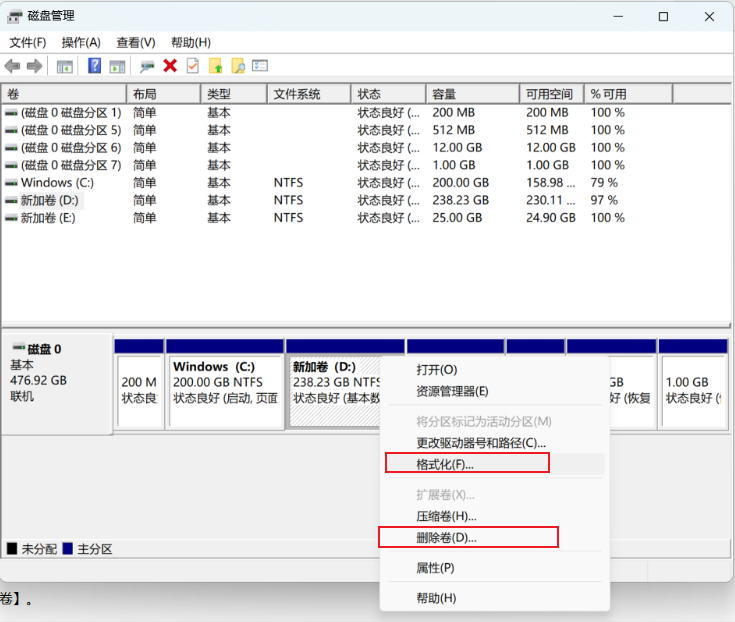
How to change the volume size in win11 How to change the volume in win11
Article Introduction:Splitting the win11 system into volumes allows the system disk to be re-partitioned, thus solving the problem of insufficient disk space in some parts of win11. This is a question many users have. However, for ordinary users, the steps of splitting into volumes are too troublesome. So how do you change the volume size in win11? As for the operation, the editor will show you how to change the volume in win11. 1. First log in to the desktop of the win11 system, right-click the computer icon, and click Manage. 2. In the computer management window that opens, click Disk Management to open it. 3. Then use the right mouse button to select the disk c drive to be partitioned, and select the compressed volume to open. 4. At this time, you can get the value of the compression space, then enter the required compression space and click Compress. 5. After prompting that the compression is completed, the system disk
2024-09-14
comment 0
695

How to delete photoshop temporary disk when it is full. How to delete temporary disk in ps
Article Introduction:Photoshop is a picture editing software used by many friends. During the use process, some users encountered the situation that the temporary disk was full, resulting in some pictures that were subsequently edited unable to be saved successfully. Faced with this problem, many No one knows how to solve it. We only need to clean and delete the temporary disk. In this software tutorial, we will share the specific steps, hoping to help everyone. How to delete the photoshop temporary disk is full: 1. First find the ps software on the desktop and double-click it to open it. 2. After opening the software, click the Edit option in the toolbar. 3. Then click Preferences in the drop-down menu bar that pops up from editing. 4. After selecting the option, go to the submenu of this option.
2024-09-09
comment 0
210
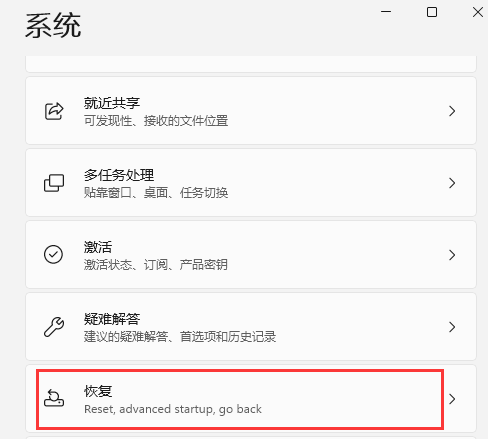
How to turn on safe mode after win11 upgrade How to turn on safe mode after win11 upgrade
Article Introduction:Many people will enter the safe mode of the system for inspection and repair when they encounter system failures. So how do you enable the safe mode when upgrading to win11? In fact, this problem is not difficult. Now the editor will show you how to enable safe mode in win11 upgrade. 1. Open the settings program and select the "Restore" option to enter. 2. After entering, find Advanced Startup and click Restart Now. 3. After restarting the computer, you will automatically enter the menu and click Troubleshooting. 4. Click to enter "Advanced Options". 5. Click "Startup Settings" 6. Then restart. 7. You can use the keyboard to select some startup options. Press 4 to boot into normal safe mode. Press 5 to provide you with safe mode with networking. Press
2024-09-14
comment 0
188
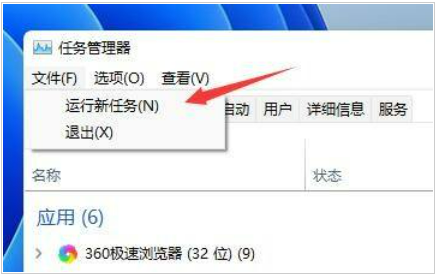
What's the matter with the win11 desktop that keeps refreshing and the splash screen cannot be operated?
Article Introduction:Sometimes when we use win11 system, we will find that the desktop keeps flashing and is completely inoperable. What the hell is going on? We can try to uninstall the latest update, or it may be because there is a problem with the overlaylcon64.dll file. Next, let me tell you in detail the solution to the problem that the Win11 desktop keeps flashing and cannot be operated! The win11 desktop keeps refreshing and the splash screen cannot be operated. Detailed explanation: Method 1: Uninstall updates 1. First, we use the keyboard "ctrl+shift+esc" key combination to open the task manager. 2. After opening, click "File" in the upper left corner and select "Run New Task". 3. Then check the "Create this task with system administrative rights" option and enter "m
2024-09-09
comment 0
987
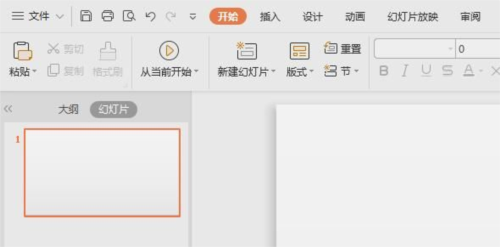
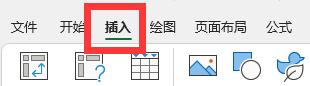
How to make a missing corner rectangle in WPS How to make a missing corner rectangle in WPS
Article Introduction:WPS is an office software used by many people. Users can use its functions to meet their editing needs. Recently, some friends want to know how to make a WPS missing corner rectangle. To solve this problem, today PHP Chinese website The editor is here to share the solution with the majority of users. The following software tutorial in this issue will bring you detailed operation steps. Let’s learn about it together. How to make a missing rectangle with WPS 1. Open WPS. 2. Click Insert. 3. Click the drop-down arrow below the shape. 4. In the pop-up interface, click on the missing corner rectangle. 5. Draw from the upper left corner toward the lower right corner of the document. 6. Then draw a missing rectangle and click on the blank space. 7. The final result is a rectangle with missing corners.
2024-09-14
comment 0
730

Perform file operations in the browser
Article Introduction:When developing WebApp, you may encounter file-related operations, such as uploading files to the server, downloading files to the local, caching files, etc. The following will introduce several different ways to perform file operations.
Tag-based upload and download
The most commonly used method of uploading files is to use the input tag. By setting the input tag's type="file", you can allow users to select files locally for upload.
function InputFile() {
const [file, setFile] = useState(null);
2024-09-19
comment 0
926

Sharing tips on operating perpetual contracts in the currency market
Article Introduction:Perpetual contract operating skills include: 1. Use high leverage with caution; 2. Set stop-loss orders; 3. Start with small trading volumes; 4. Focus on fund management; 5. Use limit orders; 6. Consider liquidity; 7 .Use technical indicators; 8. Continuous learning.
2024-09-28
comment 0
507

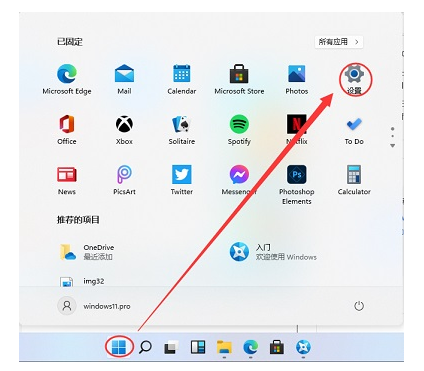
How to clean temporary files in win11 How to delete temporary files in win11
Article Introduction:We have been using the win11 system for a long time, and there will be a lot of temporary files in the C drive. These files take up space, so they need to be cleaned regularly. Many people don't know how to delete these temporary files. This win11 tutorial will teach you how to do it. If you have any friends in need, you can go to the PHP Chinese website to find more detailed steps! How to delete temporary files in win11 1. First open the win11 system desktop, click the start menu icon at the bottom of the desktop, and then select the "Settings" option. 2. Then we find the "Storage" option in the system and click on it. 3. After entering the page, we find the temporary file and click on it to prepare for cleaning. 4. We can see the space occupied by these temporary files and click to delete the files to free up this space.
2024-09-10
comment 0
732
How to restore system through backup in win11 win11 backup and restore operation steps
Article Introduction:Some people who use Win11 system will back up files so that if there is a problem with the computer, they can restore the system through the backup files. However, many people don’t know how to operate it. Today I will share with you the steps of the Win11 tutorial. I hope this article can help more people solve the problem. Win11 backup and restore operation steps 1. First, we find "Settings" in the start menu. 2. Then enter Windows "Update and Security", and then find "Backup" in the left sidebar. 3. Then select "More options" on the right and click "Restore files from current backup".
2024-09-12
comment 0
988

How does WPS search for multiple data at the same time? How does WPS search for multiple data at one time?
Article Introduction:When many friends use WPS to search for data, they only have one. When there is a lot of content to search for, it takes a lot of time to search one by one. We can use settings to search for multiple data at the same time. Many users don’t know what to do. To operate, then in response to this problem, today's software tutorial content will share the specific operation steps with the majority of users. Friends in need are welcome to check out the relevant content on the PHP Chinese website. How to use WPS to search multiple data at one time 1. Call up the search dialog box and use Ctrl F to bring up the search dialog box. 2. Click Options and select options. 3. Click the inverted triangle icon and select the inverted triangle icon on the right side of the worksheet. 4. Select the workbook and click Workbook Options in the drop-down options.
2024-09-14
comment 0
470

How to add new fonts to Word font library How to add new fonts in Word
Article Introduction:Word has its own font library, which contains many commonly used fonts. Many users want to add new fonts, but don’t know how to add them. To solve this problem, today’s software tutorial will share the complete fonts with all users. For operation steps, users in need can come to the PHP Chinese website to get the operation methods. How to add new fonts to the Word font library: 1. First download the font you want to use online and unzip it. 2. After decompression, obtain the font file and copy the file. 3. Then open my computer. 4. Then enter the C: WindowsFonts folder, which is the font folder. 5. Right-click on the blank space and paste the copied font file into it. 6. After pasting it in, you can find it in Word
2024-09-12
comment 0
993

How to re-register wps components wps re-register component operation tutorial
Article Introduction:When we use WPS to edit content, we will use a lot of WPS components, which can quickly help us edit the content. Some components have problems and cannot be used or repaired. The best solution is to re-register the components. It can be restored to use, but many users don’t know how to operate it, so this software tutorial will share the specific operation methods with the majority of users. WPS re-registration component operation tutorial: 1. After entering the application, click the gear settings icon on the side. 2. Then click the Configuration and Repair Tools option in the options below on the settings page. 3. Then click the Advanced button in the pop-up window. 4. At this time, we select the reset repair option in the new window. 5. Finally, we find the re-register component button and click it.
2024-09-09
comment 0
885

How to cancel read-only mode in WPS How to turn off read-only mode in WPS
Article Introduction:Many friends cannot edit the content when using WPS to process documents, and the title of the page shows read-only. When these two words appear, we cannot modify it. We need to cancel the read-only mode. Editor, many users don’t know how to set it up, so today the editor of PHP Chinese website will share the specific operation steps with the majority of users. Friends in need are welcome to check out the content shared in this software tutorial and follow the steps. This problem can be solved. How to turn off the read-only mode of WPS 1. Open the WPS document that needs to be released from the read-only mode. You can see the words "Read-only" at the top of the document. This means that the document is in read-only mode and needs to be released from the read-only mode. Editorial use. 2. We close the
2024-09-14
comment 0
1015

How to add a row to wps table wps table insert a row operation tutorial
Article Introduction:Many friends use wps software at work. Many users are still unfamiliar with editing table contents on the software. Some of them need to add a row after editing, but they don’t know how to do it. For this Question, this software tutorial will answer it for the majority of users. Next, let us take a look at the detailed operation steps. How to add a row to the WPS table: 1. First open the WPS software, and then select the row inside. 2. Then right-click and select Insert from the menu. 3. Then you can join successfully. 4. Similarly, if you want to insert a column, select a column first. 5. Then right-click and select Insert from the menu. 6. Finally, it can be inserted successfully.
2024-09-13
comment 0
856
How to re-enable excel plug-in after it is disabled How to restart the plug-in function in excel
Article Introduction:Many friends use plug-ins to operate when editing tables in Excel. However, many people report that their plug-in functions are disabled and cannot be used. So what should we do to restart and restore? In view of this Problem, since the software tutorial is here to share the solution with the majority of users, let's take a look at the specific steps. How to re-enable the excel plug-in if it is disabled 1. First open excel and click [Insert] on the menu bar. 2. Select the [Icon] next to [My Add-ons] at the bottom of the menu bar and click to enter. 3. Then select [Manage other add-ons] in the drop-down option and click to enter. 4. Find the [excel add-in] at the bottom and click the [icon next to it]
2024-09-09
comment 0
1121
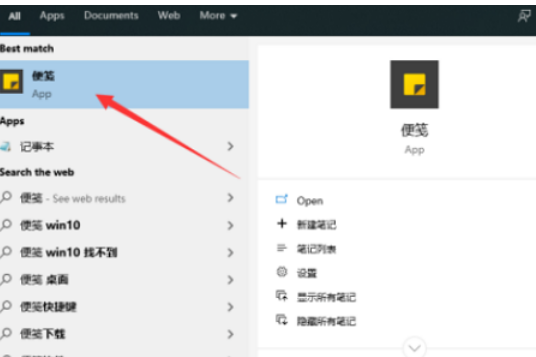
How to add pictures to Win10 Notes Steps to add pictures to Win10 Notes
Article Introduction:Hello everyone! Today I want to share with you how to add pictures to notes on Win10. In fact, the method is very simple. You only need to click the sticky note icon under the taskbar, and then click the picture logo after entering the software. Next, let me introduce this operation step in detail. Steps for adding pictures to notes in win10: 1. Search for notes on the desktop taskbar and enter the software (as shown in the picture). 2. Click the picture icon on the note editing interface (as shown in the picture). 3. Select the picture and click to open (as shown in the picture). 4. The picture in the note is successfully inserted and the editing interface is closed. 5. Return to the note interface and the edited note is saved successfully.
2024-09-12
comment 0
466
How to search devices via Bluetooth in win10 How to search devices via Bluetooth in win10 system
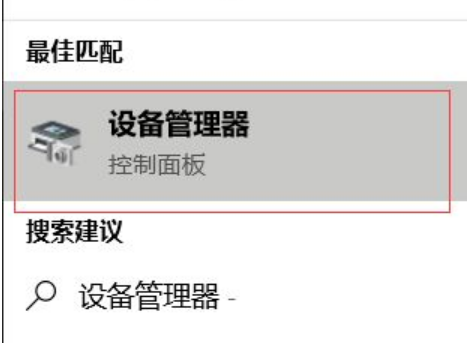
Article Introduction:Nowadays, many things can be connected using Bluetooth, such as mice, keyboards, headphones, etc. Some people using win10 system have turned on the Bluetooth function, but don’t know how to search for device pairing. In fact, as long as you change the settings, you can directly search for what you need to connect. Let’s see how to do it now! How to operate Bluetooth search device in win10 system 1. Enter "Device Manager" in the search box in the lower left corner and open it. 2. Click "Bluetooth" in the given interface, select the "QualcommQCA61x4ABluetooth" Bluetooth driver from the expanded options below, right-click and select "Update Driver". 3. Then open the computer menu bar and click Settings. 4. Click "Device" below "Settings" to enter the new interface.
2024-09-13
comment 0
541
How to set up a web server in win11 How to set up a web server in win11
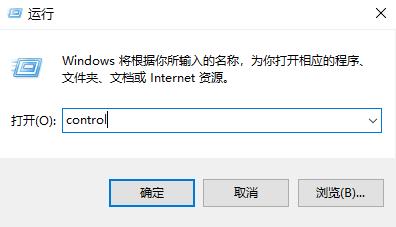
Article Introduction:Many friends who use Win11 system want to set up a Web server on their computer, but they can't do it after following the steps. Because the settings are not turned on, it can't be set up. So how to do it? Today’s Win11 tutorial will solve this problem for you! Interested friends can go to the PHP Chinese website to see the complete operation steps! How to build a web server in win11: 1. Start running with the "win+R" shortcut key, enter "control" and press Enter to open it. 2. After entering the new interface, click the "Programs and Features" option. 3. Then click "Turn Windows features on and off" in the upper left corner. 4. Then find "Web Management Tools" in the window that opens and check the small box. 5. Finally
2024-09-10
comment 0
688
