Found a total of 10000 related content

How to implement multi-level drop-down box linkage in Vue form processing
Article Introduction:How to implement multi-level drop-down box linkage in Vue form processing. When developing front-end applications, forms are one of the indispensable components. In forms, drop-down boxes, as a common selection input method, are often used to implement multi-level selection. This article will teach you how to achieve the linkage effect of multi-level drop-down boxes in Vue. In Vue, linkage of drop-down boxes can be easily achieved through data binding. Let's first look at a simple example. Suppose we have a city selector. The user needs to first select a province, and then based on the selection
2023-08-11
comment 0
2432

How to transfer steam back to the country? Detailed steps to change steam back to the country.
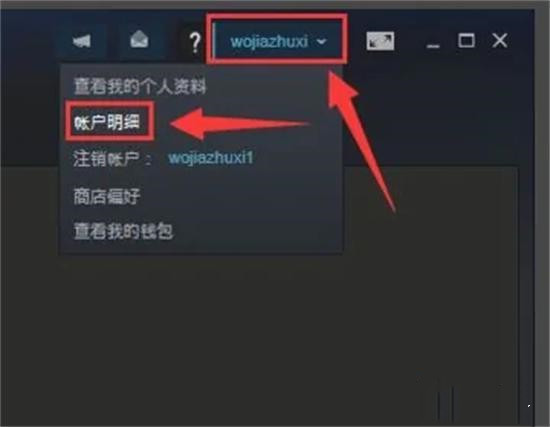
Article Introduction:Everyone should be familiar with the steam game platform. Many players download and purchase their favorite games on it. Some friends want to change back to China after changing regions. How should they do this? In response to this problem, today I will take a look at the steps to change Steam back to the Chinese region. The method is as follows: 1. First open the software and log in to the account. Click the drop-down triangle on the account to expand it and click on the account details. 2. Click Update Store Country/Region. 3. Select the country/region of residence and click the drop-down triangle to expand. Select the current country/region. You cannot choose to click on others. 4. The country/region can only be changed to the location where you currently live. If you cannot choose, click to contact Steam customer service. 5. Then click to contact Steam customer service. 6. Finally select your current residence
2024-07-24
comment 0
706

Detailed introduction to the process of opening the flash plug-in in Google Chrome
Article Introduction:First we open the chrome Google browser. Then we click the small [three] icon in the upper right corner and select the [Settings] option from the drop-down options. Then we enter the settings interface, drag the page scroll bar to the bottom, find the [Show advanced settings] button and click it. At this time, in the advanced settings options, find the privacy settings and click the [Content Settings] button. The content setting information box pops up, find the plug-in column, and click [Manage various plug-ins]. The last step is to pop up a new window of [Plugins], find the flashplayer plug-in, and check the [Always Allow] button.
2024-05-09
comment 0
531

A simple way to edit the minus plus sign in MathType
Article Introduction:Method 1: Directly use the template to open the MathType formula editor and edit the corresponding formula in the work area. When you need to enter a minus sign, select the [Operator] template in the MathType toolbar template, select the minus sign among the symbols listed, and click it. At this time, the minus sign will appear in the work area. Method 2: Insert symbols In the MathType work interface, select [Edit] - [Insert Symbol] under the menu command, and an insert symbol window will pop up. In the insert symbol window, select [Description] in the drop-down menu of [View], pull the scroll bar of the symbol panel below, find the minus plus sign, click it, and then click the [Insert] and [Close] buttons to insert in the work area Minus the plus sign.
2024-04-16
comment 0
508

How to set up secondary drop-down menu in Excel
Article Introduction:How to set up a secondary drop-down menu in excel First, we need to view the original data, which is located in a worksheet. The first line contains the names of provinces and cities, and the following lines contain the names of places and districts under the corresponding provinces and cities. Our goal is to create a linked secondary drop-down menu in columns A and B of another worksheet. First, select all data in the original table (including blank cells) and press F5 or Ctrl+G to bring up the positioning dialog box. Select [Target Criteria] in the lower left corner. 3. Select [Constant] and click the [OK] button. In this way, all non-empty cells are selected. 4. Select [Data]-[Validity]-[Create based on selected content] in the functional area. 5. Since the title is on the first line, select [First Line] as the name, and then click [OK]
2024-01-19
comment 0
3053

How to use Vue to implement multi-level linkage effects
Article Introduction:Overview of how to use Vue to implement multi-level linkage effects: In modern web development, multi-level linkage (also called cascading selection) is a very common interactive effect. It allows the user to dynamically update subordinate options by selecting a superior option. In this article, we will explore how to use the Vue framework to implement a simple multi-level linkage effect and provide specific code examples. Step 1: Create a Vue application First, we need to create a basic Vue application. We can introduce the Vue.js file and add it in the HTML document
2023-09-19
comment 0
1549

how to change xbox store region settings
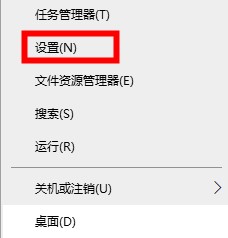
Article Introduction:What should we do when users want to download games from the Xbox store that are not available in our region? In fact, it can be achieved by switching regions through the Xbox Store, so let’s take a look at the tutorial on switching regions in the Xbox Store! Switch the Xbox store region: 1. Click the Start menu - select Settings. 2. On the Windows Settings page - click Time and Language. 3. In the selection area on the pop-up page - in the country and region - click the drop-down menu. 4. Select another country in the drop-down menu. 5. You can see that software and games have been automatically refreshed to other countries and regions.
2024-01-13
comment 0
2498

How to reassemble a Lenovo computer?
Article Introduction:How to reassemble a Lenovo computer? Steps to reinstall the Lenovo computer system: 1. Make a U disk boot disk, and then copy the downloaded Lenovo win7 system iso file directly to the GHO directory of the U disk: 2. Insert the U disk into the Lenovo computer, and keep pressing after restarting F12 or Fn+F12 shortcut key opens the boot menu, select the U disk item and press Enter: 3. Boot from the U disk to enter the main menu, press number 2 or press the up and down arrow keys to select Enter, start the pe system: 4. No partitioning is required For users, please go directly to step 6. If you want to completely repartition, you need to back up all files, then double-click to open it in the PE desktop, right-click the hard disk, and select: 5. Set the number and size of partitions. The primary partition is 35G or more. It is recommended 50G or more, if it is solid state hard drive
2024-05-03
comment 0
647

Detailed steps for Lenovo computer installation?
Article Introduction:Detailed steps for Lenovo computer installation? Steps to reinstall the Lenovo computer system: 1. Make a U disk boot disk, and then copy the downloaded Lenovo win7 system iso file directly to the GHO directory of the U disk: 2. Insert the U disk into the Lenovo computer, and keep pressing after restarting F12 or Fn+F12 shortcut key opens the boot menu, select the U disk item and press Enter: 3. Boot from the U disk to enter the main menu, press number 2 or press the up and down arrow keys to select Enter, start the pe system: 4. No partitioning is required For users, please go directly to step 6. If you want to completely repartition, you need to back up all files, then double-click to open it in the PE desktop, right-click the hard disk, and select: 5. Set the number and size of partitions. The primary partition is 35G or more. It is recommended 50G or more, if it is solid state hard drive
2024-06-01
comment 0
418

How to install Lenovo computer? Detailed steps for Lenovo computer installation?
Article Introduction:How to install Lenovo computer? 1. Before reinstalling the system, first back up the files on the desktop and the c drive to other partitions. 2. Download and install the "Xiaobai One-Click System Reinstallation" software, open it, and select "Create System". 3. Click "Make Local" to install the PE system to a partition other than the c drive, then click "Download to D drive" and confirm. Detailed steps to restart the computer and install Lenovo computer? Steps to reinstall the Lenovo computer system: 1. Make a U disk boot disk, and then copy the downloaded Lenovo win7 system iso file directly to the GHO directory of the U disk: 2. Insert the U disk into the Lenovo computer, and keep pressing after restarting F12 or Fn+F12 shortcut key opens the boot menu, select the U disk item and press Enter: 3. Boot from the U disk to enter the main menu
2024-06-02
comment 0
924

How to set several continuous animations in PPT_How to set several continuous animations for an object in PPT
Article Introduction:Step 1: Draw a rectangular table and a diagonally placed wooden board in PPT, insert a circle on the table, set the filling and other formats as a small ball. Step 2: Select the ball, click the [Animation] tab, click the [Add Animation] button in the [Advanced Animation] group, select [Fly In] in the [Enter] type, and click in the [Animation] group Click [Effect Options], select [From Top] in the pop-up drop-down list, and keep the [Start: On Click] setting unchanged in the [Timing] group. Step 3: Click the [Animation Pane] button in the [Advanced Animation] group to open the animation pane, right-click the animation effect in the animation pane, select [Effect Options] in the drop-down list, and then select Set [Bounce End: 0.25] in the box and click [OK]. fourth
2024-04-17
comment 0
727

MSI motherboard turns off uefi
Article Introduction:The steps to set up UEFI startup. For UEFI startup, you must first place the startup file in the FAT format primary partition, and then specify the startup file under the partition for startup. Just specify "FAT partition\EFI|BOOT|BOOTX6EFI" as the specified file to start the system. The first step is to keep pressing the delete button and then press the power off button. In the second step, select the advanced mode in uefi, then select boot, and click uefionly. The third step is to return to boot, click safe mode, and select uefionly. The fourth step is to press F10 and click the second option. Setting up the boot device in UEFIBIOS is very simple. Here are the specific steps: Step 1: Enter UEFIB
2024-03-24
comment 0
1105

Zenless Zone Zero What to choose for the answer to Cat Mata's Encounter Incident?
Article Introduction:What should we choose in the Zero Zone Zero Nekomata Encounter Incident? What are the specific steps to complete it? Depending on our choice, it will promote the development of the plot and also affect the change of trust. If we choose the wrong one, we will not be able to proceed to the next step. Here is what we will tell you Provides a list of selected answers to the Zero Zone Nekomata encounter incident. List of answers to the Zero Zone Nekomata Encounter Incident Event 1: [Hide and Seek] Time: Morning Location: Liufen Street - Grocery Store (Vending Machine) Select ""Nekomata-sama is the best in the world"" → Increase trust or trigger another One option, select "Wait a minute, how do you hide in three seconds" → Increase trustworthiness Event 2: [Limited Edition Toy] Time: Morning Location: Liufen Street - Toy Store Select "Buy!" → Significantly increase trustworthiness, select "Still Think about it again. ” → Trust-enhancing event 3: [ Coffee
2024-08-16
comment 0
640

Mac mobile hard disk cannot be divided into disks (mac system mobile hard disk does not read the disk)
Article Introduction:Introduction: This article is here to introduce you to the relevant content about the Mac mobile hard disk that cannot be divided into disks. I hope it will be helpful to you, let’s take a look. After Mac is upgraded to 10.11.1, how to partition the mobile hard drive on Mac? Open Launchpad, select other folders, and enter Disk Utility. Select the USB flash drive or hard drive to be formatted and click Erase. Select the desired format and click the Erase button to format the disk. After opening Disk Utility, select the inserted mobile hard drive. Click "Partitions" in the right tab and select "3 Partitions" in the partition layout. Now three partitions will be displayed on the left. You need to select each partition in turn and set the partition, format and size on the right. I set it up as follows
2024-02-15
comment 0
723

How to change win11 to win10
Article Introduction:Confirmation: You can downgrade Windows 11 to Windows 10. Steps: Check compliance (Windows 11 installed, within 10 days, Windows 10 license available). Create Windows 10 installation media (use a media creation tool or download the ISO file directly). Start Windows 10 Setup (insert media, boot from media). Select language and region. Select "Install Now". Enter the license key (if applicable). Select Custom Installation. Select a partition. finish installation.
2024-04-17
comment 0
639

How does King's Camp view historical season rankings? -How to invite friends to form a team in the King's Camp?
Article Introduction:1. Open the home page of the King’s Camp and click the “Achievements” button at the bottom. Find More Options in the toolbar and click the Current Season drop-down button. Select "All Seasons" and confirm. 3. Scroll down the page to view historical season ranks. 1. Two people need to download King’s Camp. 2. Enter the software and select the chat button. 3. Then select the contact Dida in the upper right corner. 4. Don’t be in a hurry to match. Click Customize to set the rank and branch of the person you want to match. 5. You can match, and everyone in QQ and WeChat areas is available. 6. After matching with the person, just add a contact information and ask him to help you make friends. Both parties can only make friends in their own area.
2024-03-18
comment 0
879

How to cut the amazon app into the United States How to cut the amazon app into the United States
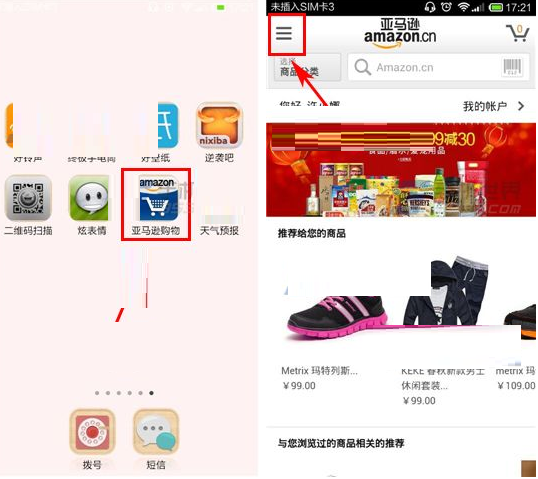
Article Introduction:1) Open [Amazon Mobile] and click the three bars [three] in the upper left corner of the homepage to jump to the menu bar. (As shown below) Use your finger to slide the menu bar up to the bottom, find the [Change Country] option, click on it, select a [Region] to switch to the local mall, the switching process will take a long time and you need to wait patiently. (As shown below)
2024-06-26
comment 0
411

Detailed tutorial on inputting less than sign in MathType
Article Introduction:Operation method 1. Select to open MathType in Insert Symbols. You will find that there are no such simple mathematical symbols on the main interface of the software. You don’t need to worry about finding them. They are actually in the Insert Symbols panel. The specific operation is as follows: Edit menu, click the [Edit] menu in the upper menu bar, select the [Insert Symbol] command in the drop-down option, this will open the Insert Symbol dialog box, select [Font], [Symbol], and Range under View above Select [All known characters], use the mouse to scroll down the right scroll bar, and you will see the less than sign. Click the mouse once, click the [Insert] button on the right, and you can enter the less than sign in the formula editing area. Operation method two: Use the computer keyboard to input when using MathType to edit formulas.
2024-04-16
comment 0
576

Word2010 tutorial: How to insert an updateable picture link into the document
Article Introduction:How to insert an updateable picture link in a Word2010 document. Step 1. Open the Word2010 document window and click the "Picture" button in the "Illustrations" group of the "Insert" ribbon. Click the "Picture" button. Step 2, select the picture to be inserted into the Word2010 document in the "Insert Picture" dialog box that opens. Then click the drop-down triangle button to the right of the "Insert" button and select the "Insert and Link" command. Select the "Insert and Link" command and the selected picture will be inserted into the Word2010 document. When the original picture content changes (the file has not been moved or renamed), reopen the Word2010 document and you will see that the picture has been updated (must close all Reprint the Word2010 document
2024-01-14
comment 0
962


