This article will help you continue learning angular, taking Tooltip as an example to learn about custom instructions, I hope it will be helpful to everyone!

In the previous article, we have given an overview of Angular related content. In the part of custom instructions, we have been able to write them, but in actual scenarios, we still need standardized management.
Angular is an upgraded version of Angular.js. [Related tutorial recommendations: "angular tutorial"]
So, in this article, we will use Tooltip to explain the content of custom instructions.
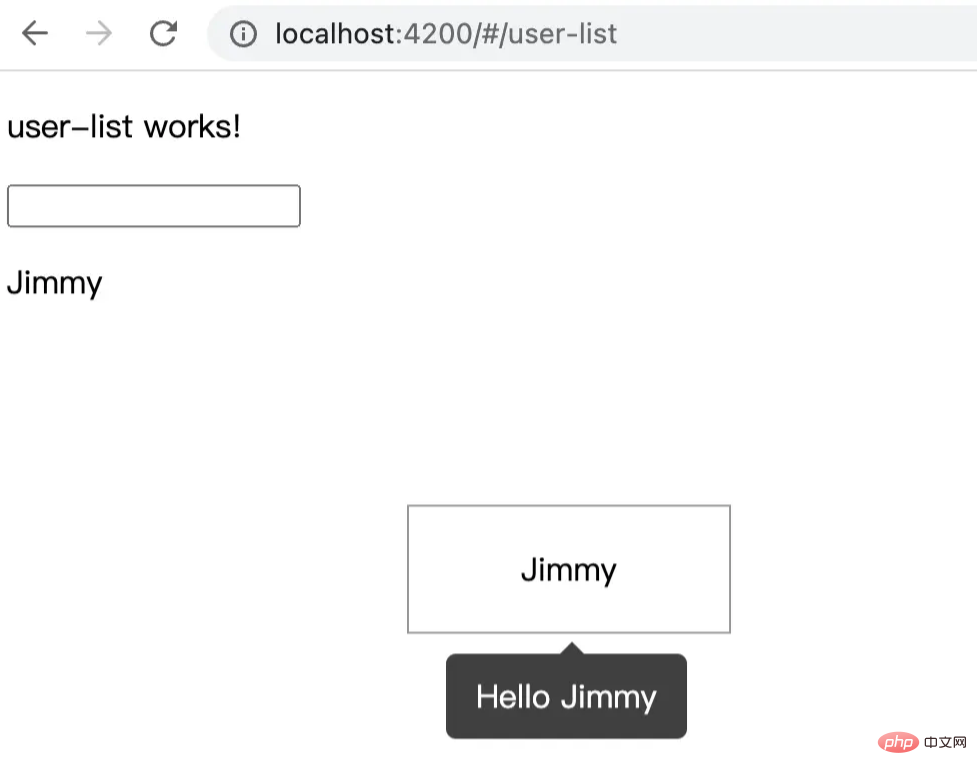
Online renderings, as follows:

Directory structure
is above Based on the code project implemented in an article, execute the command line:
# 进入 directives 文件夹
$ cd directives

# 创建 tooltip 文件夹
$ mkdir tooltip

# 进入 tooltip 文件夹
$ cd tooltip

# 创建 tooltip 组件
$ ng generate component tooltip

# 创建 tooltip 指令
$ ng generate directive tooltip
After executing the above command line, you will get the file directory structure of app/directive/tooltip as follows:
tooltip
├── tooltip                                           // tooltip 组件
│    ├── user-list.component.html                     // 页面骨架
│    ├── user-list.component.scss                     // 页面独有样式
│    ├── user-list.component.spec.ts                  // 测试文件
│    └── user-list.component.ts                       // javascript 文件
├── tooltip.directive.spec.ts                         // 测试文件
└── tooltip.directive.ts                              // 指令文件
Well, here I put the components at the same level as tooltip, mainly to facilitate management. Of course, this varies from person to person, you can put it in the public components components folder.
Write tooltip component
In the html file, there are:
<div class="caret"></div>
<div class="tooltip-content">{{data.content}}</div>In the style file .scss, there are:
$black: #000000;
$white: #ffffff;
$caret-size: 6px;
$tooltip-bg: transparentize($black, 0.25); // transparentize 是 sass 的语法
$grid-gutter-width: 30px;
$body-bg-color: $white;
$app-anim-time: 200ms;
$app-anim-curve: ease-out;
$std-border-radius: 5px;
$zindex-max: 100;

// :host 伪类选择器,给组件元素本身设置样式
:host {
  position: fixed;
  padding: $grid-gutter-width/3 $grid-gutter-width/2;
  background-color: $tooltip-bg;
  color: $body-bg-color;
  opacity: 0;
  transition: all $app-anim-time $app-anim-curve;
  text-align: center;
  border-radius: $std-border-radius;
  z-index: $zindex-max;
}

.caret { // 脱字符
  width: 0;
  height: 0;
  border-left: 6px solid transparent;
  border-right: 6px solid transparent;
  border-bottom: 6px solid $tooltip-bg;
  position: absolute;
  top: -$caret-size;
  left: 50%;
  margin-left: -$caret-size/2;
  border-bottom-color: $tooltip-bg;
}Well~,
cssis a magical thing, I will arrange an article to explain it latersassRelated content...
Then, in the javascript file tooltip.component.ts the content is as follows:
import {
  Component,
  ElementRef, // 元素指向
  HostBinding,
  OnDestroy,
  OnInit
} from '@angular/core';

@Component({
  selector: 'app-tooltip', // 标识符,表明我这个组件叫做啥,这里是 app-tooltip
  templateUrl: './tooltip.component.html', // 本组件的骨架
  styleUrls: ['./tooltip.component.scss'] // 本组件的私有样式
})
export class TooltipComponent implements OnInit {

  public data: any; // 在 directive 上赋值
  private displayTimeOut:any;

  // 组件本身 host 绑定相关的装饰器
  @HostBinding('style.top')  hostStyleTop!: string;
  @HostBinding('style.left') hostStyleLeft!: string;
  @HostBinding('style.opacity') hostStyleOpacity!: string;

  constructor(
    private elementRef: ElementRef
  ) { }

  ngOnInit(): void {
    this.hostStyleTop = this.data.elementPosition.bottom + 'px';

    if(this.displayTimeOut) {
      clearTimeout(this.displayTimeOut)
    }

    this.displayTimeOut = setTimeout((_: any) => {
      // 这里计算 tooltip 距离左侧的距离,这里计算公式是:tooltip.left + 目标元素的.width - (tooltip.width/2)
      this.hostStyleLeft = this.data.elementPosition.left + this.data.element.clientWidth / 2 - this.elementRef.nativeElement.clientWidth / 2 + 'px'
      this.hostStyleOpacity = '1';
      this.hostStyleTop = this.data.elementPosition.bottom + 10 + 'px'
    }, 500)
  }


  // 组件销毁
  ngOnDestroy() {
    // 组件销毁后,清除定时器,防止内存泄露
    if(this.displayTimeOut) {
      clearTimeout(this.displayTimeOut)
    }
  }
}Writing tooltip instructions
This is the focus of this article. I will mark the specific instructions on the code~
Related filestooltip.directive.ts The content is as follows:
import {
ApplicationRef, // 全局性调用检测
ComponentFactoryResolver, // 创建组件对象
ComponentRef, // 组件实例的关联和指引,指向 ComponentFactory 创建的元素
Directive, ElementRef,
EmbeddedViewRef, // EmbeddedViewRef 继承于 ViewRef,用于表示模板元素中定义的 UI 元素。
HostListener, // DOM 事件监听
Injector, // 依赖注入
Input
} from '@angular/core';
import { TooltipComponent } from './tooltip/tooltip.component';
@Directive({
selector: '[appTooltip]'
})
export class TooltipDirective {
@Input("appTooltip") appTooltip!: string;
private componentRef!: ComponentRef<TooltipComponent>;
// 获取目标元素的相关位置,比如 left, right, top, bottom
get elementPosition() {
return this.elementRef.nativeElement.getBoundingClientRect();
}
constructor(
protected elementRef: ElementRef,
protected appRef: ApplicationRef,
protected componentFactoryResolver: ComponentFactoryResolver,
protected injector: Injector
) { }
// 创建 tooltip
protected createTooltip() {
this.componentRef = this.componentFactoryResolver
.resolveComponentFactory(TooltipComponent) // 绑定 tooltip 组件
.create(this.injector);
this.componentRef.instance.data = { // 绑定 data 数据
content: this.appTooltip,
element: this.elementRef.nativeElement,
elementPosition: this.elementPosition
}
this.appRef.attachView(this.componentRef.hostView); // 添加视图
const domElem = (this.componentRef.hostView as EmbeddedViewRef<any>).rootNodes[0] as HTMLElement;
document.body.appendChild(domElem);
}
// 删除 tooltip
protected destroyTooltip() {
if(this.componentRef) {
this.appRef.detachView(this.componentRef.hostView); // 移除视图
this.componentRef.destroy();
}
}
// 监听鼠标移入
@HostListener('mouseover')
OnEnter() {
this.createTooltip();
}
// 监听鼠标移出
@HostListener('mouseout')
OnOut() {
this.destroyTooltip();
}
}At this point, 99% functions have been completed. Now we can call it on the page. Call
on the page
We add the following content on user-list.component.html:
<p style="margin-top: 100px;">
<!-- [appTooltip]="'Hello Jimmy'" 是重点 -->
<span
[appTooltip]="'Hello Jimmy'"
style="margin-left: 200px; width: 160px; text-align: center; padding: 20px 0; display: inline-block; border: 1px solid #999;"
>Jimmy</span>
</p>TooltipDirective We have declared this directive on app.module.ts, we can call it directly. The current effect is as follows:

The tooltip we implemented is a bottom-centered display, which is what we usually use the framework, such as angular ant design# The bottom attribute of tooltip in ##. For other attributes, if readers are interested, they can be expanded.
Introduction to Programming! !
The above is the detailed content of Angular learning using Tooltip as an example to understand custom instructions. For more information, please follow other related articles on the PHP Chinese website!