Windows 11 PE creation tool Win10XPE
The Windows 11 PE production tool Win10XPE, carefully recommended by php editor Yuzai, can help users quickly create personalized Windows 11 PE systems. This tool integrates a variety of practical tools and functions to provide users with convenient system maintenance and fault repair functions. Through Win10XPE, users can easily create a portable and efficient Windows 11 PE system to respond to various system problems and emergencies conveniently and quickly. Let us learn how to use this powerful tool to create your own Windows 11 PE system!
The Windows 11 PE produced using this program on my computer does not have Chinese input method and network driver. If you need these functions, please see: Win10XPE New Chinese Input Method, Win10XPE Installation Driver.
1. Link to the download website and click "Win10XPE_2022-01-07 Package".
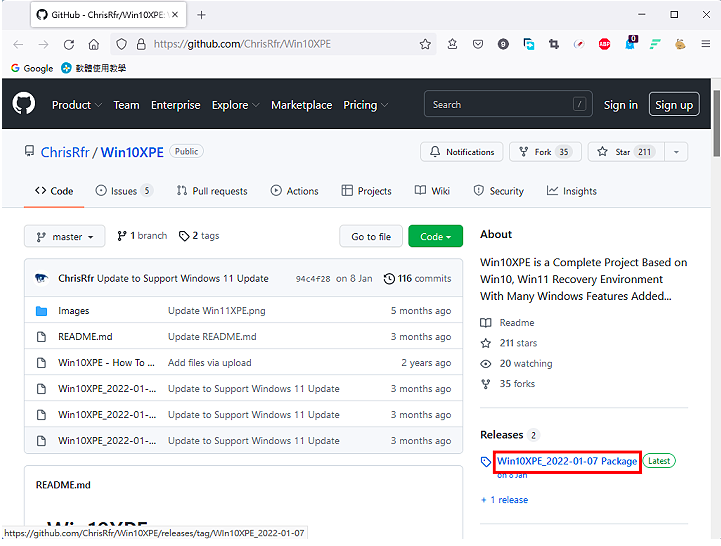 2. Click "Source code (zip)".
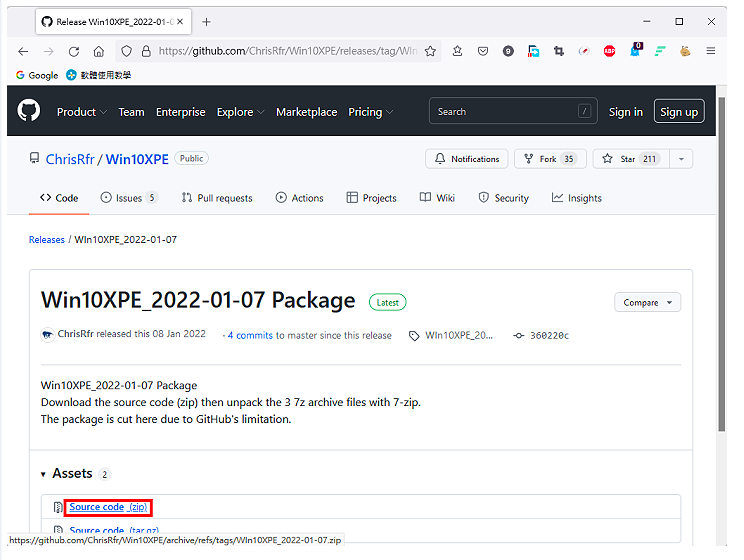
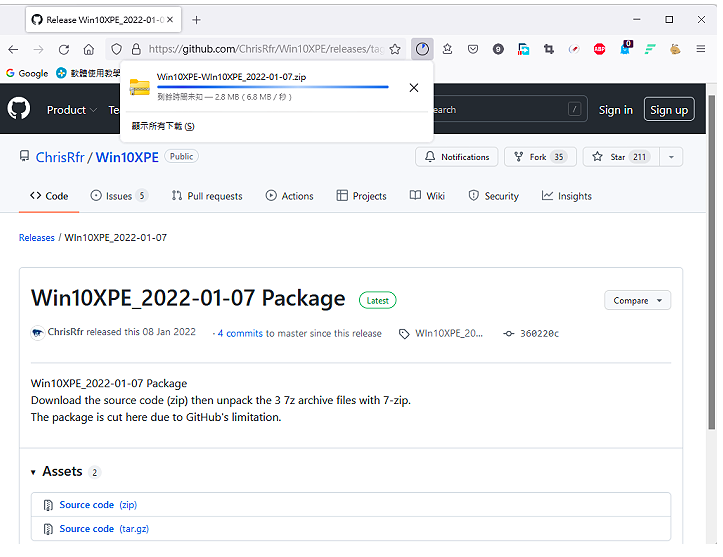
3. The file is being downloaded, as shown in the picture below.
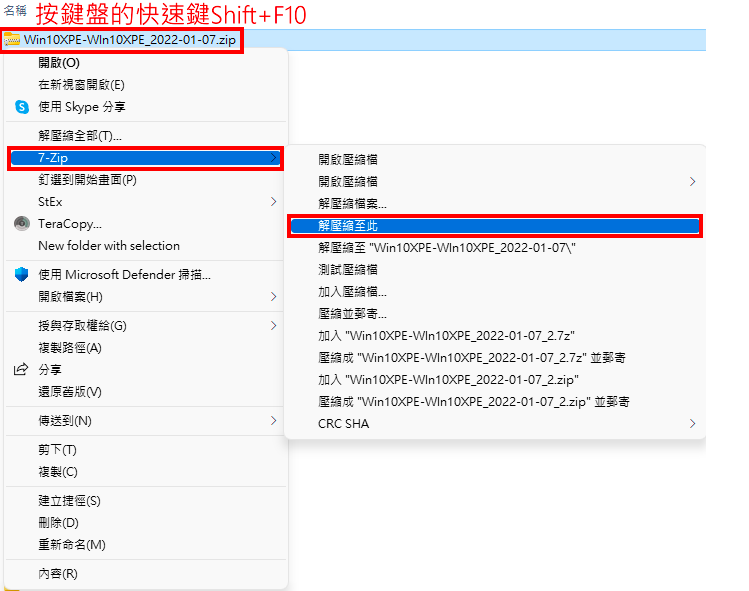
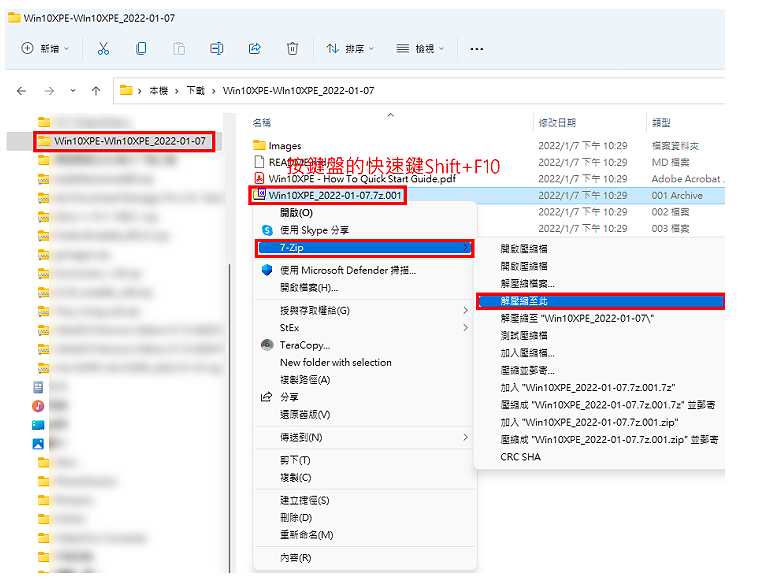
#4. After the download is completed, open File Explorer, select the file, and press the keyboard shortcut Shift F10 to display the quick menu (Windows 10 can also right-click the mouse) ), click "7-Zip", select "Extract here" to decompress the file. For details on the installation and use of the compression and decompression software 7-Zip, please refer to the free compression and decompression software 7-Zip download, installation and settings, and use 7-Zip to compress and decompress files.
5. After decompression is complete, select the file Win10XPE_202-01-07.7z.001 and press the keyboard shortcut Shift F10 to display the quick menu (Windows 10 also You can right-click the mouse and click "7-Zip\Extract here" to decompress the file.
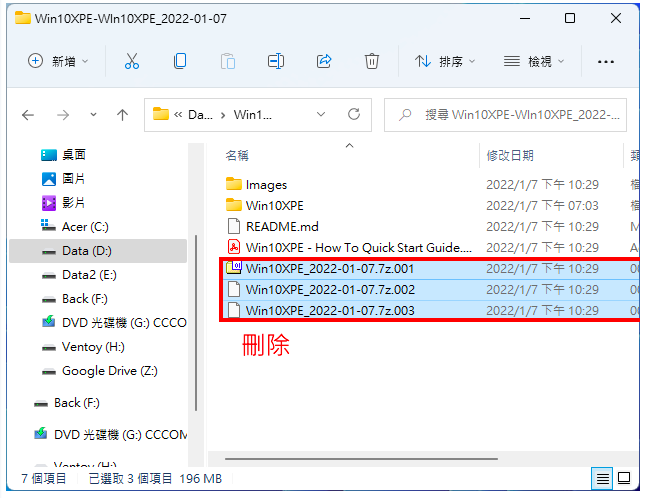
6. After decompression is complete, select and delete "Win10XPE_202-01-07.7z.001- Win10XPE_202-01-07.7z.003" to save hard disk space .
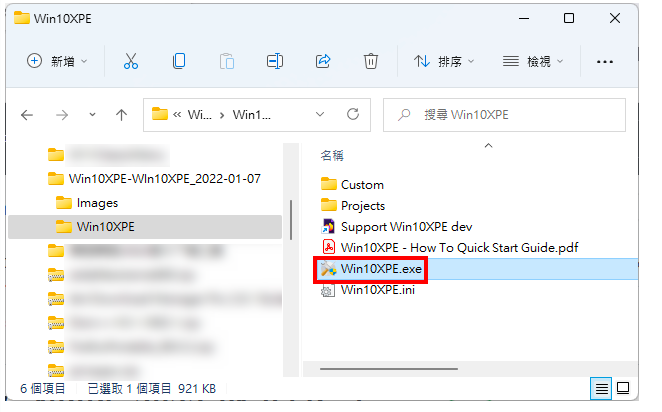
7. Click the left mouse button twice on the file Win10XPE.exe in the Win10XPE folder to open the Windows 10 PE creation program.
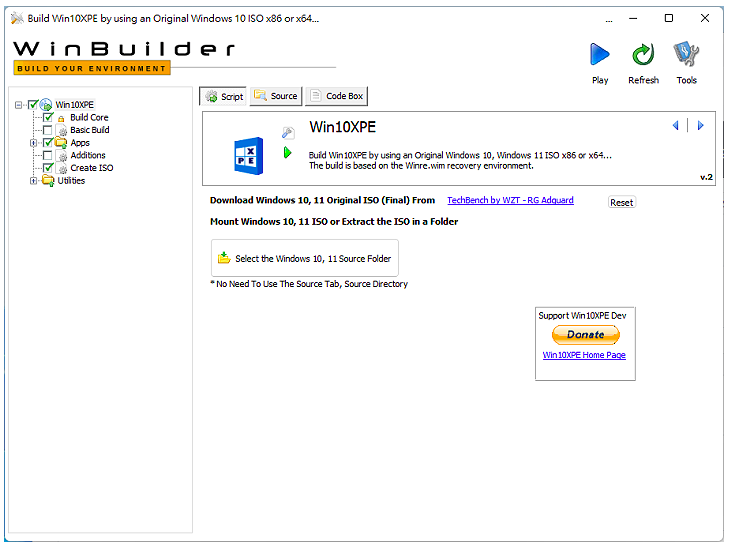
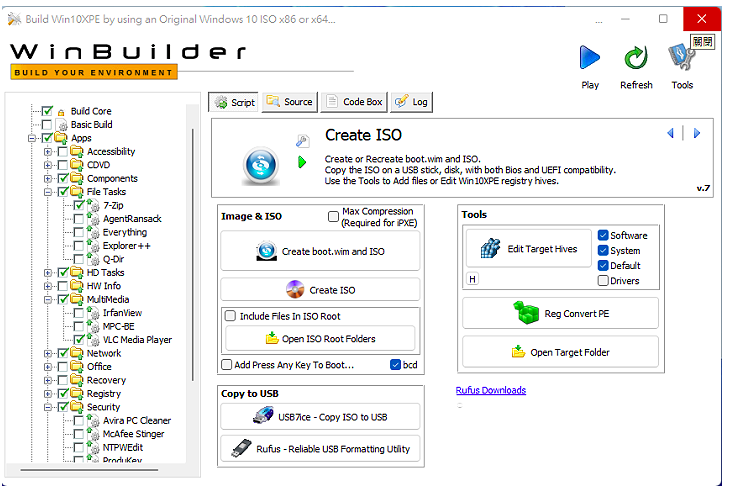
#8. The opened program is as shown below.
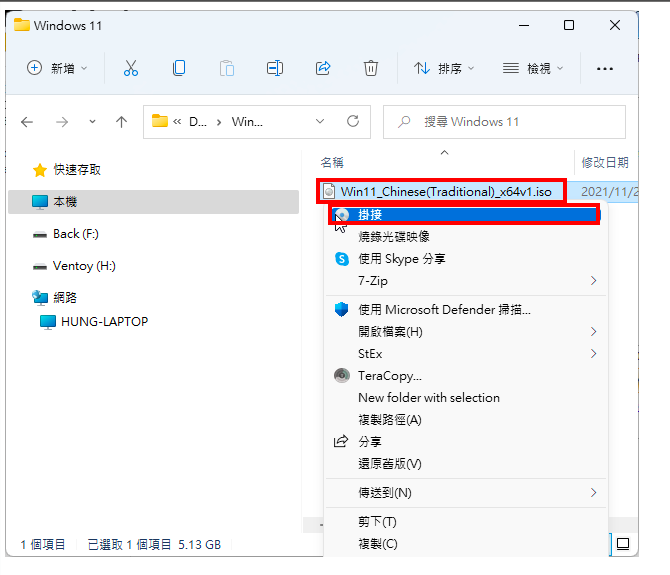
9. Right-click the Windows 11 disc image file in File Explorer and click "Mount" to mount the image file as a virtual disc. For details on downloading disc image files, see: Microsoft Windows and Office ISO Download Tool.
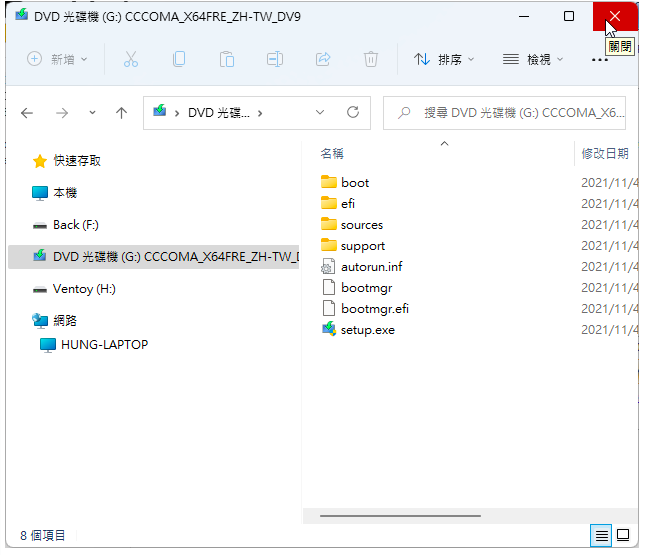
#10. The CD image file has been mounted, as shown in the figure below.
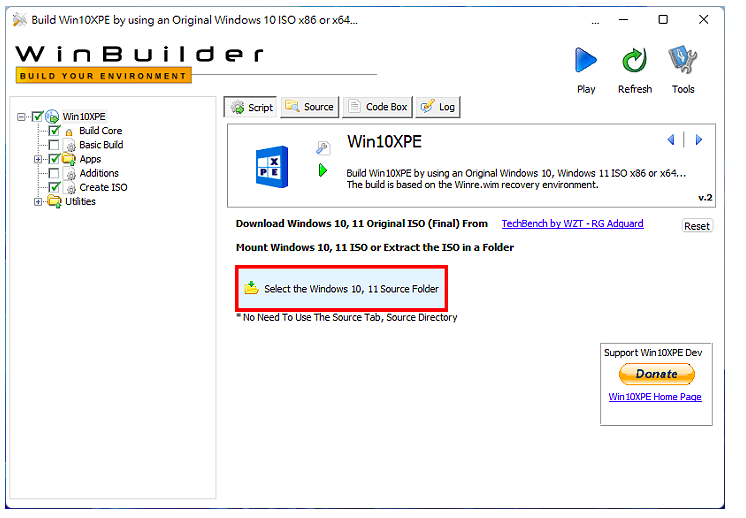
11. Click "Select the Windows 10, 11 Source Folder".
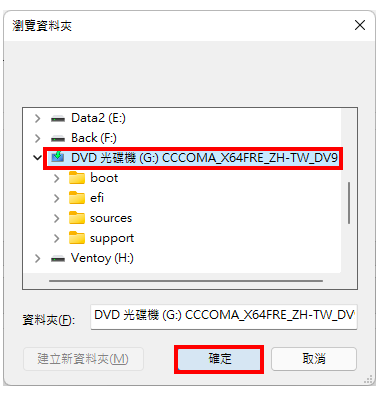
12. Select the Windows 11 virtual disc and click "OK".
#13. Choose the version of Windows 11 according to your personal needs.
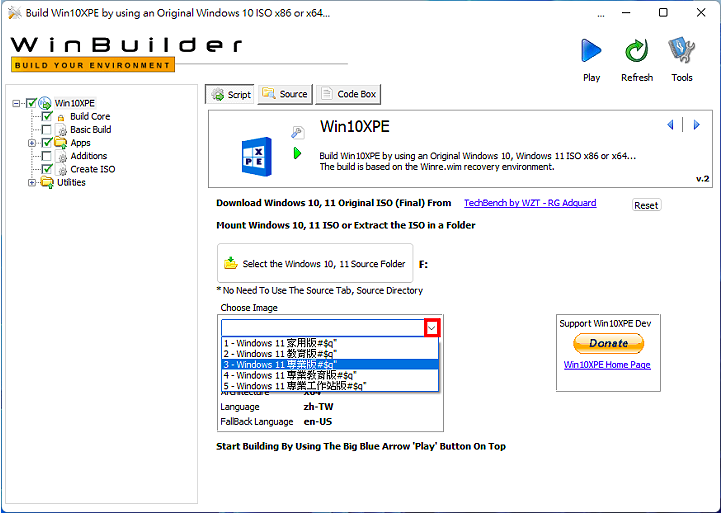
14. Click "Build Core".
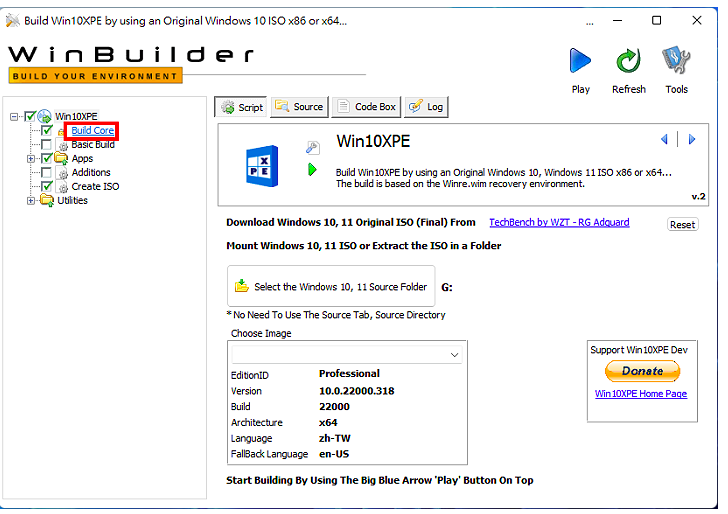
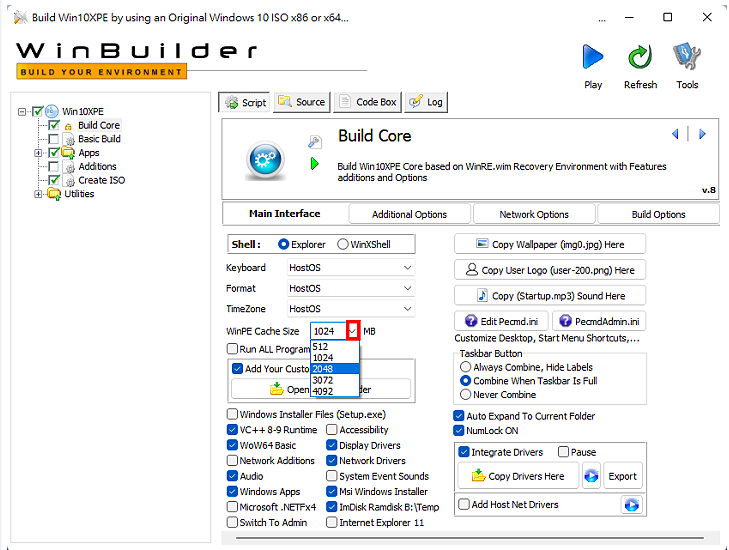
#15. Select the cache size according to your own needs.
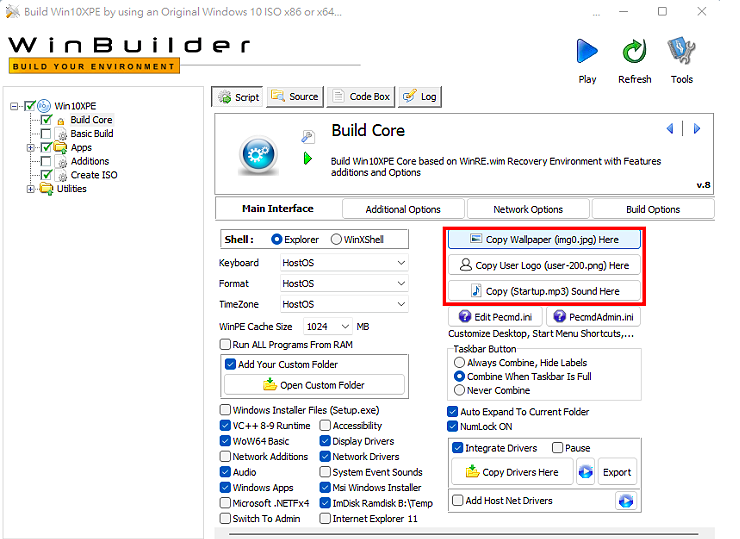
#16. According to personal needs, you can choose desktop background, personal logo and startup music.
17. Expand Apps.
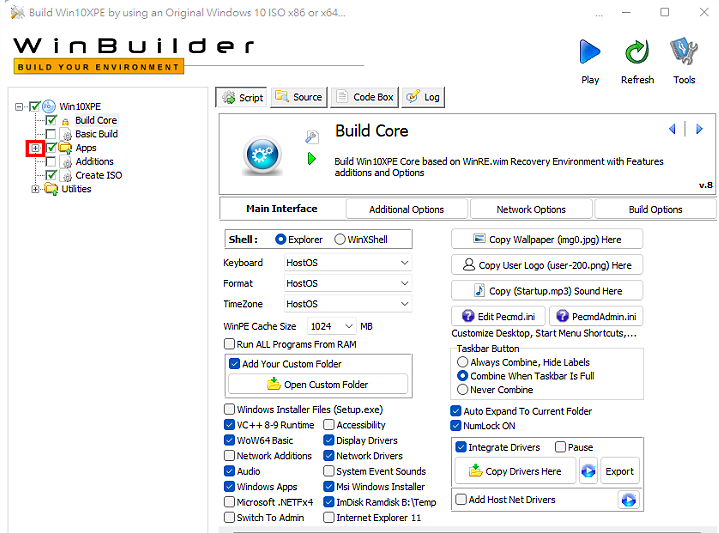
#18. According to your own needs, check the required program. If there is a language option, select Chinese Traditional. Click "Download" to download the Traditional Chinese version. The same is true if you want to use Google Chrome browser settings.
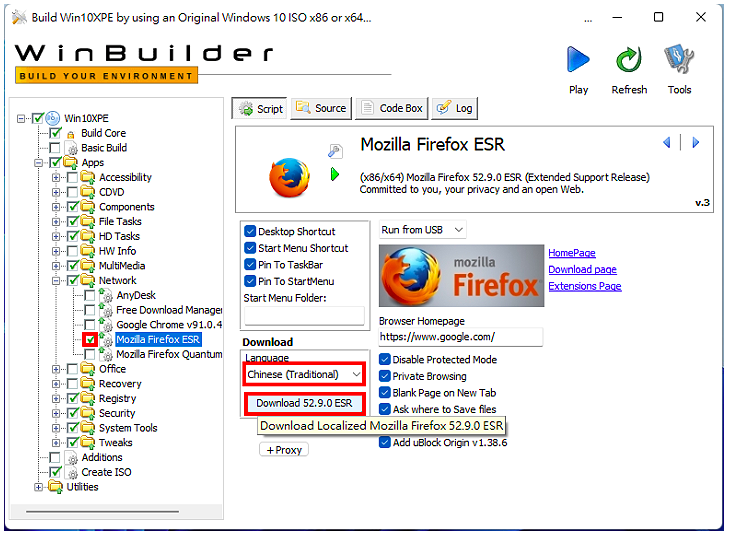
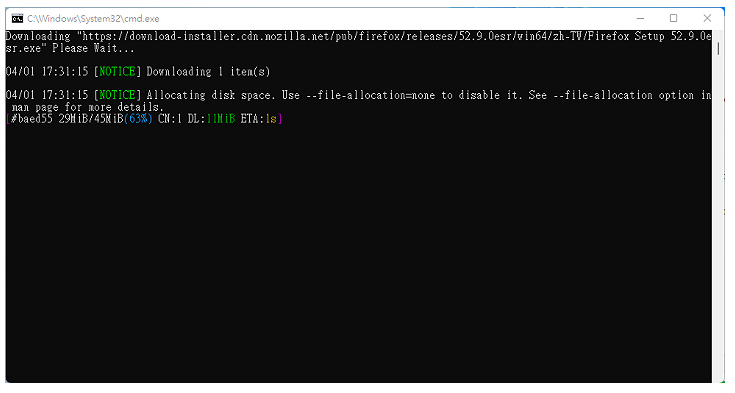
19. Downloading the Traditional Chinese version of Firefox.
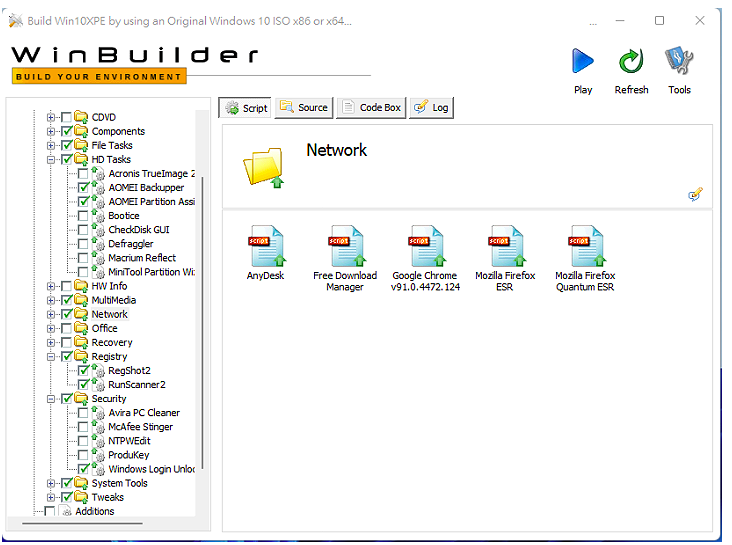
20. Continue to check other applications.
21. Check "Create ISO" and select "Create boot.wim and ISO".
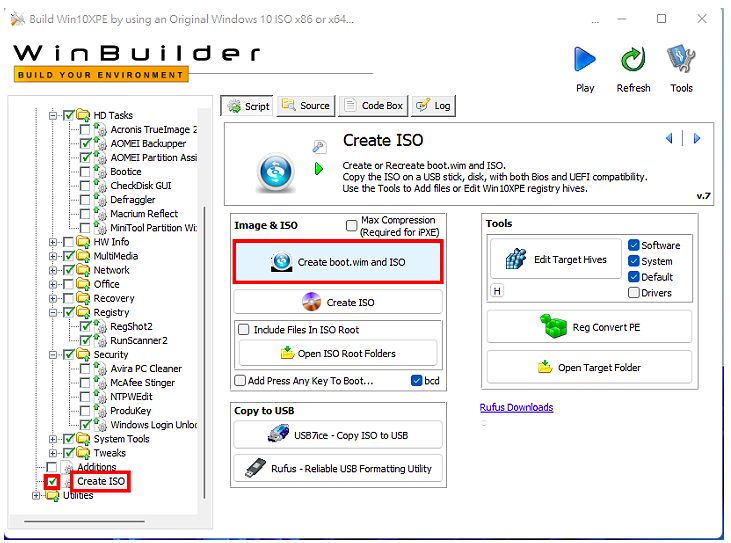
22. Click "Play" to start production.
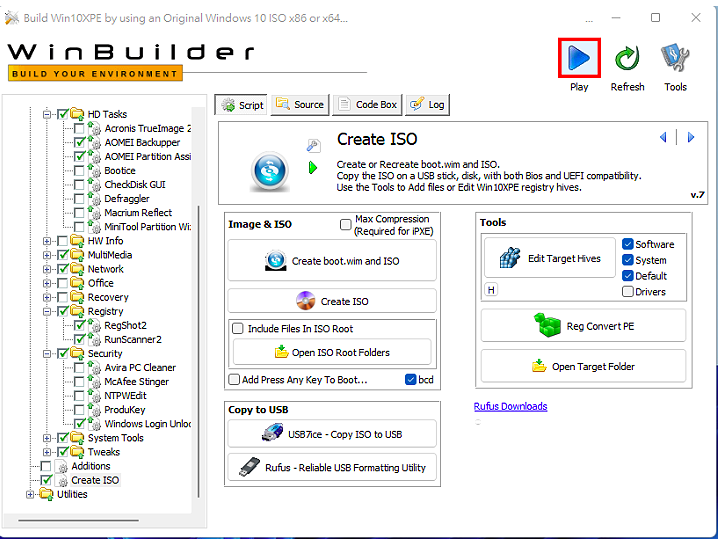
#23. Click "Yes" to download Windows ADK.
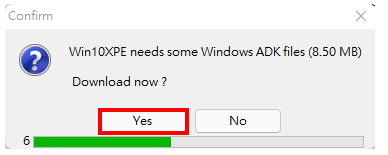
24. Windows 11 PE is being made.
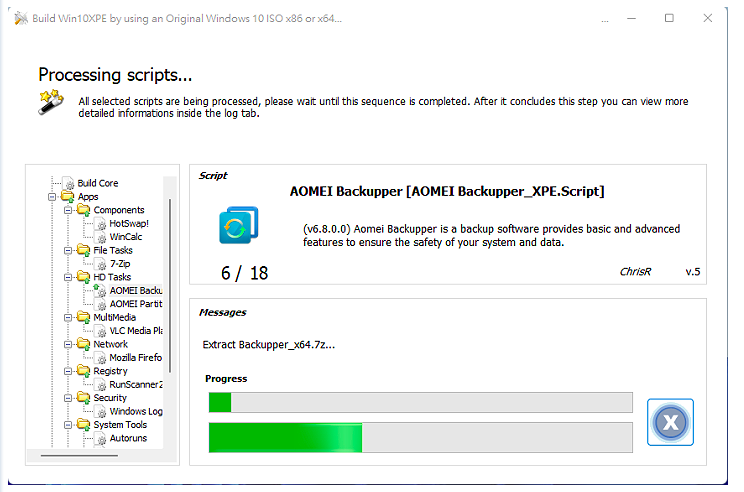
25. The Windows 11 PE disc image file is created, close the program.
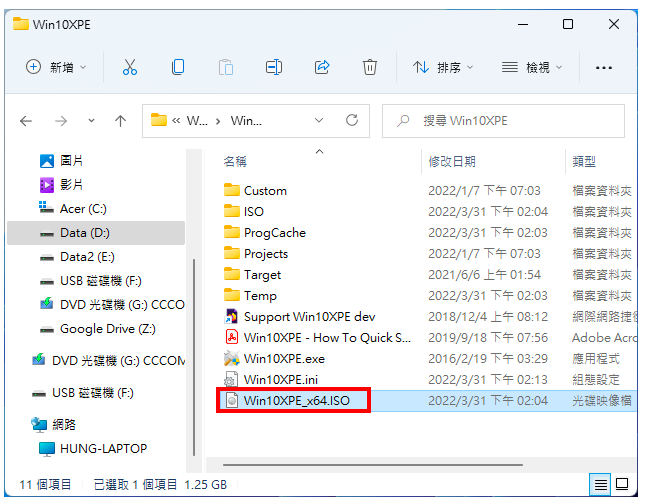
26. Open the file manager. The created ISO disc image file is as shown in the figure below. Change the file name by yourself, for example: Win11PE_x64.ISO. Use the USB bootable flash drive creation software Rufus to create an ISO file into a USB bootable flash drive, or copy the ISO file to a USB multi-bootable flash drive created with Ventoy.
27. Insert the Windows 11 PE or Ventoy bootable flash drive into the USB slot of the computer, and set the BIOS to boot from the flash drive. For details, see: Set the BIOS boot order to disk priority. 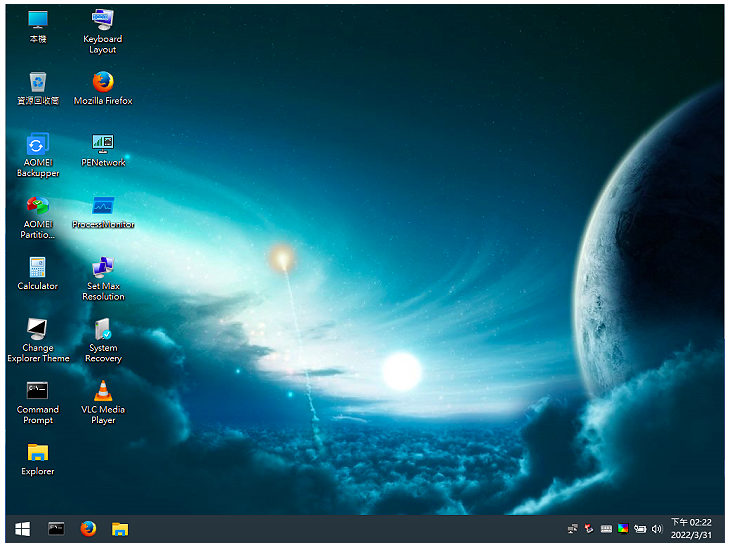
The above is the detailed content of Windows 11 PE creation tool Win10XPE. For more information, please follow other related articles on the PHP Chinese website!

Hot AI Tools

Undress AI Tool
Undress images for free

Undresser.AI Undress
AI-powered app for creating realistic nude photos

AI Clothes Remover
Online AI tool for removing clothes from photos.

Clothoff.io
AI clothes remover

Video Face Swap
Swap faces in any video effortlessly with our completely free AI face swap tool!

Hot Article

Hot Tools

Notepad++7.3.1
Easy-to-use and free code editor

SublimeText3 Chinese version
Chinese version, very easy to use

Zend Studio 13.0.1
Powerful PHP integrated development environment

Dreamweaver CS6
Visual web development tools

SublimeText3 Mac version
God-level code editing software (SublimeText3)
 the win 11 trusted platform module (tpm) is not detected or has malfunctioned
Aug 13, 2025 pm 02:24 PM
First,checkifyourPChasTPM2.0byopeningtpm.mscviaRun(Windows R);if"CompatibleTPMcannotbefound"appears,yoursystemmaylackaTPMchip,oritmaybeversion1.2,whichisinsufficientforWindows11.2.EnableTPMinBIOS/UEFIbyrestartingandenteringsetup(viaF2,F10,D
 Win11 computer suddenly black screen but still running. Recovery method with black screen without display
Aug 12, 2025 pm 09:03 PM
Common reasons for the computer's black screen but still running include driver problems, hardware connection failure or graphics card damage. The solutions are forced to restart, check the monitor connection, try different monitors or ports, update or roll back the graphics card driver, enter safe mode to troubleshoot software conflicts, check hardware such as graphics card and memory, confirm that the BIOS is set correctly, and restore the system if necessary; if you want to distinguish software and hardware problems, you can test in safe mode, observe the startup process, use diagnostic tools, replace the hardware, and listen to abnormal sounds of the computer; to prevent recurrence, keep the driver updated, install genuine software, regularly maintain the system, pay attention to the stability of heat dissipation and power supply, avoid overclocking, regularly backup data, and monitor hardware temperature.
 What to do if the taskbar at the bottom of win10 is not responding? 6 repair methods
Aug 12, 2025 pm 09:24 PM
No response when clicking on the Win10 taskbar? The Start menu cannot be opened? Icons cannot be switched? These seemingly small problems are troublesome. This article has compiled 6 practical solutions, covering restarting the Explorer, repairing system components through PowerShell, troubleshooting driver exceptions, and other methods to help you quickly restore normal use. Method 1: Restarting the Windows Explorer taskbar is part of the Explorer. Once the process is stuck or crashes, the taskbar will also lose its response. Operation process: 1. Press the shortcut key Ctrl Shift Esc to start the task manager; 2. Find "Windows Explorer" in the process, right-click to select "Restart"; 3. Wait for the desktop to refresh, test whether the taskbar is restored
 The Win10 system prompts 'Your account has been deactivated, please consult the system administrator' what to do
Aug 13, 2025 pm 06:48 PM
Recently, some win10 users encountered a prompt message "Your account has been disabled, please contact the system administrator" when booting, which caused them to be unable to enter the system smoothly. Regarding this problem, we have compiled several effective solutions for you below. Solution 1: After encountering this problem, you can try to press and hold the power button to force shut down the device and then restart it. When you see the Windows 10 login interface, press and hold the power button again to force shut down, and repeat this operation three times. After that, when you boot again, you will see a button for "View Advanced Repair Options". Clicking it will enter Windows Recovery Environment (WinRE), and then select "Troubleshoot". Select "Advanced Options" in the following interface. Continue to select Start Settings. In Startup Settings
 There is no sound on the win10 HDMI external monitor
Aug 14, 2025 pm 07:09 PM
**Computer model information: **Brand model: HP Shadow Blade, System version: Windows 10 encounters the situation where the Win10 system connects to an external monitor through HDMI? Don't worry, check the following two points first: Whether the audio device is connected normally: Make sure the external monitor itself is functioning properly, and check whether the audio output settings of Windows 10 computer are correct. HDMI connection cable and interface: If there is no problem with audio settings, it is recommended to try changing the HDMI cable or adjusting the connection method. Common reasons and solutions for silent external display of Win10HDMI: Under Win10 system, silent external display of HDMI is usually caused by the following two reasons: Audio setting error: The computer's audio output device is not set correctly
 How to turn on dark mode in Win11
Aug 16, 2025 am 09:01 AM
ToenabledarkmodeinWindows11forreducedeyestrainorbetterbatterylife,useSettings:pressWindows I,gotoPersonalization>Colors,andsetboth"Windowsmode"and"Appmode"toDark.Alternatively,toggleDarkModeinstantlyviaQuickSettings.Advanceduse
 What to do if there is no sound in Win10? Solution to the Windows Audio service that cannot be started
Aug 14, 2025 pm 06:27 PM
Many Windows 10 users may experience sudden no sound in the system, which is usually due to the deactivated Windows Audio service. The following are the specific methods to solve the problem that there is no sound in the Win10 system and the Windows Audio service cannot be started. Solution: 1. First, open the Service Manager, find and double-click the Windowsaudio service to enter its properties interface. In the Dependencies tab, you can see the three services that the service depends on, as shown in the figure below: 2. By viewing the dependencies, you will find that the "MultimediaClassScheduler" service is disabled. Double-click to open its properties window: 3. Adjust "Startup Type" to "Auto"
 win10 Professional Edition Activation Key win10 Professional Edition Permanent Activation Key 2024
Aug 12, 2025 pm 08:27 PM
1、R996F-QNPMT-94MWP-H4HPJ-YP2KG。2、NRVF6-F97HT-WJK6C-GGV7C-J44C6。3、PPFNP-JFPJG-FGB7K-VT4TK-3RR9G。4、27NBT-XMD43-BB9JY-QHGFD-FM49G。5、9H8VN-P237C-YHD77-TMBM2-TMT6T。


