

 Backend Development
Python Tutorial
Teach you step by step how to imitate a task manager using Python
Backend Development
Python Tutorial
Teach you step by step how to imitate a task manager using Python
Teach you step by step how to imitate a task manager using Python
I believe everyone is familiar with the Task Manager. Ctrl Alt Del can open it, then click to start the Task Manager, or right-click the taskbar-Start Task Manager to start the Task Manager. Start After that, the interface is as follows:
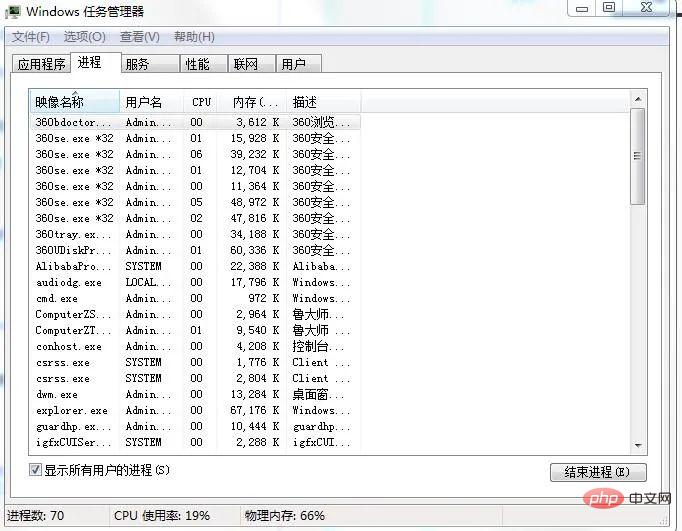
It can be seen that it lists some important parameters, such as the number of processes, CPU usage, physical memory, next Let’s list them one by one.
1. Project preparation
Editor: sublime text 3
Module: psutil tkinter
## 2. Implementation steps
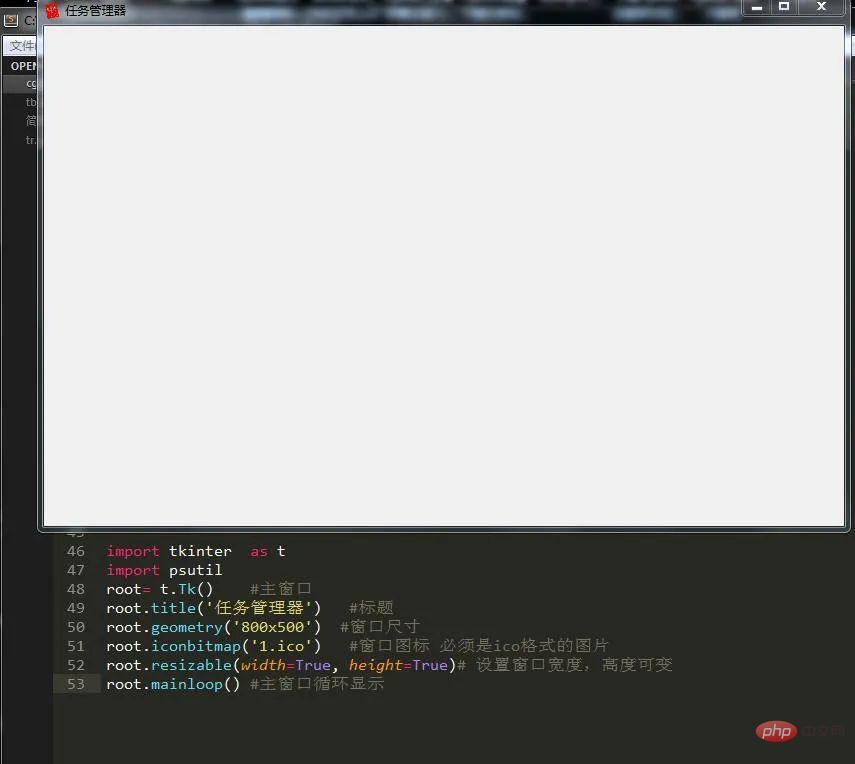
1. Write the main interface
To implement the task manager, first we write an interface. Here we use tkinter to write an interface. :
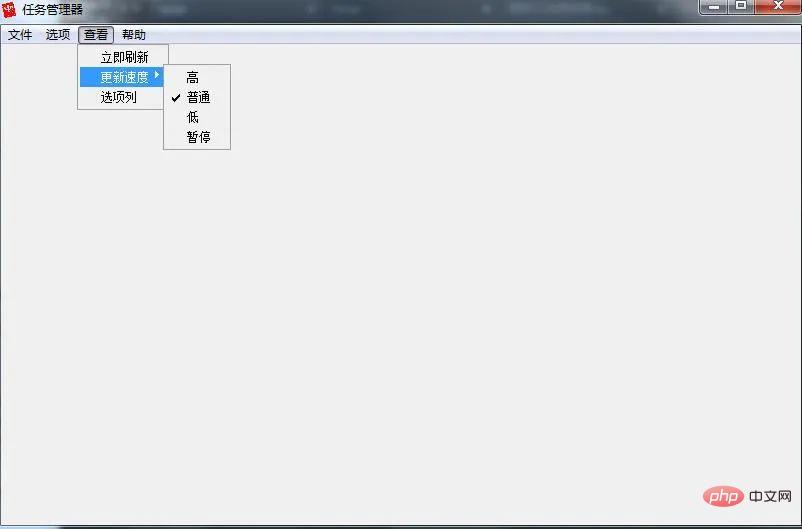
2. Write the menu bar
Let’s implement its menu bar first. The Menu module of tkinter is used here. I don’t know if you have any impression, so let’s get started. .
1) First we need to create a main menu and then load each submenu into it:
m=t.Menu(root)
2 ) Create each submenu:
#文件菜单
file=t.Menu(m,tearoff=False)
m.add_cascade(label='文件', menu=file)
file.add_command(label='新建任务',accelerator='(N)')
file.add_command(label='退出任务栏管理器',command=root.quit,accelerator='(x)')


#选项菜单
ii=t.IntVar()
ii.set(1)
o=t.Menu(m,tearoff=False)
m.add_cascade(label='选项',menu=o)
o.add_radiobutton(label='前端显示',variable=ii, value=0)
o.add_radiobutton(label='使用时最小化',variable=ii, value=1)
o.add_radiobutton(label='最小化时隐藏',variable=ii, value=2)


#查看菜单
v=t.Menu(m,tearoff=False)
m.add_cascade(label='查看',menu=v)
v.add_command(label='立即刷新')
#二级菜单
iv=t.IntVar()
iv.set(1)
s=t.Menu(v,tearoff=False)
v.add_cascade(label='更新速度',menu=s)
s.add_radiobutton(label='高',variable=iv, value=0)
s.add_radiobutton(label='普通',variable=iv, value=1)
s.add_radiobutton(label='低',variable=iv, value=2)
s.add_radiobutton(label='暂停',variable=iv, value=3)
v.add_command(label='选项列')


#帮助菜单
h=t.Menu(m,tearoff=False)
m.add_cascade(label='帮助',menu=h)
h.add_command(label='任务管理器帮助主体')
h.add_command(label='关于任务管理器')
3) Add the menu to the main interface configuration
root.configure(menu=m)
As you can see from the final result picture, it is basically similar to the task manager.
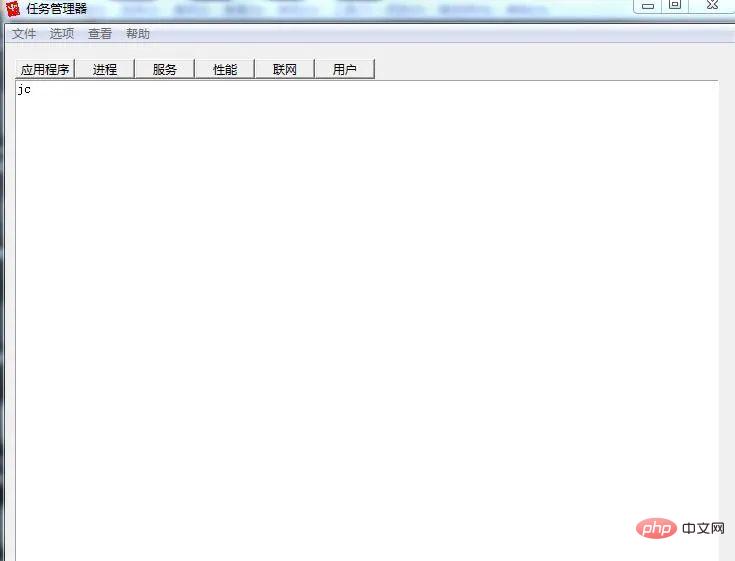
3. Functions in the interface
After the interface is written, we should add it to the interface Component, we can see from the picture of the task manager that it has a button to switch task windows:
1)编写按钮
b1=t.Button(root,text='应用程序',command=yy)
b2=t.Button(root,text='进程',command=jc)
b3=t.Button(root,text='服务',command=fw)
b4=t.Button(root,text='性能',command=xn)
b5=t.Button(root,text='联网',command=lw)
b6=t.Button(root,text='用户',command=yh)


#定位
b1.place(x=10,y=15,height=20,width=60)
b2.place(x=70,y=15,height=20,width=60)
b3.place(x=130,y=15,height=20,width=60)
b4.place(x=190,y=15,height=20,width=60)
b5.place(x=250,y=15,height=20,width=60)
b6.place(x=310,y=15,height=20,width=60)
2)编写多行文本框
text=t.Text(root,width=100,height=40)
text.place(x=10,y=36)
3)编写函数实现简单功能
def yy():
    text.delete(1.0,'end')
    text.insert('insert','yy')
def jc():
    text.delete(1.0,'end')
    text.insert('insert','jc')
def fw():
    text.delete(1.0,'end')
    text.insert('insert','fw')
def xn():
    text.delete(1.0,'end')
    text.insert('insert','xn')
def lw():
    text.delete(1.0,'end')
    text.insert('insert','lw')
def yh():
    text.delete(1.0,'end')
    text.insert('insert','yh')
这样就实现了不同按钮之间切换不同的界面。
4)编写下面的进程数,CPU使用率,物理内存
我们使用标签来放置这些参数,因为这三项的参数是可变的,所以暂时只写前面名字:
t1=t.Label(text='进程数:')
t2=t.Label(text='CPU 使用率:')
t3=t.Label(text='物理内存:')
t1.place(x=10,y=580,width=120)
t2.place(x=150,y=580,width=120)
t3.place(x=300,y=580,width=120)
5)给多行文本框添加滚动条
我们可以使用模块Scrollbar来实现,安装滚动条之前需要做两件事情:
1.指定该组件的yscrollbarcommand参数为Scrollbar的set()方法
2.指定Scrollbar 的 command 参数为该组件的 yview() 方法
接下来我们实现它:
sb=t.Scrollbar(root)
sb.pack(side='left',fill='y')
text=t.Text(root,width=100,height=40)
text.place(x=10,y=36)
sb.config(command=text.yview) #文本框内容随滚动条滚动
text.config(yscrollcommand=sb.set(0.1,0.3)) #Y轴填充
6)添加状态栏文本标签
t1=t.Label(text='')
t2=t.Label(text='')
t3=t.Label(text='')
(注:这里只是隐藏部件,万不可用destroy销毁部件)
7)实现状态栏标签功能
现在我们来实现这三个标签的内容。想必大家刚刚应该看到了,上面的标签没有设置任何内容,那么这是为什么呢?我们都知道,一旦你把内容添加进去,它就会紧随其后并不会覆盖,所以初始值必须是空,才不至于不能覆盖值。那么我们来看下具体实现过程吧。
def jcs():
  t1.configure(text='进程数:'+str(len(psutil.pids())))
  root.after(3000,jcs)
def cpu():
  pp=str(ceil(psutil.cpu_percent(1)))
  t2.configure(text='CPU 使用率:'+pp+'%')
  root.after(1500,cpu)
def wlnc():
  f= psutil.virtual_memory().free #剩余内存
  t=psutil.virtual_memory().total#总内存
  wl= float(t-f)/float(t) #为使得最后值更精确,必须用float
  t3.configure(text='物理内存:'+str(floor(wl*100))+'%')
  root.after(2000,wlnc)
这里的三个函数就是分别实现上面的三个功能的,最后将它添加到窗口事件即可。
8)功能编写
可以看到这页主要是系统运行的一些应用程序的名字,所以我们可以这样这里我们需要用到模块psutil 来获取系统的关键参数。
1.编写应用程序选项
应用程序选项包含进程号和进程名和进程文件路径,所以可以用psutil进行获取,方法如下:
text.insert('insert','进程号   '+'进程名      '+'  进程文件路径'+'\n')
  for y in psutil.pids():
    a=psutil.Process(y)
    if a.name()=='System Idle Process':
      continue
    else:
      text.insert('insert',str(y)+'     '+a.name()+'   '+a.exe()+'\n\n')
这样就可以将这些内容添加进来了。
2.编写进程选项
这里我们可以投机取巧,使用cmd中的tasklist命令,它可以打印出当前系统所有在运行的进程的信息。
mm=os.popen('tasklist')
text.insert('insert',mm.read())
3.编写服务选项
也是使用cmd中的sc 命令,它相当于一个扫描器,可以得到很多有用的信息。
mm=os.popen('sc query type= service')
text.insert('insert',mm.read())
4.编写性能选项
这个内容会比较多点,因为我们要得到比较多的参数和把组件放在多行文本框中,于是增加了一些冗余代码:
l1=t.Label(root,text='开机时间:')  tm=datetime.datetime.fromtimestamp(psutil.boot_time()).strftime("%Y-%m-%d %H:%M:%S")
  l2=t.Label(root,text=str(tm))
  l3=t.Label(root,text='当前时间:')
  l4=t.Label(root,text='')
  dq=time.strftime('%Y-%m-%d %H:%M:%S',time.localtime(time.time()))
  l4.configure(text=str(dq))
  l5=t.Label(root,text='物理内存使用情况(MB):')
  l6=t.Label(root,text='')
  jh=psutil.virtual_memory() #物理内存
  tt=int((jh.total)/1024/1024) #总量
  us=int((jh.used)/1024/1024) #使用量
  fr=int((jh.free)/1024/1024) #剩余量
  l6.configure(text='总量:' + str(tt) +'\n'+'使用:'+str(us) +'\n'+'剩余:'+str(fr))
  l7=t.Label(root,text='交换内存使用情况(MB):')
  l8=t.Label(root,text='')
  hj=psutil.swap_memory() #交换内存
  ht=int((hj.total)/1024/1024)
  hu=int((hj.used)/1024/1024)
  hf=int((hj.free)/1024/1024)
  l8.configure(text='总量:' + str(ht) + '  '+'使用:'+str(hu) +'  '+'剩余:'+str(hf))
  text.window_create('insert',window=l1) #添加组件到多行文本框
  text.window_create('insert',window=l2)
  text.insert('insert','\n\n')
  text.window_create('insert',window=l3)
  text.window_create('insert',window=l4)
  text.insert('insert','\n\n')
  text.window_create('insert',window=l5)
  text.window_create('insert',window=l6)
  text.insert('insert','\n\n')
  text.window_create('insert',window=l7)
  text.window_create('insert',window=l8)
5.编写联网选项
这里我们只获取网卡的收发流量,因此:
n = psutil.net_io_counters()
r=str(float(n.bytes_recv / 1024 / 1024))+'MB'
s= str(float(n.bytes_sent / 1024 / 1024))+'MB'
text.insert('insert','网卡接收流量: '+str(r)+'\n'+'网卡发送流量:'+str(s)+'\n')
6.编写用户选项
这里我们需要获取当前的用户数:
use='    用户'+'      '+'     状态'+'\n'
text.insert('insert',use)
for y in psutil.users():
  text.insert('2.0',str(y.name)+'  '+'运行中。。。。'+'\n')
这样就完成了任务管理器的编写了。
3. Summary
Through the understanding of the task manager, we realize that the system Some crucial information, such as the process number can be obtained through the process name, the process name can be obtained through the process number, and the usage of the cmd command can be said to be quite user-friendly. I hope this article can help everyone.
The above is the detailed content of Teach you step by step how to imitate a task manager using Python. For more information, please follow other related articles on the PHP Chinese website!

Hot AI Tools

Undress AI Tool
Undress images for free

Undresser.AI Undress
AI-powered app for creating realistic nude photos

AI Clothes Remover
Online AI tool for removing clothes from photos.

Clothoff.io
AI clothes remover

Video Face Swap
Swap faces in any video effortlessly with our completely free AI face swap tool!

Hot Article
Hot Tools

Notepad++7.3.1
Easy-to-use and free code editor

SublimeText3 Chinese version
Chinese version, very easy to use

Zend Studio 13.0.1
Powerful PHP integrated development environment

Dreamweaver CS6
Visual web development tools

SublimeText3 Mac version
God-level code editing software (SublimeText3)


 How to debug Python code in Sublime Text?
Aug 14, 2025 pm 04:51 PM
How to debug Python code in Sublime Text?
Aug 14, 2025 pm 04:51 PM
UseSublimeText’sbuildsystemtorunPythonscriptsandcatcherrorsbypressingCtrl Baftersettingthecorrectbuildsystemorcreatingacustomone.2.Insertstrategicprint()statementstocheckvariablevalues,types,andexecutionflow,usinglabelsandrepr()forclarity.3.Installth
 How to run Python code in Sublime Text?
Aug 16, 2025 am 04:58 AM
How to run Python code in Sublime Text?
Aug 16, 2025 am 04:58 AM
Make sure that Python is installed and added to the system PATH, run python--version or python3--version verification through the terminal; 2. Save the Python file as a .py extension, such as hello.py; 3. Create a custom build system in SublimeText, Windows users use {"cmd":["python","-u","$file"]}, macOS/Linux users use {"cmd":["python3
 How to debug a Python script in VSCode
Aug 16, 2025 am 02:53 AM
How to debug a Python script in VSCode
Aug 16, 2025 am 02:53 AM
To debug Python scripts, you need to first install the Python extension and configure the interpreter, then create a launch.json file to set the debugging configuration, then set a breakpoint in the code and press F5 to start the debugging. The script will be paused at the breakpoint, allowing checking variables and step-by-step execution. Finally, by checking the problem by viewing the console output, adding logs or adjusting parameters, etc., to ensure that the debugging process is simple and efficient after the environment is correct.
 What are class methods in Python
Aug 21, 2025 am 04:12 AM
What are class methods in Python
Aug 21, 2025 am 04:12 AM
ClassmethodsinPythonareboundtotheclassandnottoinstances,allowingthemtobecalledwithoutcreatinganobject.1.Theyaredefinedusingthe@classmethoddecoratorandtakeclsasthefirstparameter,referringtotheclassitself.2.Theycanaccessclassvariablesandarecommonlyused
 How to automatically format Python code in VSCode
Aug 14, 2025 pm 04:10 PM
How to automatically format Python code in VSCode
Aug 14, 2025 pm 04:10 PM
ToautomaticallyformatPythoncodeinVSCode,installBlackusingpipinstallblack,installtheofficialMicrosoftPythonextension,setBlackastheformatterinsettings.jsonwith"python.formatting.provider":"black",enableformatonsavebyadding"edit
 How does the yield keyword work in Python
Aug 15, 2025 am 08:23 AM
How does the yield keyword work in Python
Aug 15, 2025 am 08:23 AM
The yield keyword is used to define a generator function, so that it can pause execution and return values one by one, and then recover from the pause; the generator function returns a generator object, has lazy evaluation characteristics, and can save memory. It is suitable for handling scenarios such as large files, streaming data, and infinite sequences. The generator is an iterator that supports next() and for loops, but cannot be rewind and must be recreated to iterate again.
 python asyncio queue example
Aug 21, 2025 am 02:13 AM
python asyncio queue example
Aug 21, 2025 am 02:13 AM
asyncio.Queue is a queue tool for secure communication between asynchronous tasks. 1. The producer adds data through awaitqueue.put(item), and the consumer uses awaitqueue.get() to obtain data; 2. For each item you process, you need to call queue.task_done() to wait for queue.join() to complete all tasks; 3. Use None as the end signal to notify the consumer to stop; 4. When multiple consumers, multiple end signals need to be sent or all tasks have been processed before canceling the task; 5. The queue supports setting maxsize limit capacity, put and get operations automatically suspend and do not block the event loop, and the program finally passes Canc
 How to create a Python project in Sublime Text?
Aug 16, 2025 am 08:53 AM
How to create a Python project in Sublime Text?
Aug 16, 2025 am 08:53 AM
InstallSublimeTextandPython,thenconfigureabuildsystembycreatingaPython3.sublime-buildfilewiththeappropriatecmdandselectorsettingstoenablerunningPythonscriptsviaCtrl B.2.OrganizeyourprojectbycreatingadedicatedfolderwithPythonfilesandsupportingdocument
