
长期以来,Python 社区一直在讨论如何使 Python 成为网页浏览器中流行的编程语言。然而网络浏览器实际上只支持一种编程语言:JavaScript。随着网络技术的发展,我们已经把越来越多的程序应用在网络上,如游戏、数据科学可视化以及音频和视频编辑软件。这意味着我们已经把繁重的计算带到了网络上——这并不是JavaScript的设计初衷。所有这些挑战提出了对新编程语言的需求,这种语言可以提供快速、可移植、紧凑和安全的代码执行。因此,主要的浏览器供应商致力于实现这个想法,并在2017年向世界推出了WebAssembly。
在本教程中,我们将看一下WebAssembly如何帮助你在浏览器中运行Python代码。
要明确的是,JavaScript本身就是一种强大的编程语言。它只是不适合某些操作。关于这一点,请看JavaScript的创始人Brendan Eich的《从ASM.JS到WebAssembly》一文。
假设你想教一门Python课程。为了使你的课程更加有趣和好玩,在每一节课之后,你想为你的学生安排一个练习,这样他们就可以练习他们所学到的知识。
这里的问题是,学生需要通过安装特定版本的Python来准备一个开发环境,创建并激活一个虚拟环境,并安装所有必要的包。这可能会耗费大量的时间和精力。由于每台机器都是不同的,所以也很难对此提供确切的指导。
虽然你可以创建一个后端,在Docker容器或AWS Lambda函数中运行提交的代码,但你选择保持简单堆栈,在课程内容中添加一个Python编辑器,可以在客户端、在网络浏览器中运行Python代码,并向用户展示结果。这正是你在本教程中要构建的东西。

根据Mozilla开发者网络(MDN)文档的定义,WebAssembly(WASM)的定义如下:
WebAssembly是一种运行在现代网络浏览器中的新型代码,并且提供新的性能特性和效果。它设计的目的不是为了手写代码而是为诸如C、C++和Rust等低级源语言提供一个高效的编译目标。
因此,WASM让我们在浏览器中运行用不同语言(不仅仅是JavaScript)编写的代码,有以下好处:
因此,在我们上面的例子中,如果用户在我们的服务器上运行代码,我们不需要担心,如果成千上万的学生尝试练习代码,我们也不需要担心,因为代码的执行发生在客户端,在Web浏览器上。
WebAssembly的设计并不是为了杀死JavaScript。它是对JavaScript的补充。当JavaScript不是合适的工具时,它可以被使用,如游戏、图像识别和图像/视频编辑等。
请看 WebAssembly.org的使用案例,了解更多你可能想利用WebAssembly的情况。
本教程使用Pyodide库来运行Python代码,它将CPython解释器编译为WebAssembly,并在浏览器的JavaScript环境中运行。它带有一些预装的Python软件包。你也可以使用Micropip来使用更多的软件包。
用下面的代码创建一个新的HTML文件。
<head>
<script src="https://cdn.jsdelivr.net/pyodide/v0.20.0/full/pyodide.js"></script>
<script>
async function main() {
let pyodide = await loadPyodide({
indexURL : "https://cdn.jsdelivr.net/pyodide/v0.20.0/full/"
});
console.log(pyodide.runPython("print('Hello, world from the browser!')"));
};
main();
</script>
</head>
在你的浏览器中打开该文件。然后,在你的浏览器的开发者工具控制台中,你应该做如下事情:
Loading distutils
Loading distutils from https://cdn.jsdelivr.net/pyodide/v0.20.0/full/distutils.js
Loaded distutils
Python initialization complete
Hello, world from the browser!
你可以看到,最后一行是Python代码在浏览器中执行的结果。
让我们快速看一下上面的代码。
在前面的例子中,你看到了安装Pyodide并开始使用它是多么容易。你只需要从CDN导入 pyodide.js并通过 loadPyodide初始化它。之后,你可以使用 pyodide.runPython("你的Python代码")在浏览器中运行你的 Python 代码。
当你第一次下载Pyodide时,下载量很大,因为你要下载完整的CPython解释器,但你的浏览器会缓存它,你不需要再次下载它。
在Pyodide上还有一个庞大而活跃的社区。其官方网址如下:
//m.sbmmt.com/link/3dcf44c3136a27a28b3bb27586fd5fc5
可以看一下其中的Pyodide 路线图、GitHub上的公开问题、Gitter社区。
第一次加载Pyodide,需要四到五秒(取决于你的连接速度),因为你必须下载约10MB左右的文件。另外,Pyodide代码的运行速度比本地Python慢3到5倍。
一般来说,如果你想在浏览器中运行Python,你有两种方法可用。
1、使用转译器将Python转换为JavaScript。Brython、Transcrypt 和 Skulpt 都使用这种方法。
2、转换Python运行环境以在浏览器中使用。Pyodide 和 PyPy.js 使用这种方法。
方案一和方案二的一个主要区别是,方案一中提到的库不支持Python包。也就是说,它们的下载量比方案二中的库要小得多,因此,它们的速度也更快。
在这个教程中,我们选择了Pyodide,因为它的语法更简单,而且支持Python包。如果你对其他选项感兴趣,请随时查看它们的文档。
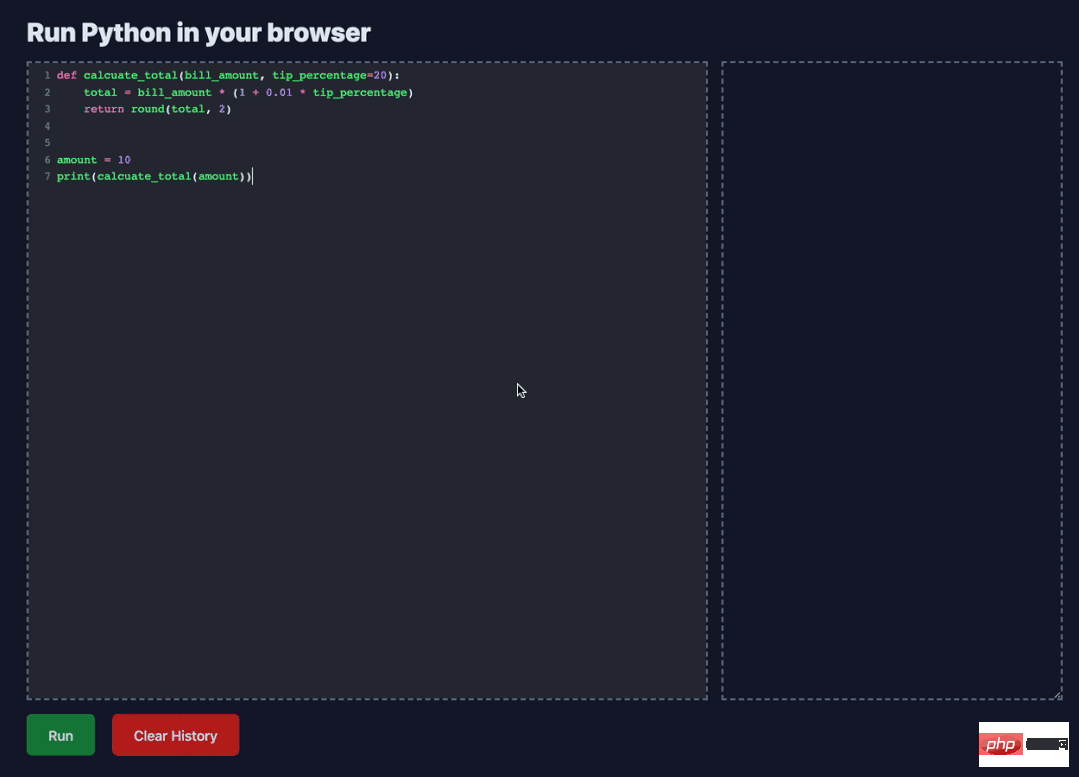
在本节中,我们将创建一个简单的Python编辑器,可以在浏览器中运行代码。
1、Pyodide
2、CodeMirror
3、Flask
创建一个新的项目。
$ mkdir python_editor_wasm
$ cd python_editor_wasm
创建并激活一个虚拟环境。
$ python3.10 -m venv env
$ source env/bin/activate
(env)$
安装Flask:
(env)$ pip install Flask
在项目的根部创建一个名为app.py的文件并添加以下代码。
from flask import Flask, render_template
app = Flask(__name__)
@app.route('/')
def index():
return render_template('index.html')
if __name__ == '__main__':
app.run(debug=True)
在我们项目的根部创建一个 "templates "文件夹,并在其下添加index.html文件。
templates/index.html:
<!doctype html>
<html >
<head>
<meta charset="UTF-8">
<meta name="viewport" content="width=device-width, initial-scale=1.0">
<!-- install tailwindcss from cdn, don't do this for production application -->
<script src="https://cdn.tailwindcss.com"></script>
<!-- install pyodide version 0.20.0 -->
<script src="https://cdn.jsdelivr.net/pyodide/v0.20.0/full/pyodide.js"></script>
<!-- import codemirror stylings -->
<link rel="stylesheet" href="https://cdnjs.cloudflare.com/ajax/libs/codemirror/5.48.4/codemirror.min.css" />
<!-- install codemirror.js version /5.63.3 from cdn -->
<script src="https://cdnjs.cloudflare.com/ajax/libs/codemirror/5.63.3/codemirror.min.js"
integrity="sha512-XMlgZzPyVXf1I/wbGnofk1Hfdx+zAWyZjh6c21yGo/k1zNC4Ve6xcQnTDTCHrjFGsOrVicJsBURLYktVEu/8vQ=="
crossorigin="anonymous" referrerpolicy="no-referrer"></script>
<!-- install codemirror python language support -->
<script src="https://cdnjs.cloudflare.com/ajax/libs/codemirror/5.63.3/mode/python/python.min.js"
integrity="sha512-/mavDpedrvPG/0Grj2Ughxte/fsm42ZmZWWpHz1jCbzd5ECv8CB7PomGtw0NAnhHmE/lkDFkRMupjoohbKNA1Q=="
crossorigin="anonymous" referrerpolicy="no-referrer"></script>
<!-- import codemirror dracula theme styles from cdn -->
<link rel="stylesheet" href="https://cdnjs.cloudflare.com/ajax/libs/codemirror/5.63.3/theme/dracula.css"/>
<style>
/* set codemirror ide height to 100% of the textarea */
.CodeMirror {
height: 100%;
}
</style>
</head>
<body >
<p >Run Python in your browser</p>


<!-- our code editor, where codemirror renders it's editor -->
<textarea  name="code" ></textarea>


<!-- output section where we show the stdout of the python code execution -->
<textarea readonly   name="output"></textarea>


<!-- run button to pass the code to pyodide.runPython() -->
<button onclick="evaluatePython()" type="button" >Run</button>
<!-- clean the output section -->
<button onclick="clearHistory()" type="button" >Clear History</button>
<script src="/static/js/main.js"></script>
</body>
</html>
在 index.html文件的头部,我们导入了用于格式化的Tailwind CSS,Pyodide.js 0.20.0,以及CodeMirror及其依赖包。
UI有三个重要的组成部分:
1、Editor。用户可以在这里写Python代码。它是一个文本区域的HTML元素,其ID为代码。当我们初始化codemirror时,我们让它知道我们想用这个元素作为一个代码编辑器。
2、Output。显示代码输出的地方。它是一个id为output的textarea元素。当Pyodide执行Python代码时,它将把结果输出到这个元素。我们也在这个元素中显示一个错误信息。
3、Run button。当用户点击这个按钮时,我们抓取编辑器元素的值并将其作为一个字符串传递给 pyodide.runPython。当 pyodide.runPython返回结果时,我们在输出元素中显示它。
现在在项目的根部,创建 static/js文件夹。然后,在 js文件夹下,创建一个名为 main.js的新文件。
static/js/main.js:
我们完成了以下步骤:
// find the output element
const output = document.getElementById("output");
// initialize codemirror and pass configuration to support Python and the dracula theme
const editor = CodeMirror.fromTextArea(
document.getElementById("code"), {
mode: {
name: "python",
version: 3,
singleLineStringErrors: false,
},
theme: "dracula",
lineNumbers: true,
indentUnit: 4,
matchBrackets: true,
}
);
// set the initial value of the editor
editor.setValue("print('Hello world')");
output.value = "Initializing...n";
// add pyodide returned value to the output
function addToOutput(stdout) {
output.value += ">>> " + "n" + stdout + "n";
}
// clean the output section
function clearHistory() {
output.value = "";
}
// init pyodide and show sys.version when it's loaded successfully
async function main() {
let pyodide = await loadPyodide({
indexURL: "https://cdn.jsdelivr.net/pyodide/v0.20.0/full/",
});
output.value = pyodide.runPython(`
import sys
sys.version
`);
output.value += "n" + "Python Ready !" + "n";
return pyodide;
}
// run the main function
let pyodideReadyPromise = main();
// pass the editor value to the pyodide.runPython function and show the result in the output section
async function evaluatePython() {
let pyodide = await pyodideReadyPromise;
try {
pyodide.runPython(`
import io
sys.stdout = io.StringIO()
`);
let result = pyodide.runPython(editor.getValue());
let stdout = pyodide.runPython("sys.stdout.getvalue()");
addToOutput(stdout);
} catch (err) {
addToOutput(err);
}
}
1、初始化CodeMirror,支持Python和Dracula主题。
2、初始化Pyodide。
3、添加了一个名为 evaluatePython的函数,当用户点击运行按钮时执行。它将代码元素的值传递给 pyodide.runPython,并通过 addToOutput 在输出元素中显示结果。
4、增加了一个叫 clearHistory的函数,当用户点击 ClearHistory按钮时,它将清除输出元素。
要在本地运行Flask开发服务器,请运行:
(env)$ flask run
现在服务器应该在5000端口运行。在你的浏览器中导航到 http://127.0.0.1:5000,测试一下代码编辑器。
在本教程中,主要讲解了如何使用WebAssembly在浏览器中运行Python代码,但一般来说,WebAssembly涵盖了更广泛的使用情况。
我们的部署平台比以往任何时候都更加多样化。WebAssembly可以影响客户端Web开发、服务器端开发、游戏、教育、云计算、移动平台、loT、serverless等方面。
The above is the detailed content of Run Python in the browser with WebAssembly. For more information, please follow other related articles on the PHP Chinese website!


