Home > Development Tools > git > body text

Gitlab learning some git specifications commonly used by enterprises

青灯夜游
Release: 2023-04-01 08:30:02
forward
1620 people have browsed it

Gitlab learning some git specifications commonly used by enterprises

As the saying goes, there is no rule without rules, and our git also needs to be standardized.

The following introduces some norms commonly used by enterprises.

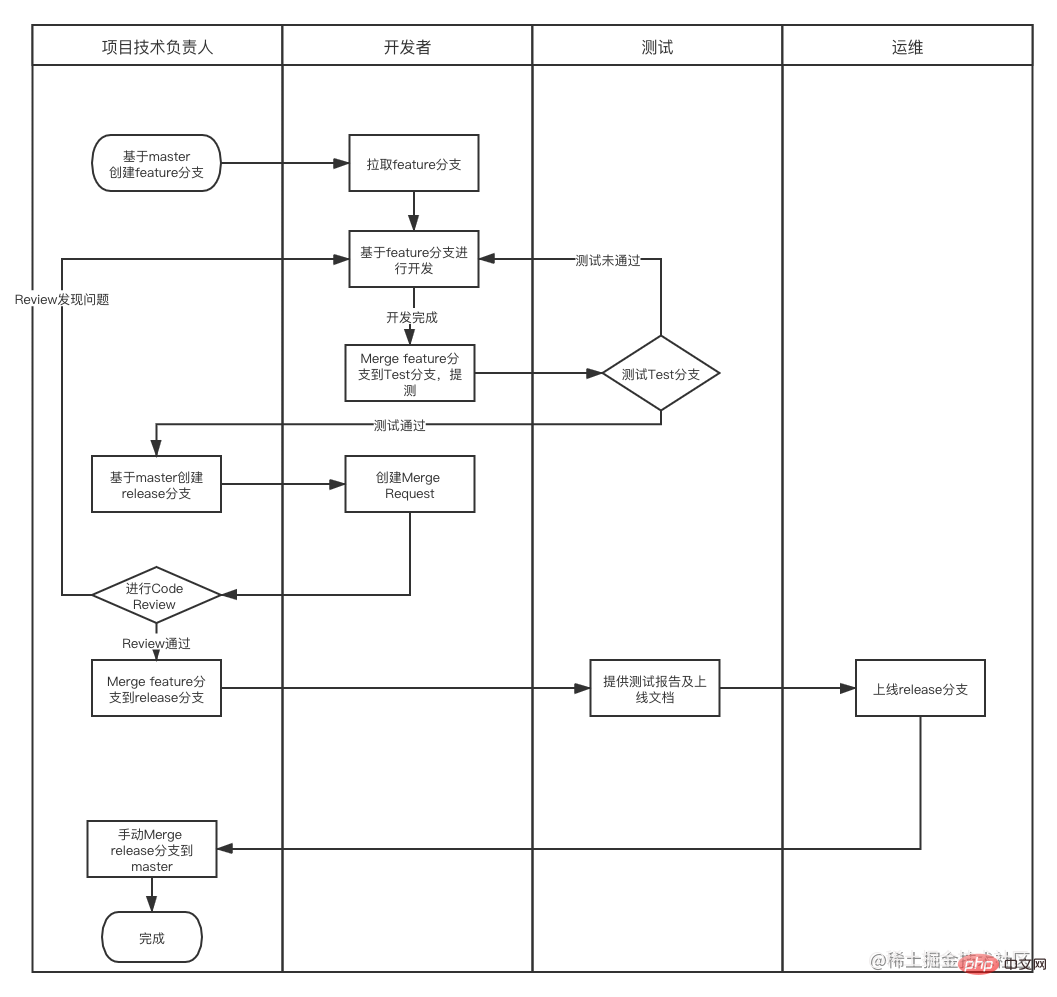
Branch management specifications

Branch naming cannot be strange, there must be a unified naming method. There are mainly the following types:

Branch management Naming convention Explanation
master master branch master The stable version branch, after the return is completed, Merged from the release branch by the project technical leader, and tagged
test test branch test/yyyyMMdd_ Function name example: test/20220426_blog Testers use branches, merged from the feature branch during testing
feature function development branch feature/yyyyMMdd_ Function name_Responsible person example: feature/20220426_blog_xiumubai New feature development uses branches, based on master
fix bug repair branch fix/yyyyMMdd_ Function name_Responsible person example: fix/20220426_blog_xiumubai Emergency online bug fixes use branches, based on master to establish
release online branch release/version number example: release/0.1.0 The branch used for online is established based on master. The feature branch to be merged must be code reviewed before it can be merged into the online version.

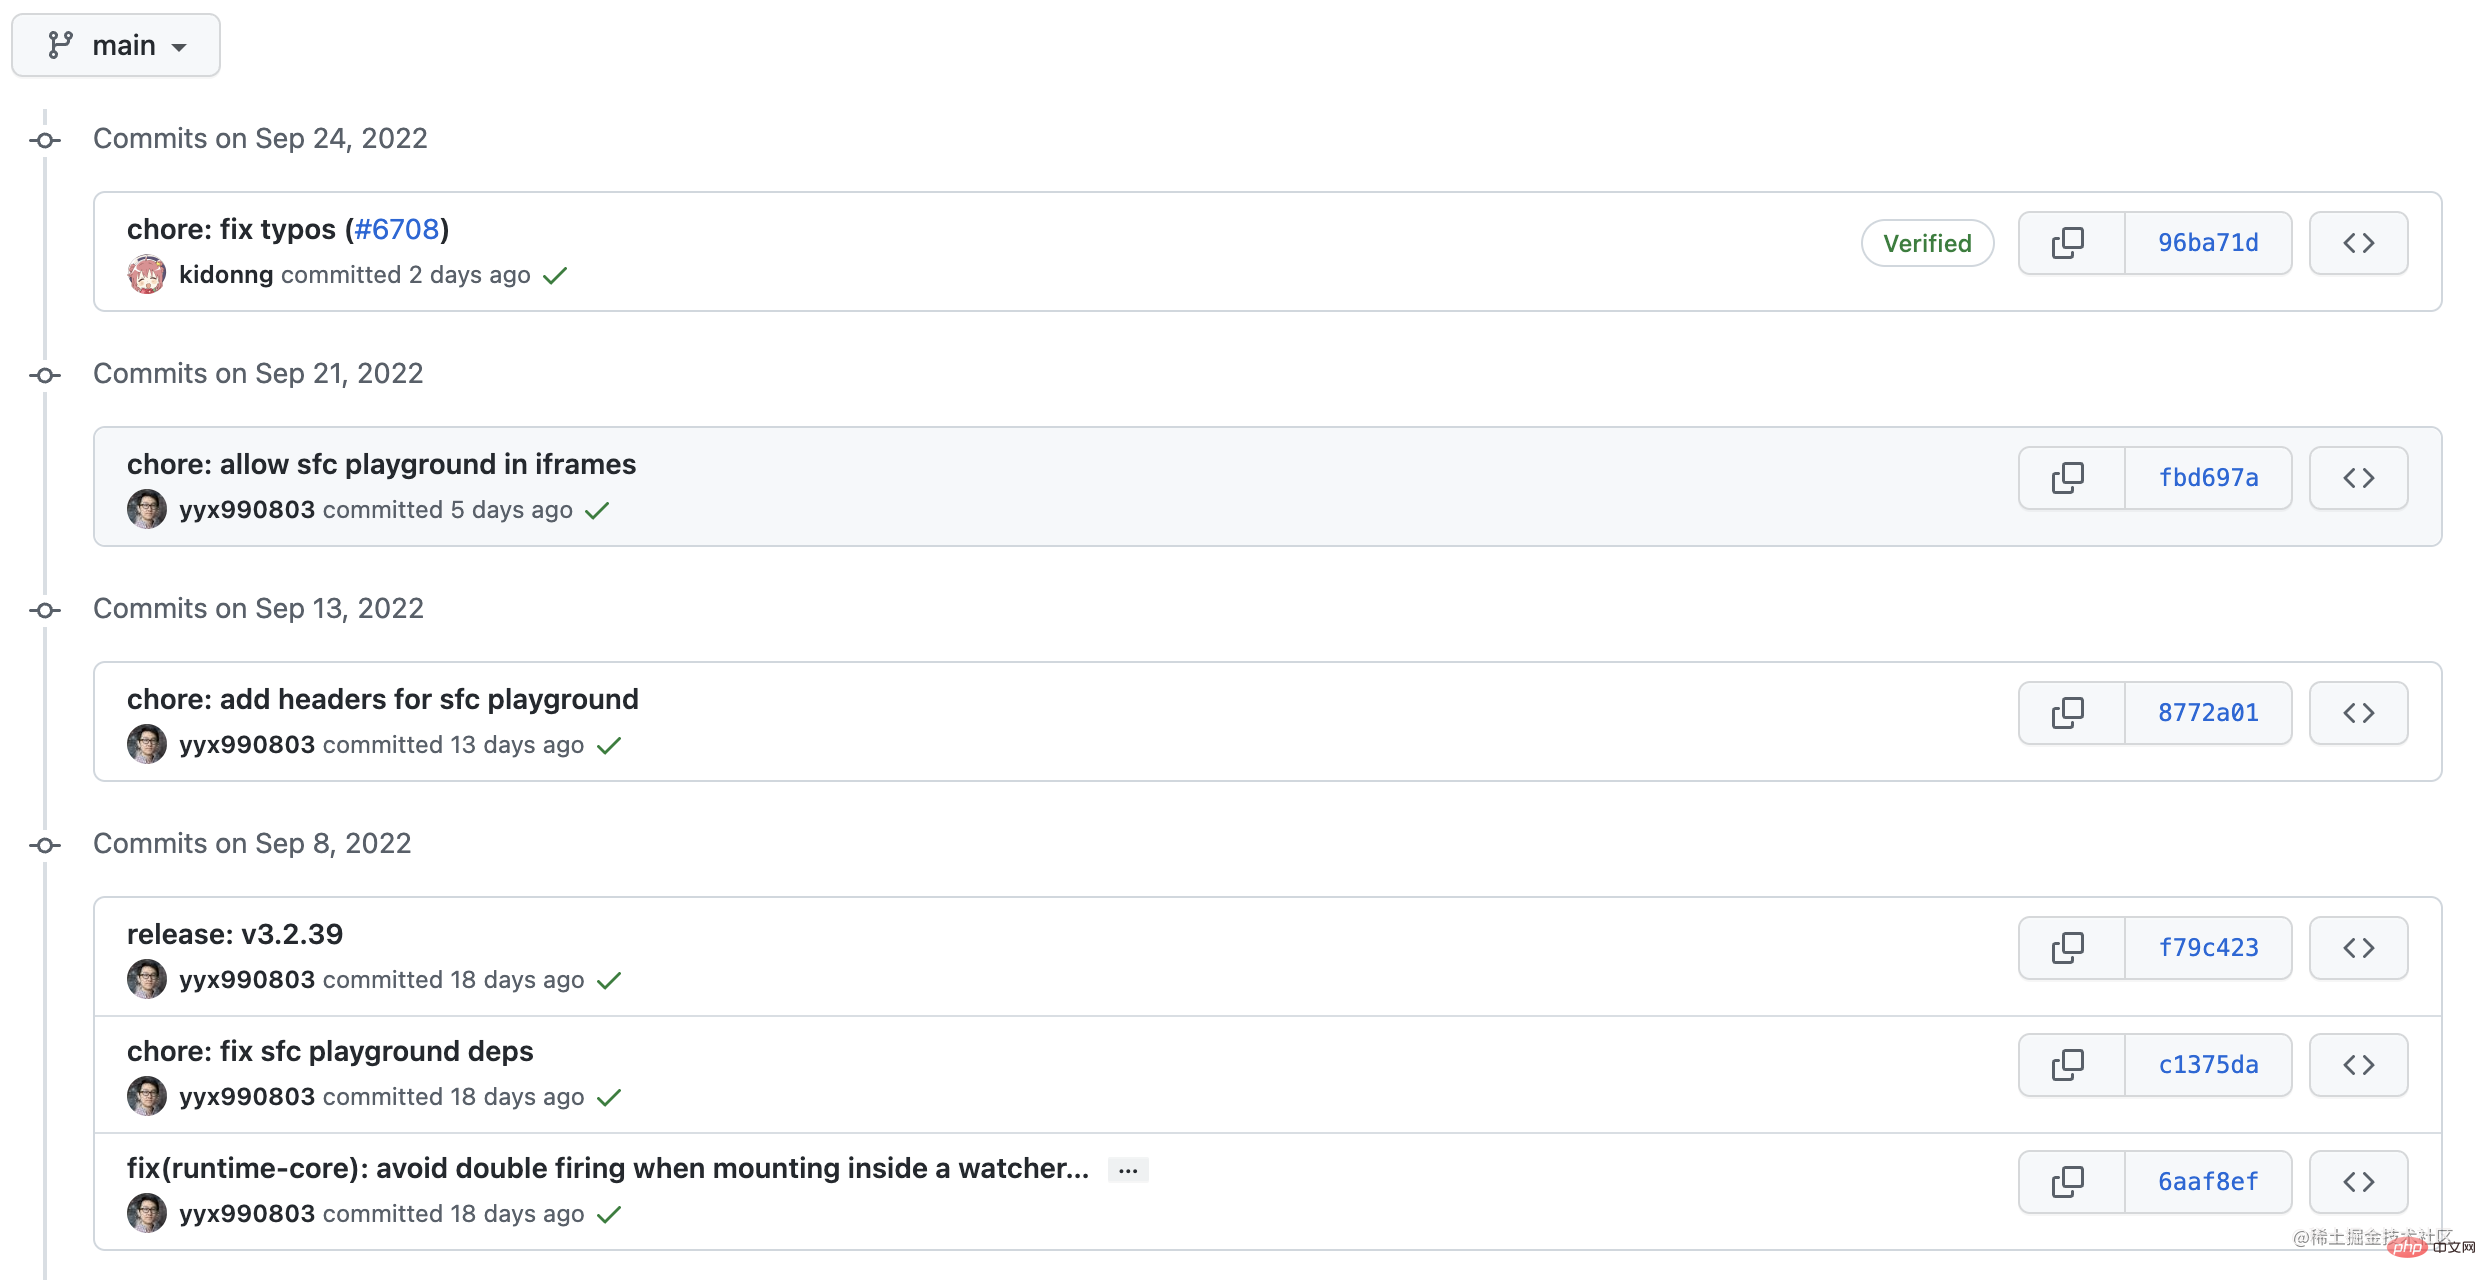
Number management specifications

When we go online, we need to tag the version number. The following is the version number specification:

项目上线release分支创建定义:
  
第一个数字是主版本。第二个数字是次版本。第三个数字是补丁版本(hotfix 类的更新)。

主版本:含有破坏性更新、大调整等。 例如:1.1.0 > 2.0.0

次版本:增加新功能特性。例如:1.1.0 > 1.2.0

补丁版本:修复问题等。例如:1.1.0 > 1.1.1
Copy after login

The following figure is a development flow chart based on git specifications. :

Submit information specification

Finally, when committing, you need to specify the commit information, and you must add the prefix

##choreBuild process or auxiliary tools change

下图是vue3源码的提交信息规范:

下面我们就实际操作一下,如果通过husky+commitlint集成一个统一规范的git commit信息。

配置 git 提交的校验钩子

  • husky: git提交时触发hooks
  • commitlint: 对提交的内容做规范校验 husky,主要对pre-commit和commit-msg钩子做校验。
# 安装husky
yarn add husky -D
# 初始化husky配置,在根目录新增.husky配置文件。初始化配置pre-commit
npx husky-init 
# 另外新增一个hooks,commit-msg
npx husky add .husky/commit-msg
Copy after login

目录结构是下面这样子的:

commit-msg文件中添加 npm run commitlint

pre-commit文件中有个npm run test我们先注释掉,不然会报错。

安装commitlint

# 添加依赖文件
yarn add @commitlint/config-conventional @commitlint/cli -D
Copy after login

添加配置文件,新建commitlint.config.js,然后添加下面的代码:

module.exports = {
  extends: ['@commitlint/config-conventional'],
  // 校验规则
  rules: {
    'type-enum': [
      2,
      'always',
      [
        'feat',
        'fix',
        'docs',
        'style',
        'refactor',
        'perf',
        'test',
        'chore',
        'revert',
        'build',
      ],
    ],
    'type-case': [0],
    'type-empty': [0],
    'scope-empty': [0],
    'scope-case': [0],
    'subject-full-stop': [0, 'never'],
    'subject-case': [0, 'never'],
    'header-max-length': [0, 'always', 72],
  },
}
Copy after login

配置scripts

因为我们需要运行npm run commitlint,所以需要在package.json文件中添加如下代码:

# 在scrips中添加下面的代码
{
"scripts": {
    "commitlint": "commitlint --config commitlint.config.js -e -V"
  },
}
Copy after login

配置结束,现在当我们填写commit信息的时候,前面就需要带着下面的subject

'feat',
'fix',
'docs',
'style',
'refactor',
'perf',
'test',
'chore',
'revert',
'build',
Copy after login

比如:git commit -m "feat: test",注意feat:后面有个空格

我们来写一个错误的来测试一下:

提示subject是空的。

使用正确的提交方式,提交成功了

使用 commitizen 做git规范化提交

由于添加了commitlint验证,对于不熟悉提交规范的新手同学会有一定影响,可以添加 commitizen 工具,手动生成规范化commit。

Commitizen是一个格式化commit message的工具。

# 工具安装
yarn add -D commitizen
Copy after login

使用cz-conventional-changelog

安装工具

yarn add cz-conventional-changelog -D
Copy after login

配置命令

"script": {
    "commit": "cz"
}
Copy after login

在package.json 中添加定义commitizen使用规则,

{
	"config": {
    "commitizen": {
      "path": "./node_modules/cz-conventional-changelog"
    }
  },
}
Copy after login

当执行git commit的时候,就可以提示我们填写代码规则了

自定义 commitizen 规则

使用 cz-customizable 工具

# 安装依赖
yarn add cz-customizable -D
Copy after login

配置命令

"script": {
    "commit": "git-cz"
}
Copy after login

在package.json 中添加自定义commitizen,使用git-cz执行git commit命令

"config": {
    "commitizen": {
        "path": "./node_modules/cz-customizable"
    }
}
Copy after login

在根目录创建的.cz-config.js, 自定义commit提示内容

module.exports = {
  types: [
    { value: 'feat', name: '✨feat:     新功能' },
    { value: 'fix', name: '?fix:      修复' },
    { value: 'docs', name: '✏️docs:     文档变更' },
    { value: 'style', name: '?style:    代码格式(不影响代码运行的变动)' },
    {
      value: 'refactor',
      name: '♻️refactor: 重构(既不是增加feature,也不是修复bug)'
    },
    { value: 'perf', name: '⚡️perf:     性能优化' },
    { value: 'test', name: '✅test:     增加测试' },
    { value: 'chore', name: '?chore:    构建过程或辅助工具的变动' },
    { value: 'revert', name: '⏪️revert:   回退' },
    { value: 'build', name: '?️build:    打包' },
    { value: 'ci', name: '?CI:   related changes' }
  ],
  // override the messages, defaults are as follows
  messages: {
    type: '请选择提交类型(必选):',
    // scope: '请输入文件修改范围(可选):',
    customScope: '请输入修改范围(可选):',
    subject: '请简要描述提交(必填):',
    // body: '请输入详细描述(可选,待优化去除,跳过即可):',
    // breaking: 'List any BREAKING CHANGES (optional):\n',
    footer: '请输入要关闭的issue(待优化去除,跳过即可):',
    confirmCommit: '确认使用以上信息提交?(y/n/e/h)'
  },
  // used if allowCustomScopes is true
  allowCustomScopes: true,
  // allowBreakingChanges: ['feat', 'fix'],
  skipQuestions: ['body', 'footer'],
  // limit subject length, commitlint默认是72
  subjectLimit: 72
}
Copy after login

当我们提交代码的时候,需要先git add .,然后执行npm run commit,就可以根据响应的提示填写commit信息 了,如下图所示:

(学习视频分享:编程基础视频

The above is the detailed content of Gitlab learning some git specifications commonly used by enterprises. For more information, please follow other related articles on the PHP Chinese website!

Related labels:
source:juejin.cn
Statement of this Website
The content of this article is voluntarily contributed by netizens, and the copyright belongs to the original author. This site does not assume corresponding legal responsibility. If you find any content suspected of plagiarism or infringement, please contact admin@php.cn
Popular Tutorials
More>
Latest Downloads
More>
Web Effects
Website Source Code
Website Materials
Front End Template
About us Disclaimer Sitemap
php.cn:Public welfare online PHP training,Help PHP learners grow quickly!
PrefixExplanation
featNew features
fixFix
docsDocumentation changes
styleCode format
refactorRefactor
perfPerformance optimization
testAdd test
revert Fallback
buildPackaging