In the Go language, a slice is a reference to a continuous fragment of an array, so a slice is a reference type. This fragment can be the entire array, or it can be identified by the start and end indexes. A subset of some items; the memory distribution of a slice is continuous, so the slice can be treated as an array of variable size. A slice is a data structure with three fields: a pointer to the underlying array, the number of elements the slice accesses (i.e., the length), and the number of elements the slice is allowed to grow to (i.e., the capacity).

The operating environment of this tutorial: Windows 7 system, GO version 1.18, Dell G3 computer.
A slice is a reference to a continuous fragment of an array, so a slice is a reference type (so more similar to the array type in C/C, or the list type in Python). This fragment can It is the entire array, or it can be a subset of some items identified by the start and end indexes. It should be noted that the items identified by the end index are not included in the slice.
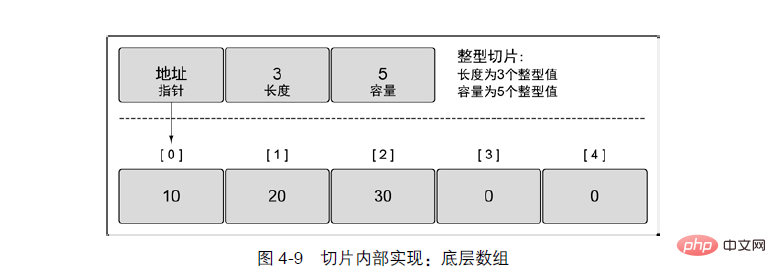
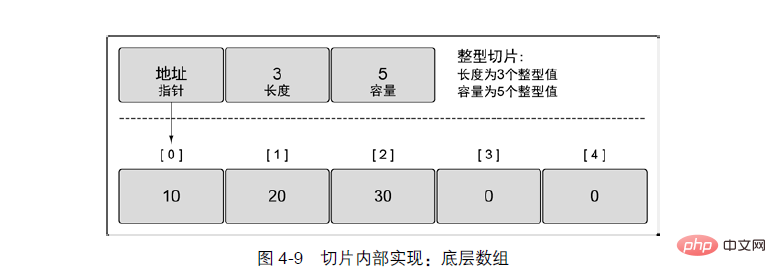
The internal structure of slices in the Go language includes address, size and capacity. Slices are generally used to quickly operate a data set. If a data set is compared to cutting a cake, a slice is the "piece" you want. , the cutting process includes where to start (the starting position of the slice) and how big to cut (the size of the slice). The capacity can be understood as the size of the pocket holding the slice, as shown in the figure below.
Figure: Slice structure and memory allocation
The memory distribution of slices is continuous, so you can treat the slice as an array with a variable size.
The slice has a data structure with three fields. These data structures contain metadata that the Go language needs to operate on the underlying array. These three fields are pointers to the underlying array and the number of elements accessed by the slice (i.e. the length). ) and the number of elements (i.e., capacity) the slice is allowed to grow to. The difference between length and capacity will be further explained later.

The slice points to a continuous memory area by default, which can be an array or a slice. The slice itself.
Generating slices from a continuous memory area is a common operation. The format is as follows:
slice [开始位置 : 结束位置]
The syntax is as follows:
slice: represents the target slice object;
Start position: corresponds to the index of the target slice object;
End position: corresponds to the end index of the target slice.
Generate a slice from an array, the code is as follows:
var a  = [3]int{1, 2, 3}
fmt.Println(a, a[1:2])where a is an array with 3 integer elements, initialized to values 1 to 3, using a [1:2] can generate a new slice, and the code running result is as follows:
[1 2 3] [2]
where [2] is the result of a[1:2] slice operation.
Generating a new slice from an array or slice has the following characteristics:
The number of elements taken out is: end position - starting position;
The element taken out does not include the index corresponding to the end position. The last element of the slice is obtained using slice[len(slice)];
When the default starting position is used, it means starting from the continuous From the beginning of the area to the end position;
When the default end position is used, it means from the start position to the end of the entire continuous area;
Both at the same time By default, it is equivalent to the slice itself; when both
are 0, it is equivalent to an empty slice and is generally used for slice reset.
When taking the slice element value according to the index position, the value range is (0~len(slice)-1). If it exceeds the limit, a runtime error will be reported. When the slice is generated, the end You can fill in len(slice) for the position but no error will be reported.
Let’s get familiar with the characteristics of slicing through examples.
1) Generate slices from the specified range
Slices and arrays are inseparable. If the array is understood as an office building, then slicing is to separate different consecutive floors. Rent to users. The rental process requires selecting the start floor and end floor. This process will generate slices. The sample code is as follows:
var highRiseBuilding [30]int
for i := 0; i < 30; i++ {
        highRiseBuilding[i] = i + 1
}
// 区间
fmt.Println(highRiseBuilding[10:15])
// 中间到尾部的所有元素
fmt.Println(highRiseBuilding[20:])
// 开头到中间指定位置的所有元素
fmt.Println(highRiseBuilding[:2])The code output is as follows:
A 30-story high-rise building is constructed in the code. The element values of the array range from 1 to 30, representing different independent floors. The output results are different rental and sale plans.
The code description is as follows:
Line 8, try to rent out an interval floor.
Line 11, for rent above 20 floors.
Line 14, for rent below 2 floors, usually commercial shops.
切片有点像C语言里的指针,指针可以做运算,但代价是内存操作越界,切片在指针的基础上增加了大小,约束了切片对应的内存区域,切片使用中无法对切片内部的地址和大小进行手动调整,因此切片比指针更安全、强大。
2) 表示原有的切片
生成切片的格式中,当开始和结束位置都被忽略时,生成的切片将表示和原切片一致的切片,并且生成的切片与原切片在数据内容上也是一致的,代码如下:
a := []int{1, 2, 3}
fmt.Println(a[:])a 是一个拥有 3 个元素的切片,将 a 切片使用 a[:] 进行操作后,得到的切片与 a 切片一致,代码输出如下:
[1 2 3]
3) 重置切片,清空拥有的元素
把切片的开始和结束位置都设为 0 时,生成的切片将变空,代码如下:
a := []int{1, 2, 3}
fmt.Println(a[0:0])代码输出如下:

除了可以从原有的数组或者切片中生成切片外,也可以声明一个新的切片,每一种类型都可以拥有其切片类型,表示多个相同类型元素的连续集合,因此切片类型也可以被声明,切片类型声明格式如下:
var name []Type
其中 name 表示切片的变量名,Type 表示切片对应的元素类型。
下面代码展示了切片声明的使用过程:
// 声明字符串切片
var strList []string

// 声明整型切片
var numList []int

// 声明一个空切片
var numListEmpty = []int{}

// 输出3个切片
fmt.Println(strList, numList, numListEmpty)

// 输出3个切片大小
fmt.Println(len(strList), len(numList), len(numListEmpty))

// 切片判定空的结果
fmt.Println(strList == nil)
fmt.Println(numList == nil)
fmt.Println(numListEmpty == nil)代码输出结果:
代码说明如下:
第 2 行,声明一个字符串切片,切片中拥有多个字符串。
第 5 行,声明一个整型切片,切片中拥有多个整型数值。
第 8 行,将 numListEmpty 声明为一个整型切片,本来会在{}中填充切片的初始化元素,这里没有填充,所以切片是空的,但是此时的 numListEmpty 已经被分配了内存,只是还没有元素。
第 11 行,切片均没有任何元素,3 个切片输出元素内容均为空。
第 14 行,没有对切片进行任何操作,strList 和 numList 没有指向任何数组或者其他切片。
第 17 行和第 18 行,声明但未使用的切片的默认值是 nil,strList 和 numList 也是 nil,所以和 nil 比较的结果是 true。
第 19 行,numListEmpty 已经被分配到了内存,但没有元素,因此和 nil 比较时是 false。
切片是动态结构,只能与 nil 判定相等,不能互相判定相等。声明新的切片后,可以使用 append() 函数向切片中添加元素。
如果需要动态地创建一个切片,可以使用 make() 内建函数,格式如下:
make( []Type, size, cap )
其中 Type 是指切片的元素类型,size 指的是为这个类型分配多少个元素,cap 为预分配的元素数量,这个值设定后不影响 size,只是能提前分配空间,降低多次分配空间造成的性能问题。
示例如下:
a := make([]int, 2)
b := make([]int, 2, 10)

fmt.Println(a, b)
fmt.Println(len(a), len(b))
代码输出如下:
其中 a 和 b 均是预分配 2 个元素的切片,只是 b 的内部存储空间已经分配了 10 个,但实际使用了 2 个元素。
容量不会影响当前的元素个数,因此 a 和 b 取 len 都是 2。
温馨提示
使用 make() 函数生成的切片一定发生了内存分配操作,但给定开始与结束位置(包括切片复位)的切片只是将新的切片结构指向已经分配好的内存区域,设定开始与结束位置,不会发生内存分配操作。
切片的使用和数组是一模一样的:
func main() {
    slice1 := []int{1,2,3,4}
    fmt.Println(slice1[1])
}切片之所以称为切片,是因为它只是对应底层数组的一部分,看如下所示代码:
func main() {
    slice := []int{10, 20, 30, 40, 50}
    newSlice := slice[1:3]
}为了说明上面的代码,我们看下面的这张图:
第一个切片slice 能够看到底层数组全部5 个元素的容量,不过之后的newSlice 就看不到。对于newSlice,底层数组的容量只有4 个元素。newSlice 无法访问到它所指向的底层数组的第一个元素之前的部分。所以,对newSlice 来说,之前的那些元素就是不存在的。
需要记住的是,现在两个切片共享同一个底层数组。如果一个切片修改了该底层数组的共享部分,另一个切片也能感知到,运行下面的代码:
func main() {
    slice := []int{10, 20, 30, 40, 50}
    newSlice := slice[1:3]

    slice[1] = 200
    fmt.Println(newSlice[0])
}运行结果如下:
200
切片只能访问到其长度内的元素。试图访问超出其长度的元素将会导致语言运行时异常,比如对上面的newSlice,他只能访问索引为1和2的元素(不包括3),比如:
func main() {
    slice := []int{10, 20, 30, 40, 50}
    newSlice := slice[1:3]

    fmt.Println(newSlice[3])
}运行代码,控制台会报错:
panic: runtime error: index out of range

goroutine 1 [running]:
main.main()
E:/go-source/go-arr/main.go:20 +0x11我们知道切片可以再生出切片,那么子切片的容量为多大呢?我们来测试一下:
func main() {
    slice := make([]int, 2, 10)
    slice1 := slice[1:2]
    fmt.Println(cap(slice1))
}控制台打印结果为:
9
9
从结果我们可以推测,子切片的容量为底层数组的长度减去切片在底层数组的开始偏移量,比如在上面的例子中,slice1的偏移值为1,底层数组的大小为10,所以两者相减,得到结果9。
go提供了append方法用于向切片中追加元素,如下所示:
func main() {
    slice := make([]int, 2, 10)
    slice1 := slice[1:2]
    slice2 := append(slice1, 1)
    slice2[0] = 10001
    fmt.Println(slice)
    fmt.Println(cap(slice2))
}输出结果如下:
[0 10001]
9
此时slice,slice1,slice2共享底层数组,所以只要一个切片改变了某一个索引的值,会影响到所有的切片,还有一点值得注意,就是slice2的容量为9,记住这个值。
为了说明问题,我把例子改为如下所示代码:
func main() {
    slice := make([]int, 2, 10)
    slice1 := slice[1:2]
    slice2 := append(slice1, 1)
    slice2 = append(slice2, 1)
    slice2 = append(slice2, 1)
    slice2 = append(slice2, 1)
    slice2 = append(slice2, 1)
    slice2 = append(slice2, 1)
    slice2 = append(slice2, 1)
    slice2 = append(slice2, 1)
    slice2 = append(slice2, 1)
    slice2 = append(slice2, 1)
    slice2 = append(slice2, 1)
    slice2 = append(slice2, 1)
    slice2[0] = 10001
    fmt.Println(slice)
    fmt.Println(slice1)
    fmt.Println(cap(slice2))
}此时我们再次打印结果,神奇的事情出现了:
[0 0]
[0]
18
虽然我们改变0位置的值,但是并没有影响到原来的slice和slice1,这是为啥呢?我们知道原始的slice2对应的底层数组的容量为9,经过我们一系列的append操作,原始的底层数组已经无法容纳更多的元素了,此时Go会分配另外一块内存,把原始切片从位置1开始的内存复制到新的内存地址中,也就是说现在的slice2切片对应的底层数组和slice切片对应的底层数组完全不是在同一个内存地址,所以当你此时更改slice2中的元素时,对slice已经来说,一点儿关系都没有。
另外根据上面的打印结果,你也应该猜到了,当切片容量不足的时候,Go会以原始切片容量的2倍建立新的切片,在我们的例子中2*9=18,就是这么粗暴。
在前面的例子中,我们创建子切片的时候,没有指定子切片的容量,所以子切片的容量和我们上面讨论的计算子切片的容量方法相等,那么我们如何手动指定子切片的容量呢?
在这里我们借用《Go实战》中的一个例子:
func main() {
    source := []string{"Apple", "Orange", "Plum", "Banana", "Grape"}
    slice := source[2:3:4]
    fmt.Println(cap(slice))
}如果你仔细看的话,上面的子切片的生成方式和普通的切片有所不同,[]里面有三个部分组成,,第一个值表示新切片开始元素的索引位置,这个例子中是2。第二个值表示开始的索引位置(2)加上希望包括的元素的个数(1),2+1 的结果是3,所以第二个值就是3。为了设置容量,从索引位置2 开始,加上希望容量中包含的元素的个数(2),就得到了第三个值4。所以这个新的切片slice的长度为1,容量为2。还有一点大家一定要记住,你指定的容量不能比原先的容量,这里就是source的容量大,加入我们这样设置的话:
func main() {
    source := []string{"Apple", "Orange", "Plum", "Banana", "Grape"}
    slice := source[2:3:10]
    fmt.Println(cap(slice))
}运行结果如下,报错了,哈哈:
panic: runtime error: slice bounds out of range [::10] with capacity 5

goroutine 1 [running]:
main.main()
E:/learn-go/slice/main.go:7 +0x1d关于如何迭代切片,我们可以使用range配置来使用,如下:
func main() {
    slice:=[]int{1,2,4,6}
    for _, value:=range slice{
        fmt.Println(value)
    }
}关于迭代切片,大家有一点需要注意,就以上面的例子为例,value只是slice中元素的副本,为啥呢?我们来验证这一点:
func main() {
    slice:=[]int{1,2,4,6}
    for index, value:=range slice{
        fmt.Printf("value[%d],indexAddr:[%X],valueAddr:[%X],sliceAddr:[%X]\n",value,&index,&value,&slice[index])
    }
}控制台打印结果如下:
value[1],indexAddr:[C00000A0B8],valueAddr:[C00000A0D0],sliceAddr:[C000010380]
value[2],indexAddr:[C00000A0B8],valueAddr:[C00000A0D0],sliceAddr:[C000010388]
value[4],indexAddr:[C00000A0B8],valueAddr:[C00000A0D0],sliceAddr:[C000010390]
value[6],indexAddr:[C00000A0B8],valueAddr:[C00000A0D0],sliceAddr:[C000010398]
从上面的结果可以看到index和value的地址始终是不变的,所以它们始终是同一个变量,只是变量引用地址的内容发生了变化,从而验证迭代的时候,只能是切片元素的副本,最后看看sliceAddr代表的地址相隔8个字节,因为在64位系统上,每一个int类型的大小为8个字节。
函数间传递切片,也是以值的方式传递的,但是你还记得这篇博文开头给出的切片的布局么?
切片由三个部分组成,包括指向底层数组的指针,当前切片的长度,当前切片的容量,所以切片本身并不大,我们来测试一个切片的大小:
func main() {
    slice:=[]int{1,2,4,6}
    fmt.Println(unsafe.Sizeof(slice))
}测试结果为:
24
也就是这个slice切片的大小为24字节,所以当切片作为参数传递的时候,几乎没有性能开销,还有很重要的一点,参数生成的副本的地址指针和原始切片的地址指针是一样的,因此,如果你在函数里面修改了切片,那么会影响到原始的切片,我们来验证这点:
func main() {
    slice:=[]int{1,2,4,6}
    handleSlice(slice)
    fmt.Println(slice)
}打印结果:
[100 2 4 6]
The above is the detailed content of How to interpret go language slices. For more information, please follow other related articles on the PHP Chinese website!
 Usage of Type keyword in Go
 How to implement linked list in go
 What are the Go language programming software?
 How to learn go language from 0 basics
 How to define variables in golang
 What are the methods to implement operator overloading in Go language?
 What are the operators in Go language?
 What are the data conversion methods in golang?