vue is suitable for multi-page applications. Vue relies on webpack during engineering development, and webpack integrates all resources together to form an html file and a bunch of js files; if you want to use vue to implement multi-page applications, you need to reconfigure its dependencies. That is, by modifying the webpack configuration, the scaffolding has the ability to build multi-page applications.

The operating environment of this tutorial: windows7 system, vue3 version, DELL G3 computer.
We know that vue can quickly develop web single-page applications, and the official provides us with its own application scaffolding vue-cli. We only need to download the scaffolding and install the dependencies to start the prototype of the vue application.
This benefits from webpack’s dependency tracking, loaders of various resource suffixes, and the powerful functions of related webpack plug-ins.
However, sometimes, we have development needs for multiple pages. In this case, we can build multiple applications for multiple pages, such as generating multiple application directories through vue-cli, but in this case There will be a lot of duplicate construction code and boilerplate code, and it will also destroy the unity of the application and make it difficult to maintain. We can modify the webpack configuration based on vue-cli to enable the scaffolding to build multi-page applications.
Vue relies on webpack during engineering development, and webpack integrates all resources together to form an html file and a bunch of js files. If vue is implemented as a multi-page application, it needs to be Dependency reconfiguration, that is, modifying the webpack configuration file.
The following mainly details the multi-page application development (MPA) of Vue
1.1. Configuration files that need to be modified
1. Enter \build\webpack.base. In the conf.js directory, find the entry in the module.exports domain, and configure and add multiple entries there:
Pay attention to the modification and correspondence of the green box.
  entry: {
    app: './src/main.js',
    one: './src/pages/one.js',
    two: './src/pages/two.js'
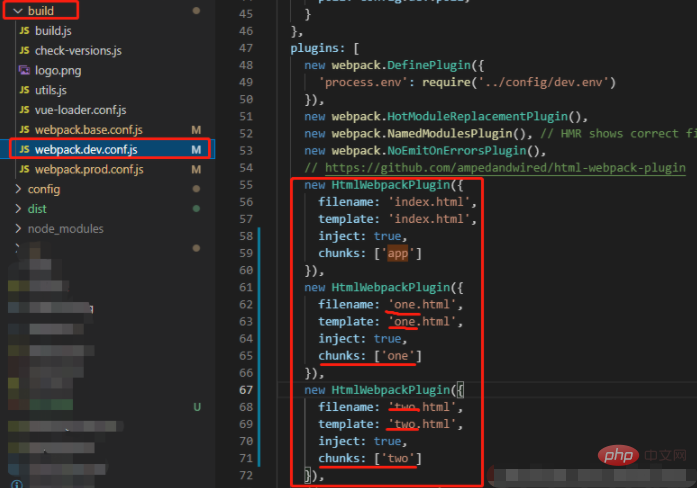
}2. Make modifications to the development environment run dev, open the \build\webpack.dev.conf.js file, and find the plugins in module.exports. The following is written as follows:

    new HtmlWebpackPlugin({
      filename: 'index.html',
      template: 'index.html',
      inject: true,
      chunks: ['app']
    }),
    new HtmlWebpackPlugin({
      filename: 'one.html',
      template: 'one.html',
      inject: true,
      chunks: ['one']
    }),
    new HtmlWebpackPlugin({
      filename: 'two.html',
      template: 'two.html',
      inject: true,
      chunks: ['two']
}),Note: The configuration here is more important. If it is not written well, an error will be reported during packaging. The app in chunks refers to the entry of webpack.base.conf.js, which is the same as the corresponding variable name. The function of chunks is that each entry will correspond to an entry every time it is compiled and run. If not written, the resources of all pages will be introduced. That is, the single-page application was formed before the project configuration was changed.
3. Then configure the run build, which is the compilation environment. First open the \config\index.js file and add this

    index: path.resolve(__dirname, '../dist/index.html'),
    one: path.resolve(__dirname, '../dist/one.html'),
    two: path.resolve(__dirname, '../dist/two.html'),
to the build. Note: This is the html formed in the dist folder after packaging.
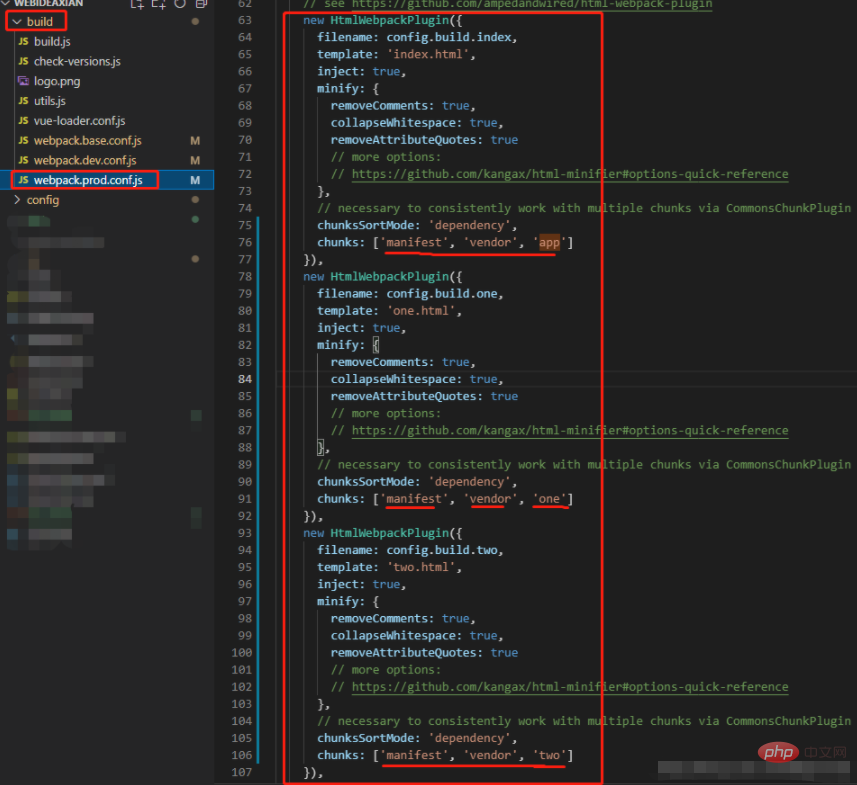
4. Then open the /build/webpack.prod.conf.js file, find HTMLWebpackPlugin in plugins, and add

 new HtmlWebpackPlugin({
      filename: config.build.index,
      template: 'index.html',
      inject: true,
      minify: {
        removeComments: true,
        collapseWhitespace: true,
        removeAttributeQuotes: true
      },
      chunksSortMode: 'dependency',
      chunks: ['manifest', 'vendor', 'app']
    }),
    new HtmlWebpackPlugin({
      filename: config.build.one,
      template: 'one.html',
      inject: true,
      minify: {
        removeComments: true,
        collapseWhitespace: true,
        removeAttributeQuotes: true
      },
      chunksSortMode: 'dependency',
      chunks: ['manifest', 'vendor', 'one']
    }),
    new HtmlWebpackPlugin({
      filename: config.build.two,
      template: 'two.html',
      inject: true,
      minify: {
        removeComments: true,
        collapseWhitespace: true,
        removeAttributeQuotes: true
      },
      chunksSortMode: 'dependency',
      chunks: ['manifest', 'vendor', 'two']
}),description: The filename refers to the build in \config\index.js. Each page must be configured with one chunks, otherwise the resources of all pages will be loaded.

##2.3. Codes for several files that need to be created
1. One.js file code: (I am giving an example here), two.js is similar to this code , please replace "one" with "two".import Vue from 'vue'
import one from './one.vue'
Vue.config.productionTip = false
/* eslint-disable no-new */
new Vue({
el: '#one',
render: h => h(one)
})<template>
<div>
<p>{{msg}}</p>
</div>
</template>
<script>
export default {
name: 'one',
data() {
return {
msg: 'I am one'
}
}
}
</script>nbsp;html> <meta> <meta> <title>one-page</title> <div></div>
I forgot to modify the id before, the page is blank and has no content. When you open the console, you can see that there is no content in the div tag, and the id It was the app that made me realize it, and it was fine after I modified it. [Related recommendations: vuejs video tutorial, web front-end development]
The above is the detailed content of Is vue suitable for multi-page applications?. For more information, please follow other related articles on the PHP Chinese website!