This article will talk to you about the related principles of back-end JWT authentication and how to use it in Node. I hope it will be helpful to everyone, thank you.

[Related tutorial recommendations: nodejs video tutorial]
The emergence of one technology is to make up for the shortcomings of another technology. Before the emergence of JWT, the Session authentication mechanism needed to be implemented with Cookie. Since Cookie does not support cross-domain access by default, when it comes to the front-end cross-domain request to the back-end interface, a lot of additional configuration is required to achieve cross-domain Session authentication.
Note:
JWT (full English name: JSON Web Token) is currently the most popular cross-domain authentication solution plan. The essence is a string writing specification, as shown below, which is used to transfer safe and reliable information between users and servers.
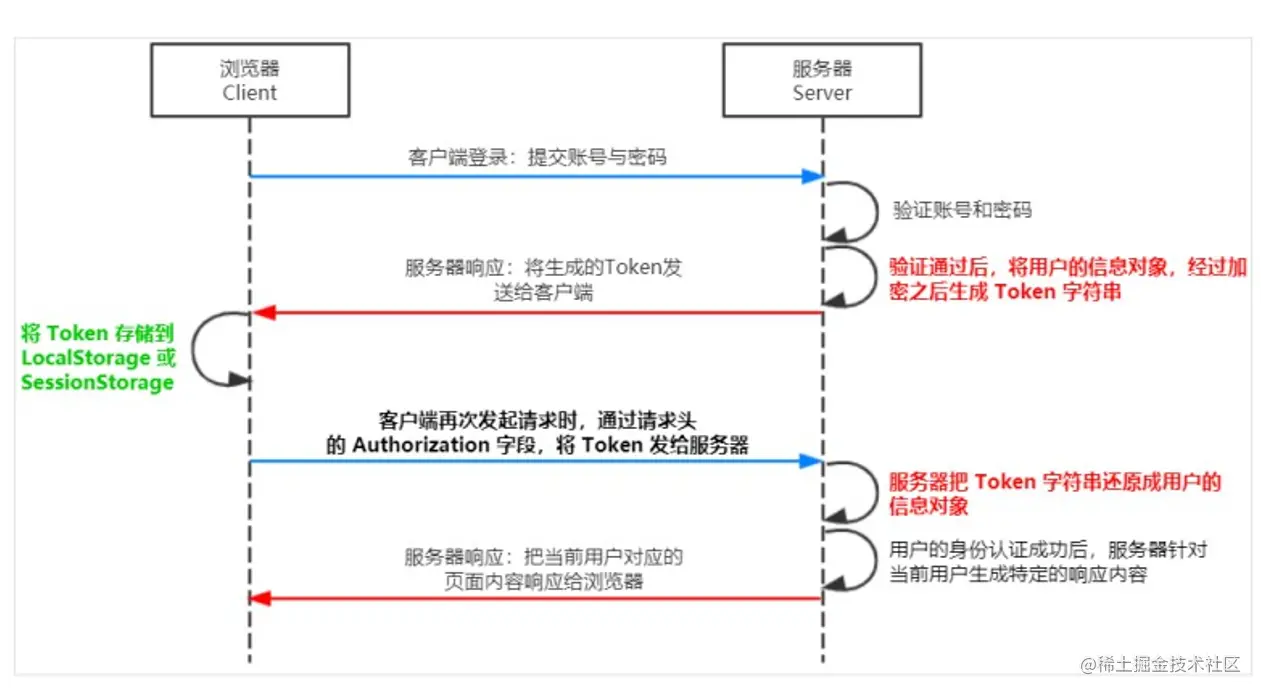
token authentication mechanism for identity verification is the most common solution. The process is as follows:

restoring the Token string.
Token is divided into three parts, Header, Payload, and Signature ( Signature) and spliced with .. The header and payload store data in JSON format, but are encoded. The format is as follows:
Header.Payload.Signature
Bearer eyJhbGciOiJIUzI1NiIsInR5cCI6IkpXVCJ9.eyJ1c2VybmFtZSI6ImFkbWluIiwiaWF0IjoxNjQ0ODI3NzI2LCJleHAiOjE2NDQ4Mjc3NTZ9.gdZKg9LkPiQZIgNAZ1Mn14GQd9kZZua-_unwHQoRsKE
alg, and there is also a field named typ. The default is JWT. The algorithm in the following example is HS256:
{ "alg": "HS256", "typ": "JWT" }eyJhbGciOiJIUzI1NiIsInR5cCI6IkpXVCJ9
Token, such as the user's id and name, by default it will also carry the issuance time of the token iat, and you can also set the expiration time, as follows:
{
   "sub": "1234567890",
   "name": "CoderBin",
   "iat": 1516239022
}eyJzdWIiOiIxMjM0NTY3ODkwIiwibmFtZSI6IkpvaG4gRG9lIiwiaWF0IjoxNTE2MjM5MDIyfQ
secretKey to the results of the first two Perform the HMACSHA25 algorithm, the formula is as follows:
Signature = HMACSHA256(base64Url(header)+.+base64Url(payload),secretKey)
localStorage or sessionStorage middle.
put the JWT in the Authorization field of the HTTP request header, in the following format:
Authorization: Bearer
is divided into two parts:
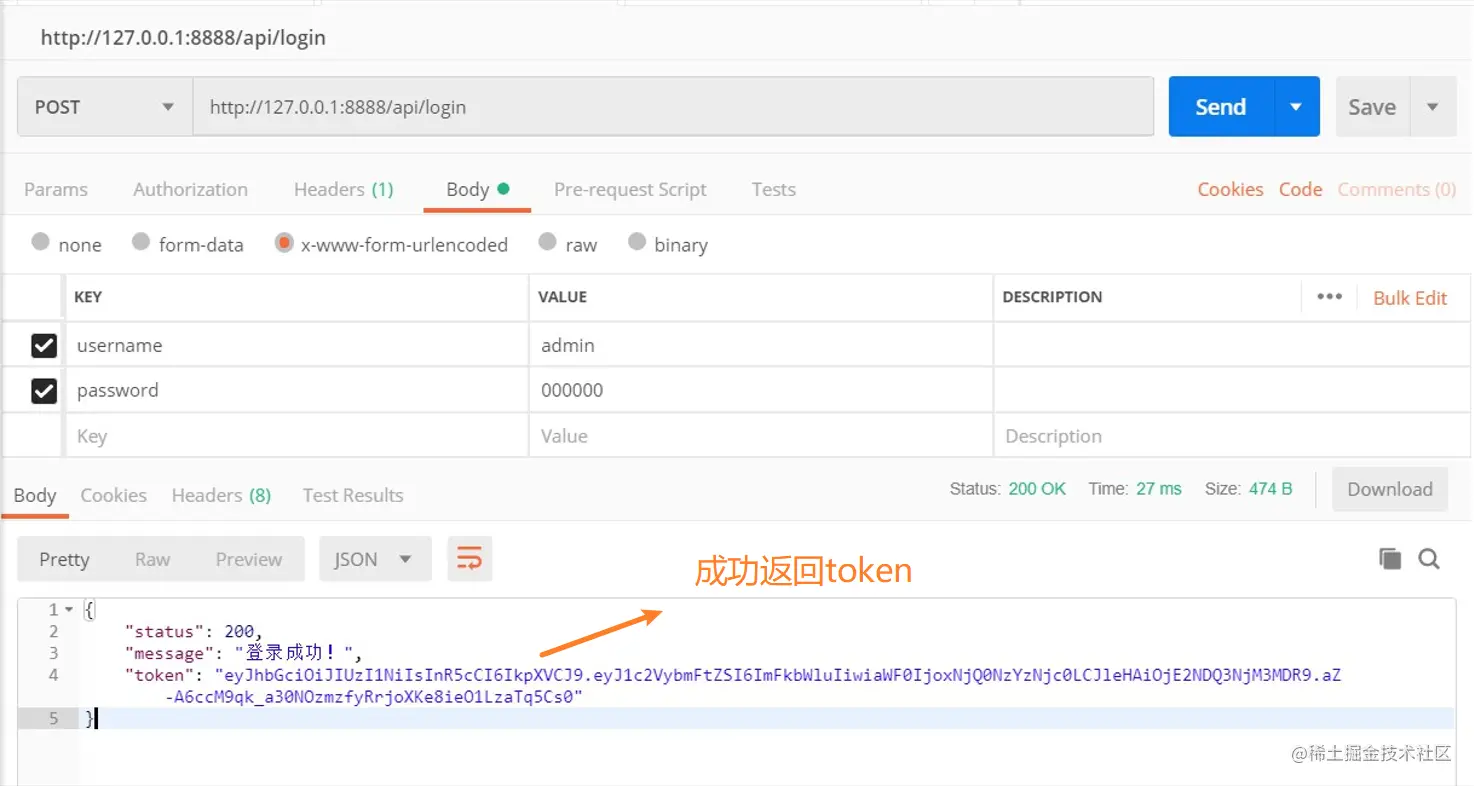
environment. Finally, there is the complete code with comments. You can directly look at the final code 运行如下命令,安装如下两个 JWT 相关的包: 其中: 在 为了保证 JWT 字符串的安全性,防止 JWT 字符串在网络传输过程中被别人破解,我们需要专门定义一个用于加密和解密的 secret 密钥: 当生成 JWT 字符串的时候,需要使用 secret 密钥对用户的信息进行加密,最终得到加密好的 JWT 字符串 当把 JWT 字符串解析还原成 JSON 对象的时候,需要使用 secret 密钥进行解密 调用 jsonwebtoken 包提供的 注意:千万不要把密码加密到 token 字符串中! 客户端每次在访问那些有权限接口的时候,都需要主动通过请求头中的 Authorization 字段,将 Token 字符串发送到服务器进行身份认证。 此时,服务器可以通过 express-jwt 这个中间件,自动将客户端发送过来的 Token 解析还原成 JSON 对象: 注意:只要配置成功了 express-jwt 这个中间件,就会自动把解析出来的用户信息,挂载到 req.user 属性上 注意: 当 express-jwt 这个中间件配置成功之后,即可在那些有权限的接口中,使用 当使用 express-jwt 解析 Token 字符串时,如果客户端发送过来的 Token 字符串过期或不合法,会产生一个解析失败的错误,影响项目的正常运行。我们可以通过 Express 的错误中间件,捕获这个错误并进行相关的处理,示例代码如下: 借助 postman 工具测试接口 JWT鉴权机制有许多优点: 当然,不可避免的也有一些缺点: This brief analysis of the JWT authentication mechanism ends here. I hope it will be helpful to everyone, thank you! For more node-related knowledge, please visit: nodejs tutorial! 1. 安装 JWT 相关的包
npm i jsonwebtoken express-jwt
jsonwebtoken 用于生成 JWT 字符串express-jwt 用于验证token,将 JWT 字符串解析还原成 JSON 对象2. 导入 JWT 相关的包
app.js中// 导入用于生成 JWT 字符串的包
const jwt = require('jsonwebtoken')
// 导入用户将客户端发送过来的 JWT 字符串,解析还原成 JSON 对象的包
const expressJWT = require('express-jwt')3. 定义 secret 密钥 *
// 这个 secretKey 的是可以是任意的字符串
const secretKey = 'CoderBin ^_^'
4. 在登录成功后生成 JWT 字符串 *
sign() 方法,将用户的信息加密成 JWT 字符串,响应给客户端:// 登录接口
app.post('/api/login', function (req, res) {
// 将 req.body 请求体中的数据,转存为 userinfo 常量
const userinfo = req.body
// 省略登录失败情况下的代码...
// 登录成功
// 在登录成功之后,调用 jwt.sign() 方法生成 JWT 字符串。并通过 token 属性发送给客户端
const tokenStr = jwt.sign(
{ username: userinfo.username },
secretKey,
{ expiresIn: '30s' }
)
// 向客户端响应成功的消息
res.send({
status: 200,
message: '登录成功!',
token: tokenStr // 要发送给客户端的 token 字符串
})
})5. 将 JWT 字符串还原为 JSON 对象 *
express.JWT({ secret: secretKey, algorithms: ['HS256'] }) 就是用来解析 Token 的中间件algorithms: ['HS256']// 1. 使用 app.use() 来注册中间件
app.use(expressJWT({
secret: secretKey,
algorithms: ['HS256']
}).unless({ path: [/^\/api\//] }))6. 使用 req.user 获取用户信息
req.user 对象,来访问从 JWT 字符串中解析出来的用户信息了,示例代码如下:// 这是一个有权限的 API 接口,必须在 Header 中携带 Authorization 字段,值为 token,才允许访问
app.get('/admin/getinfo', function (req, res) {
// TODO_05:使用 req.user 获取用户信息,并使用 data 属性将用户信息发送给客户端
console.log(req.user);
res.send({
status: 200,
message: '获取用户信息成功!',
data: req.user // 要发送给客户端的用户信息
})
})7. 捕获解析 JWT 失败后产生的错误
app.use((err, req, res, next) => {
// 这次错误是由 token 解析失败导致的
if (err.name === 'UnauthorizedError') {
return res.send({
status: 401,
message: '无效的token'
})
}
res.send({
status: 500,
message: '未知的错误'
})
})8. 完整代码
app.js// 导入 express 模块
const express = require('express')
// 创建 express 的服务器实例
const app = express()
// TODO_01:安装并导入 JWT 相关的两个包,分别是 jsonwebtoken 和 express-jwt
const jwt = require('jsonwebtoken')
const expressJWT = require('express-jwt')
// 允许跨域资源共享
const cors = require('cors')
app.use(cors())
// 解析 post 表单数据的中间件
const bodyParser = require('body-parser')
// 这里用内置的中间件也行: app.use(express.urlencoded({ extended: false }))
app.use(bodyParser.urlencoded({ extended: false }))
// TODO_02:定义 secret 密钥,建议将密钥命名为 secretKey
// 这个 secretKey 的是可以是任意的字符串
const secretKey = 'smiling ^_^'
// TODO_04:注册将 JWT 字符串解析还原成 JSON 对象的中间件
// 1. 使用 app.use() 来注册中间件
// 2. express.JWT({ secret: secretKey, algorithms: ['HS256'] }) 就是用来解析 Token 的中间件
// 2.1 express-jwt 模块,现在默认为 6版本以上,必须加上: algorithms: ['HS256']
// 3. .unless({ path: [/^\/api\//] }) 用来指定哪些接口不需要访问权限
// 4. 注意:只要配置成功了 express-jwt 这个中间件,就会自动把解析出来的用户信息,挂载到 req.user 属性上
app.use(expressJWT({ secret: secretKey, algorithms: ['HS256'] }).unless({ path: [/^\/api\//] }))
// 登录接口
app.post('/api/login', function (req, res) {
// 将 req.body 请求体中的数据,转存为 userinfo 常量
const userinfo = req.body
// 登录失败
if (userinfo.username !== 'admin' || userinfo.password !== '000000') {
return res.send({
status: 400,
message: '登录失败!'
})
}
// 登录成功
// TODO_03:在登录成功之后,调用 jwt.sign() 方法生成 JWT 字符串。并通过 token 属性发送给客户端
// 参数 1:用户的信息对象
// 参数 2:解密的秘钥
// 参数 3:配置对象,可以配置 token 的有效期
// 记住:千万不要把密码加密到 token 字符串中!
const tokenStr = jwt.sign({ username: userinfo.username }, secretKey, { expiresIn: '30s' })
res.send({
status: 200,
message: '登录成功!',
token: tokenStr // 要发送给客户端的 token 字符串
})
})
// 这是一个有权限的 API 接口,必须在 Header 中携带 Authorization 字段,值为 token,才允许访问
app.get('/admin/getinfo', function (req, res) {
// TODO_05:使用 req.user 获取用户信息,并使用 data 属性将用户信息发送给客户端
console.log(req.user);
res.send({
status: 200,
message: '获取用户信息成功!',
data: req.user // 要发送给客户端的用户信息
})
})
// TODO_06:使用全局错误处理中间件,捕获解析 JWT 失败后产生的错误
app.use((err, req, res, next) => {
// 这次错误是由 token 解析失败导致的
if (err.name === 'UnauthorizedError') {
return res.send({
status: 401,
message: '无效的token'
})
}
res.send({
status: 500,
message: '未知的错误'
})
})
// 调用 app.listen 方法,指定端口号并启动web服务器
app.listen(8888, function () {
console.log('Express server running at http://127.0.0.1:8888')
})八. 测试结果
1 测试登录接口

2. 测试登录需要权限的接口-失败
3. 测试登录需要权限的接口-成功
九、最后总结
The above is the detailed content of What is JWT? How to implement JWT authentication mechanism in Node (a brief analysis). For more information, please follow other related articles on the PHP Chinese website!