How to useVue3 to develop Figma plug-in? The following article will introduce you to the principle of Figma plug-in, record the process of developing Fimga plug-in using Vue 3, and attach the out-of-box code. I hope it will be helpful to you!

Figma is a popular design tool nowadays, and more and more design teams Start switching from Sketch to Figma. The biggest feature of Figma is that itis developed using Web technologyand is completelycross-platform. Figma plug-ins are also developed using Web technology. As long as you knowhtml,js,css, you can write a Figma plug-in.
Figma plug-in principle
Before introducing the Fimga plug-in, let’s first Learn about Fimga's technical architecture.
Figma is developed as a whole usingReact. The core canvas area is a piece ofcanvas, which is rendered usingWebGL. And the canvas engine part usesWebAssembly, which is why Figma can be so smooth. The desktop Figma App usesElectron- a framework for developing desktop applications using web technology. Electron is similar to a browser, but it actually runs a web application internally.
To develop a safe and reliable plug-in system on the Web,iframeis undoubtedly the most direct solution.iframeis a standard W3C specification that has been used in browsers for many years. Its characteristics are:
Security, natural sandbox isolation environment, pages within iframe Unable to operate the main frame;
Reliable, very good compatibility, and has been tested by the market for many years;
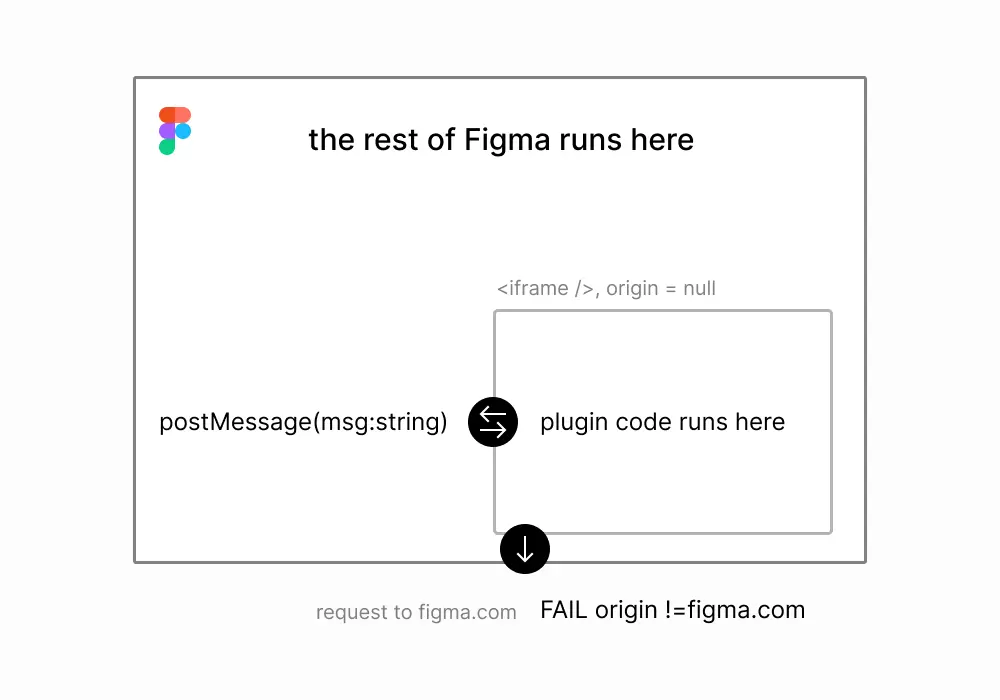
But it also has obvious shortcomings : Communication with the main framework can only be done throughpostMessage(STRING), and the communication efficiency is very low. If you want to operate a canvas element in the plug-in, you must first copy the node information of the element from the main frame toiframe, and then update the node information to the main frame after completing the operation iniframe. This involves a lot of communication, and for complex design draft node information is very huge, which may exceed the communication limit.
In order to ensure the ability to operate the canvas, you must return to the main thread. The main problem with plug-ins running on the main thread is security, so Figma developers implemented ajssandbox environment on the main thread, usingRealm API. Only pure js code and the API provided by Figma can be run in the sandbox, and browser APIs (such as network, storage, etc.) cannot be accessed, thus ensuring security.

Interested students are recommended to read"How to build a plugin system on the web and also sleep well at night"written by the official team, for details This article introduces the selection process of Figma plug-in solution, and I benefit a lot from reading it.
After comprehensive consideration, Figma divides the plug-in into two parts: the plug-in UI runs iniframe, and the code that operates the canvas runs in the isolation sandbox of the main thread. The UI thread and the main thread communicate throughpostMessage.
Plug-in configuration filemanifest.jsonis respectively configured with themainfield pointing to thejsfile loaded into the main thread,uiField configuration is loaded into thehtmlfile iniframe. When opening the plug-in, the main thread calls thefigma.showUI()method to load theiframe.
Write the simplest Figma plug-in
In order to understand the running process of the plug-in, we first write the simplest Figma plug-in. The function is simple: you can add or subtract square color blocks.
First you mustdownloadand install Figma Desktop.
Create a new code project and create a newmanifest.jsonfile in the root directory with the following content:
{ "name": "simple-demo", "api": "1.0.0", "main": "main.js", "ui": "index.html", "editorType": [ "figjam", "figma" ] }
Create new root directoryindex.html,
Create a new root directorymain.jswith the following content:
console.log('from code 2'); figma.showUI(__html__, { width: 400, height: 400, });
Figma desktop APP, right-click anywhere on the canvas Open the menu,Plugins->Development->Import plugin from manifest..., select themanifest.jsoncreated earlier file path to successfully import the plug-in. Then right-clickPlugins->Development->simple-demo(plugin name) to open the plug-in.
Test click the button and it functions normally. It’s just that the color blocks don’t appear on the page yet (don’t worry). The debugging console can be opened throughPlugins->Development->Open console. You can see the log we printed.
As mentioned earlier, the canvas code runs on the main thread. For execution efficiency, the plug-in can only operate on the main thread if it wants to operate the canvas content. That is inmain.js. The top-level objectfigmais exposed inmain.js, which encapsulates a series of APIs used to operate the canvas. For details, please see theofficial website documentation. We usefigma.createRectangle()to create a rectangle. The main thread needs to listen to events from the UI thread throughfigma.ui.onmessageto respond. The modified code ofmain.jsis as follows:
console.log('figma plugin code runs!') figma.showUI(__html__, { width: 400, height: 400, }); const nodes = []; figma.ui.onmessage = (msg) => {= if (msg.type === "add-block") { const rect = figma.createRectangle(); rect.x = nodes.length * 150; rect.fills = [{ type: "SOLID", color: { r: 1, g: 0.5, b: 0 } }]; figma.currentPage.appendChild(rect); nodes.push(rect); } else if (msg.type === "sub-block") { const rect = nodes.pop(); if (rect) { rect.remove(); } } figma.viewport.scrollAndZoomIntoView(nodes); };
At the same time, some codes inindex.htmlneed to be modified and passed toparent.postMessageThe main thread sends the event:
function addBlock() { console.log('add'); var num = +blockNumEle.innerText; num += 1; blockNumEle.innerText = num; parent.postMessage({ pluginMessage: { type: 'add-block' } }, '*') } function subBlock() { console.log('substract'); var num = +blockNumEle.innerText; if (num === 0) return; num -= 1; blockNumEle.innerText = num; parent.postMessage({ pluginMessage: { type: 'sub-block' } }, '*') }
Restart the plug-in, try it again, and find that you can successfully add and subtract color blocks.
Using Vue 3 to develop the Figma plug-in
Through the previous example, we have already understood the functions of the Figma plug-in Operating principle. But it is very inefficient to write code with this "native"jsandhtml. We can use the latest Web technology to write code, as long as the packaged product includes ajsfile running in the main frame and ahtmlfile running in theiframeThat’s it. I decided to try usingVue 3to develop plugins. (Learning video sharing:vuejs tutorial)
AboutVue 3I won’t go into too much introduction. Everyone who knows understands it. If you don’t understand, you can go here first. Study it and come back. The focus here is not on which framework to use (change to vue 2, the react process is similar), but on the construction tools.
Viteis a new generation build tool developed by the author of Vue, and is also the recommended build tool for Vue 3. Let’s first build aVueTypeScripttemplate project.
npm init vite@latest figma-plugin-vue3 --template vue-ts cd figma-plugin-vue3 npm install npm run dev
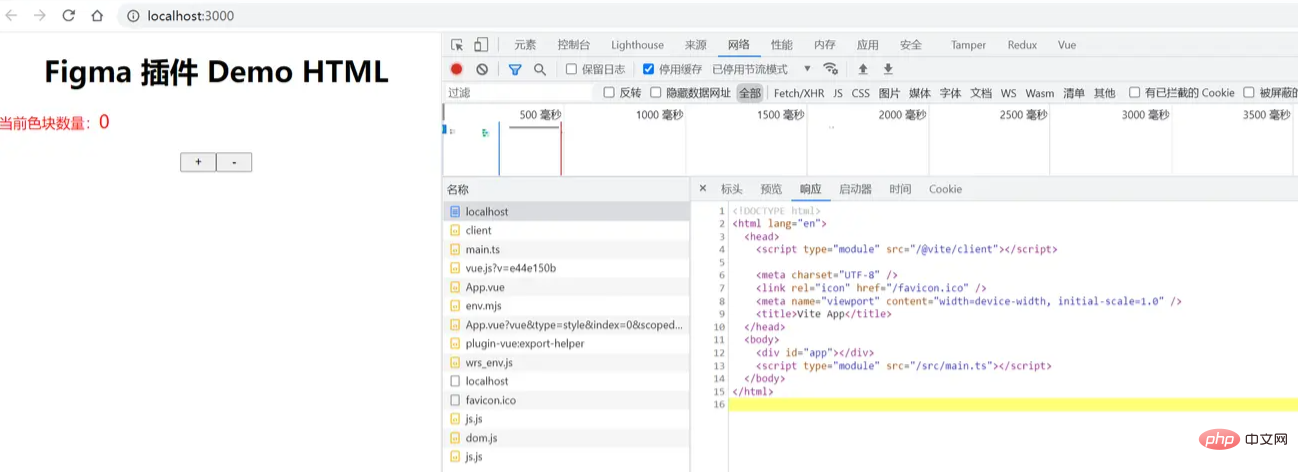
Then openhttp://localhost:3000through the browser to see the page.
We transplant the previous plug-in demo to Vue 3.src/App.vueThe code modification is as follows:
Figma 插件 Demo
当前色块数量:{{ num }}
We store the js code running in the main thread sandbox in thesrc/workerdirectory. Create a newsrc/worker/code.tswith the following content:
console.log('figma plugin code runs!') figma.showUI(__html__, { width: 400, height: 400, }); const nodes: RectangleNode[] = []; figma.ui.onmessage = (msg) => { if (msg.type === "add-block") { const rect = figma.createRectangle(); rect.x = nodes.length * 150; rect.fills = [{ type: "SOLID", color: { r: 1, g: 0.5, b: 0 } }]; figma.currentPage.appendChild(rect); nodes.push(rect); } else if (msg.type === "sub-block") { const rect = nodes.pop(); if (rect) { rect.remove(); } } figma.viewport.scrollAndZoomIntoView(nodes); };
The ts type declaration offigmais missing in the above code, so we need to install it.
npm i -D @figma/plugin-typings
Modifytsconfig.json, addtypeRoots, so ts The code will not report errors. Also add"skipLibCheck": trueto resolve type declaration conflicts.
{ "compilerOptions": { // ... "skipLibCheck": true, "typeRoots": [ "./node_modules/@types", "./node_modules/@figma" ] }, }
The build products required by the Figma plug-in are:
##manifest.jsonFile as plug-in configuration
index.htmlas UI code
code.jsAs the main thread js code
publicAll files in the directory will be Go to the build productdistdirectory.
{ "name": "figma-plugin-vue3", "api": "1.0.0", "main": "code.js", "ui": "index.html", "editorType": [ "figjam", "figma" ] }
默认情况下vite会用index.html作为构建入口,里面用到的资源会被打包构建。我们还需要一个入口,用来构建主线程 js 代码。
执行npm i -D @types/node,安装Node.js的类型声明,以便在 ts 中使用Node.jsAPI。vite.config.ts的build.rollupOptions中增加input。默认情况下输出产物会带上文件hash,所以也要修改output配置:
import { defineConfig } from 'vite' import vue from '@vitejs/plugin-vue' import { resolve } from 'path'; // https://vitejs.dev/config/ export default defineConfig({ plugins: [vue()], build: { sourcemap: 'inline', rollupOptions: { input:{ main: resolve(__dirname, 'index.html'), code: resolve(__dirname, 'src/worker/code.ts'), }, output: { entryFileNames: '[name].js', }, }, }, })
执行npm run build,dist目录会有构建产物。然后我们按照前面的步骤,将dist目录添加为 Figma 插件。Plugins->Development->Import plugin from manifest...,选择dist/manifest.json文件路径。
启动插件......怎么插件里一片空白?好在 Figma 里面有 devtools 调试工具,我们打开瞧一瞧。
可以看到,我们的index.html已经成功加载,但是 js 代码没加载所以页面空白。js、css 等资源是通过相对路径引用的,而我们的iframe中的src是一个base64格式内容,在寻找 js 资源的时候因为没有域名,所以找不到资源。
解决办法也很简单,我们给资源加上域名,然后本地起一个静态资源服务器就行了。修改vite.config.ts,加上base: 'http://127.0.0.1:3000'
import { defineConfig } from 'vite' import vue from '@vitejs/plugin-vue' import { resolve } from 'path'; // https://vitejs.dev/config/ export default defineConfig({ plugins: [vue()], base: 'http://127.0.0.1:3000', build: { sourcemap: 'inline', rollupOptions: { input: { main: resolve(__dirname, 'index.html'), code: resolve(__dirname, 'src/worker/code.ts'), }, output: { entryFileNames: '[name].js', }, }, }, preview: { port: 3000, }, })
重新构建代码npm run build。然后启动静态资源服务器npm run preview。通过浏览器访问http://localhost:3000/可以看到内容。
然后重新打开 Figma 插件看看。果然,插件已经正常了!
Figma 加载插件只需要
index.html和code.js,其他资源都可以通过网络加载。这意味着我们可以将 js、css 资源放在服务端,实现插件的热更?不知道发布插件的时候会不会有限制,这个我还没试过。
我们已经能成功通过 Vue 3 来构建 Figma 插件了,但是我不想每次修改代码都要构建一遍,我们需要能够自动构建代码的开发模式。
vite 自动的dev模式是启动了一个服务,没有构建产物(而且没有类似webpack里面的writeToDisk配置),所以无法使用。
vite的 build 命令有watch模式,可以监听文件改动然后自动执行build。我们只需要修改package.json,scripts里新增"watch": "vite build --watch"。
npm run watch # 同时要在另一个终端里启动静态文件服务 npm run preview
这种方式虽然修改代码后会自动编译,但是每次还是要关闭插件并重新打开才能看到更新。这样写UI还是太低效了,能不能在插件里实现HMR(模块热重载)功能呢?
vite dev 的问题在于没有构建产物。code.js是运行在 Fimga 主线程沙箱中的,这部分是无法热重载的,所以可以利用vite build --watch实现来编译。需要热重载的是index.html以及相应的 js 、css 资源。 先来看一下npm run dev模式下的 html 资源有什么内容:

理论上来说,我们只需要把这个 html 手动写入到dist目录就行,热重载的时候 html 文件不需要修改。直接写入的话会遇到资源是相对路径的问题,所以要么把资源路径都加上域名(http://localhost:3000),或者使用
对比上面的 html 代码和根目录的index.html文件,发现只是增加了一个。所以我们可以自己解析index.html,然后插入相应这个标签,以及一个jsdom。
const JSDOM = require('jsdom'); const fs = require('fs'); // 生成 html 文件 function genIndexHtml(sourceHTMLPath, targetHTMLPath) { const htmlContent = fs.readFileSync(sourceHTMLPath, 'utf-8'); const dom = new JSDOM(htmlContent); const { document } = dom.window; const script = document.createElement('script'); script.setAttribute('type', 'module'); script.setAttribute('src', '/@vite/client'); dom.window.document.head.insertBefore(script, document.head.firstChild); const base = document.createElement('base'); base.setAttribute('href', 'http://127.0.0.1:3000/'); dom.window.document.head.insertBefore(base, document.head.firstChild); const result = dom.serialize(); fs.writeFileSync(targetHTMLPath, result); }
同时 vite 提供了JavaScript API,所以我们可以代码组织起来,写一个 js 脚本来启动开发模式。新建文件scripts/dev.js,完整内容如下:
const { JSDOM } = require('jsdom'); const fs = require('fs'); const path = require('path'); const vite = require('vite'); const rootDir = path.resolve(__dirname, '../'); function dev() { const htmlPath = path.resolve(rootDir, 'index.html'); const targetHTMLPath = path.resolve(rootDir, 'dist/index.html'); genIndexHtml(htmlPath, targetHTMLPath); buildMainCode(); startDevServer(); } // 生成 html 文件 function genIndexHtml(sourceHTMLPath, targetHTMLPath) { const htmlContent = fs.readFileSync(sourceHTMLPath, 'utf-8'); const dom = new JSDOM(htmlContent); const { document } = dom.window; const script = document.createElement('script'); script.setAttribute('type', 'module'); script.setAttribute('src', '/@vite/client'); dom.window.document.head.insertBefore(script, document.head.firstChild); const base = document.createElement('base'); base.setAttribute('href', 'http://127.0.0.1:3000/'); dom.window.document.head.insertBefore(base, document.head.firstChild); const result = dom.serialize(); fs.writeFileSync(targetHTMLPath, result); } // 构建 code.js 入口 async function buildMainCode() { const config = vite.defineConfig({ configFile: false, // 关闭默认使用的配置文件 build: { emptyOutDir: false, // 不要清空 dist 目录 lib: { // 使用库模式构建 entry: path.resolve(rootDir, 'src/worker/code.ts'), name: 'code', formats: ['es'], fileName: (format) => `code.js`, }, sourcemap: 'inline', watch: {}, }, }); return vite.build(config); } // 开启 devServer async function startDevServer() { const config = vite.defineConfig({ configFile: path.resolve(rootDir, 'vite.config.ts'), root: rootDir, server: { hmr: { host: '127.0.0.1', // 必须加上这个,否则 HMR 会报错 }, port: 3000, }, build: { emptyOutDir: false, // 不要清空 dist 目录 watch: {}, // 使用 watch 模式 } }); const server = await vite.createServer(config); await server.listen() server.printUrls() } dev();
执行node scripts/dev.js,然后在 Figma 中重启插件。试试修改一下 Vue 代码,发现插件内容自动更新了!
最后在package.json中新建一个修改一下dev的内容为"dev": "node scripts/dev.js"就可以了。
前面通过自己生产index.html的方式有很大的弊端:万一后续 vite 更新后修改了默认 html 的内容,那我们的脚本也要跟着修改。有没有更健壮的方式呢?我想到可以通过请求devServer来获取 html 内容,然后写入本地。话不多说,修改后代码如下:
const { JSDOM } = require('jsdom'); const fs = require('fs'); const path = require('path'); const vite = require('vite'); const axios = require('axios'); const rootDir = path.resolve(__dirname, '../'); async function dev() { // const htmlPath = path.resolve(rootDir, 'index.html'); const targetHTMLPath = path.resolve(rootDir, 'dist/index.html'); await buildMainCode(); await startDevServer(); // 必须放到 startDevServer 后面执行 await genIndexHtml(targetHTMLPath); } // 生成 html 文件 async function genIndexHtml(/* sourceHTMLPath,*/ targetHTMLPath) { const htmlContent = await getHTMLfromDevServer(); const dom = new JSDOM(htmlContent); // ... const result = dom.serialize(); fs.writeFileSync(targetHTMLPath, result); } // ... // 通过请求 devServer 获取HTML async function getHTMLfromDevServer () { const rsp = await axios.get('http://localhost:3000/index.html'); return rsp.data; } dev();
Figma 基于Web平台的特性使之能成为真正跨平台的设计工具,只要有浏览器就能使用。同时也使得开发插件变得非常简单,非专业人士经过简单的学习也可以上手开发一个插件。而Web社区有数量庞大的开发者,相信 Figma 的插件市场也会越来越繁荣。
本文通过一个例子,详细讲述了使用 Vue 3 开发 Figma 插件的过程,并且完美解决了开发模式下热重载的问题。我将模板代码提交到了 Git 仓库中,需要的同学可以直接下载使用:figma-plugin-vue3。
开发 Figma 插件还会遇到一些其他问题,例如如何进行网络请求、本地存储等,有空再继续分享我的实践心得。
本文转载自:https://juejin.cn/post/7084639146915921956
作者:大料园
(学习视频分享:web前端开发)
The above is the detailed content of Record a process of developing Fimga plug-in using Vue 3. For more information, please follow other related articles on the PHP Chinese website!