


Video tutorial recommendation:nodejs tutorial
In the node.js field, Express.js is a well-known REST APIs development framework. Although it is very good, no one tells you how to organize the project code.
Usually this is okay, but for developers this is another problem we have to face.
A good project structure can not only eliminate duplicate code, improve system stability, improve system design, but also make it easier to expand in the future.
For years I have been dealing with refactoring and migrating node.js projects that were poorly structured and poorly designed. This article is a summary of my previous accumulated experience.
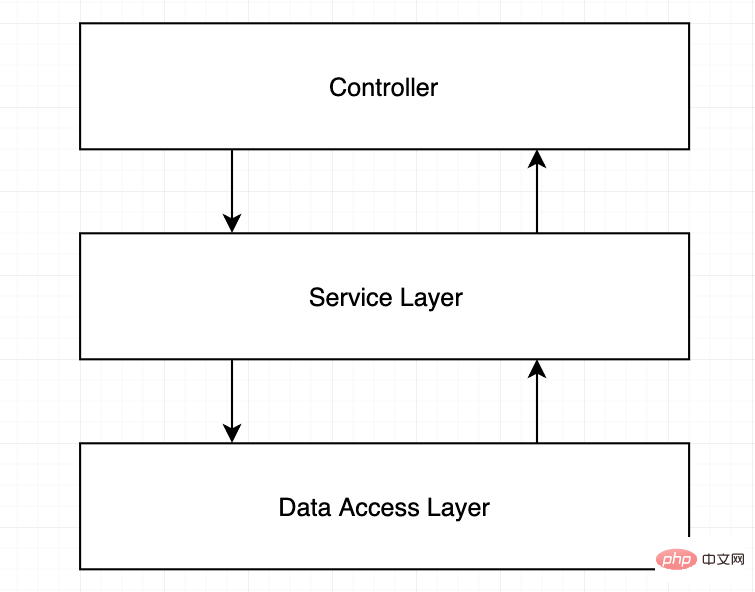
The following is my recommended way of organizing project code.
It comes from the practice of the projects I participated in. The functions and functions of each directory module are as follows:
src │ app.js # App 统一入口 └───api # Express route controllers for all the endpoints of the app └───config # 环境变量和配置信息 └───jobs # 队列任务(agenda.js) └───loaders # 将启动过程模块化 └───models # 数据库模型 └───services # 存放所有商业逻辑 └───subscribers # 异步事件处理器 └───types # Typescript 的类型声明文件 (d.ts)
And, this is not just the way the code is organized...
This idea comes from theSeparation of Concerns Principle, which separates business logic from node.js API routing.
Because one day in the future, you may handle your business in a CLI tool or elsewhere. Of course, it may not, but using API calls to handle your own business in a project is not a good idea after all...
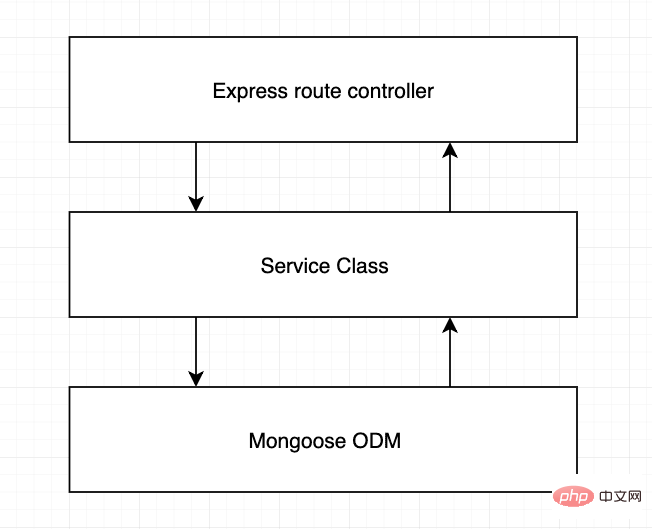
Do not handle business logic directly in the controller!!
In your application, you may have to handle business directly in the controller for convenience. Unfortunately, if you do this, you will soon be faced with relatively complex controller code, and "negative consequences" will follow, such as having to use complexrequest## when dealing with unit tests. # orresponseSimulation.
At the same time, it will become complicated when deciding when to return a response to the client, or when you want to perform some processing after sending the response. Please do not do this like the following example.route.post('/', async (req, res, next) => { // 这里推荐使用中间件或Joi 验证器 const userDTO = req.body; const isUserValid = validators.user(userDTO) if(!isUserValid) { return res.status(400).end(); } // 一堆义务逻辑代码 const userRecord = await UserModel.create(userDTO); delete userRecord.password; delete userRecord.salt; const companyRecord = await CompanyModel.create(userRecord); const companyDashboard = await CompanyDashboard.create(userRecord, companyRecord); ...whatever... // 这里是“优化”,但却搞乱了所有的事情 // 向客户端发送响应... res.json({ user: userRecord, company: companyRecord }); // 但这里的代码仍会执行 :( const salaryRecord = await SalaryModel.create(userRecord, companyRecord); eventTracker.track('user_signup',userRecord,companyRecord,salaryRecord); intercom.createUser(userRecord); gaAnalytics.event('user_signup',userRecord); await EmailService.startSignupSequence(userRecord) });
SOLIDprinciples applicable to node.js
In this layer, there should not be any form of data query operations. The correct approach is to use a data access layer.
Example
route.post('/', validators.userSignup, // 中间件处理验证 async (req, res, next) => { // 路由的实际责任 const userDTO = req.body; // 调用服务层 // 这里演示如何访问服务层 const { user, company } = await UserService.Signup(userDTO); // 返回响应 return res.json({ user, company }); });
import UserModel from '../models/user'; import CompanyModel from '../models/company'; export default class UserService { async Signup(user) { const userRecord = await UserModel.create(user); const companyRecord = await CompanyModel.create(userRecord); // 依赖用户的数据记录 const salaryRecord = await SalaryModel.create(userRecord, companyRecord); // 依赖用户与公司数据 ...whatever await EmailService.startSignupSequence(userRecord) ...do more stuff return { user: userRecord, company: companyRecord }; } }
View sample code on Github https://github.com/santiq/bulletproof-nodejsUse publish/subscribe mode Strictly speaking, the publish/subscribe model does not belong to the three-tier structure, but it is very practical. Here is a simple node.js API for creating users. At the same time, you may also need to call external services, analyze data, or send a series of emails. Soon, this simple function, originally used to create users, was filled with various functions and the code had exceeded 1,000 lines. Now it’s time to split these functions into independent functions so that your code can continue to remain maintainable.
import UserModel from '../models/user'; import CompanyModel from '../models/company'; import SalaryModel from '../models/salary'; export default class UserService() { async Signup(user) { const userRecord = await UserModel.create(user); const companyRecord = await CompanyModel.create(user); const salaryRecord = await SalaryModel.create(user, salary); eventTracker.track( 'user_signup', userRecord, companyRecord, salaryRecord ); intercom.createUser( userRecord ); gaAnalytics.event( 'user_signup', userRecord ); await EmailService.startSignupSequence(userRecord) ...more stuff return { user: userRecord, company: companyRecord }; } }
Synchronously calling dependent services is still not the best solution.
A better approach is to trigger events, such as: a new user registers using email . In this way, the API that creates the user has completed its function, and the rest is left to the processor that subscribes to the event.import UserModel from '../models/user'; import CompanyModel from '../models/company'; import SalaryModel from '../models/salary'; export default class UserService() { async Signup(user) { const userRecord = await this.userModel.create(user); const companyRecord = await this.companyModel.create(user); this.eventEmitter.emit('user_signup', { user: userRecord, company: companyRecord }) return userRecord } }
eventEmitter.on('user_signup', ({ user, company }) => { eventTracker.track( 'user_signup', user, company, ); intercom.createUser( user ); gaAnalytics.event( 'user_signup', user ); })
eventEmitter.on('user_signup', async ({ user, company }) => { const salaryRecord = await SalaryModel.create(user, company); })
eventEmitter.on('user_signup', async ({ user, company }) => { await EmailService.startSignupSequence(user) })
register the 'unhandledPromise' event handler in the form ofprocess.on('unhandledRejection',cb)##Dependency Injection
In this way, injecting
dependenciesbecomes very flexible, for example, when you write unit tests for the service, or when using the service in another context.
Code without dependency injection
import UserModel from '../models/user'; import CompanyModel from '../models/company'; import SalaryModel from '../models/salary'; class UserService { constructor(){} Sigup(){ //调用 UserMode, CompanyModel,等 ... } }
export default class UserService { constructor(userModel, companyModel, salaryModel){ this.userModel = userModel; this.companyModel = companyModel; this.salaryModel = salaryModel; } getMyUser(userId){ // 通过this获取模型 const user = this.userModel.findById(userId); return user; } }
import UserService from '../services/user'; import UserModel from '../models/user'; import CompanyModel from '../models/company'; const salaryModelMock = { calculateNetSalary(){ return 42; } } const userServiceInstance = new UserService(userModel, companyModel, salaryModelMock); const user = await userServiceInstance.getMyUser('12346');
一个服务可以拥有的依赖项数量是无限的,当您添加一个新的服务时重构它的每个实例是一个无聊且容易出错的任务。
这就是创建依赖注入框架的原因。
其思想是在类中声明依赖项,当需要该类的实例时,只需调用「服务定位器」。
我们可以参考一个在 nodejs 引入 D.I npm库typedi的例子。
你可以在官方文档上查看更多关于使用 typedi的方法
https://www.github.com/typestack/typedi
警告 typescript 例子
import { Service } from 'typedi'; @Service() export default class UserService { constructor( private userModel, private companyModel, private salaryModel ){} getMyUser(userId){ const user = this.userModel.findById(userId); return user; } }
services/user.ts
现在,typedi将负责解析 UserService 所需的任何依赖项。
import { Container } from 'typedi'; import UserService from '../services/user'; const userServiceInstance = Container.get(UserService); const user = await userServiceInstance.getMyUser('12346');
滥用服务定位器是一种反面模式
在 Express.js 中使用依赖注入
在express.js中使用 D.I. 是 node.js 项目架构的最后一个难题。
路由层
route.post('/', async (req, res, next) => { const userDTO = req.body; const userServiceInstance = Container.get(UserService) // Service locator const { user, company } = userServiceInstance.Signup(userDTO); return res.json({ user, company }); });
太棒了,项目看起来很棒!
它是如此有组织,以至于我现在就想写代码了。
在github上查看源码
https://github.com/santiq/bulletproof-nodejs
通过使用依赖注入和这些组织模式,单元测试变得非常简单。
您不必模拟 req/res 对象或要求(…)调用。
例子:注册用户方法的单元测试
tests/unit/services/user.js
import UserService from '../../../src/services/user'; describe('User service unit tests', () => { describe('Signup', () => { test('Should create user record and emit user_signup event', async () => { const eventEmitterService = { emit: jest.fn(), }; const userModel = { create: (user) => { return { ...user, _id: 'mock-user-id' } }, }; const companyModel = { create: (user) => { return { owner: user._id, companyTaxId: '12345', } }, }; const userInput= { fullname: 'User Unit Test', email: 'test@example.com', }; const userService = new UserService(userModel, companyModel, eventEmitterService); const userRecord = await userService.SignUp(teamId.toHexString(), userInput); expect(userRecord).toBeDefined(); expect(userRecord._id).toBeDefined(); expect(eventEmitterService.emit).toBeCalled(); }); }) })
因此,既然业务逻辑封装到了服务层中,那么在定时任务中使用它就更容易了。
您永远不应该依赖 node.js的setTimeout或其他延迟执行代码的原生方法,而应该依赖一个框架把你的定时任务和执行持久化到数据库。
这样你就可以控制失败的任务和成功的反馈信息。
我已经写了一个关于这个的好的练习,
查看我关于使用 node.js 最好的任务管理器 agenda.js 的指南.
https://softwareontheroad.com/nodejs-scalability-issues
根据应用程序的12个因素的最佳概念,我们存储 API 密钥和数据库连接配置的最佳方式是使用.env文件。
创建一个.env文件,一定不要提交(在你的仓库里要有一个包含默认值的.env 文件),dotenv这个npm 包会加载 .env 文件,并把变量添加到 node.js 的process.env对象中。
这些本来已经足够了,但是我喜欢添加一个额外的步骤。
拥有一个config/index.ts文件,在这个文件中,dotenv这个npm 包会加载 .env 文件,然后我使用一个对象存储这些变量,至此我们有了一个结构和代码自动加载。
config/index.js
const dotenv = require('dotenv'); //config()方法会读取你的 .env 文件,解析内容,添加到 process.env。 dotenv.config(); export default { port: process.env.PORT, databaseURL: process.env.DATABASE_URI, paypal: { publicKey: process.env.PAYPAL_PUBLIC_KEY, secretKey: process.env.PAYPAL_SECRET_KEY, }, paypal: { publicKey: process.env.PAYPAL_PUBLIC_KEY, secretKey: process.env.PAYPAL_SECRET_KEY, }, mailchimp: { apiKey: process.env.MAILCHIMP_API_KEY, sender: process.env.MAILCHIMP_SENDER, } }
这样可以避免代码中充斥着process.env.MY_RANDOM_VAR指令,并且通过自动完成,您不必知道 .env 文件中是如何命名的。
在github 上查看源码
https://github.com/santiq/bulletproof-nodejs
加载器源于W3Tech microframework但不依赖于他们扩展。
这个想法是指,你可以拆分启动加载过程到可测试的独立模块中。
先来看一个传统的 express.js 应用的初始化示例:
const mongoose = require('mongoose'); const express = require('express'); const bodyParser = require('body-parser'); const session = require('express-session'); const cors = require('cors'); const errorhandler = require('errorhandler'); const app = express(); app.get('/status', (req, res) => { res.status(200).end(); }); app.head('/status', (req, res) => { res.status(200).end(); }); app.use(cors()); app.use(require('morgan')('dev')); app.use(bodyParser.urlencoded({ extended: false })); app.use(bodyParser.json(setupForStripeWebhooks)); app.use(require('method-override')()); app.use(express.static(__dirname + '/public')); app.use(session({ secret: process.env.SECRET, cookie: { maxAge: 60000 }, resave: false, saveUninitialized: false })); mongoose.connect(process.env.DATABASE_URL, { useNewUrlParser: true }); require('./config/passport'); require('./models/user'); require('./models/company'); app.use(require('./routes')); app.use((req, res, next) => { var err = new Error('Not Found'); err.status = 404; next(err); }); app.use((err, req, res) => { res.status(err.status || 500); res.json({'errors': { message: err.message, error: {} }}); }); ... more stuff ... maybe start up Redis ... maybe add more middlewares async function startServer() { app.listen(process.env.PORT, err => { if (err) { console.log(err); return; } console.log(`Your server is ready !`); }); } // 启动服务器 startServer();
天呐,上面的面条代码,不应该出现在你的项目中对吧。
再来看看,下面是一种有效处理初始化过程的示例:
const loaders = require('./loaders'); const express = require('express'); async function startServer() { const app = express(); await loaders.init({ expressApp: app }); app.listen(process.env.PORT, err => { if (err) { console.log(err); return; } console.log(`Your server is ready !`); }); } startServer();
现在,各加载过程都是功能专一的小文件了。
loaders/index.js
import expressLoader from './express'; import mongooseLoader from './mongoose'; export default async ({ expressApp }) => { const mongoConnection = await mongooseLoader(); console.log('MongoDB Intialized'); await expressLoader({ app: expressApp }); console.log('Express Intialized'); // ... 更多加载器 // ... 初始化 agenda // ... or Redis, or whatever you want }
express 加载器。
loaders/express.js
import * as express from 'express'; import * as bodyParser from 'body-parser'; import * as cors from 'cors'; export default async ({ app }: { app: express.Application }) => { app.get('/status', (req, res) => { res.status(200).end(); }); app.head('/status', (req, res) => { res.status(200).end(); }); app.enable('trust proxy'); app.use(cors()); app.use(require('morgan')('dev')); app.use(bodyParser.urlencoded({ extended: false })); // ...More middlewares // Return the express app return app; })
mongo 加载器
loaders/mongoose.js
import * as mongoose from 'mongoose' export default async (): Promise=> { const connection = await mongoose.connect(process.env.DATABASE_URL, { useNewUrlParser: true }); return connection.connection.db; }
在 Github 查看更多加载器的代码示例
https://github.com/santiq/bulletproof-nodejs
我们深入的分析了 node.js 项目的结构,下面是一些可以分享给你的总结:
使用3层结构。
控制器中不要有任何业务逻辑代码。
采用发布/订阅模型来处理后台异步任务。
使用依赖注入。
使用配置管理,避免泄漏密码、密钥等机密信息。
将 node.js 服务器的配置拆分为可独立加载的小文件。
前往 Github 查看完整示例
https://github.com/santiq/bulletproof-nodejs
Original address: https://dev.to/santypk4/bulletproof-node-js-project-architecture-4epf
Translation address: https://learnku.com/ nodejs/t/38129
For more programming-related knowledge, please visit:Introduction to Programming! !
The above is the detailed content of Detailed explanation of Nodejs Express.js project architecture. For more information, please follow other related articles on the PHP Chinese website!


![[Web front-end] Node.js quick start](https://img.php.cn/upload/course/000/000/067/662b5d34ba7c0227.png)


