


This article mainly introduces the detailed use of before and :after pseudo-elements in CSS, including the use of insertion operations for some non-text content. Friends in need can refer to it
If you have been paying close attention From various web design blogs, you may have noticed that the :before and :after pseudo-elements have gained quite a bit of attention in front-end development. Especially in Nicolas Gallagher's blog, many pseudo-class elements were used later.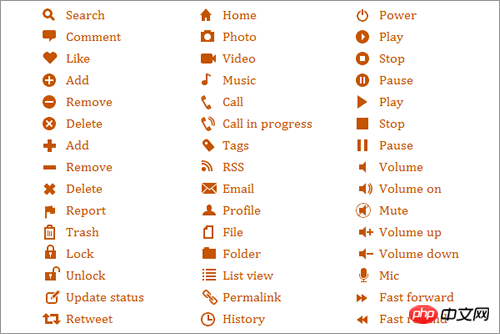
Nicolas Gallagher used pseudo-elements to create 84 GUI icons with static HTML tags.
To complement the above (and capitalize on current trends), I've collected a few things that run entirely under pseudo-elements. This article is mainly aimed at this group of people, that is, they have seen cool things made with pseudo elements, but want to know all about the use of before in CSS technology.
Although the CSS specification contains other pseudo-elements, our focus is :before and :after. So, for the sake of simplicity, when I say "pseudo-elements" I refer to these two particular pseudo-elements in general.
What can pseudo elements do?
"Pseudo elements", as the name suggests. It creates a fake element and inserts it before or after the content of the target element.
The word "pseudo" is the English translation of the Greek, and its basic meaning is "lying, dishonest, wrong." So the name pseudo-element is appropriate. Because in the documentation it doesn't actually change anything. Instead, they are ghost-like elements inserted into CSS that are visible to the user and can be controlled via CSS.
Basic Syntax
:before and :after pseudo-element coding is very simple (like most css properties, it does not require a lot of prefixes). Here is a simple example.
#example:before { content: "#"; } #example:after { content: "."; }
Two things are mentioned in this example. First, we use #example:before and #example:after to target the same element. Strictly speaking, they are pseudo-elements in the code.
Second, as mentioned in the content module, pseudo-elements are useless if the "content" attribute is not set.
In this example, elements with the id attribute will have a hash symbol placed before the content, and a period after the content.
Syntax Notes
You can set the content attribute value to empty and just treat it as a box with little content. Like this:
#example:before { content: ""; display: block; width: 100px; height: 100px; }
However, you cannot completely remove the content attribute. If you do, the pseudo-element will not work. At a minimum, the content property requires a null reference as its value (i.e. :content:"").
You may notice that you can also write pseudo-elements using two colons (::before and ::after), which I have discussed before. The short explanation is that there is no difference between the two syntaxes. The only difference is that the pseudo-element (double colon) and the pseudo-class in CSS3 are (single colon)
Finally, in terms of syntax. Technically, you can apply pseudo-elements generally, rather than on specific elements, like this:
:before { content: "#"; }
While the above is valid, it's pretty useless. The code inserts a hash symbol before the content of each element in the DOM. Even if you delete thetag and all its content, you will still see two hash symbols on the page: one in theand another in thetag, and the browser will automatically Which one to create.
Characteristics of inserted content
As mentioned earlier, inserted content is not visible in the source code of the page. Visible only in CSS
Also, inserted elements are inline elements by default (or, in HTML5, in the category of textual semantics). Therefore, in order to give an inserted element height, padding, margins, etc., you usually have to explicitly define it as a block-level element.
This will be a brief explanation of how to design pseudo elements, look at this picture of my text editor below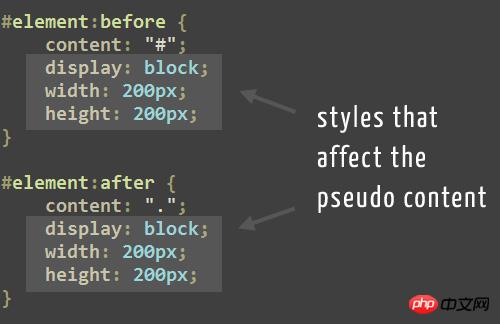
In this example, I highlight The style will be applied to the element inserted before and after the content of the target element.
Also note that typical CSS inheritance rules apply to inserted elements. For example, if you have the font families Helvetica, Arial, and Sans Serif applied to the body element, then the pseudo-element will inherit these font families just like any other element.
Similarly, pseudo-elements will not inherit styles that are not naturally inherited from parent elements (such as padding and margins).
What comes before or after?
Your intuition is that the :before and :after pseudo-elements may be injected before or after the inserted content will be injected into the target element. But, as mentioned above, this is not the case.
The injected content will be a child element of the associated target element, but it will be placed "before" or "after" any content of this element.
To prove this, take a look at the code below. First, in the HTML:
Other content.
Here is the css to insert the pseudo element:
p.box { width: 300px; border: solid 1px white; padding: 20px; } p.box:before { content: "#"; border: solid 1px white; padding: 2px; margin: 0 10px 0 0; }
在此html里,你所看的一段文字带有的是一个类的box,还有这样的文字“Other content”在里面(像你所会看到的一样,如果你看见了首页的源代码)。在css中,这段内容被设置了宽度,以及一些padding和可见的边框
然后我们有了伪元素。在这个例子中,它是一个散列符号插入到该段内容之前。随后css给了它一个边框以及一些padding和margins。
这里是浏览器中查看的结果: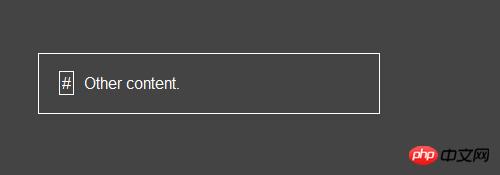
外面的盒子是这个段落。围绕有散列符号的边框表示伪元素的边界。所以,不是插入“before”到段落,而是伪元素被置于到此段落的“Other content”的前面。
插入非文本内容
我简要的提醒,你可以把属性的值置为空字符串或是插入文本内容。你基本上有属性的值要包含什么的两个额外的选择
首先,你可以包含一个指向一个图像的URL,就像在css里包含一个背景图像一样做你能做的
p:before { content: url(image.jpg); }
注意不能使用引号。如果你将URL用引号括起来,那么它会变成一个字符串和插入文本“url(image.jpg)”作为其内容,插入的而不是图像本身。
当然,你可以包含一个Data URI代替图像引用,正如你可以用css背景一样。
你还可以选择ATRR(X)中的函数的形式。此功能,根据规范?,“把X属性的值以字符串的形式返回”
下面是一个例子:
a:after { content: attr(href); }
attr()函数的功能是什么?它得到特定属性的值并把它作为插入的文本成为一个伪元素。
上面的代码会导致页面上的每一个元素的href值立即被放置在每个各自的元素的后面。在文档被打印时,它可以用作一个包含所有URl的打印样式表。
你也可以用这个函数去获取元素的title属性,或者甚至是microdata的值。当然,并不是所有的例子都符合自己的实际,但根据不同的情况,一个特定的属性值作为一个伪元素可以是实际的
然而,获取title或者图像的alt的值并作为实际的伪元素显示在页面上是不可能的。记住伪元素必须是被应用元素的子元素。图像,这是void(或者是空元素),没有子元素,所以它在这个列子中不可用,同样也适用于其他空元素,例如:。
可怕的浏览器兼容性
任何前端技术的发展势头,第一个问题就是浏览器的支持。在这种情况之下,它不是个很大的问题。
浏览器支持:before 和 :after 伪元素栈,像这样:
Chrome 2+,
Firefox 3.5+ (3.0 had partial support),
Safari 1.3+,
Opera 9.2+,
IE8+ (with some minor bugs),
几乎所有的移动浏览器。
唯一真正的问题是没有获得支持的(不用奇怪)IE6和IE7。所以,如果你的爱好者是在良好合适的web开发(或者其他具有较低IE版本的市场),你可以继续自由地使用伪元素。
伪元素不是决定性的
幸运的是,缺少伪元素不会造成大问题。大多数情况下,伪元素一般修饰(或者帮助)内容,不会给不支持的浏览器造成问题。所以,如果你的支持者具有较高的IE版本,你仍然可以在某种程度上使用它们。
一些提醒
正如前面提到的,伪元素不会出现在DOM中。这些元素不是真正的元素。因此,它们不是可用的。所以,不要使用伪元素生成内容,是您的网页的可用性和可访问性的关键。
另外一件需要记住的是,开发工具,例如火狐,不要用伪元素显示内容。所以,如果使用了,伪元素会造成难以维护和调试缓慢。
(更新:在评论中提到的,你可以使用谷歌的开发工具来查看一个伪元素相关联的风格,但不会出现在DOM元素里。同时,火狐在1.8版加入伪元素支持它。)
你所需要用有的理念是用这个技术以创造出实用的东西。与此同时,将来进一步研究CSS伪元素,一定要看看我们已经链接的一些文章。
译者手语:整个翻译依照原文线路进行,并在翻译过程略加了个人对技术的理解。如果翻译有不对之处,还烦请同行朋友指点。谢谢!
以上就是本文的全部内容,希望对大家的学习有所帮助,更多相关内容请关注PHP中文网!
相关推荐:
About the code for replacing ellipsis when CSS text exceeds div or span
##How to align css icons with text
The above is the detailed content of Analysis on the use of before and :after pseudo-elements in CSS. For more information, please follow other related articles on the PHP Chinese website!


![[Web front-end] Node.js quick start](https://img.php.cn/upload/course/000/000/067/662b5d34ba7c0227.png)


