Hello everyone, we often use shared folders as a tool at work, but sometimes there is a problem that win10 shared files do not have permission to access. Don't worry, I'll teach you how to solve this problem. First, we open the service page, then find the workstation option, and then we can operate it! Now, let’s learn more about how to solve this problem!
Detailed explanation of win10 shared files without permission to access
1. First, we need to press the win key and r key on the keyboard to open the run window, and then enter the [services, msc] command, and then Click OK.

2. Enter the service page, find the [workstation] option on the page, and double-click it to enter.

3. On the page that opens, if your workstation is not enabled, then we need to click the start button to run it.

4. Next, we open the run window, enter the [gepdit, msc] options, and then click the OK button to enter.

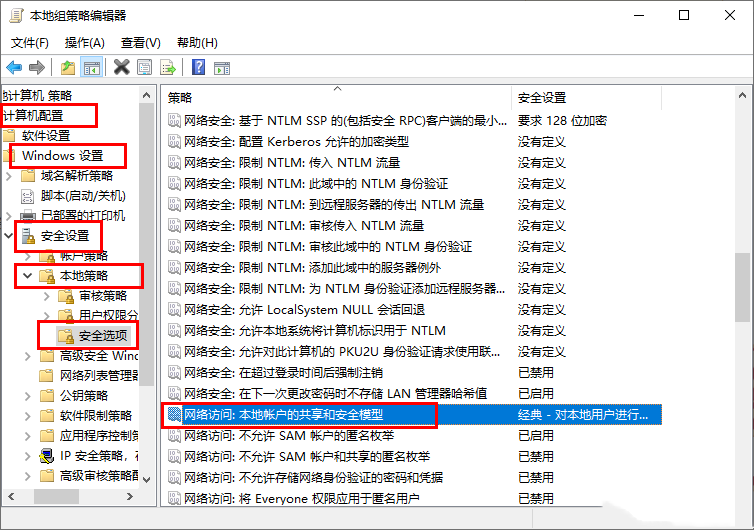
5. In the window that opens, click [Computer Configuration-Windows Settings-Security Settings-Local Policy-Security Options] on the left to open, and then click on the right Find [Sharing and Security Model for Local Accounts] on the side and double-click it.

6. In the page that opens, we need to set [Classic - authenticate local users without changing their original identity], and then click OK.

7. Next, we right-click the folder to be shared and select the [Properties] option to enter.

8. In the page that opens, we need to click the [Sharing] tab, and then click [Advanced Sharing].

9. Then, in the advanced sharing page that opens, click [Permissions], click and check [Read] in the next window, and then click Click the OK button to save.

The above is the detailed content of What to do if win10 shared files do not have permission to access win10 shared files do not have permission to access detailed explanation. For more information, please follow other related articles on the PHP Chinese website!


