
Detailed implementation example of CSS translucent border (picture)
1. Translucent border
Question:
If we want to set a red background and a black translucent border for a container, we might write like this:
border: 20px solid rgba(0,0,0,0.5);
background: red;
But the effect is like this (picture 1-1.png); Why does our translucent color not implement a translucent border?
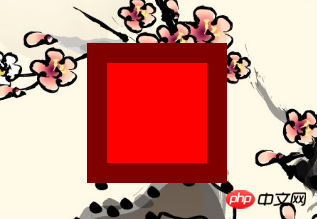
Figure 1-1.png
Solution:
We can pass background-clipAttribute To adjust the default behavior above, set its value to padding-box, and then the effect we want will appear (Figure 1-2.png);
border: 20px solid rgba(0,0,0,0.5);
background: red;
background-clip: padding-box;
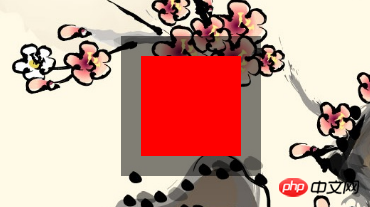
Figure 1-2.png
2.background-clip
Since the background-clip attribute is used, let's take a look at this attribute;
background-clip:
Set the background of the element (backgroundPicture or color) extends below the border.
| Values (values) | Description |
|---|---|
| border-box | Default initial value, the background extends to the outer edge of the border (but under the border) |
| padding-box | Nothing under the border Background, that is, the background extends to the inner margin outer edge |
| content-box | The background is cropped to the outer edge of the content area (content-box) |
| text | ExperimentAPI, the background is cropped into the foreground text. |
示例
CSS content
span {
   border: 10px blue;
   border-style: dotted double;
   margin: 1em;
   padding: 2em;
   background: #F8D575;
}
.border-box { background-clip: border-box; }
.padding-box { background-clip: padding-box; }
.content-box { background-clip: content-box; }
.text { background-clip: text; }
HTML content
<span class="border-box">border-box</span>
<span class="padding-box">padding-box</span>
<span class="content-box">content-box</span>
<span class="text">text</span>
效果:(图2-1.png)

图2-1.png
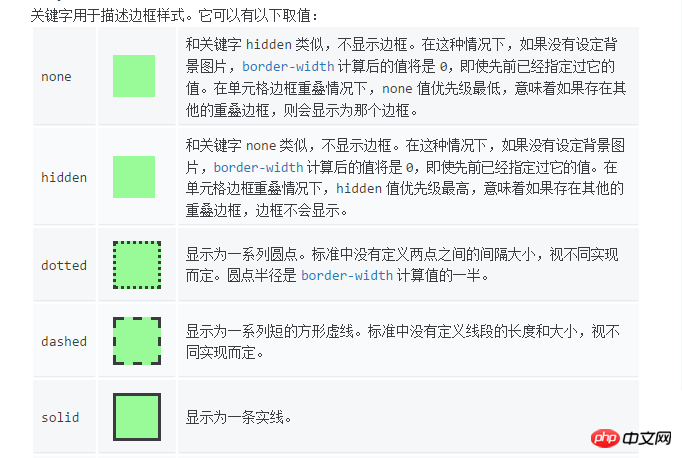
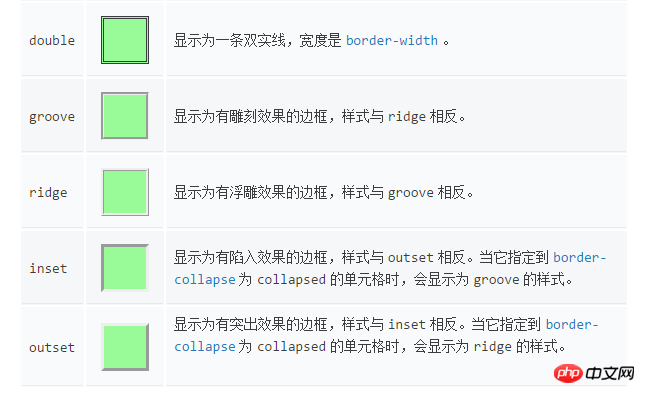
3.border-style
4.border-image
初始值:
border-image-source: none
border-image-slice: 100%
border-image-width: 1
border-image-outset: 0s
border-image-repeat: stretch
4.1 border-image-source: none |
where
where
Gradient示例:
CSS content
.gradient {
    border: 30px solid;
    border-image-source: linear-gradient(to right, red, green, blue);
    /*border-image-source: linear-gradient(90deg, red, green, blue);*/
    border-image-slice: 10;
    padding: 20px;
}
HTML content
<p class="gradient">The image is stretched to fill the area.</p>
效果:(图4-1.png)

图4-1.png
4.2 border-image-slice: [
这个 border-imge-slice 属性传入1~4个参数(number没有单位专指像素或百分比值)将图片分割成9个部分,1,2,3,4四个区块是不会拉伸,不会平铺,称之为盲区,5,6,7,8四个区块可以通过 border-image-repeat 来控制拉伸平铺和重复( stretch:默认值,拉伸; repeat:平铺; round:整数次平铺; ),第9区块不显示,传入参数 fill 则显示第9区块,分割情况如下图(图4-2.png && 图2-3.png):
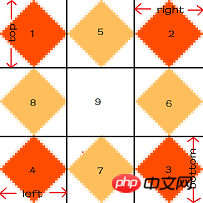
图4-2.png
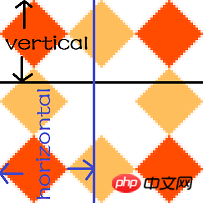
图4-3.png
我们通过上面这张图片(81px^81px)来看传入不同个数的参数是如何分割这张图片的;
1个参数
/* border-image-slice: slice */
border-image-slice: 27;
border: 30px solid transparent;
padding: 20px;
border-image-source:url([https://mdn.mozillademos.org/files/4127/border.png](https://mdn.mozillademos.org/files/4127/border.png));
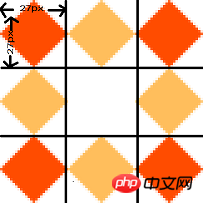
图4-4.png

图4-5.png(效果图)
2个参数(参考图4-3.png)
/* border-image-slice: vertical horizontal */
border-image-slice: 40 40.5;
border: 30px solid transparent;
padding: 20px;
border-image-source:url([https://mdn.mozillademos.org/files/4127/border.png](https://mdn.mozillademos.org/files/4127/border.png));
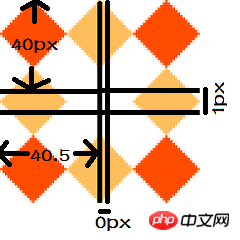
图4-6.png

图4-7.png(效果图)
3个参数
/* border-image-slice: top horizontal bottom */
border-image-slice: 27 40 27;
border: 30px solid transparent;
padding: 20px;
border-image-source:url([https://mdn.mozillademos.org/files/4127/border.png](https://mdn.mozillademos.org/files/4127/border.png));

图4-8.png(效果图)
4个参数(参考图4-2.png)
/* border-image-slice: top right bottom left */
border-image-slice: 27 40 27 27;
border: 30px solid transparent;
padding: 20px;
border-image-source:url([https://mdn.mozillademos.org/files/4127/border.png](https://mdn.mozillademos.org/files/4127/border.png));

图4-9.png(效果图)
4.3 border-image-width: [
语法:
border-image-width: all                        /* One-value syntax */
E.g. border-image-width: 3;
border-image-width: vertical horizontal        /* Two-value syntax */
E.g. border-image-width: 2em 3em;
border-image-width: top horizontal bottom      /* Three-value syntax */
E.g. border-image-width: 5% 15% 10%;
border-image-width: top right bottom left      /* Four-value syntax */
E.g. border-image-width: 5% 2em 10% auto;
设置边框图片的width,如果超出了设置的border-width,会向内扩展;查看下方示例,比较(图4-10.png && 图4-11.png);
示例:
border: 30px solid transparent;
padding: 20px;
border-image-source: url("https://mdn.mozillademos.org/files/4127/border.png");
border-image-slice: 27;
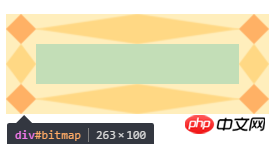
图4-10.png
border: 30px solid transparent;
padding: 20px;
border-image-source:url([https://mdn.mozillademos.org/files/4127/border.png](https://mdn.mozillademos.org/files/4127/border.png));
border-image-slice: 27;
border-image-width: 1 2 1 1;
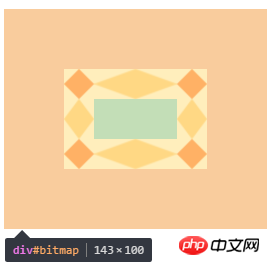
图4-11.png
4.4 border-image-outset: [
语法:
/* border-image-outset: sides */
border-image-outset: 30%;
/* border-image-outset:vertical horizontal */
border-image-outset: 10% 30%;
/* border-image-outset: top horizontal bottom */
border-image-outset: 30px 30% 45px;
/* border-image-outset:top right bottom left  */
border-image-outset: 7px 12px 14px 5px;
效果是将边框图片延伸到盒子外面,查看下放示例,比较(图4-12.png && 图4-13.png);
示例:
border: 30px solid transparent;
 padding: 20px;
 border-image-source:url([https://mdn.mozillademos.org/files/4127/border.png](https://mdn.mozillademos.org/files/4127/border.png));
 border-image-slice: 27;
 margin: 60px;

图4-12.png
border: 30px solid transparent;
padding: 20px;
border-image-source:url([https://mdn.mozillademos.org/files/4127/border.png](https://mdn.mozillademos.org/files/4127/border.png));
border-image-slice: 27;
margin: 60px;
border-image-outset: 2 1 1 1;
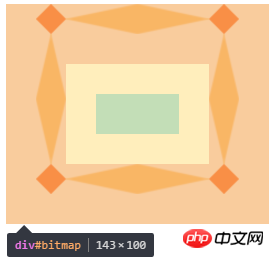
图4-13.png
4.4 border-image-repeat: [ stretch | repeat | round ]{1,2}
| 值(value) | 说明 |
|---|---|
| stretch | 默认初始值 ,;拉伸 |
| repeat | 平铺 |
| round | 整数次平铺 |
语法:
border-image-repeat: type                      /* One-value syntax */
E.g. border-image-value: stretch;
border-image-repeat: horizontal vertical       /* Two-value syntax */
E.g. border-image-width: round space;
The above is the detailed content of Detailed explanation of implementation examples of CSS translucent borders (picture). For more information, please follow other related articles on the PHP Chinese website!


