The previous article introduced you to the jQuery EasyUI tutorial-ProgressBar (progress bar). This component is commonly used by front-end developers at work. Next, I will introduce you to the jQuery-Tooltip (prompt box) component. , also very useful in the work process.
This article will give you a detailed introduction to the use case of jQuery-Tooltip (prompt box), and through the step-by-step code implementation process, it will not only let you master the implementation of Tooltip, but also enhance your programming interest and enthusiasm in front-end development work. level.
Use $.fn.tooltip.defaults to override the default value object. (Translator's Note: New plugin in version 1.3.3)
When the user moves the mouse over the element, a message prompt box will be displayed. The content of the prompt box can be any HTML element in the page or send a background request through Ajax to obtain the content of the prompt box.

Use case:
Create a prompt box
Create a prompt box through two methods: tags and Javascript.
1. Create a prompt box through tags and add a class name of "easyui-tooltip" to the element without any Javascript code.
<a href=”#” title=”This is the tooltip message.” class=”easyui-tooltip”>Hover me</a>
2. Create a prompt box through Javascript.
<a id=”dd” href=”javascript:void(0)”>Click here</a>
$(‘#dd’).tooltip({
position: ‘right’,
content: ‘<span style=”color:#fff”>This is the tooltip message.</span>’,
onShow: function(){
$(this).tooltip(‘tip’).css({
backgroundColor: ‘#666′,
borderColor: ‘#666′
});
}
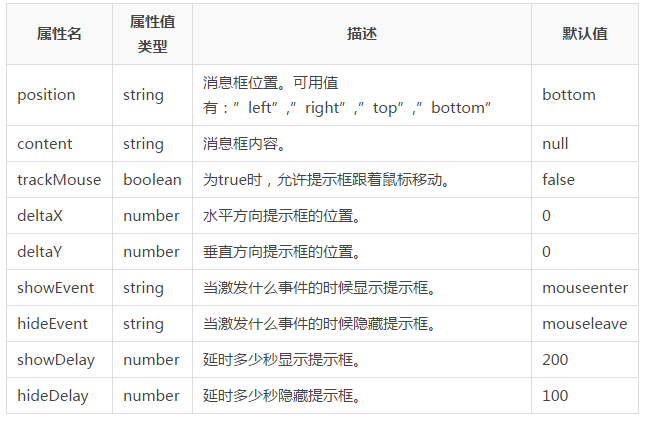
});Properties:

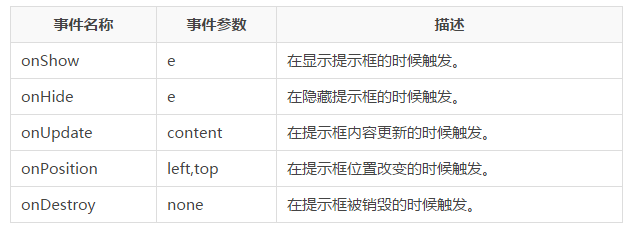
Events:

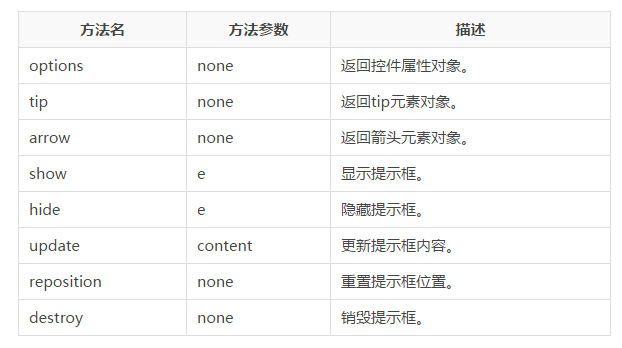
Methods:

The above is the content of the jQuery EasyUI tutorial-Tooltip (prompt box). For more related content, please pay attention to the PHP Chinese website (m.sbmmt.com)!


