

昨天下載了一個微信小程式的開發者工具,大概看了一下文檔,簡單的用他的方法實作了ajax請求。本文主要介紹了微信小程式ajax實現請求伺服器資料及模版遍歷資料功能,結合實例形式分析了微信小程式ajax調用及模板wx:for循環列表渲染相關操作技巧,需要的朋友可以參考下,希望能幫助到大家。
頭標題和底部tab配置都在 app.json檔案中,底部tab位元最少兩個,最多五個。下面是app.json檔案程式碼和相關註解
{
 "pages":[
  "pages/index/index",
  "pages/tucao/tucao",
  "pages/center/center"
 ],
 "window":{
  "backgroundTextStyle":"",
  "navigationBarBackgroundColor": "red",
  "navigationBarTitleText": "一个标题而已",
  "navigationBarTextStyle":"white"
 },
 "tabBar": {
  "list": [{
   "pagePath": "pages/index/index",
   "text": "首页",
   "iconPath": "/images/public/menu-cd.png",
   "selectedIconPath": "/images/public/menu.png"
  },{
   "pagePath": "pages/tucao/tucao",
   "text": "吐槽",
   "iconPath": "/images/public/hot-cd.png",
   "selectedIconPath": "/images/public/hot.png"
  },{
   "pagePath": "pages/center/center",
   "text": "我的",
   "iconPath": "/images/public/center-cd.png",
   "selectedIconPath": "/images/public/center.png"
  }],
  "borderStyle": "white"
 }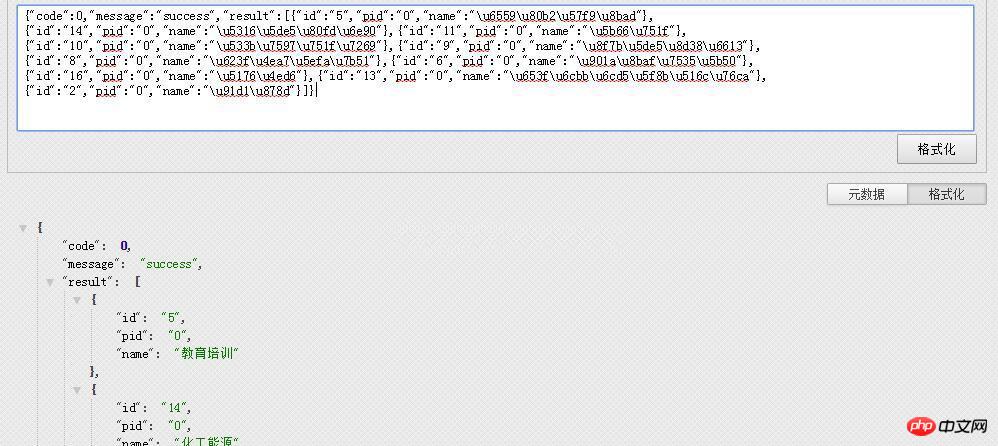
}這裡我是透過微信小程式wx.request實作ajax請求伺服器資料的,一個程式裡面最多能有五個這樣的請求。下面是index.js的程式碼
//index.js
//获取应用实例
var app = getApp()
Page({
 data: {
  motto: 'Hello World',
  userInfo: {},
  Industry:{}
 },
 onLoad: function (res) {
  var that = this
  //调用应用实例的方法获取全局数据
  app.getUserInfo(function(userInfo){
   //更新数据
   that.setData({
    userInfo:userInfo
   })
  })
  wx.request({
   url: 'http://xx.xxxxx.com/xxx.php',//上线的话必须是https,没有appId的本地请求貌似不受影响
   data: {},
   method: 'GET', // OPTIONS, GET, HEAD, POST, PUT, DELETE, TRACE, CONNECT
   // header: {}, // 设置请求的 header
   success: function(res){
    console.log(res.data.result)
    that.setData({
     Industry:res.data.result
    })
   },
   fail: function() {
    // fail
   },
   complete: function() {
    // complete
   }
  })
 }
})其中http://xx.xxxxx.com/xxx.php的回傳資料格式是一個json,格式如下
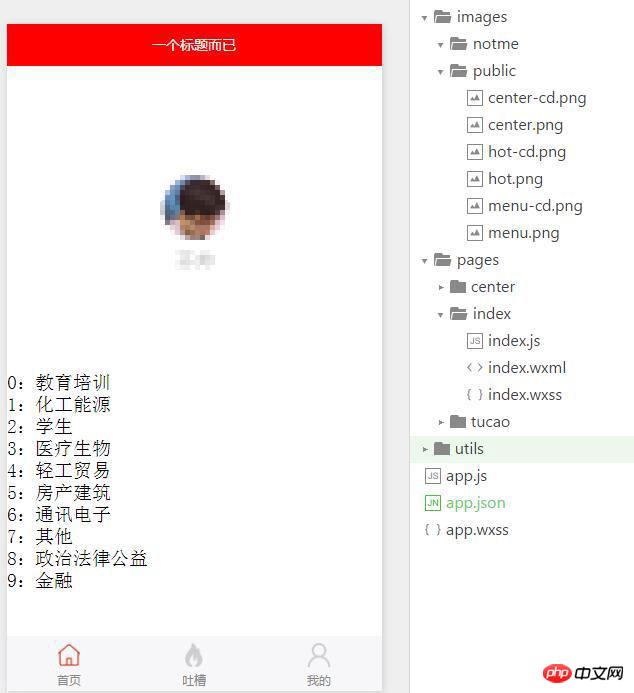
展示頁面就簡單了,變數{{array}} 微信模版遍歷資料使用wx:for 。 index.wxml程式碼如下:
<!--index.wxml-->
<view class="container">
 <view bindtap="bindViewTap" class="userinfo">
  <image class="userinfo-avatar" src="{{userInfo.avatarUrl}}" background-size="cover"></image>
  <text class="userinfo-nickname">{{userInfo.nickName}}</text>
 </view>
</view>
<view wx:for="{{Industry}}" wx:ket="{{index}}">
  {{index}}:{{item.name}}
</view>相關推薦:
以上是微信小程式ajax實作請求伺服器資料實例的詳細內容。更多資訊請關注PHP中文網其他相關文章!


