
Software level: ★★★★★
Software size: 21m
Authorization method: Unknown authorization
Software category: Other categories
Running environment: Win9x/NT/2000/XP/
Software update: 04.26
Software introduction: Photo studio production software is a must-have for photo album production. Usually we modify a picture, change the background of a character, and also use picture deduction. These tasks can be achieved with PS, but to achieve good results, it is difficult for novices to do it, and even for PS masters, it takes a lot of effort. A lot of effort. The software introduced below makes everything simple. This is one of the PS static cutout software. After installation, it can be used as a PS filter. It is very convenient, especially for girls with flying hair. It can achieve a satisfactory effect for you, with clear hair roots visible. The following is an introduction from installation to simple use.
Usage tutorial
1. Install knockout 2.0 in Photoshop
After downloading knockout
2.0, you must install the "plug-in" filter in photoshop "Under the path, this step is critical.
1.Installation path in photoshop 7.0: C:""ProgramFiles""Adobe""Photoshop 7.0""Filter""Plug-In
2.photoshop Installation path in CS
8.01: C:""ProgramFiles""Adobe""Photoshop CS
8.01""Plug-ins""Filter
When you start photoshop after installation, in the filter menu There is knockout 2.0 in it.
2. Steps to cut out pictures using knockout
2.0
Open the picture: Run PhotoShop
, we open a picture. 
Copy the new layer: Select the "Background" layer, right-click the mouse and select "Copy Layer". Because KnockOut
2.0 cannot be run with the original layer, we need to create a new "Background Copy" layer. 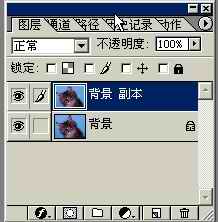
Start KnockOut 2.0: Select "KnockOut2" → "Load Working
Layer" under "Filter" to start running KnockOut 2.0 (Figure 3). After entering KnockOut 2.0, select Zoom Tool (icon 1) in Toolbox
to adjust the view size of the image so that the image is completely displayed on the screen so that we can view the image Perform the operation (click "CTRL + left mouse button" to enlarge the image, click "ATL + left mouse button" to reduce the image). 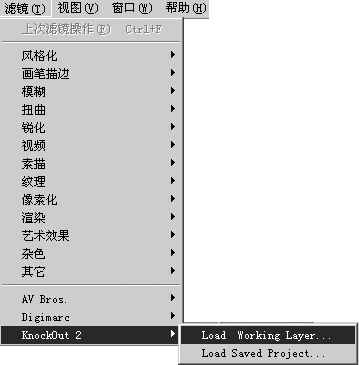
Draw the reserved area of the picture: Click Inside
object in the toolbox in the KnockOut 2.0 interface, and start drawing lines along the inner edge of the picture (Figure 4) , the part within the drawn line is the part that needs to be retained. When drawing lines, be careful not to touch the outside of the image, otherwise the cutout will be damaged. In short, remember that the background color inside the lines is opaque. If you can't see the actual edge of the image clearly when drawing the line, you can press the L key to zoom in. If you are not satisfied with the drawn area, you can press the "Ctrl+D" keys to cancel the drawn area and redraw the area. 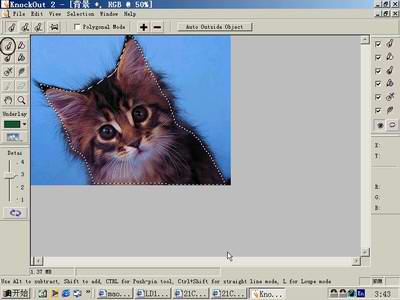
Then click the Outside
object in the toolbox and draw a line along the outer edge of the picture (Figure 5). After this drawing is completed, the parts other than the drawn lines need to be deleted. The area between the inside of the drawn line and the last drawn line is the transition area of the image from opaque to transparent, which is the area where we are going to cut out the image. 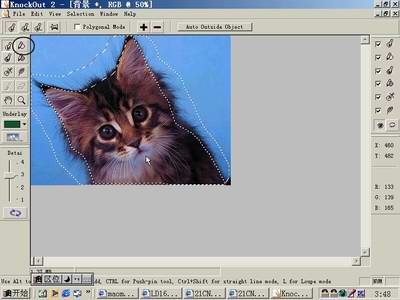
Set the image background color: Click the small triangle under the Underlay key on the left and a color box will pop up. We can choose one according to our needs. If we are not satisfied with these colors, You can click the Other button to adjust it yourself.
Set the cutout accuracy: Set the Detai value to 4 (as shown in Figure 6). This value is based on the complexity of the edge of the picture: the simpler picture is set to 1, as the complexity The degree can gradually increase). 
Cutout: Click the cutout button , the program will automatically cut out the image, and finally get the result shown in (Figure 7). If you want to cancel the cutout, you can click Revert in the File menu to restore it.
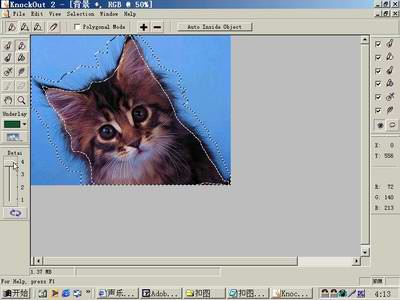
Embed background image: Do you want to add a beautiful background image to the cut out image? Clicking on the small frame above Detai will bring up a menu, and then select according to the path.
Exit: Click Apply in the File menu to return to the PhotoShop interface. If you still want to add any dazzling effects, just continue in PhotoShop. 
More PS cutout filter knockout 2.0 download (with usage tutorial) For related articles, please pay attention to the PHP Chinese website!
 How much is Snapdragon 8gen2 equivalent to Apple?
 How to resolve WerFault.exe application error
 absolutelayout
 Mongodb and mysql are easy to use and recommended
 number_format usage
 rgb to hexadecimal conversion
 How to make charts and data analysis charts in PPT
 What are the commonly used third-party libraries in PHP?


