컴포넌트 소개
컴포넌트 시스템은 Vue.js의 중요한 개념 중 하나이며 독립적이고 재사용 가능한 작은 컴포넌트를 사용하여 모든 유형의 대규모 애플리케이션을 구축할 수 있는 추상화를 제공합니다. 인터페이스는 구성요소 트리로 추상화될 수 있습니다.
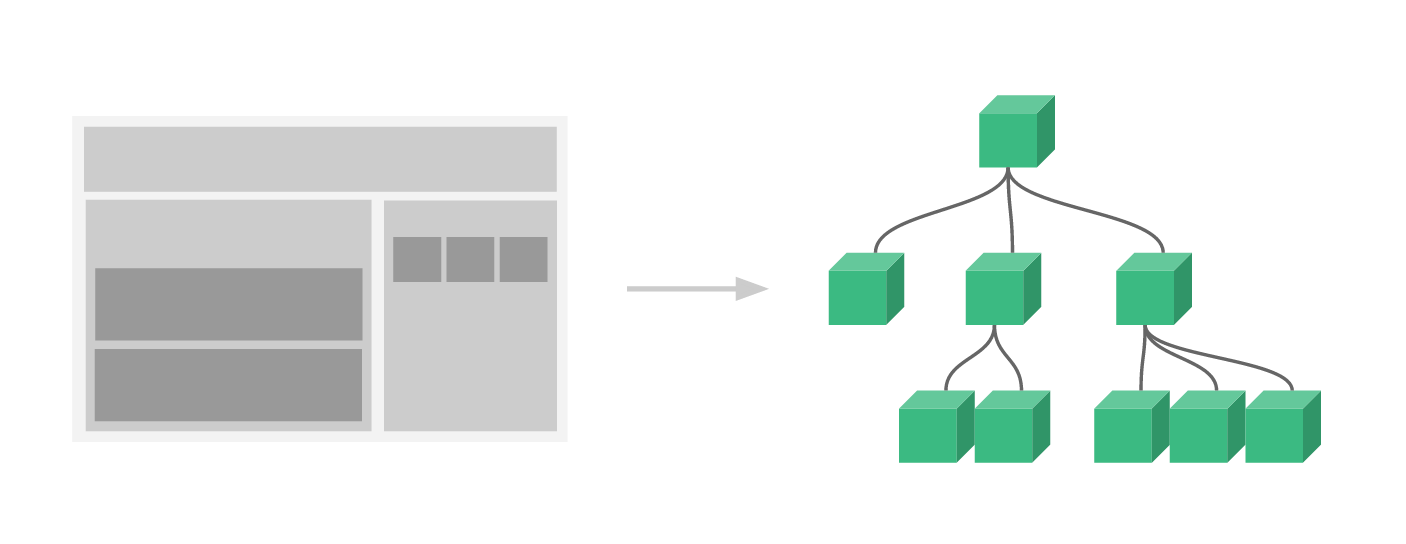
그럼 구성요소란 무엇일까요?
구성 요소는 HTML 요소를 확장하고 재사용 가능한 HTML 코드를 캡슐화할 수 있습니다. 구성 요소를 사용자 정의 HTML 요소로 생각할 수 있습니다.
컴포넌트 생성 및 등록
기본 단계
Vue.js 컴포넌트를 사용하는 세 가지 단계는 컴포넌트 생성자 생성, 컴포넌트 등록, 컴포넌트 사용입니다.
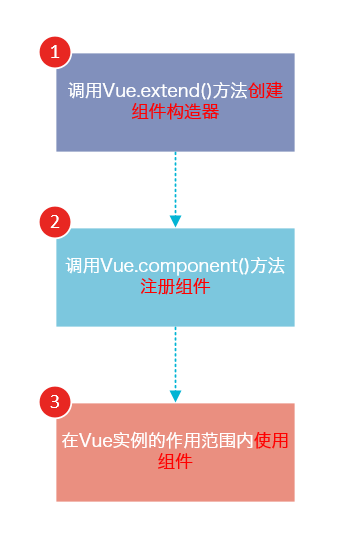
다음 코드는 이러한 3단계를 보여줍니다.
<!DOCTYPE html>
<html>
<body>
<p id="app">
<!-- 3. #app是Vue实例挂载的元素,应该在挂载元素范围内使用组件-->
<my-component></my-component>
</p>
</body>
<script src="js/vue.js"></script>
<script>
// 1.创建一个组件构造器
var myComponent = Vue.extend({
template: '<p>This is my first component!</p>'
})
// 2.注册组件,并指定组件的标签,组件的HTML标签为<my-component>
Vue.component('my-component', myComponent)
new Vue({
el: '#app'
});
</script>
</html>실행 결과는 다음과 같습니다.

보시다시피 컴포넌트를 사용하는 것은 일반적인 HTML 요소를 사용하는 것과 다르지 않습니다.
컴포넌트 생성 및 등록 이해
다음 단계를 사용하여 컴포넌트 생성 및 등록을 이해합니다.
1 Vue 생성자입니다. 확장 기능에서 Vue.extend()를 호출하면 특정 구성 요소 인스턴스가 아닌 구성 요소 생성자가 생성됩니다.
2. Vue.extend() 생성자에는 옵션 개체가 있으며, 옵션 개체의 템플릿 속성은 구성 요소에서 렌더링할 HTML을 정의하는 데 사용됩니다.
3. Vue.comComponent()를 사용하여 컴포넌트를 등록할 때 2개의 매개변수를 제공해야 합니다. 첫 번째 매개변수는 컴포넌트의 레이블이고 두 번째 매개변수는 구성요소 생성자입니다.
4. Vue.comComponent() 메서드는 내부적으로 구성 요소 생성자를 호출하여 구성 요소 인스턴스를 생성합니다.
5. 구성 요소는 Vue 인스턴스에 마운트되어야 합니다. 그렇지 않으면 적용되지 않습니다.
5번 항목에 유의하세요. 다음 코드는 3곳에서 my-comComponent 태그를 사용하지만 #app1 및 #app2 아래에 있는 my-comComponent 태그만 작동합니다.
<!DOCTYPE html>
<html>
<body>
<p id="app1">
<my-component></my-component>
</p>
<p id="app2">
<my-component></my-component>
</p>
<!--该组件不会被渲染-->
<my-component></my-component>
</body>
<script src="js/vue.js"></script>
<script>
var myComponent = Vue.extend({
template: '<p>This is a component!</p>'
})
Vue.component('my-component', myComponent)
var app1 = new Vue({
el: '#app1'
});
var app2 = new Vue({
el: '#app2'
})
</script>
</html>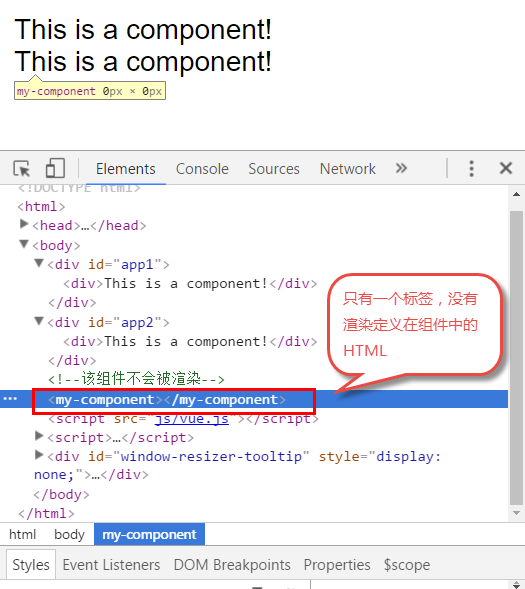
글로벌 등록 및 로컬 등록
컴포넌트 등록을 위해 Vue.comComponent()를 호출하면 해당 컴포넌트의 등록이 전역적으로 이루어집니다. 이는 모든 Vue 예제에서 구성 요소를 사용할 수 있음을 의미합니다.
글로벌 등록이 필요하지 않거나 구성 요소가 다른 구성 요소에서 사용되는 경우 옵션 개체의 구성 요소 속성을 사용하여 로컬 등록을 구현할 수 있습니다.
위의 예는 로컬 등록으로 변경될 수 있습니다:
<!DOCTYPE html>
<html>
<body>
<p id="app">
<!-- 3. my-component只能在#app下使用-->
<my-component></my-component>
</p>
</body>
<script src="js/vue.js"></script>
<script>
// 1.创建一个组件构造器
var myComponent = Vue.extend({
template: '<p>This is my first component!</p>'
})
new Vue({
el: '#app',
components: {
// 2. 将myComponent组件注册到Vue实例下
'my-component' : myComponent
}
});
</script>
</html>
由于my-component组件是注册在#app元素对应的Vue实例下的,所以它不能在其它Vue实例下使用。
<p id="app2">
<!-- 不能使用my-component组件,因为my-component是一个局部组件,它属于#app-->
<my-component></my-component>
</p>
<script>
new Vue({
el: '#app2'
});
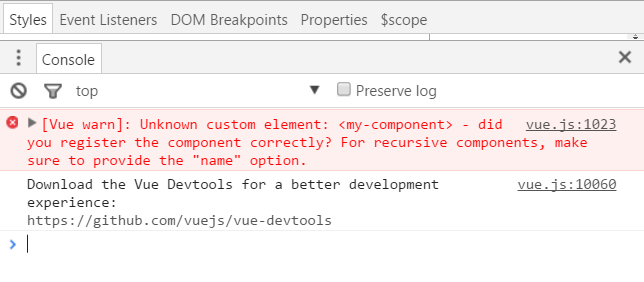
</script>이렇게 하면 브라우저에 오류 메시지가 표시됩니다:
상위 및 하위 구성 요소
상위 구성 요소와 하위 구성 요소 간의 관계를 구성하는 구성 요소에서 다른 구성 요소를 정의하고 사용할 수 있습니다.
<!DOCTYPE html>
<html>
<body>
<p id="app">
<parent-component>
</parent-component>
</p>
</body>
<script src="js/vue.js"></script>
<script>
var Child = Vue.extend({
template: '<p>This is a child component!</p>'
})
var Parent = Vue.extend({
// 在Parent组件内使用<child-component>标签
template :'<p>This is a Parent component</p><child-component></child-component>',
components: {
// 局部注册Child组件,该组件只能在Parent组件内使用
'child-component': Child
}
})
// 全局注册Parent组件
Vue.component('parent-component', Parent)
new Vue({
el: '#app'
})
</script>
</html>이 코드를 실행한 결과는 다음과 같습니다.
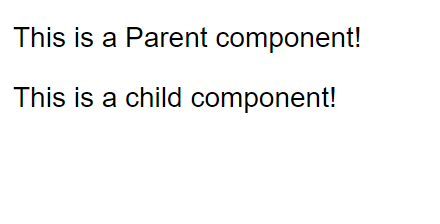
우리는 이 코드를 여러 단계로 이해하게 됩니다.
우리는 이 코드는 여러 단계로 이해됩니다.
var Child = Vue.extend(…)定义一了个Child组件构造器
var Parent = Vue.extend(…)定义一个Parent组件构造器
components: { ‘child-component': Child },将Child组件注册到Parent组件,
并将Child组件的标签设置为child-component。
template :'<p>This is a Parent component</p>
<child-component></child-component>',在Parent组件内以标签的形式使用Child组件。
Vue.component(‘parent-component', Parent) 全局注册Parent组件페이지의 태그를 사용하여 상위 구성 요소의 콘텐츠를 렌더링하면 하위 구성 요소의 콘텐츠도 렌더링됩니다.
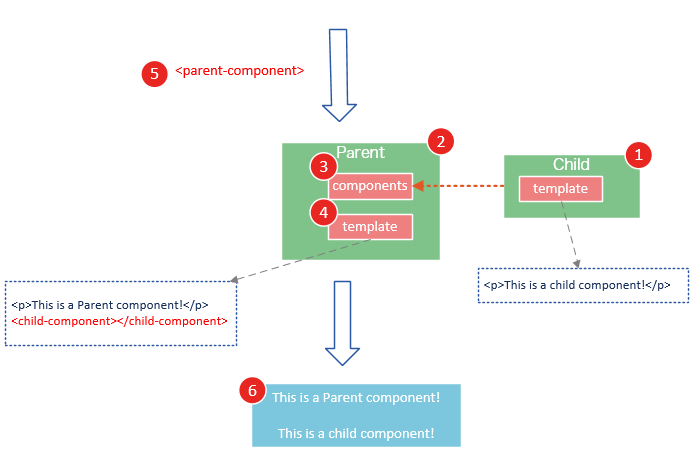
Child 컴포넌트는 Parent 컴포넌트에 등록되어 있으며, 정확히 Parent 컴포넌트에서만 사용할 수 있습니다. 자식 컴포넌트는 부모 컴포넌트의 템플릿에서만 사용할 수 있습니다.
하위 구성 요소를 사용하는 다음 두 가지 방법은 잘못되었습니다.
1. 상위 구성 요소의
<p id="app">
 <parent-component>
 <child-component></child-component>
 </parent-component>
</p>
을 하위 태그로 사용합니다. .
이 방법이 왜 효과적이지 않습니까? 하위 구성 요소가 상위 구성 요소에 등록되면 Vue.js는 상위 구성 요소의 템플릿을 컴파일하고 템플릿의 콘텐츠는 상위 구성 요소가 렌더링할 HTML을 이미 결정했기 때문입니다.
부모 구성 요소는 런타임과 동일합니다. 하위 태그 중 일부는 일반 HTML로만 실행되며, 하위 구성 요소는 표준 HTML 태그가 아니며 브라우저에서 직접 무시됩니다.
2. 상위 구성 요소 태그 외부에 하위 구성 요소
<p id="app">
 <parent-component>
 </parent-component>
 <child-component>
 </child-component>
</p>
를 사용하여 이 코드를 실행하면 브라우저에 다음 오류가 표시됩니다.
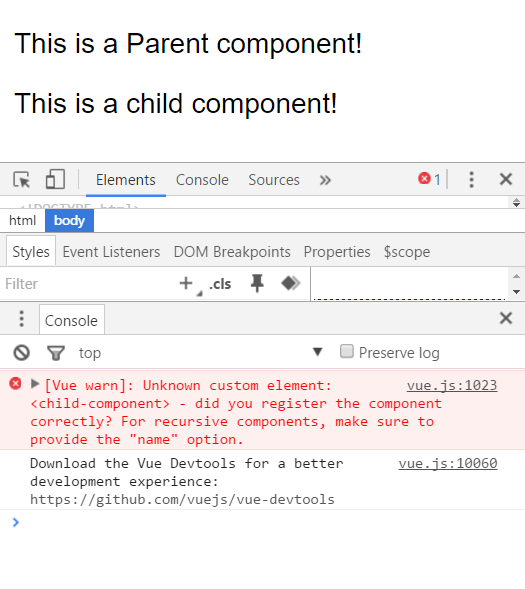
컴포넌트 등록 구문 슈가
위의 컴포넌트 등록 방법은 다소 번거롭습니다. 이 과정을 단순화하기 위해 Vue.js에서는 등록 구문 슈가를 제공합니다. <… 옵션 개체의 경우 옵션 개체의 템플릿 속성을 사용하여 구성 요소 템플릿을 정의합니다.
이 방법을 사용하면 Vue는 뒤에서 자동으로 Vue.extend()를 호출합니다.
옵션 개체의 구성 요소 속성에 로컬 등록 구현:
// 全局注册,my-component1是标签名称
Vue.component('my-component1',{
template: '<p>This is the first component!</p>'
})
var vm1 = new Vue({
el: '#app1'
})var vm2 = new Vue({
el: '#app2',
components: {
// 局部注册,my-component2是标签名称
'my-component2': {
template: '<p>This is the second component!</p>'
},
// 局部注册,my-component3是标签名称
'my-component3': {
template: '<p>This is the third component!</p>'
}
}
})尽管语法糖简化了组件注册,但在template选项中拼接HTML元素比较麻烦,这也导致了HTML和JavaScript的高耦合性。
庆幸的是,Vue.js提供了两种方式将定义在JavaScript中的HTML模板分离出来
使用script标签
<!DOCTYPE html>
<html>
<body>
<p id="app">
<my-component></my-component>
</p>
<script type="text/x-template" id="myComponent">
<p>This is a component!</p>
</script>
</body>
<script src="js/vue.js"></script>
<script>
Vue.component('my-component',{
template: '#myComponent'
})
new Vue({
el: '#app'
})
</script>
</html>template选项现在不再是HTML元素,而是一个id,Vue.js根据这个id查找对应的元素,然后将这个元素内的HTML作为模板进行编译。
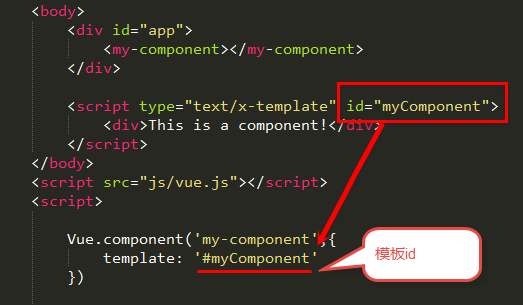
注意:使用script标签时,type指定为text/x-template,意在告诉浏览器这不是一段js脚本,浏览器在解析HTML文档时会忽略script标签内定义的内容。

使用template标签
如果使用template>标签,则不需要指定type属性。
<!DOCTYPE html>
<html>
<head>
<meta charset="UTF-8">
<title></title>
</head>
<body>
<p id="app">
<my-component></my-component>
</p>
<template id="myComponent">
<p>This is a component!</p>
</template>
</body>
<script src="js/vue.js"></script>
<script>
Vue.component('my-component',{
template: '#myComponent'
})
new Vue({
el: '#app'
})
</script>
</html>在理解了组件的创建和注册过程后,我建议使用script>或template>标签来定义组件的HTML模板。
这使得HTML代码和JavaScript代码是分离的,便于阅读和维护。
另外,在Vue.js中,可创建.vue后缀的文件,在.vue文件中定义组件,这个内容我会在后面的文章介绍
组件的el和data选项
传入Vue构造器的多数选项也可以用在 Vue.extend() 或Vue.component()中,不过有两个特例: data 和el。
Vue.js规定:在定义组件的选项时,data和el选项必须使用函数。
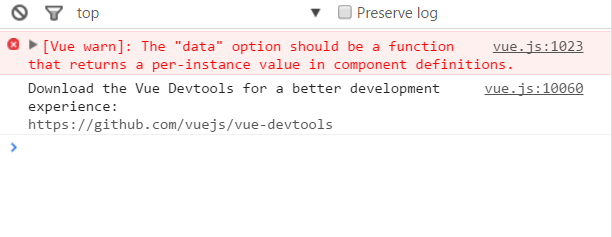
下面的代码在执行时,浏览器会提出一个错误
Vue.component('my-component', {
 data: {
 a: 1
 }
}) 
另外,如果data选项指向某个对象,这意味着所有的组件实例共用一个data。
我们应当使用一个函数作为 data 选项,让这个函数返回一个新对象:
Vue.component('my-component', {
 data: function(){
 return {a : 1}
 }
})
使用props
组件实例的作用域是孤立的。这意味着不能并且不应该在子组件的模板内直接引用父组件的数据。可以使用 props 把数据传给子组件。
props基础示例
下面的代码定义了一个子组件my-component,在Vue实例中定义了data选项。
var vm = new Vue({
 el: '#app',
 data: {
 name: 'keepfool',
 age: 28
 },
 components: {
 'my-component': {
  template: '#myComponent',
  props: ['myName', 'myAge']
 }
 }
})为了便于理解,你可以将这个Vue实例看作my-component的父组件。
如果我们想使用父组件的数据,则必须先在子组件中定义props属性,也就是props: [‘myName', ‘myAge']这行代码。
定义子组件的HTML模板:
 <template id="myComponent">
 <table>
 <tr>
  <th colspan="2">
  子组件数据
  </th>
 </tr>
 <tr>
  <td>my name</td>
  <td>{{ myName }}</td>
 </tr>
 <tr>
  <td>my age</td>
  <td>{{ myAge }}</td>
 </tr>
 </table>
</template>将父组件数据通过已定义好的props属性传递给子组件:
<p id="app">
 <my-component v-bind:my-name="name" v-bind:my-age="age"></my-component>
</p>
注意:在子组件中定义prop时,使用了camelCase命名法。由于HTML特性不区分大小写,camelCase的prop用于特性时,需要转为 kebab-case(短横线隔开)。例如,在prop中定义的myName,在用作特性时需要转换为my-name。
这段程序的运行结果如下:

父组件是如何将数据传给子组件的呢?相信看了下面这图,也许你就能很好地理解了。
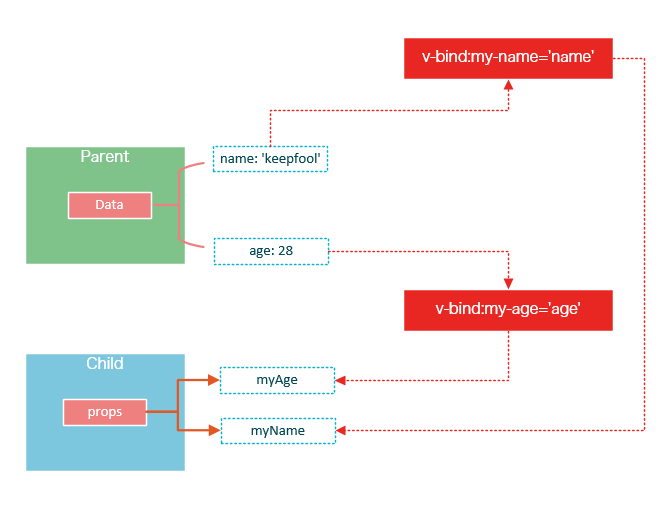
在父组件中使用子组件时,通过以下语法将数据传递给子组件:
<child-component v-bind:子组件prop="父组件数据属性"></child-component>
prop的绑定类型
单向绑定
既然父组件将数据传递给了子组件,那么如果子组件修改了数据,对父组件是否会有所影响呢?
我们将子组件模板和页面HTML稍作更改:
<p id="app">

 <table>
  <tr>
   <th colspan="3">父组件数据</td>
  </tr>
  <tr>
   <td>name</td>
   <td>{{ name }}</td>
   <td><input type="text" v-model="name" /></td>
  </tr>
  <tr>
   <td>age</td>
   <td>{{ age }}</td>
   <td><input type="text" v-model="age" /></td>
  </tr>
 </table>

 <my-component v-bind:my-name="name" v-bind:my-age="age"></my-component>
</p>

<template id="myComponent">
 <table>
  <tr>
   <th colspan="3">子组件数据</td>
  </tr>
  <tr>
   <td>my name</td>
   <td>{{ myName }}</td>
   <td><input type="text" v-model="myName" /></td>
  </tr>
  <tr>
   <td>my age</td>
   <td>{{ myAge }}</td>
   <td><input type="text" v-model="myAge" /></td>
  </tr>
 </table>
</template>运行这个页面,我们做两个小试验:
1. 在页面上修改子组件的数据
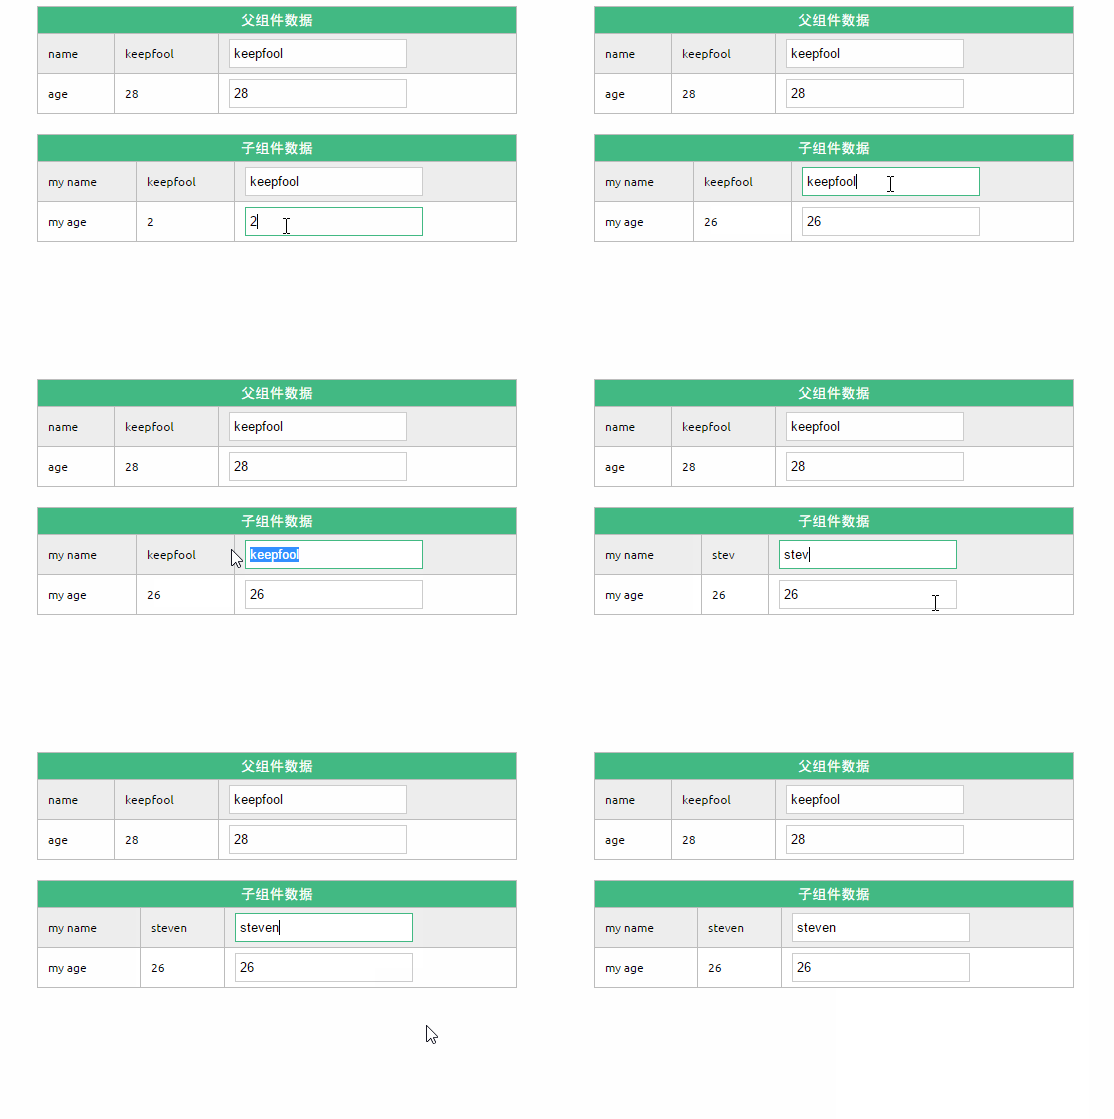
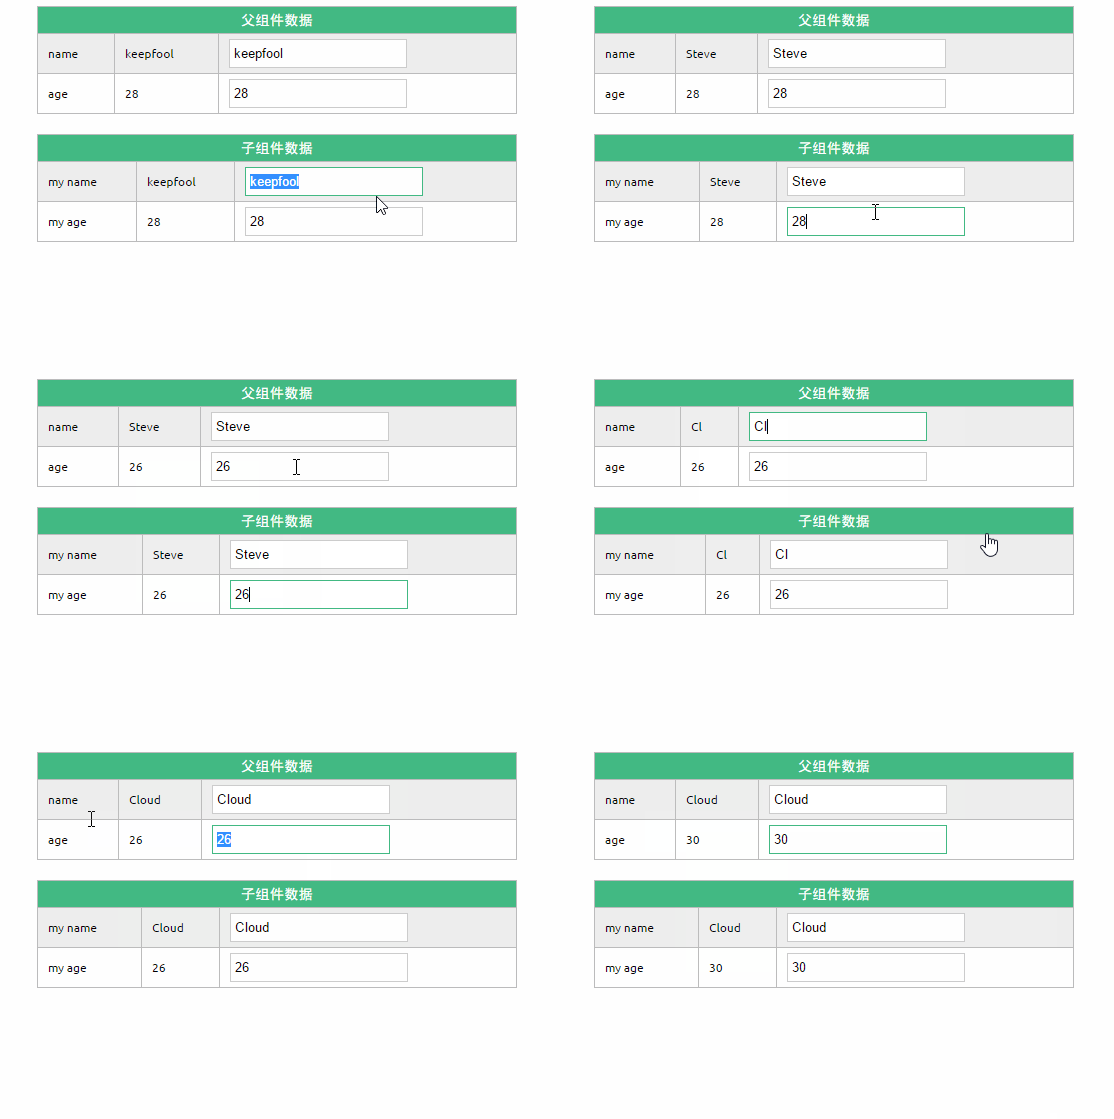
修改了子组件的数据,没有影响父组件的数据。
2. 在页面上修改父组件的数据
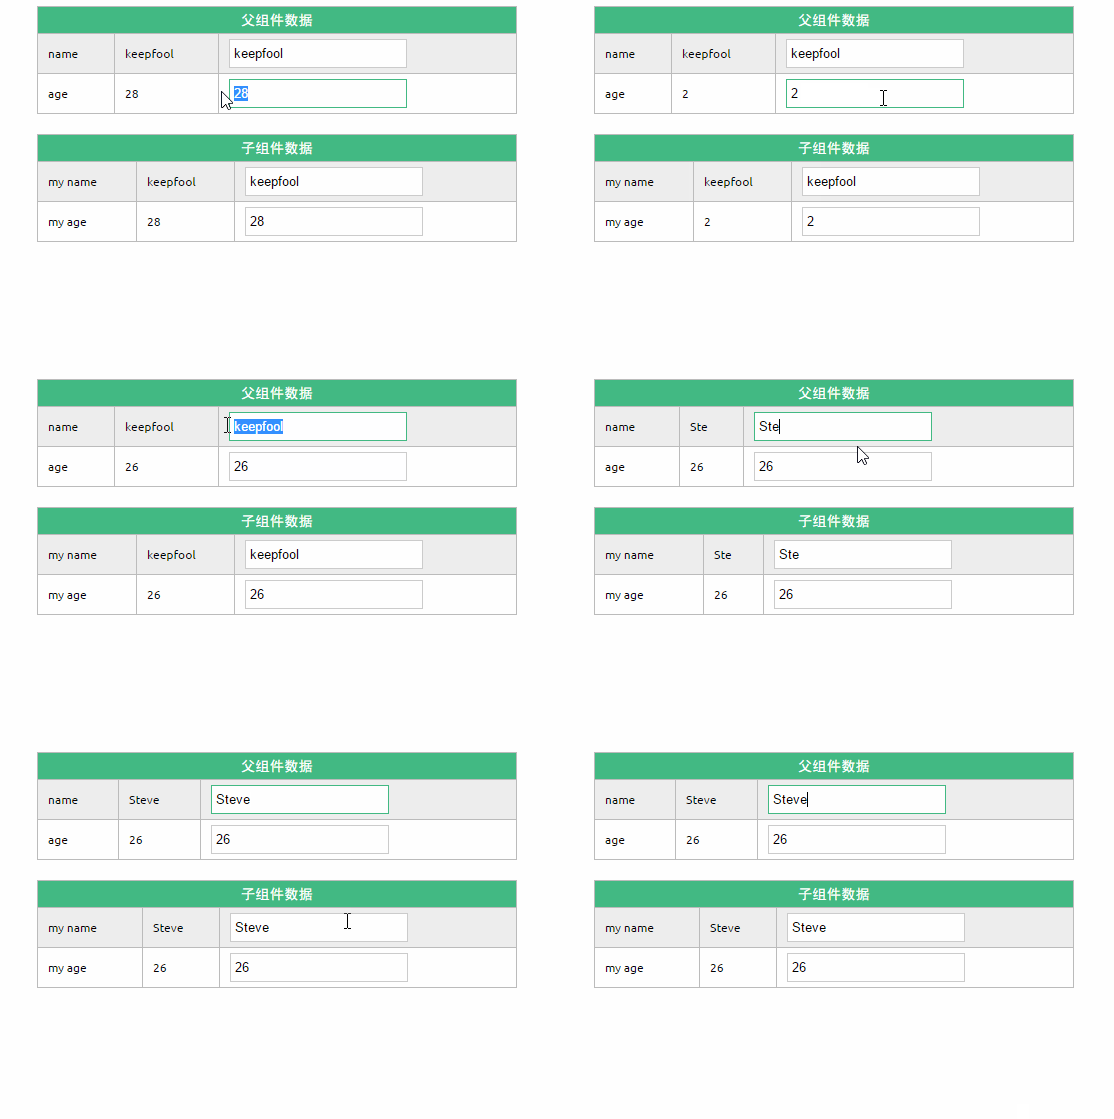
修改了父组件的数据,同时影响了子组件。
prop默认是单向绑定:当父组件的属性变化时,将传导给子组件,但是反过来不会。这是为了防止子组件无意修改了父组件的状态
双向绑定
可以使用.sync显式地指定双向绑定,这使得子组件的数据修改会回传给父组件。
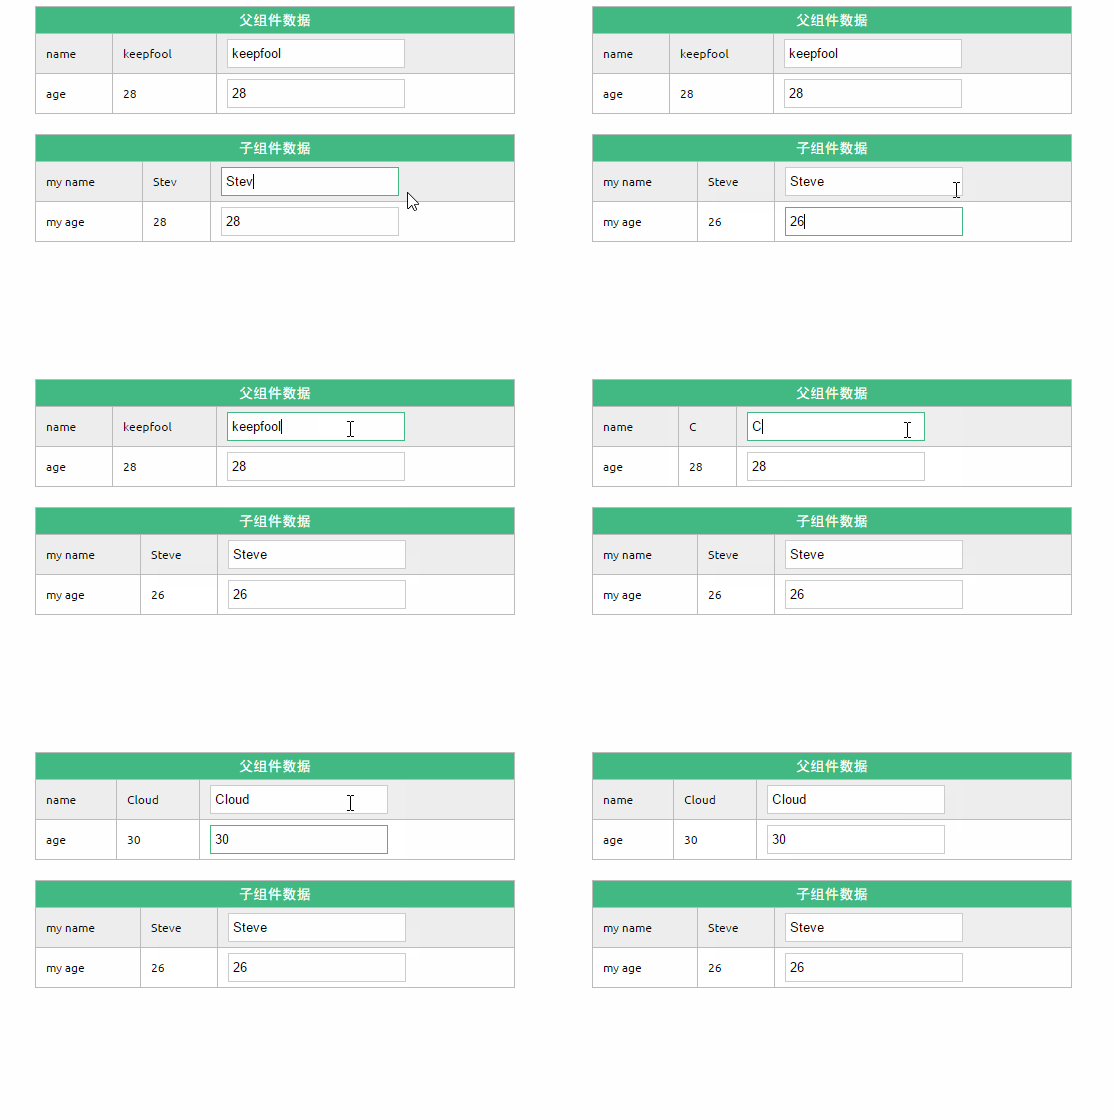
单次绑定
可以使用.once显式地指定单次绑定,单次绑定在建立之后不会同步之后的变化,这意味着即使父组件修改了数据,也不会传导给子组件。
示例
为了尽快消化这些知识,我们来做一个小示例吧。
<!DOCTYPE html>
<html>
<head>
<meta charset="UTF-8">
<title></title>
<link rel="stylesheet" href="styles/demo.css" />
</head>
<body>
<p id="app">
<p id="searchBar">
Search <input type="text" v-model="searchQuery" />
</p>
<simple-grid :data="gridData" :columns="gridColumns" :filter-key="searchQuery">
</simple-grid>
</p>
<template id="grid-template">
<table>
<thead>
<tr>
<th v-for="col in columns">
{{ col | capitalize}}
</th>
</tr>
</thead>
<tbody>
<tr v-for="entry in data | filterBy filterKey">
<td v-for="col in columns">
{{entry[col]}}
</td>
</tr>
</tbody>
</table>
</template>
</body>
<script src="js/vue.js"></script>
<script>
Vue.component('simple-grid', {
template: '#grid-template',
props: {
 data: Array,
 columns: Array,
 filterKey: String
}
})
var demo = new Vue({
el: '#app',
data: {
searchQuery: '',
gridColumns: ['name', 'age', 'sex'],
gridData: [{
name: 'Jack',
age: 30,
sex: 'Male'
}, {
name: 'Bill',
age: 26,
sex: 'Male'
}, {
name: 'Tracy',
age: 22,
sex: 'Female'
}, {
name: 'Chris',
age: 36,
sex: 'Male'
}]
}
})
</script>
</html>
除了以上介绍的知识点,这个示例还用到了两个知识点:
1. prop验证
props: {
data: Array,
columns: Array,
filterKey: String
}
这段代码表示:父组件传递过来的data和columns必须是Array类型,filterKey必须是字符串类型。
更多prop验证的介绍,请参考:官方文档prop验证
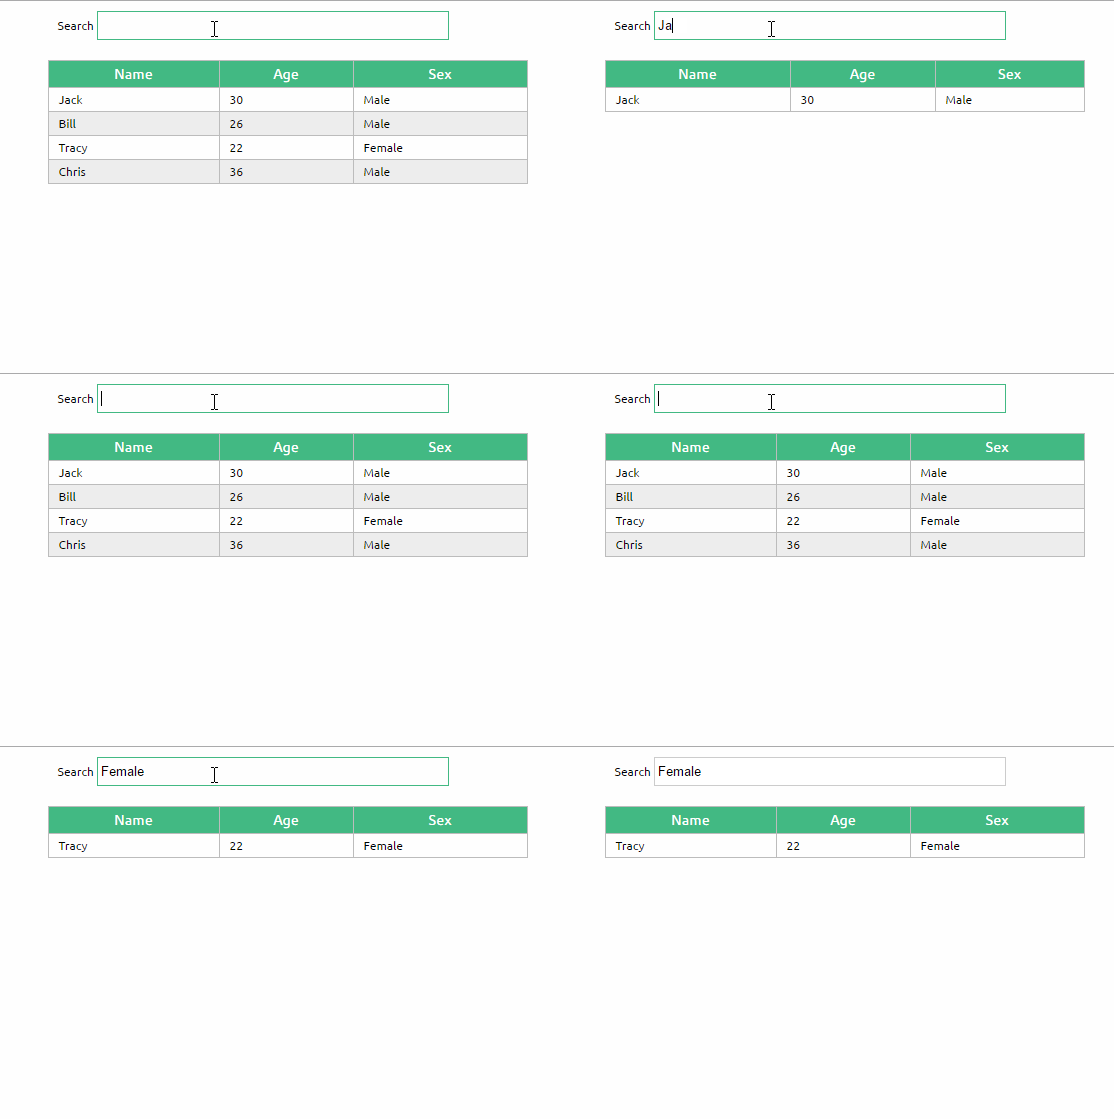
2. filterBy过滤器
可以根据指定的字符串过滤数据。
总结
使用组件的前提是创建并注册组件,本篇文章详细介绍了组件从创建到使用的步骤,并介绍了几种不同的方式去创建和注册组件;然后介绍了组件的props选项,它用于将父组件的数据传递给子组件,最后我们用一个小的示例演示了这些知识点。
相关文章: