Java 버전의 Redis 구현
최근 Redis 코드를 살펴보니 매우 간단하다는 것을 알았습니다. 하나를 다른 언어로 구현(복사)하고 싶은 충동이 들었습니다. 원래는 Python을 사용하여 구현하려고 했습니다. 이유
첫째: Java의 NIO와 Netty의 EventLoop의 조합은 Redis 네트워크 모델과 매우 유사합니다. Redis 모델도 더 간단합니다. EventLoop 스레드가 하나만 있기 때문입니다. 쓰기(복사)
둘째: Netty 아키텍처는 꽤 좋습니다.
Redis Server를 매우 추상적인(간단한) 관점에서 보면, 기본적으로 단일 라인 요청을 처리하는 해시테이블인 6379를 수신하는 프로그램입니다. Redis 프로토콜은 http 프로토콜보다 훨씬 간단합니다.
다음은 일반적인 형식입니다. 이 프로토콜은 다음과 같습니다.
*<参数数量> CR LF
$<参数 1 的字节数量> CR LF<参数 1 的数据> CR LF
...
$<参数 N 的字节数量> CR LF<参数 N 的数据> CR LF
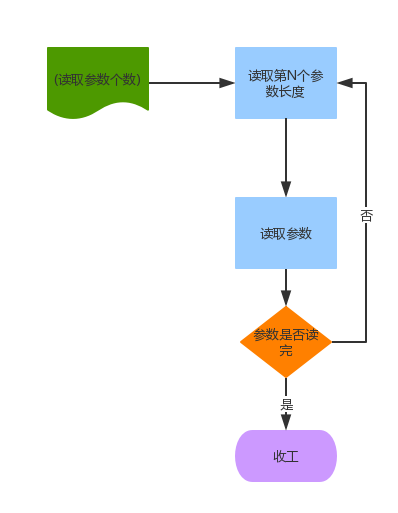
이것은 기본적으로 매우 간단한 유한 상태 머신입니다.

그래서 명령 구문 분석기에 3가지 상태를 설정했습니다.
public enum State {
    NUMBER_OF_ARGS,
    NUMBER_BYTE_OF_ARGS,
    ARGS_DATA
}
초기 상태를 설정하겠습니다. NUMBER_OF_ARGS 설정은 처음에는 녹색 상태입니다. 데이터가 도착하면 프로그램의 상태가 무엇인지, 무엇을 하는지 지속적으로 판단합니다.
while(true){    switch (state()){        case NUMBER_OF_ARGS:
            //从当前数据中读取参数个数
            break;        case NUMBER_BYTE_OF_ARGS:
            //从数据中读取参数长度
            break;        case ARGS_DATA:
            //按参数长度读取参数
            //判断参数个数.如果到了最后一个.则跳出,否则状态转回NUMBER_BYTE_OF_ARGS
            break;
    }
}
위의 아이디어에 따라 구현해 보겠습니다. package me.yunanw.redisinjava;
import io.netty.buffer.ByteBuf;
import io.netty.channel.ChannelHandlerContext;
import io.netty.handler.codec.DecoderException;
import io.netty.handler.codec.ReplayingDecoder;import java.util.List;
/**
* Created by yunanw on 2016/10/15.
*/
public class CommandDecoder extends ReplayingDecoder {
public enum State {
NUMBER_OF_ARGS,
NUMBER_BYTE_OF_ARGS,
ARGS_DATA
}
static final char CR = '\r';
static final char LF = '\n';
public CommandDecoder(){
state(State.NUMBER_OF_ARGS);
}
protected void decode(ChannelHandlerContext channelHandlerContext, ByteBuf byteBuf, List list) throws Exception {
RedisFrame frame = doDecode(channelHandlerContext,byteBuf,list);
if (frame != null){
list.add(frame);
}
}
private RedisFrame doDecode(ChannelHandlerContext channelHandlerContext, ByteBuf byteBuf, List list) throws Exception {
RedisFrame frame = null;
int currentArgsLen = 0;
int argsCount = 0;
while(true){
switch (state()){
case NUMBER_OF_ARGS:
if (byteBuf.readByte() != '*'){
throw new DecoderException("can not found *");
}
argsCount = parseRedisNumber(byteBuf);
frame = new RedisFrame(argsCount);
checkpoint(State.NUMBER_BYTE_OF_ARGS);
break;
case NUMBER_BYTE_OF_ARGS:
if (byteBuf.readByte() != '$'){
throw new DecoderException("can not found $");
}
currentArgsLen = parseRedisNumber(byteBuf);
checkpoint(State.ARGS_DATA);;
break;
case ARGS_DATA:
frame.AppendArgs(byteBuf.readBytes(currentArgsLen).array());
if (byteBuf.readByte() != CR || byteBuf.readByte() != LF)
throw new DecoderException("can not found CR OR LF");
if ((--argsCount) = 0 && digit < 10)
{
result = (result * 10) + digit;
} else {
throw new DecoderException("Invalid character in integer");
}
} while ((readByte = byteBuf.readByte()) != CR);
if ((readByte = byteBuf.readByte()) != LF)
{
throw new DecoderException("can not found LF");
}
return (negative? -result:result);
}
}위 코드를 이해하면 작은 문제가 발생합니다. 네트워크 문제로 인해 데이터가 완전히 수신되지 않을 수도 있습니다. 그리고 우리 코드에서는 이 부분을 전혀 고려하지 않습니다. 그리고 도대체 체크포인트가 무엇인가요?첫 번째 질문: 에서 사실, 우리는 이 문제를 고려했습니다. 그래서 우리는 ReplayingDecoder의 CallDecode 메소드를 살펴보겠습니다. (이름은 매우 간단합니다. 그 기능을 이해해야 합니다.) </p><pre class="brush:java;toolbar:false">
try {
decode(ctx, replayable, out);
//省略} catch (Signal replay) {
replay.expect(REPLAY); //省略
// Return to the checkpoint (or oldPosition) and retry.
int checkpoint = this.checkpoint;
if (checkpoint >= 0) {
in.readerIndex(checkpoint);
} else {
// Called by cleanup() - no need to maintain the readerIndex
// anymore because the buffer has been released already.
}
break;
}신호 재생은 Netty Error에 정의된 것입니다. 오류를 읽으면 Netty는 다음 데이터가 도착할 때까지 기다렸다가 구문 분석이 다시 성공할 수 있는지 확인하기 위해 Decode 메서드를 다시 시도합니다. 원하는 데이터를 읽었습니다.하지만 주의하세요. replaydecoder의 decode 메서드는 반복적으로 호출되므로 코드에서 이에 대비해야 합니다.2: CheckPoint는 Decode가 매번 반복적으로 호출되는 것을 방지하기 위해 처음부터 실행하고 상태를 설정합니다. 자 이제 모니터링 부분의 코드를 만듭니다. 복사하세요 </p><pre class="brush:java;toolbar:false">
ServerBootstrap bootstrap = new ServerBootstrap();
final DefaultEventExecutorGroup group = new DefaultEventExecutorGroup(1);
try {
bootstrap.group(new NioEventLoopGroup(), new NioEventLoopGroup())
.channel(NioServerSocketChannel.class)
.option(ChannelOption.SO_BACKLOG, 100)
.localAddress(port)
.childOption(ChannelOption.TCP_NODELAY, true)
.childHandler(new ChannelInitializer() {
@Override
public void initChannel(SocketChannel ch) throws Exception {
ChannelPipeline p = ch.pipeline();
p.addLast(new CommandDecoder());
p.addLast(new RedisServerHandler());
}
});
// Start the server.
ChannelFuture f = bootstrap.bind().sync();
// Wait until the server socket is closed.
f.channel().closeFuture().sync();
} finally {
// Shut down all event loops to terminate all threads.
group.shutdownGracefully();
}Redis 프로토콜을 RedisFrame 클래스로 구문 분석합니다 </p><pre class="brush:java;toolbar:false">
package me.yunanw.redisinjava;import java.util.ArrayList;import java.util.List;
/**
* Created by yunanw on 2016/10/17.
*/
public class RedisFrame {
private int argsCount = 0;
List ArgsData = null;
public RedisFrame(int argsCount){
this.argsCount = argsCount;
this.ArgsData = new ArrayList(argsCount);
} public void AppendArgs(byte[] args){
this.ArgsData.add(new String(args));
} public int getCommandCount(){
return ArgsData.size();
} public String GetFristCommand(){
if (ArgsData.size() > 0){
return ArgsData.get(0);
}
return null;
}
public String GetCommand(int index){
if (ArgsData.size() > index){
return ArgsData.get(index);
}
return null;
}
}이제 Redis-cli를 열고 "fake"에 연결할 수 있는지 확인해보세요. Redis" 서버. 흥미로운 점은 - --Redis-cli를 열면 자동으로 "Command" 명령이 전송됩니다. 어떤 대답을 하든 연결된 것으로 간주합니다

핫 AI 도구

Undress AI Tool
무료로 이미지를 벗다

Undresser.AI Undress
사실적인 누드 사진을 만들기 위한 AI 기반 앱

AI Clothes Remover
사진에서 옷을 제거하는 온라인 AI 도구입니다.

Clothoff.io
AI 옷 제거제

Video Face Swap
완전히 무료인 AI 얼굴 교환 도구를 사용하여 모든 비디오의 얼굴을 쉽게 바꾸세요!

인기 기사

뜨거운 도구

메모장++7.3.1
사용하기 쉬운 무료 코드 편집기

SublimeText3 중국어 버전
중국어 버전, 사용하기 매우 쉽습니다.

스튜디오 13.0.1 보내기
강력한 PHP 통합 개발 환경

드림위버 CS6
시각적 웹 개발 도구

SublimeText3 Mac 버전
신 수준의 코드 편집 소프트웨어(SublimeText3)

뜨거운 주제
 8646
8646
 17
17
 1787
1787
 16
16
 1730
1730
 56
56
 1582
1582
 29
29
 1451
1451
 31
31


