This article mainly introduces the method of changing the second-level menu to the third-level menu in the Vue iview-admin framework. It has a certain reference value. Now I share it with you. Friends in need can refer to it
Recently, I have been using the Vue backend template of iview-admin. After downloading it from git, I found that the left navigation bar supports up to the second-level menu. I also found that many children are asking how to implement the third-level menu. In actual application scenarios, there will still be a need for a three-level menu. There is no other good way but to manually change the code yourself.
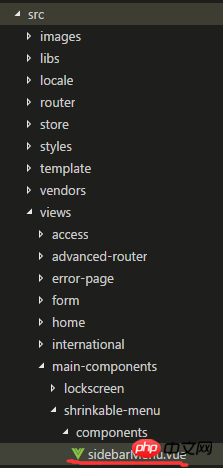
1. Step 1: First rewrite the template in VUE, modify the sidebarMenu.vue file, and create the specific directory of the file as shown below:

Change the second-level nesting structure of the Menu navigation menu component to a third-level nesting. It is nothing more than determining whether there is a children attribute under the second-level routing page and whether it contains child elements. If so, directly v-for loop generates children. Element tag, the new structure is as follows:
<template>
    <menu>
        <template>
            <menuitem>
                <icon></icon>
                <span>{{ itemTitle(item.children[0]) }}</span>
            </menuitem>

            <submenu> 1" :name="item.name" :key="item.name">
                <template>
                    <icon></icon>
                    <span>{{ itemTitle(item) }}</span>
                </template>
                <template>
                    <!-- 添加条件判断是否还有三级菜单 v-if="child.children.length<=1"  -->
                    <menuitem>
                        <icon></icon>
                        <span>{{ itemTitle(child) }}</span>
                    </menuitem>
                    <!-- 以下为新增 添加条件判断如果有三级菜单 则增加三级菜单 -->
                    <submenu>
                         <template>
                             <icon></icon>
                              <span>{{ itemTitle(child) }}</span>
                         </template>
                         <template>
                              <menuitem>
                                   <icon></icon>
                                   <span>{{ itemTitle(son) }}</span>
                              </menuitem>
                         </template>
                    </submenu>
                    <!-- 以上为新增 -->
                </template>
            </submenu>
        </template>
    </menu>
</template>Add a method isThirdLeveMenu under methods in the component to determine whether it contains the children attribute:
methods: {
    changeMenu(active) {
      this.$emit("on-change", active);
    },
    itemTitle(item) {
      if (typeof item.title === "object") {
        return this.$t(item.title.i18n);
      } else {
        return item.title;
      }
    },
    isThirdLeveMenu(child){
       if(child.children){
           if(child.children.length>0)return true;
           else  return false;
       }
       else {
         return false;
       }
    }
},Step 2: Modify the logic of creating the current path Method: setCurrentPath, in the util.js file under the libs folder:
util.setCurrentPath = function (vm, name) {
    let title = '';
    let isOtherRouter = false;
    vm.$store.state.app.routers.forEach(item => {
        if (item.children.length === 1) {
            if (item.children[0].name === name) {
                title = util.handleTitle(vm, item);
                if (item.name === 'otherRouter') {
                    isOtherRouter = true;
                }
            }
        } else {
            item.children.forEach(child => {
                if (child.name === name) {
                    title = util.handleTitle(vm, child);
                    if (item.name === 'otherRouter') {
                        isOtherRouter = true;
                    }
                }
            });
        }
    });
    let currentPathArr = [];
    //去首页
    if (name === 'home_index') {
        currentPathArr = [
            {
                title: util.handleTitle(vm, util.getRouterObjByName(vm.$store.state.app.routers, 'home_index')),
                path: '',
                name: 'home_index'
            }
        ];
    }
    //去导航菜单一级页面或者OtherRouter路由中的页面
    else if ((name.indexOf('_index') >= 0 || isOtherRouter) && name !== 'home_index') {
        currentPathArr = [
            {
                title: util.handleTitle(vm, util.getRouterObjByName(vm.$store.state.app.routers, 'home_index')),
                path: '/home',
                name: 'home_index'
            },
            {
                title: title,
                path: '',
                name: name
            }
        ];
    }
    //去导航菜单二级页面或三级页面
    else {
        let currentPathObj = vm.$store.state.app.routers.filter(item => {

            var hasMenu;
            if (item.children.length  {
                return  child.name === name;
            })[0];

           // let thirdLevelObj =
           console.log(childObj)
           //二级页面
            if (childObj) {
                currentPathArr = [
                    {
                        title: '首页',
                        path: '/home',
                        name: 'home_index'
                    },
                    {
                        title: currentPathObj.title,
                        path: '',
                        name: currentPathObj.name
                    },
                    {
                        title: childObj.title,
                        path: currentPathObj.path + '/' + childObj.path,
                        name: name
                    }
                ];
            }
            //childobj为undefined,再从三级页面中遍历
            else {
                let thirdObj;
                let childObj = currentPathObj.children.filter((child) => {
                    let hasChildren;
                    hasChildren = child.name === name;
                    if (hasChildren) return hasChildren

                    if (child.children) {
                        let sonArr = child.children;
                        for (let n = 0; n <p><strong> Step 3: Create three-level pages test-child.vue, testcaca.vue and three-level routing The structure of the container component artistic-publish-center.vue</strong><br><strong>artical-publish-center.vue is as follows: It must have the <rout-view> tag</rout-view></strong></p><p><img src="https://img.php.cn//upload/image/524/766/974/1531115697133053.png" title="1531115697133053.png" alt="How to change the second-level menu to the third-level menu in the Vue iview-admin framework"> </p><p>Vue wrote the other two third-level pages casually: </p><p><img src="https://img.php.cn//upload/image/142/703/339/1531115707261749.png" title="1531115707261749.png" alt="How to change the second-level menu to the third-level menu in the Vue iview-admin framework"></p><p><strong>Step 4: At this point, the container can realize the long-awaited third level Menu, ^_^. Add a third-level page route in the router. In router.js under the router folder: </strong><br>. Add it to appRouter. You can put it in the children array of title: 'Component': </p><pre class="brush:php;toolbar:false">{
                path: 'artical-publish',
                title: '用户配置',
                name: 'artical-publish',
                icon: 'compose',
                component: () => import('@/views/test/artical-publish-center.vue'), //引用三级页面的中间容器层
                children:[
                    {
                        path: 'testcaca',
                        icon: 'ios-pause',
                        name: 'testcaca',
                        title: 'test4',
                        component: () => import('@/views/test/testcaca.vue')
                    },
                    {
                        path: 'test-child',
                        icon: 'ios-pause',
                        name: 'test-child',
                        title: 'test-child',
                        component: () => import('@/views/test/test-child.vue')
                    }
                ]
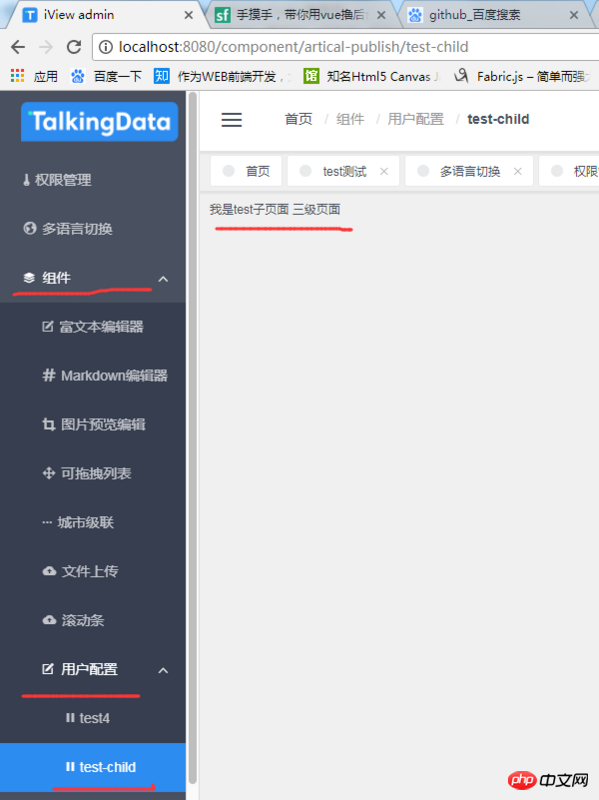
}Finally save, run your project, and look at the third-level menu coming out:

The above is the entire article Content, I hope it will be helpful to everyone’s learning. For more related content, please pay attention to the PHP Chinese website!
Related recommendations:
Self-made vue component communication plug-in using mixin to write plug-ins
Vue activity creation project design And development of navigation bar
The above is the detailed content of How to change the second-level menu to the third-level menu in the Vue iview-admin framework. For more information, please follow other related articles on the PHP Chinese website!


