This article mainly introduces the solution for two or more menus to share a component in the actual development of vue webpack. Friends who need it can refer to it
In the actual development of vue, we often encounter When it comes to sharing a component, for example, there are two buttons in a menu. Clicking each button calls the same component, and its content is to request different content based on different routing parameters.
The first step is to create a new demo of vue webpack vuecli as follows:
Install vue-cli globally. vue-cil is a scaffolding tool for vue. The installation command is:
npm install -g vue-cli
The second step is to enter the project directory and create a vuedemo folder project. Follow the following two steps:
cd vue_test_project //进入vue_test_project目录下
vue init webpack vuedemo //在vue_test_project目录下创建一个vuedemo工程
After entering this command, some prompts will appear. Don’t worry about what they are. Just keep pressing Just press Enter.
The third step is as follows:
cd vuedemo
npm install
It will take a while to execute npm install because the code will be downloaded from the server. And there will be some warning messages during execution. Don't worry, just wait. If there is no response for a long time, just ctrl c to stop it and then execute it again.
The last step is as follows:
npm run dev
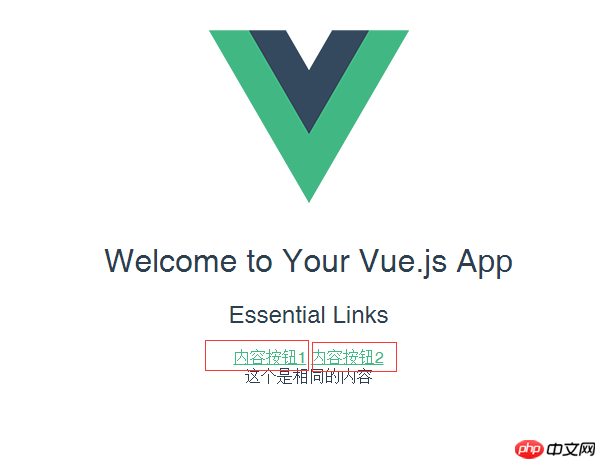
After running npm run dev, a browser window will automatically open, and you can see the actual effect. This demo is created. Now add some content to this demo and modify it to the following:

Modify the content of HelloWorld.vue to the following:
<template>
<p class="hello">
<h1>{{ msg }}</h1>
<h2>Essential Links</h2>
<p class="btn">
<router-link :to="{name:'content',params:{differId:'con1'}}">内容按钮1</router-link>
<router-link :to="{name:'content',params:{differId:'con2'}}">内容按钮2</router-link>
</p>
<router-view></router-view>
</p>
</template>
<script>
export default {
name: 'HelloWorld',
data () {
return {
msg: 'Welcome to Your Vue.js App'
}
}
}
</script>
<style scoped>
h1, h2 {
font-weight: normal;
}
ul {
list-style-type: none;
padding: 0;
}
li {
display: inline-block;
margin: 0 10px;
}
a {
color: #42b983;
}
</style>The index under the routing router The modification of .html is as follows:
import Vue from 'vue'
import Router from 'vue-router'
import HelloWorld from '@/components/HelloWorld'
import content from '@/components/conDetail'
Vue.use(Router)
export default new Router({
 routes: [
 {
 path: '/',
 name: 'HelloWorld',
 component: HelloWorld,
 children:[
  {name:'content',path:'content/:differId',component:content}
 ]
 }
 ]
})Now create a conDetail.vue as follows:
<template>
<p class="same">
这个是相同的内容
<p class="conlist">
<template v-for="item in items">
<p>{{item.con}}</p>
</template>
</p>
</p>
</template>
<script>
export default {
name: 'conDetail',
data () {
return {
msg: '',
differIdType:'',
conlist:[
{'con':'这是第一个内容按钮的内容1'},
{'con':'这是第一个内容按钮的内容2'}
],
items:[],
}
},
mounted(){
this.differIdType = this.$route.params.differId == 'con1' ? '0' : '1';
if(this.differIdType == 0){
this.items = this.conlist;
}else{
this.items = [];
}
},
watch:{
$route:function(to,from){
this.differIdType = to.params.differId == 'con1' ? '0' : '1';
if(this.differIdType == 0){
this.items = this.conlist;
}else{
this.items = [];
}
}
}
}
</script>
<style>
</style>The result is that when you click content button 1, the content of the object appears. Click content button 2. , the corresponding content appears. Of course, what I write here is that when button 2 is clicked, the content of its items is an empty array. The monitoring of $route is also used here.
When reusing components, if you want to respond to changes in routing parameters, you can simply watch (monitor changes) $route object:
const User = {
 template: '...',
 watch: {
 '$route' (to, from) {
  // 对路由变化作出响应...
 }
 }
}Or use the beforeRouteUpdate guard introduced in 2.2:
const User = {
 template: '...',
 beforeRouteUpdate (to, from, next) {
 // react to route changes...
 // don't forget to call next()
 }
}The above is what I compiled for everyone. I hope it will be helpful to everyone in the future.
Related articles:
How to implement basic shopping cart functions using Angular
Details about routing and middleware in node.js Introduction
How to implement entry/leave animation in Vue
Detailed interpretation of the entry function run in webpack
The above is the detailed content of Problem with sharing a component in vue+webpack (detailed tutorial). For more information, please follow other related articles on the PHP Chinese website!


