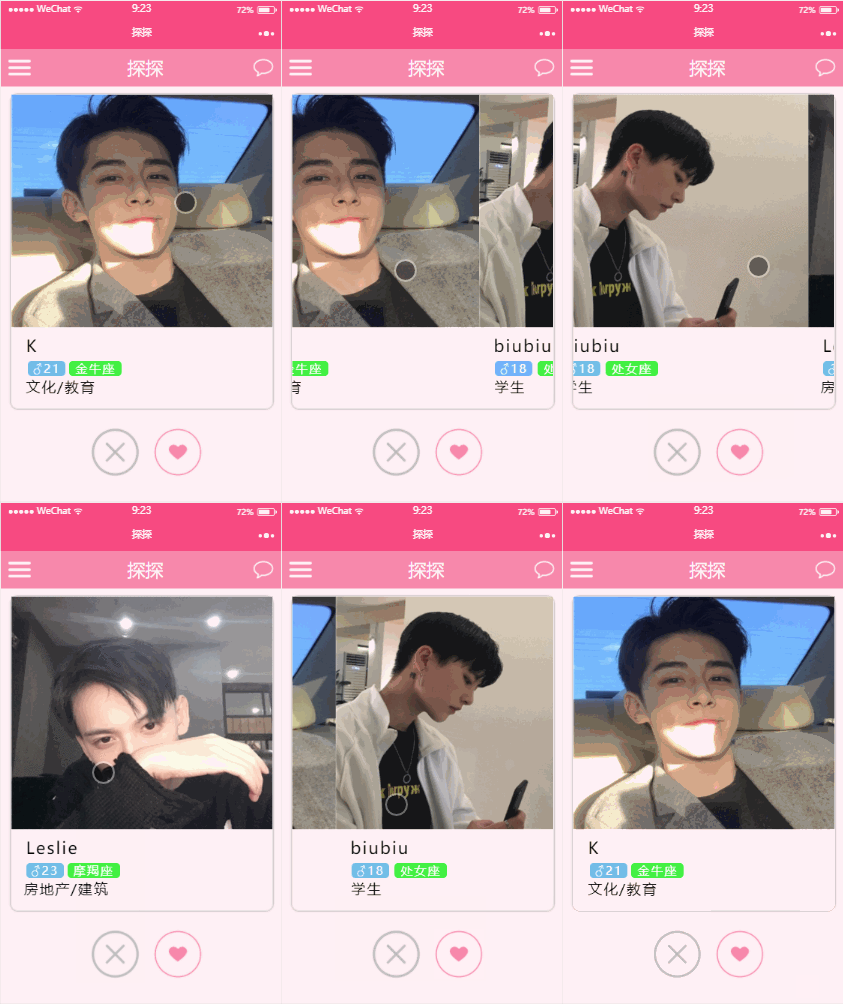
This article mainly introduces the implementation code of left and right sliding in the WeChat applet. It is very good and has reference value. Friends in need can refer to it
If you don’t want to slide left or right, Another person
No matter you are a programmer or a programmer, what you do every day is coding or coding, and there are problems that cannot be solved by code (what problems have you not clicked in your mind abcd (number), Tantan can help you solve it. Recently, a dating software is very popular on the Internet called Tantan (it is said to be a YP software). As a former Tantan veteran player who only browsed pictures but had never tried it, and a girl who loves front-end, I decided to imitate this app. Since it is developed by Zhiji, it is not up to Zhiji. There is no doubt that the theme style of the entire APP has been changed to my favorite ultimate girl fan hhh. Let us feel the charm of Tantan together. ~
Overall effect of the project

##Project Analysis of some function points
The homepage picture slides left and right to correspond to the button change
<swiper class='swiper-item__content' current="" bindchange="changeswiper"> <swiper-item class="swip"> <view class='page__bd_content'> <image class="slide-image" src="http://pic.qqtn.com/up/2017-12/15126388387704237.jpg" mode="scaleToFill"/> <view class="name">K</view> <view class="age">♂21</view> <view class="conste">金牛座</view> <view class="status">文化/教育</view> </view> </swiper-item> </swiper>
<view class="page__ft">
<image class="notlike {{left?'active':''}}" src="../../images/notlike.png" />
<image class="like {{right?'active':''}}" src="../../images/like.png" />
</view>.active {
animation: active 1s ease;//定义一个叫做active的动画
}
@keyframes active {//补充active动作脚本
0% {
transform: scale(0.8);
}
50% {
transform: scale(1.2);
}
100% {
transform: scale(1.0);
}
}
data: {
 left: false ,
 right: false,
 activeIndex: 0
},changeswiper: function(e) {
var index = e.detail.current;//当前所在页面的 index
if(index > this.data.activeIndex) {//左滑事件判断
this.setData({
left: true//若为左滑,left值为true,触发图片动画效果
})
} else if(index < this.data.activeIndex) {//右滑事件判断
this.setData({
right: true//若为右滑,right值为true,触发图片动画效果
})
}
setTimeout(() => {//每滑动一次,数据发生变化
this.setData({
activeIndex: index,
left:false,
right:false
})
}, 1000);
},Upload pictures from local

<image class="addImg" src="{{imgUrl}}" bindtap="uploadImg" />data: {
imgUrl: '../../images/addImg.png'
},uploadImg: function(e) {
var that = this;
wx.chooseImage({
count: 1, //上传图片数量
sizeType: ['original', 'compressed'], // 可以指定是原图还是压缩图,默认二者都有
sourceType: ['album', 'camera'], // 可以指定来源是相册还是相机,默认二者都有
success: function (res) {// 返回选定照片的本地文件路径列表,tempFilePath可以作为img标签的src属性显示图片
var tempFilePaths = res.tempFilePaths;
that.setData({
imgUrl: tempFilePaths
})
wx.showToast({//显示上传成功
title: '上传成功',
icon: 'success',
duration: 2000
})
}
}),
<swiper-item>
 <view class="swiper-item__content">
  <block wx:for="{{friendsList}}" wx:key="index">
   <view class="weui-tab__content">
    <view class="weui-media-box__hd">
     <image src="{{item.avatar}}" mode="aspectFit"></image>
    </view>
    <view class="weui-media-box__bd">
     <view class="weui-media-box__nickname">{{item.nickname}}</view>
     <view class="weui-media-box__message">{{item.message}}</view>
    </view>
   </view>
  </block>
 </view>
</swiper-item>wx.request({
url: 'https://www.easy-mock.com/mock/5a23dbf382614c0dc1bebf04/getFriendsList/getFriendsList',
success: (res) => {
// console.log(response);
this.setData({
friendsList: res.data.data.friendsList
})
}
})Detailed introduction to routing and middleware in node.js
How to achieve entry in Vue /Leave animation
Detailed interpretation of the entry function run in webpack
Solution to the Bootstrap modal box submission BUG
The above is the detailed content of How to achieve left and right sliding in WeChat mini program. For more information, please follow other related articles on the PHP Chinese website!


