


Detailed steps for drawing grid lines with MathType

php editor Apple presents you with a detailed step-by-step guide to drawing grid lines using MathType. MathType is a powerful mathematical formula editing software that can help users typeset mathematical formulas more accurately by setting grid lines. Following our guidance, you will easily master how to draw grid lines in MathType, making your mathematical formulas more professional and standardized.
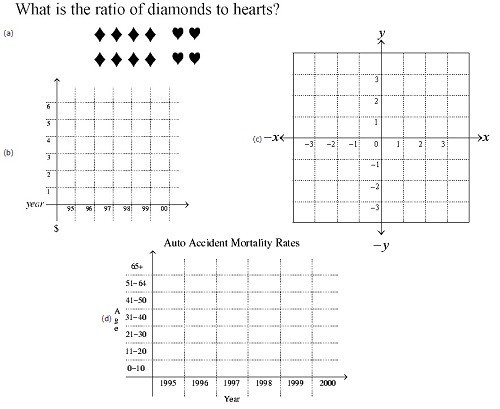
Place dividing lines in the MathType matrix template so that you can simulate a right-angled plane; in the matrix template without dividing lines, you can create pictograms and statistical charts,
Specific operations for creating a plane right angle:
1. Open the MathType formula editing window and select [Define Spacing] from the MathType format menu.
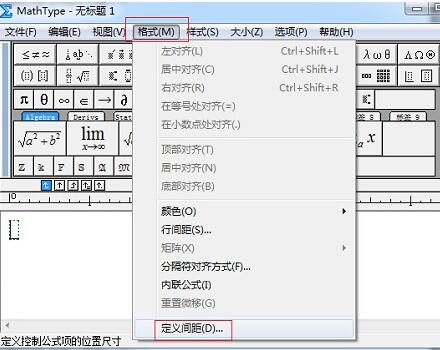
2. Set the line spacing to 100% and the operator spacing to 1%. Click [OK].
Note: Don’t forget to reset these values when you finish the current work, otherwise the format will be wrong when the equations entered in the future are displayed. A better method is to save this MathType format as a parameter file. If you are not familiar with parameter files, you can refer to the relevant MathType documentation.
3. Enter y and press the Enter key to insert a new line in MathType.
4. Select Center Alignment in the MathType format menu.
5. Select the upward arrow from the MathType arrow template to insert, and then press the Enter key. Enter [-x].
6. Insert a left-pointing arrow from the MathType arrow template.
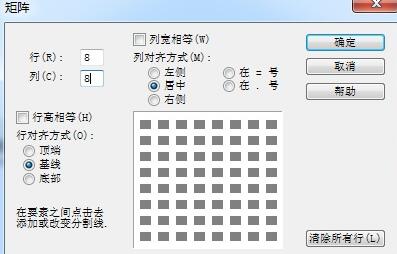
7. Select [Variable size of matrix or chart] from the MathType matrix template:
Determine how big a grid you want. You can build a 32×32 grid. In the examples in this article, an 8×8 grid is created.
8. In the matrix dialog box, set the rows and columns to 8 respectively, then the matrix dialog box is as follows:
9. After defining the matrix, start filling in the dividing lines . There are four divider lines to choose from: no line, solid line, dashed line and dotted line. Lines can be inserted by clicking with the mouse between the gray cells of the grid. Continue clicking to cycle between these four lines. In the following example, we use solid lines for the x-axis, y-axis and boundary lines, and use dotted lines in the plane to form a square, as shown in the figure:

10. Click After [OK], create a matrix in the MathType window, and the alignment will be corrected in later operations.
11. Move the cross cursor to the right of the matrix. Insert a right arrow, type x and hit enter.
12. Insert a downward template into the large MathType arrow template and press Enter, enter [-y].
13. Enter the coordinate axis in the matrix grid. After the insertion is completed, select them respectively and select [Subscript] in the MathType size menu to reduce the value.
14. Enter labels 1, 2, and 3 in the x-axis text box, set the color of the box to white and enter -2. The purpose of this is to make the content of each box All the same, these -2's are visible in MathType, but not in your document. All the elements in this plane's right angles are now fully edited, as shown below:
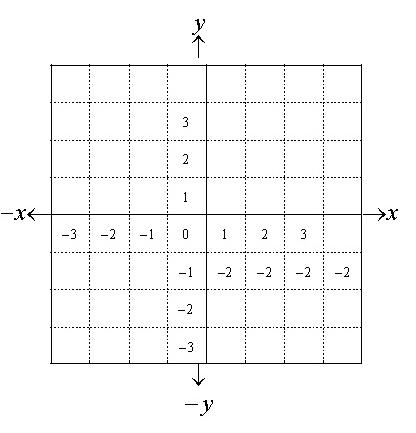
15. To align the points, arrows, and axis labels on the axes, you need to slightly Move the arrows and labels to the corresponding positions. After making rough adjustments, you will have completed a complete coordinate plane grid, as shown in the figure:

The above is the detailed content of Detailed steps for drawing grid lines with MathType. For more information, please follow other related articles on the PHP Chinese website!

Hot AI Tools

Undress AI Tool
Undress images for free

Undresser.AI Undress
AI-powered app for creating realistic nude photos

AI Clothes Remover
Online AI tool for removing clothes from photos.

Clothoff.io
AI clothes remover

Video Face Swap
Swap faces in any video effortlessly with our completely free AI face swap tool!

Hot Article
Hot Tools

Notepad++7.3.1
Easy-to-use and free code editor

SublimeText3 Chinese version
Chinese version, very easy to use

Zend Studio 13.0.1
Powerful PHP integrated development environment

Dreamweaver CS6
Visual web development tools

SublimeText3 Mac version
God-level code editing software (SublimeText3)


 How to implement statistical charts of massive data under the Vue framework
Aug 25, 2023 pm 04:20 PM
How to implement statistical charts of massive data under the Vue framework
Aug 25, 2023 pm 04:20 PM
How to implement statistical charts of massive data under the Vue framework Introduction: In recent years, data analysis and visualization have played an increasingly important role in all walks of life. In front-end development, charts are one of the most common and intuitive ways of displaying data. The Vue framework is a progressive JavaScript framework for building user interfaces. It provides many powerful tools and libraries that can help us quickly build charts and display massive data. This article will introduce how to implement statistical charts of massive data under the Vue framework, and attach
 Implementation of pie chart and radar chart functions in Vue statistical charts
Aug 18, 2023 pm 12:28 PM
Implementation of pie chart and radar chart functions in Vue statistical charts
Aug 18, 2023 pm 12:28 PM
Implementation of the pie chart and radar chart functions of Vue statistical charts Introduction: With the development of the Internet, the demand for data analysis and chart display is becoming more and more urgent. As a popular JavaScript framework, Vue provides a wealth of data visualization plug-ins and components to facilitate developers to quickly implement various statistical charts. This article will introduce how to use Vue to implement the functions of pie charts and radar charts, and provide relevant code examples. Introducing statistical chart plug-ins In Vue development, we can use some excellent statistical chart plug-ins to help us implement
 Implementation of ranking and comparison functions of Vue statistical charts
Aug 26, 2023 am 09:45 AM
Implementation of ranking and comparison functions of Vue statistical charts
Aug 26, 2023 am 09:45 AM
The ranking and comparison functions of Vue statistical charts are implemented in the field of data visualization. Statistical charts are an intuitive and clear way to display data. As a popular front-end framework, Vue provides a wealth of tools and components to implement various charts. This article will introduce how to use Vue to implement the ranking and comparison functions of statistical charts. Before starting, we need to install Vue and related chart libraries. We will use Chart.js as the charting library, which provides rich chart types and interactive functions. C can be installed via the following command
 How to use Vue to implement real-time updated statistical charts
Aug 18, 2023 pm 10:41 PM
How to use Vue to implement real-time updated statistical charts
Aug 18, 2023 pm 10:41 PM
How to use Vue to implement real-time updated statistical charts Introduction: With the rapid development of the Internet and the explosive growth of data, data visualization has become an increasingly important way to convey information and analyze data. In front-end development, the Vue framework, as a popular JavaScript framework, can help us build interactive data visualization charts more efficiently. This article will introduce how to use Vue to implement a real-time updated statistical chart, obtain data in real time and update the chart through WebSocket, and provide relevant information at the same time.
 ECharts and golang technical guide: practical tips for creating various statistical charts
Dec 17, 2023 pm 09:56 PM
ECharts and golang technical guide: practical tips for creating various statistical charts
Dec 17, 2023 pm 09:56 PM
ECharts and golang technical guide: Practical tips for creating various statistical charts, specific code examples are required. Introduction: In the field of modern data visualization, statistical charts are an important tool for data analysis and visualization. ECharts is a powerful data visualization library, while golang is a fast, reliable and efficient programming language. This article will introduce you to how to use ECharts and golang to create various types of statistical charts, and provide code examples to help you master this skill. Preparation
 Implementation of heat map function of Vue statistical chart
Aug 26, 2023 am 09:40 AM
Implementation of heat map function of Vue statistical chart
Aug 26, 2023 am 09:40 AM
Implementation of the heat map function of Vue statistical charts Heat map is a commonly used data visualization tool, which can visually display the degree of data concentration. Under the Vue framework, we can easily implement the heat map function by using third-party libraries. This article will introduce how to use Vue and the heat library to create a simple heat map. Step 1: Install dependencies First, we need to install a thermal library in the Vue project. Run the following command from the command line to install the library: npminstallvue-heatm
 Implementation of area chart and scatter chart functions of Vue statistical chart
Aug 20, 2023 am 11:58 AM
Implementation of area chart and scatter chart functions of Vue statistical chart
Aug 20, 2023 am 11:58 AM
The area chart and scatter chart functions of Vue statistical charts are implemented. With the continuous development of data visualization technology, statistical charts play an important role in data analysis and display. Under the Vue framework, we can use the existing chart library and combine it with Vue's two-way data binding and componentization features to easily implement the functions of area charts and scatter charts. This article will introduce how to use Vue and commonly used chart libraries to implement these two statistical charts. Implementation of area charts Area charts are often used to show the trend of data changes over time. In Vue, we can use v
 Detailed steps for drawing grid lines with MathType
Apr 16, 2024 pm 06:31 PM
Detailed steps for drawing grid lines with MathType
Apr 16, 2024 pm 06:31 PM
Place dividing lines in the MathType matrix template so that you can simulate a right-angled plane; in the matrix template without dividing lines, you can create pictograms and statistical charts, and create a plane with right angles. Specific operations: 1. Open MathType In the formula editing window, select [Define Spacing] from the MathType format menu. 2. Set the line spacing to 100% and the operator spacing to 1%. Click [OK]. Note: Don't forget to reset these values when you finish the current work, otherwise the format will be wrong when the equations entered in the future are displayed. A better method is to save this MathType format as a parameter file. If you are not familiar with parameter files, you can refer to the
