This article will guide you to turn off the Palm Check function on Windows 11/10 PC. Palm Check is a feature designed to prevent accidental palm or other touches from being mistakenly recognized as input when typing on the keyboard. This is usually found in touchpad settings, especially on touch-enabled devices like laptops.

Sometimes you may need to turn off Palm Check or similar features to give you more flexibility in controlling input when you need to use the keyboard and touchpad at the same time. In this article, we will introduce how to disable the Palm Check feature on Windows 11/10 PC, allowing you to better cope with your needs when gaming or running applications.
While typing, you may accidentally touch the touchpad with your palm or other parts, causing the cursor to move or click unexpectedly. Enabling Palm Detection on your touchpad detects pressure or patterns associated with typing, ignoring accidental touches or pressure from your palm, allowing you to type more smoothly and avoid accidental cursor movements or clicks.
With Palm Check disabled, the touchpad will more easily react to unintentional cursor movement. To turn off the Palm Check feature, you can follow these steps in Windows 11/10:
Let’s look at this in detail.
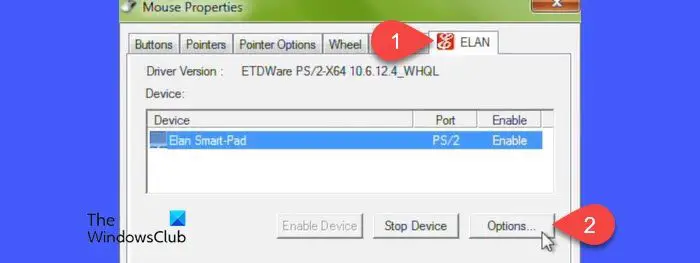
Tip: Specific options and settings may vary by device manufacturer and touchpad driver, for example the example below is for an Elan touchpad.
Click the start button icon, select Settings, and go to Bluetooth device touchpad. Scroll down and click "Related settings" under "More touchpad settings."
Select the Elan tab in the mouse properties popup and you will see your ELAN Smart-Pad listed in the Devices section. Click the Options button to open a window where you can adjust the settings for certain touchpad functions (gestures or clicks) on your Windows 11/10 PC.

Click on the Additional tab. Then click PalmTracing. Lower the PalmTrack sensitivity setting by moving the slider to the left (towards minimum).

Click Apply and then OK to close the window. Restart your computer to apply the changes to your Windows 11/10 computer.
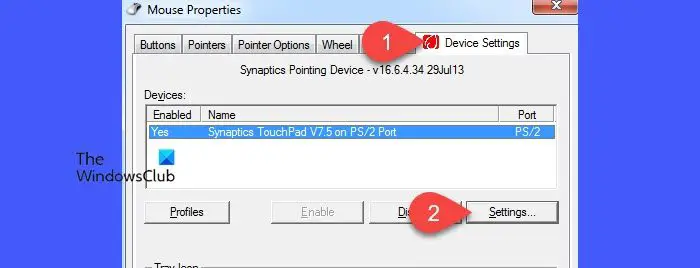
Likewise, for Synaptics TouchPad, you can turn off Palm Check from the TouchPad settings by following these steps:
Open the Mouse Properties window and click the Device Settings tab. Select your TouchPad device and click the Settings button.

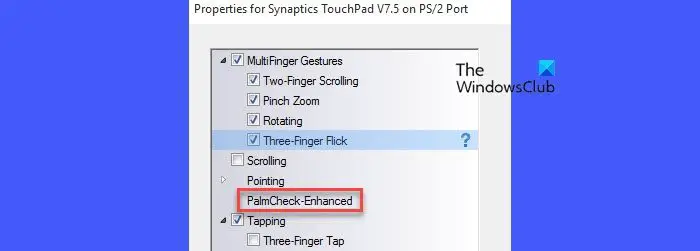
In the Synaptics TouchPad Properties window, select the PalmCheck-Enhanced option and click the Gear icon next to it.

In the PalmCheck enhancement popup, drag the PalmCheck slider to the left (toward Off). Click Close, then click Apply, then OK. Restart your computer to apply the changes.

The following method demonstrates the Synaptics touchpad process. Please proceed with caution and back up your data and registry before making any modifications.
Press Win R and enter ‘regdit’ in the Run dialog box. Press Enter. Click the Yes button in the User Account Control pop-up window.
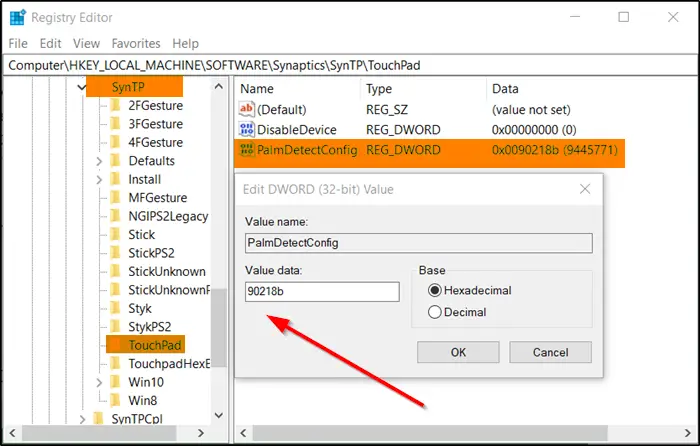
Navigate to the following path in the Registry Editor window:
ComputerHKEY_LOCAL_MACHINESOFTWARESynapticsSynTPTouchPad
Double-click the PalmDetectConfig key in the right panel. Set the value DATA to 0, keep Base as hexadecimal, and click the OK button.

Repeat the above process for the following paths as well:
ComputerHKEY_LOCAL_MACHINESOFTWARESynapticsOEMTouchPad
Close the Registry Editor and restart your PC for the changes to take effect.
I hope this helps.
Reading: The mouse cursor jumps or moves randomly while typing in Windows.
Enabling the touchpad on a Windows 11 computer is fairly easy. Press Win I to open Windows Settings. Navigate to Bluetooth & Devices > Touchpad. Look for the Touchpad toggle at the top of your TouchPad settings. Flip the switch to the on position to enable the touchpad. Alternatively, press Win X to bring up the Power User menu and select Device Manager. Navigate to Mouse and other pointing devices, right-click your touchpad device, and select Enable device.
Read Next: How to turn off Touchpad Tap to Click on Windows 11.
The above is the detailed content of How to turn off Palm Check in Windows 11/10. For more information, please follow other related articles on the PHP Chinese website!


