


In this tutorial, I'll show you how easy it is to extend the HTML language with custom tags. Custom tags can be used to implement a variety of behaviors, so they are a very convenient way to write less code and make your HTML documents simpler.
To learn more about custom tags, check out my article on creating encapsulated custom tags using Shadow DOM.
For example, with HTML, you can use thetag to display bold text. If you want a list, you can use thefor each list item. Tags are interpreted by the browser and work with CSS to determine how web content is displayed and how parts of the content behave.
Sometimes, using just one HTML tag is not enough to fulfill the functionality required by a web application. Usually this is solved by using multiple HTML tags along with JavaScript and CSS, but this solution is not that elegant.
A more elegant solution is to use a custom tag - an identifier contained inthat the browser will interpret to render the functionality we expect. Like regular HTML tags, we should be able to use custom tags multiple times on the page, and we should also be able to have tag attributes and sub-tags to assist in the functionality of the custom tag.
Simply put, custom elements can be used to unlock the following features:
In this article, we will learn about custom elements by building a custom tag named
ThecustomElementsAPI in modern browsers makes it easy!
In order to implement and test our tags, we need to create a few things:
Let’s edit theindex.htmlfile and make its contents look like this:
This is my Gravatar picture:
If we loadindex.htmlin the browser now, the results won't be that impressive because we haven't implemented the code for the custom markup yet.
One thing to note is that browsers are very forgiving, so you can have unknown tags in your document and the browser will ignore them. In order for our custom label to actually display the Gravatar image of my email, we must first understand how Gravatar works.
In order to create a custom label, you need to usewindow.customElements.define().
customElements.define()The first parameter is the name of the tag. This is what we mentioned in the HTML file. The name should always have a dash (-). Taginvalid. This allows the parser to differentiate between regular elements and custom tags.
customElements.define()有第二个可选对象。该对象用于提及新元素的原型。默认情况下,自定义元素继承自HTMLElement。上面的代码相当于下面的代码:
customElements.define("codingdude-gravatar", CodingDudeGravatar);
如果您希望创建扩展另一个 HTML 元素的自定义元素,则必须在customElements.define()中扩展本机元素。继承本机元素的自定义元素也称为“类型扩展自定义元素”。
customElements.define("codingdude-gravatar", class extends HTMLButtonElement {...});
还有一些需要注意的事情:
DOMException。HTML 元素的所有标准规则都适用于自定义元素。就像标准元素一样,您可以使用 JavaScript 在 DOM 中创建自定义元素,或在 HTML 中声明它。
在 HTML 中声明自定义元素:
使用 JavaScript 在 DOM 中创建自定义元素:
var codingdudeGravatar = document.createElement('codingdude-gravatar'); codingdudeGravatar.addEventListener('click',function(e){});
在 HTML 中实例化类型扩展元素:
使用 JavaScript 在 DOM 中创建类型扩展元素:
var codingdudeGravatar = document.createElement('button', 'codingdude-gravatar');
在自定义标签中添加标记相当简单。首先,您需要创建一个扩展父 HTML 元素的类。在我们的例子中,我们将扩展HTMLElement。在HTMLElement中,我们将使用constructor添加事件侦听器并调整自定义标记的innerText。记得调用super()因为这将有助于继承父类的方法和属性。永远记住,构造函数内的this指向创建的自定义元素。
这是我们组件外观的简单概述。
class CodingDudeGravatar extends HTMLElement { constructor() { super() this.addEventListener('click', e => { alert('You Clicked Me!') }); this.innerText="Hello There!" } } window.customElements.define('codingdude-gravatar', CodingDudeGravatar);
在开始向自定义标记添加标记之前,您需要了解与自定义标记关联的生命周期方法。有四个生命周期回调。
| 回调 | 目的 |
|---|---|
构造函数 |
创建自定义标签元素的实例 |
connectedCallback |
自定义标签元素的实例被插入到文档中 |
disconnectedCallback |
自定义标签元素的实例从文档中删除 |
attributeChangedCallback(attributeName, oldValue, newValue) |
添加、删除或更新了自定义标记元素中的属性 |
带有这些回调的自定义标记的骨架如下所示:
class CodingDudeGravatar extends HTMLElement { constructor() { super(); // always call super() first in the constructor. ... } connectedCallback() { ... } disconnectedCallback() { ... } attributeChangedCallback(attrName, oldVal, newVal) { ... } }
我们已经了解了如何在自定义元素中使用构造函数。现在,让我们在代码中使用其他回调方法!让我们从connectedCallback开始。
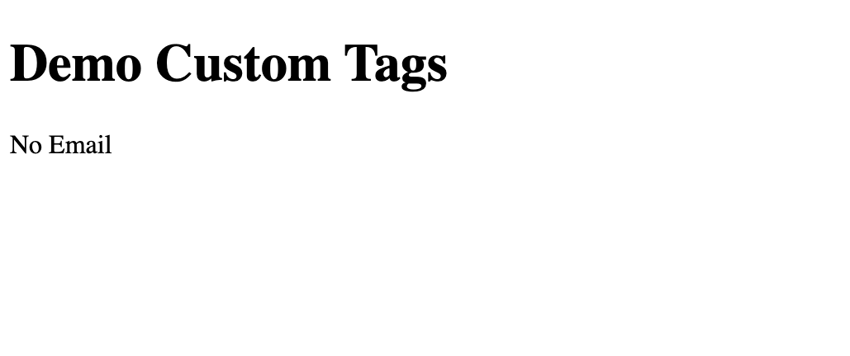
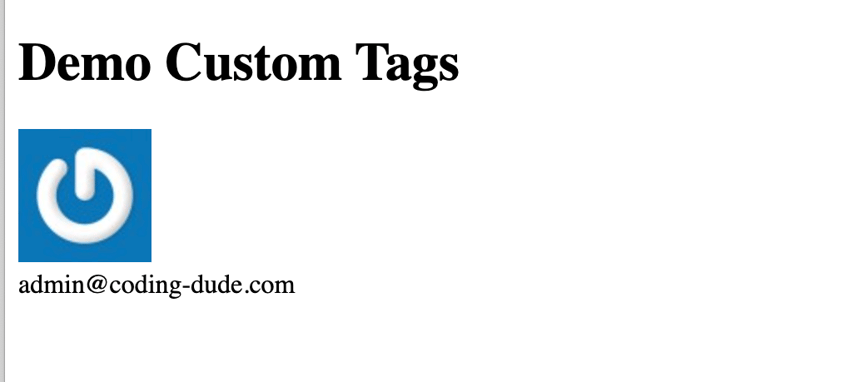
connectedCallbackconnectedCallback可用于检查自定义标记中的电子邮件属性。一旦元素添加到文档中,就会进行此检查。我们将使用getter函数来检查custom tag是否具有email属性。
class CodingDudeGravatar extends HTMLElement { get email() { return this.hasAttribute('email'); } constructor() { super() this.addEventListener('click', e => { alert('You Clicked Me!') }); this.innerText="Hello There!" } connectedCallback(){ if(this.email){ var email = this.attributes.email.value; var gravatar = "https://www.gravatar.com/avatar" this.innerHTML = " "+email } else { this.innerHTML = "No Email"; } } }
当自定义标记插入 HTML 中时,您将看到如下内容:
但是,当在自定义标签中设置email属性时,屏幕将如下所示:
attributeChangedCallback浏览器将为observedAttributes数组中列出的所有属性调用生命周期方法attributeChangedCallback。其背后的目标是提高自定义标签的性能。例如,如果用户决定更改样式,您不希望触发attributeChangedCallback。在我们的例子中,我们希望仅当电子邮件更改时才调用attributeChangedCallback。为了实现这一点,代码如下所示:
class CodingDudeGravatar extends HTMLElement { get email() { return this.hasAttribute('email'); } constructor() { super() this.addEventListener('click', e => { alert('You Clicked Me!') }); this.innerText="Hello There!" } connectedCallback(){ if(this.email){ var email = this.attributes.email.value; var gravatar = "http://www.gravatar.com/avatar" this.innerHTML = ""+email } else { this.innerHTML = "No Email"; } } static get observedAttributes() { return ['email']; } attributeChangedCallback(name, oldValue, newValue) { if(name == 'email'){ alert(`The ${name} changed to ${newValue}`) } } }
根据上面的代码,每次我们更改电子邮件时都会看到一条警报。
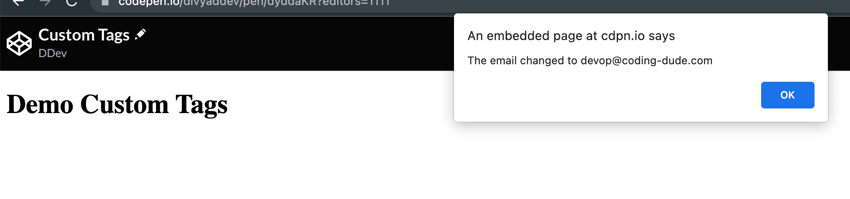
自定义元素中的回调是同步的。如果在自定义元素上调用el.setAttribute('email','newemail'),浏览器将立即触发attributeChangedCallback()。
disconnectedCallback生命周期方法列表中的最后一个是disconnectedCallback。当您从文档中删除元素时,将调用此方法。当您想要清除自定义标签造成的影响时,该方法非常有用。您可以使用el.remove()方法轻松删除自定义标签。
但是,您必须非常小心disconnectedCallback()的使用方式。如果用户选择关闭选项卡或浏览器,则永远不会触发此回调。
在任何基于 HTML 的应用程序中,开发人员使用反映在 DOM 上的属性是很常见的。例如,hidden是可用于隐藏元素的属性,例如只会隐藏 DOM 中的元素。开发人员自然希望这些属性也适用于自定义标签。
由于我们从HTMLElement扩展,因此默认情况下这些属性将出现在自定义元素中。然而,这些属性的行为是可以修改的。大多数时候,JavaScript 类中的 getter 和 setter 用于控制属性。
codingdude-gravatar[hidden] { opacity: 0.5; pointer-events: none; } ...inside the class { get hidden() { return this.hasAttribute('hidden'); } set hidden(val) { // Reflect the value of `hidden` as an attribute. if (val) { this.setAttribute('hidden', ''); } else { this.removeAttribute('hidden'); } } }
本文中讨论的所有内容都可以在以下演示中进行实验。
这只是自定义元素工作原理的开始。这个领域还有很多东西需要探索和学习。请继续关注此空间,了解有关自定义元素及其高级概念的更多帖子。
The above is the detailed content of Create custom tags to extend HTML functionality. For more information, please follow other related articles on the PHP Chinese website!


![[Web front-end] Node.js quick start](https://img.php.cn/upload/course/000/000/067/662b5d34ba7c0227.png)


