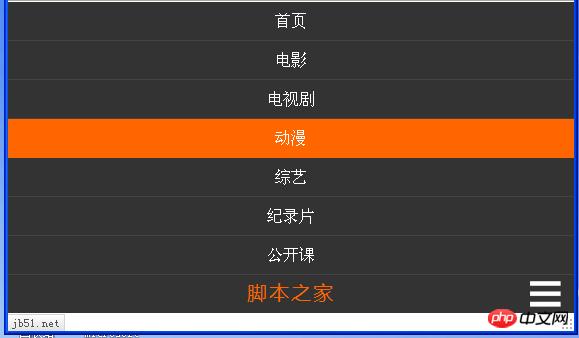
today i made a responsive navigation bar that can automatically change the style of the navigation bar with different screen resolutions or browser window sizes. the main thing used here is css3 media query. for details, you can check out the article a brief talk on responsive layout. i won’t spend a lot of space introducing it here. i mainly look at how to make this navigation bar.
it should also be mentioned that ie6-ie8 does not support css3 media query, so we need special treatment for ie6-ie8 and let them maintain the default style, which is good for both layout and style. take this into consideration.
first take a look at the layout. the html code is as follows:
the code is as follows:
<p class="navbar">
    <p class="nav">
        <ul id="menu">
            <li class="current"><a href="#">首页</a></li>
            <li><a href="#">电影</a></li>
            <li><a href="#">电视剧</a></li>
            <li><a href="#">动漫</a></li>
            <li><a href="#">综艺</a></li>
            <li><a href="#">纪录片</a></li>
            <li><a href="#">公开课</a></li>
        </ul>
        <p class="hot">
            <a href="#">钢铁侠3</a>
            <a href="#">中国合伙人</a>
            <a href="#">盛夏晚晴天</a>
            <a href="#">陆贞传奇</a>
        </p>
        <!--判断浏览器是否是ie9,ie10或者是非ie浏览器-->
        <!--[if (gt ie 8) | !(ie)]><!-->
        <h1 class="title" id="title">
            <a href="#">风驰网</a>
            <span class="btn" id="btn"></span>
        </h1>
        <!--<![endif]-->
    </p>
</p>
the html part also has a conditional comment, when the browser is ie6-8, mount a class "ie6-8" to the html tag, which facilitates processing in the style sheet:
the code is as follows:
<!doctype html>
<!--[if lt ie 9]><html class="ie6-8"><![endif]-->
<html>
...
the following is style control. first, process the overall style and ie6-ie8
the code is as follows:
* {margin: 0; padding: 0;}
body {font: 14px/22px "宋体", arial, serif;}
.navbar {margin-top: 80px; width: 100%; height: 38px; background: #333;}
.nav {margin: 0 auto; border: 0px solid #ccc;}
.nav ul {list-style: none; width: auto;}
.nav ul li {height: 38px; text-align: center;}
.nav ul li a {display: block; font-size: 16px; color: #fff; text-decoration: none; line-height: 39px;}
.ie6-8 .nav {width: 1000px; height: 38px;}
.ie6-8 .nav ul li {float: left;}
.ie6-8 .nav ul li a {padding: 0 30px 0 30px;}
.ie6-8 .nav ul li.current {background: #f60;}
.ie6-8 .nav ul li:hover a {color: #f60;}
.ie6-8 .nav ul li a:hover {_color: #f60;}/*ie6 hack*/
.ie6-8 .nav ul li.current:hover a {color: #fff;}
.ie6-8 .nav .hot {float: left; margin-left: 20px; padding-top: 8px;}
.ie6-8 .nav .hot a {padding: 0 5px 0 5px; font-size: 12px; color: #fff; text-decoration: none;}
.ie6-8 .nav .hot a:hover {color: #f60; text-decoration: underline;}
.ie6-8 .nav .title {display: none;}ok, let’s use media query .
when the screen width is greater than 1000px:
the code is as follows:
@media screen and (min-width: 1000px) {
    .nav {width: 1000px; height: 38px;}
    .nav ul li {float: left; width: auto;}
    .nav ul li a {padding: 0 30px 0 30px;}
    .nav ul li.current {background: #f60;}
    .nav ul li:hover a {color: #f60;}
    .nav ul li.current:hover a {color: #fff;}
    .nav .hot {margin-left: 20px; padding-top: 8px;}
    .nav .hot a {padding: 0 5px 0 5px; font-size: 12px; color: #fff; text-decoration: none;}
    .nav .hot a:hover {color: #f60; text-decoration: underline;}
    .nav .title {display: none;}
}when the screen width is between 640px and 1000px:
p>the code is as follows:
@media screen and (min-width: 640px) and (max-width: 1000px) {
    .nav {width: auto; height: 38px;}
    .nav ul li {float: left; width: 14%; min-width: 50px;}
    .nav ul li.current {background: #f60;}
    .nav ul li:hover a {color: #f60;}
    .nav ul li.current:hover a {color: #fff;}
    .nav .hot {display:none;}
    .nav .title {display: none;}
}when the screen width is less than 640px:
the code is as follows:
@media screen and (max-width: 640px) {
    .navbar {margin-top: 0; height: auto; background: #444;}
    .nav {width: auto; height: auto;}
    .nav ul li {margin-top: 1px; width: 100%; min-width: 100px;background: #333;}
    .nav ul li a:active {background: #f60;}
    .nav .hot {display:none;}
    .nav .title {position: relative; width: 100%; height: 38px; border-top: 1px solid #444; background: #333; text-align: center; font:normal 20px/35px "microsoft yahei", arial, serif; letter-spacing: 2px;}
    .nav .title a {color: #f60; text-decoration: none;}
    .nav .title .btn {position: absolute; right: 10px; top: 0; width: 34px; height: 34px; padding: 2px; background: url(btn.png) center center no-repeat; cursor: pointer;}
}ok, the layout and style control is complete, and the effects are there. the effects in 3 different states are as follows:
 |


but for the third picture, we also want an effect, that is, the menu can be collapsed when the icon in the lower right corner is clicked, then how to do this? this can be achieved with js. when the menu is in the collapsed state, click the picture menu to expand it; when the menu is in the expanded state, click the icon menu to collapse it, and it also needs animation effects. ok, let’s take a look at js, but i won’t go into detail about js. let’s post the core code:
this part of the code is used to produce animation effects:
the code is as follows:
var move = function (obj, target) {
    var timer;
    clearInterval(timer);
    timer = setInterval(function () {
        var speed = (target - obj.offsetTop)/3;
        speed = speed > 0 ? Math.ceil(speed) : Math.floor(speed);
        if (Math.abs(obj.offsetTop - target) < 4) {
            clearInterval(timer);
            obj.style.marginTop = target + "px";
        } else {
            obj.style.marginTop = obj.offsetTop + speed + "px";
        }
    }, 30);
}ok, this is basically the responsive navigation bar.
【recommended tutorials】
1. css video tutorial
2. css online manual
3. bootstrap tutorial