


Screenshot or screen clipping is a tool available in Microsoft Word, PowerPoint and Excel. Screenshot or screen clipping tools are used to easily add screenshots or screen clippings to improve the readability of your documents. Screenshot or screen clipping tools can also simplify the recording process by capturing screenshots of open programs or screens to reduce switching back and forth between different screens and programs.
The screenshot or screen clipping tool appears in different places in MS Word, PowerPoint and Excel.
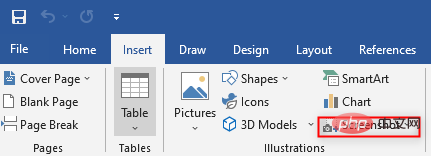
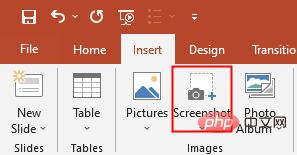
In MS Word and PowerPoint, the screenshot or screen clipping tool is on the Insert tab in the Illustrations group.
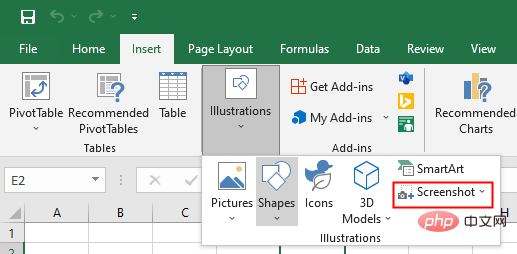
In MS Excel, the screenshot or screen clipping tool is located on the Insert tab in the Image group.
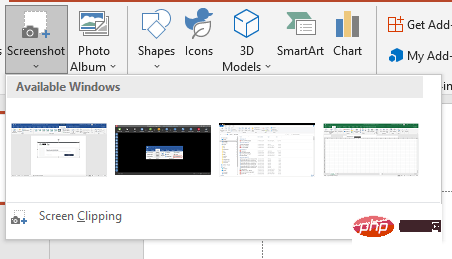
Screenshot is used to capture the entire window, while ScrrenClipping is used to capture a portion of the window.
Steps to use screenshots:
2. To use the screenshot or screen clipping tool in Microsoft Excel, click the Insert tab, then click Illustrations, and then click Screenshot
Steps to use screen clipping:
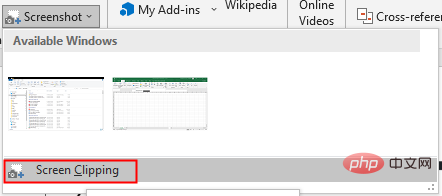
This will take you to the screen where you want to screen clip. The entire screen will become opaque.
4. Press and drag the mouse to capture the desired portion of the screen. The captured sections are automatically added to the document.
After taking a screenshot or screen clipping and inserting it into the document, we can use picture tools to edit the image. Picture tools can be used to crop and add styles to screenshots or screen clippings.
The above is the detailed content of Insert screenshots or screen clippings in MS Word, PowerPint and Excel. For more information, please follow other related articles on the PHP Chinese website!
 Blue screen code 0x000009c
 A collection of common computer commands
 You need permission from admin to make changes to this file
 Tutorial on turning off Windows 11 Security Center
 How to set up a domain name that automatically jumps
 What are the virtual currencies that may surge in 2024?
 The reason why header function returns 404 failure
 How to use js code


![[Web front-end] Node.js quick start](https://img.php.cn/upload/course/000/000/067/662b5d34ba7c0227.png)


