


Webpack is a front-end resource construction tool, a static module bundler; webpack has five core concepts (entry, output, loader, plug-in, mode). The following article will give you an in-depth understanding of it. Check it out, hope it helps everyone!

1. Entry
Entry ) instructs webpack to use which file as the entry point to start packaging, analyze and build the internal dependency graph.
2. Output
Output instructs webpack where to output the packaged resource bundles and how to name them.
3. Loader
webpack can only understand JavaScript and JSON files, which is the built-in capability of webpack available out of the box. Loaders enable webpack to process other types of files and convert them into valid modules that can be used by applications and added to the dependency graph.
4. Plugins
Plugins can be used to perform a wider range of tasks. Plug-ins range from packaging optimization and compression to redefining variables in the environment.
5. Mode
Mode instructs webpack to use the configuration of the corresponding mode.
The following is a detailed introduction to the five core concepts of webpack.
The entry object is used by webpack to find, start and build the bundle. entry is the starting point of the application. From this starting point, the application starts execution. If you pass an array, each item in the array will be executed. The entry point indicates which module webpack should use to start building its internal dependency graph. After entering the entry point, webpack will find out which modules and libraries the entry point depends on (directly and indirectly).
Simple rule: Every HTML page has a starting point. Single page application (SPA): one entry point, multi-page application (MPA): multiple entry points.
The default value is ./src/index.js, but you can specify one (or more) different properties by configuring the entry attribute in webpack configuration The starting point of the entrance. For example: The value type of
//单入口--字符串
module.exports = {
  entry: './path/to/my/entry/file.js',
};
//多入口--数组
module.exports = {
  entry: ['./src/index.js', './src/add.js']
};
//多入口--对象
module.exports = {
  entry: {
    home: './home.js',
    about: './about.js',
    contact: './contact.js'
  }
};entry:
String: single entry, packaged to form a chunk, and only one bundle file will be output in the end. The default name of the chunk is main
Array: multiple entries, all entry files will eventually form only one chunk, and finally a bundle file will be output. The name of the chunk defaults to main. Generally only used in the HMR function to make html hot updates take effect
Object: multiple entries, as many chunks are formed as many keys, and as many bundle files are output, each The key will be the name of the chunk. In the object type, the value of each key can also be an array, not just a string
output Instructs webpack how and where to output your bundles, assets, and anything else you package or load using webpack. The default value of the output bundle is ./dist/main.js, and other generated files are placed in the ./dist folder by default.
You can configure these processes by specifying an output field in the configuration:
//webpack.config.js
const path = require('path');
module.exports = {
  entry: './path/to/my/entry/file.js',
  output: {
    path: path.resolve(__dirname, 'dist'),
    filename: 'my-first-webpack.bundle.js',
  },
};We can pass output.filename and output.path attribute to tell webpack the name of the bundle and where the bundle is generated.
2.1, output.filename (file name and directory)
This option determines the directory and name of each output bundle. These bundles will be written to the directory specified by the output.path option.
For a single entry starting point, filename will be a static name. However, when creating multiple bundles through multiple entry points, code splitting, or various plugins, other methods should be used to give each bundle a unique name.
//单入口时:
module.exports = {
  //...
  output: {
    filename: 'js/bundle.js'
  }
};
//多入口--使用入口名称:
module.exports = {
  //...
  output: {
    filename: '[name].bundle.js'
  }
};
//多入口--使用每次构建过程中,唯一的 hash 生成
module.exports = {
  //...
  output: {
    filename: '[name].[hash].bundle.js'
  }
};
...2.2, output.path (file directory)
output.path specifies the directory of all output files, that is, the directory where all future resources will be output. Public directory. path must be an absolute path.
module.exports = {
  //...
  output: {
    path: path.resolve(__dirname, 'dist/assets')
  }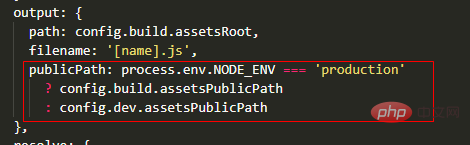
};2.3, output.publicPath (path prefix of referenced resources)
publicPath specifies the public path introduced by all resources in the html file Path prefix. It does not affect the path of the generated file. Instead, when the html file introduces various resources, publicPath is added as a prefix to the path of the imported resources.
Example:
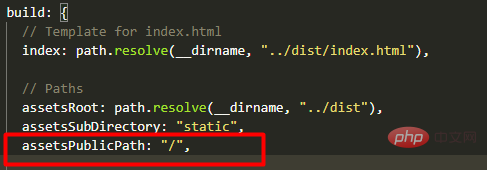
In the webpack configuration generated by vue-cli, the value of publicPath in the production environment defaults to '/', which is the root directory of the current directory.
打包过后,我们打开 html 文件,可以看到 html 文件中引入的资源路径为:
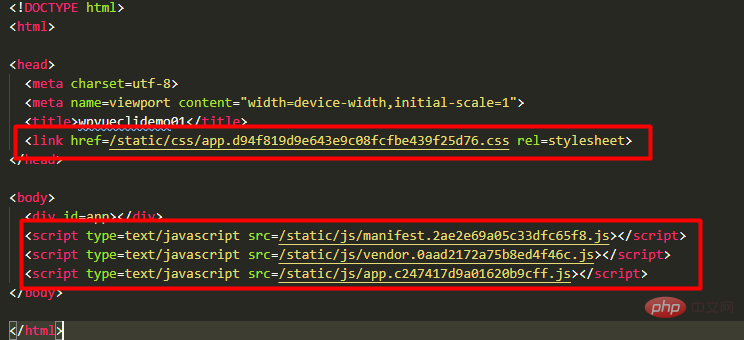
可以看到,都在路径前面加了 / 符号。当我们打开浏览器访问生成的 html 文件时,会发现报错,资源访问不到,报404,此时资源的访问类似如下:

在服务器上可能会是如下,但访问一样可能会有问题。

我们可以将 publicPath 修改为相对路径,或者直接把它注释掉也行。
2.3.1、path和publicPath的区别
<span class="token comment">打包后文件在硬盘中的存储位置,是webpack所有文件的输出的路径,<strong>必须是绝对路径。</strong>比如:输出的js、图片,HtmlWebpackPlugin生成的html文件等,都会存放在以path为基础的目录下。</span>
2.4、output.chunkFilename(非入口chunk的名称)
output.chunkFilename 决定了非入口(non-entry) chunk 文件的名称。也就是除了入口文件生成的chunk外,其他文件生成的chunk文件命名。
module.exports = {
  //...
  output: {
    chunkFilename: 'js/[name]_chunk.js'   //非入口chunk的名称
  }
};webpack 本身只能打包 JavaScript 和 JSON 文件(webpack3+和webpack2+内置可处理JSON文件,但webpack1+并不支持,需要引入json-loader),这是 webpack 开箱可用的自带能力。webpack 本身不支持打包其他类型文件,比如 css、vue 等,但我们可以通过各种 loader 来让 webpack 去处理这些类型的文件。loader 可以将文件从不同的语言(如 TypeScript)转换为 JavaScript 或将内联图像转换为 data URL,loader 甚至允许你直接在 JavaScript 模块中 import CSS文件!
通过使用不同的loader,webpack有能力调用外部的脚本或工具,实现对不同格式的文件的处理,比如说分析转换 scss为css,或者把下一代的JS文件(ES6,ES7)转换为现代浏览器兼容的JS文件。对React的开发而言,合适的Loaders可以把React的中用到的JSX文件转换为JS文件。
在 webpack 的配置中,loader 有两个属性:
test 属性,识别出哪些文件会被转换。
use 属性,定义出在进行转换时,应该使用哪个 loader。
include/exclude(可选):手动添加必须处理的文件(文件夹)或屏蔽不需要处理的文件(文件夹)
query(可选):为loaders提供额外的设置选项
//示例:webpack.config.js
const path = require('path');
module.exports = {
  output: {
    filename: 'my-first-webpack.bundle.js',
  },
  module: {
    rules: [
        { test: /\.txt$/, loader: 'raw-loader' },
        { test: /\.css$/, use: ['style-loader', 'css-loader'] }   //使用多个loader的话应该用 use
    ],
  },
};以上配置中,对一个单独的 module 对象定义了 rules 属性,里面包含两个必须属性:test 和 use。这相当于告诉 webpack 编译器在碰到 require()/import 语句中被解析为 '.txt' 的路径时,在对它打包之前,先使用raw-loader 转换一下。
使用多个loader的话应该用 use,use 数组中的 loader 执行顺序:从右到左,依次执行。比如上面的 css 文件,首先 css-loader 会将 css 文件编译成 JS 加载到 JS文件中,然后再由 style-loader 创建 style 标签,将 JS 中的样式资源插入到 head 标签中。
3.1、CSS-loader
webpack提供两个工具处理样式表,css-loader 和 style-loader,二者处理的任务不同。css-loader使你能够使用类似import的方法来引入 css 文件,style-loader将所有的计算后的样式加入页面中,二者组合在一起使你能够把样式表嵌入webpack打包后的JS文件中,由此就可以在JS文件中引入css文件了。
//安装
npm install --save-dev style-loader css-loader  //css-loader版本太高编译可能会出错,建议降低版本比如 css-loader@1.0.1 可用
//使用
module.exports = {
   ...
    module: {
        rules: [
            {
                test: /(\.jsx|\.js)$/,
                use: {
                    loader: "babel-loader"
                },
                exclude: /node_modules/
            },
            {
                test: /\.css$/,  //对同一个文件引入多个loader的方法。loader的作用顺序是后面的loader先开始作用
                use: [
                    {
                        loader: "style-loader"
                    }, {
                        loader: "css-loader"
                    }
                ]
            }
        ]
    }
};假设有一个 main.css 文件:
body {
  backgroud: green;
}为了让webpack能找到”main.css“文件,我们把它导入”main.js “中,如下:
//main.js
import React from 'react';
import {render} from 'react-dom';
import Greeter from './Greeter';
import './main.css';//使用require导入css文件

render(<Greeter />, document.getElementById('root'));通常情况下,css会和js打包到同一个文件中,并不会打包为一个单独的css文件。不过通过合适的配置webpack也可以把css打包为单独的文件的。
loader 用于转换某些类型的模块,而插件则可以用于执行范围更广的任务,包括:打包优化、压缩、资源管理、注入环境变量等。插件目的在于解决 loader 无法实现的其他事。
要使用某个插件,我们需要通过npm安装它,然后在 plugins 属性下添加该插件的一个实例。由于插件可以携带参数/选项,你必须在 webpack 配置中,向 plugins 属性传入 new 实例。多数插件可以通过选项自定义,你也可以在一个配置文件中因为不同目的而多次使用同一个插件。
//webpack.config.js
const HtmlWebpackPlugin = require('html-webpack-plugin'); // 通过 npm 安装
const webpack = require('webpack'); // 用于访问内置插件
module.exports = {
  module: {
    rules: [{ test: /\.txt$/, use: 'raw-loader' }],
  },
  plugins: [new HtmlWebpackPlugin({ template: './src/index.html' })],
};在上面的示例中,html-webpack-plugin 为应用程序生成一个 HTML 文件,并自动注入所有生成的 bundle。
4.1、BannerPlugin插件(添加版权说明)
下面我们添加了一个给打包后代码添加版权声明的插件。该插件是webpack中的内置插件不用安装。
const webpack = require('webpack');
module.exports = {
...
    module: {
        rules: [
            {
                test: /(\.jsx|\.js)$/,
                use: {
                    loader: "babel-loader"
                },
                exclude: /node_modules/
            },
            {
                test: /\.css$/,
                use: [
                    {
                        loader: "style-loader"
                    }, {
                        loader: "css-loader",
                        options: {
                            modules: true
                        }
                    }, {
                        loader: "postcss-loader"
                    }
                ]
            }
        ]
    },
    plugins: [
        new webpack.BannerPlugin('wenxuehai版权所有,翻版必究')
    ],
};4.2、Hot Module Replacement 插件(热加载)
Hot Module Replacement(HMR)是webpack里很有用的一个插件,它允许你在修改组件代码后,自动刷新实时预览修改后的效果。热加载和webpack-dev-server不同,热替换在应用运行时,无需刷新页面,便能查看代码更新后的效果 ,就跟直接在浏览器上修改dom样式一样,而webpack-dev-server是要刷新页面的。
(1)在webpack配置文件中添加HMR插件;
(2)在Webpack Dev Server中添加“hot”参数;
4.2.1、react实现热加载
React模块可以使用Babel实现功能热加载。Babel有一个叫做react-transform-hrm的插件,可以在不对React模块进行额外的配置的前提下让HMR正常工作;
安装react-transform-hmr
npm install --save-dev babel-plugin-react-transform react-transform-hmr
const webpack = require('webpack');
module.exports = {
    entry: __dirname + "/app/main.js",//已多次提及的唯一入口文件
    output: {
        path: __dirname + "/public",
        filename: "bundle.js"
    },
    devtool: 'eval-source-map',
    devServer: {
        contentBase: "./public",//本地服务器所加载的页面所在的目录
        historyApiFallback: true,//不跳转
        inline: true,
        hot: true
    },
    module: {
        rules: [
            {
                test: /(\.jsx|\.js)$/,
                use: {
                    loader: "babel-loader"
                },
                exclude: /node_modules/
            },
            {
                test: /\.css$/,
                use: [
                    {
                        loader: "style-loader"
                    }, {
                        loader: "css-loader",
                        options: {
                            modules: true
                        }
                    }, {
                        loader: "postcss-loader"
                    }
                ]
            }
        ]
    },
    plugins: [
        new webpack.BannerPlugin('版权所有,翻版必究'),
     new webpack.HotModuleReplacementPlugin()  //热加载插件
    ],
};配置Babel
// .babelrc
{
  "presets": ["react", "env"],
  "env": {
    "development": {
    "plugins": [["react-transform", {
       "transforms": [{
         "transform": "react-transform-hmr",
         "imports": ["react"],
         "locals": ["module"]
       }]
     }]]
    }
  }
}//Greeter,js
import React, {
Component
} from 'react'
import styles from './main.css'
class Greeter extends Component {
render() {
return (
< div>
<h1>
aaaf
</h1>
</div>
);
}
}
export default Greeter//main.js
import React from 'react';
import {
render
} from 'react-dom';
import Greeter from './greeter.js';
render( < Greeter / > , document.getElementById('root'));现在如果我们就可以实现热加载模块了,每次保存就能在浏览器上直接看到更新内容,浏览器不必刷新也不会自动刷新。
(有时候没有效果可能是版本问题)
4.3、ExtractTextWebpackPlugin插件(抽离css)
在默认情况下,webpack 不会将 css 样式作为一个独立文件,而是会将 css 也打包到 js 文件中,打包生成的 js 文件在渲染时会通过 js 语法来将样式通过 style 标签的形式来插入到页面中。但是这样的话,打包出来的 bundle 文件可能会过大,此时我们可以通过 ExtractTextWebpackPlugin 插件来将 css 样式独立成 css 文件。
ExtractTextWebpackPlugin 插件会将入口 chunk 中引用到的 *.css(包括引入的css文件和vue文件中style所写的样式),移动到一个独立分离的 CSS 文件中。ExtractTextPlugin 对每个入口 chunk 都会生成一个对应的 css文件,也就是说一个入口对应着一个 css 文件,多个入口的话就会分别生成多个对应的 css 文件。
通过 ExtractTextWebpackPlugin 插件,你的样式将不再内嵌到 JS bundle 中,而是会放到一个单独的 CSS 文件(即 styles.css)当中。 如果你的样式文件大小较大,这会做更快提前加载,因为 CSS bundle 会跟 JS bundle 并行加载。
const ExtractTextPlugin = require("extract-text-webpack-plugin");
module.exports = {
  module: {
    rules: [
      {
        test: /\.css$/,
        use: ExtractTextPlugin.extract({
          fallback: "style-loader",
          use: "css-loader"
        })
      }
    ]
  },
  plugins: [
    new ExtractTextPlugin({
      filename: utils.assetsPath('css/[name].[contenthash].css'),   //ExtractTextPlugin 对每个入口 chunk 都生成一个对应的文件,所以当你配置多个入口 chunk 的时候,必须使用 [name], [id] 或 [contenthash]
      // allChunks: true,   //当使用 `CommonsChunkPlugin` 并且在公共 chunk 中有提取的 chunk(来自`ExtractTextPlugin.extract`)时,`allChunks` **必须设置为 `true`。
    }),
  ]
}4.3.1、allChunks选项(是否也将异步加载的样式一起提取出来)
ExtractTextWebpackPlugin 插件的 allChunks 选项的默认值为 false。
allChunks 选项的意思是是否需要将异步加载的样式一起提取出来。因为在默认情况下,就算使用了 ExtractTextWebpackPlugin 插件,如果该样式或者样式文件是异步加载的话,那么这些样式是不会被提取到独立的 css 文件中的,而是仍然会打包到 js 文件中。
所以allChunks:false为默认值,默认是从 entry 的入口提取代码,但是不会提取异步加载的代码;allChunks:true则是提取所有模块的代码(包括异步加载的模块)到一个文件里面。如果使用了异步加载样式,但是 allChunks 又设为了 false,那么我们就需要设置 ExtractTextPlugin.extract 的 fallback, fallback是在异步代码加载的 css 代码没有被提取的情况下, 以style-loader的情况去加载异步组件的样式。
可参考:
https://github.com/sevenCon/blog-github/blob/master/articles/webpack学习笔记(2)-ExtractTextWebpackPlugin的使用.md
https://blog.csdn.net/weixin_41134409/article/details/88416356
通过选择 development, production 或 none 之中的一个,来设置 mode 参数,你可以启用 webpack 内置在相应环境下的优化。其默认值为 production。
module.exports = {
  mode: 'production',
};在配置文件中直接配置 mode 选项将告知 webpack 使用相应模式的内置优化,mode选项有development、production、none。
development : 开发模式,打包的代码不会被压缩,开启代码调试,
production : 生产模式,则正好反之。
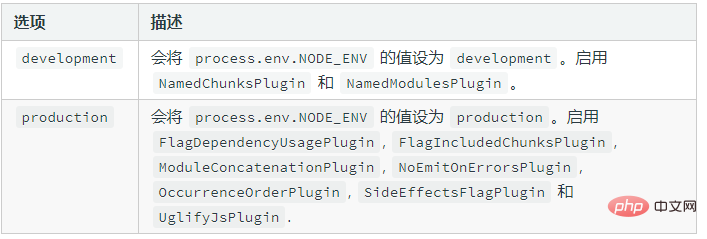
将 mode 设为development或者production,webpack会自动同时也设置 process.env.NODE_ENV 的值,我们可以在任何文件夹中直接拿到该值。但如果只设置 NODE_ENV,则不会自动设置 mode。(在node中,全局变量 process 表示的是当前的node进程。process.env 属性包含着用户环境的信息。process.env 本身并不存在NODE_ENV这个属性,我们一般会自己去定义 NODE_ENV 属性,用它来判断是生产环境还是开发环境)
(请注意:mode选项是webpack4新增的,在4之前都是用DefinePlugin插件设置,webpack4把DefinePlugin删除了)
5.1、vue-cli项目mode配置详解
在 webpack 中,一般都会在配置文件中配置 NODE_ENV 的值。在使用 vue-cli 默认生成的 vue 项目中,NODE_ENV 配置情况如下:
//webpack.dev.conf.js 文件下,引入了 dev.env.js 文件
new webpack.DefinePlugin({
      'process.env': require('../config/dev.env')
}),//dev.env.js 文件中
module.exports = merge(prodEnv, {
NODE_ENV: '"development"'
})//webpack.prod.conf.js 文件下,引入了 prod.env.js 文件
const env = require('../config/prod.env')
new webpack.DefinePlugin({
'process.env': env
}),//prod.env.js 文件中
module.exports = {
NODE_ENV: '"production"'
}从上面可以知道,在开发环境下,配置文件将 NODE_ENV 配置成了 'development';在生产环境下,配置文件将 NODE_ENV 配置成了 'production'。
我们在运行项目时,会执行 npm run dev 或者 npm run build,这两个命令时使用了开发环境或者生产环境的配置文件来生成运行项目,由此也对应着配置了对应的 NODE_ENV 的值,我们也就能够在项目的任一文件中(配置文件不一定,因为要看配置了 NODE_ENV 的值的配置文件有没有生效了才行)获取到对应的 NODE_ENV 的值。
5.2、process.env.NODE_ENV配置
process 是 node 的全局变量,并且 process 有 env 这个属性,但是没有 NODE_ENV 这个属性。NODE_ENV 变量并不是 process.env 直接就有的,而是通过设置得到的,但是 NODE_ENV 变量通常约定用于定义环境类型。这个变量的作用是:我们可以通过判断这个变量区分开发环境或生产环境。
(1)可以通过webpack的内置插件 DefinePlugin 来设置全局变量值:
new webpack.DefinePlugin({
      'process.env.NODE_ENV': JSON.stringify('production')
}),设置完后在执行脚本上可以取到该值,比如:
// main.js
console.log(process.env.NODE_ENV);    //production
但是在webpack的配置文件 webpack.config.js 中取不到该值。
(2)通过 cross-env 包设置
先下载 cross-env 包:
cnpm i cross-env -D
设置 package.json 文件:
"build": "cross-env NODE_ENV=test webpack --config webpack.config.js"
此时在配置文件中可以取到该值(process.env.NODE_ENV),但是在可执行脚本中取不到,需要配合DefinePlugin 插件使用
更多编程相关知识,请访问:编程视频!!
The above is the detailed content of An in-depth analysis of the five core concepts of webpack. For more information, please follow other related articles on the PHP Chinese website!


![Node.js complete introductory tutorial [es6+npm+express+webpack+promise]](https://img.php.cn/upload/course/000/000/068/6242b4c8f1a39624.png)


![[Web front-end] Node.js quick start](https://img.php.cn/upload/course/000/000/067/662b5d34ba7c0227.png)


