

This article brings you relevant knowledge about Redis, which mainly introduces some basic knowledge about redis. Redis is an in-memory database, power outage, data loss, process restart, data Lost, let’s take a look at it, I hope it will be helpful to everyone.

Recommended learning: Redis video tutorial
yum install redis -y
# 1.下载redis源码
wget http://download.redis.io/releases/redis-4.0.10.tar.gz
# 2.解压缩
tar -zxf redis-4.0.10.tar.gz
# 3.切换redis源码目录
cd redis-4.0.10.tar.gz
# 4.编译源文件
make
# 5.编译好后,src/目录下有编译好的redis指令
# 6.make install 安装到指定目录,默认在/usr/local/bin
make install DESTDIR=/your/dir
For redis installed with yum, the default configuration file is in /etc/redis.conf
# vim /etc/redis.conf #打开如下参数即可# 这里是绑定redis的启动地址,如果你支持远程连接,就改为0.0.0.0bind 0.0.0.0  #更改端口port 6500#设置redis的密码requirepass haohaio#默认打开了安全模式protected-mode yes
#打开一个redis后台运行的参数daemonize yes
# 为什么使用systemctl start redis无法连接呢?
# 是因为这个命令默认连接的是6379端口,我们更改了redis端口,因此无法连接了

# 请使用如下的命令,指定配置文件启动
[root@s25linux opt]# redis-server /etc/redis.conf
#检查redis的进程
[root@s25linux opt]# ps -ef|grep redis
root       6498      1  0 11:42 ?        00:00:00 redis-server 0.0.0.0:6500
# 连接redis服务端,指定ip地址和端口,以及密码连接redis
# -p 指定端口
# -h 指定ip地址
# auth指令,用于密码验证
[root@s25linux opt]# redis-cli -p 6500 -h 192.168.178.143
192.168.178.143:6500> ping
(error) NOAUTH Authentication required.
192.168.178.143:6500> auth  haohaio
OK
192.168.178.143:6500> ping
PONG
1.keys *  列出redis所有的key
2.type key      查看key类型
3.expire key seconds    过期时间
4.ttl key     查看key过期剩余时间        -2表示key已经不存在了
5.persist     取消key的过期时间   -1表示key存在,没有过期时间
6.exists key     判断key存在    存在返回1    否则0
7.del keys     删除key    可以删除多个
8.dbsize         计算key的数量
redis Provides RDB persistence function. This function can save the state of redis in memory to the hard disk. It can be manually executed.
redis.conf, executed regularly.
compressedbinary file. This file is saved on the hard disk. Redis can use this file to restore the current state of the database. state.
daemonize yes		#后台运行
port 6379			#端口
logfile /data/6379/redis.log #指定redis的运行日志,存储位置
dir /data/6379		#指定redis的数据文件,存放路径
dbfilename  s25_dump.rdb	#指定数据持久化的文件名字
bind 127.0.0.1		#指定redis的运行ip地址
#redis触发save指令,用于数据持久化的时间机制
# 900秒之内有1个修改的命令操作,如set .mset,del
save 900 1
# 在300秒内有10个修改类的操作
save 300 10
# 60秒内有10000个修改类的操作
save 60  10000
mkdir -p /data/6379
[root@s25linux s25redis]# pkill -9 redis
redis-server s25_rdb_redis.conf
127.0.0.1:6379> set addr shahe
OK
127.0.0.1:6379>
127.0.0.1:6379> set  age 18
OK
127.0.0.1:6379>
127.0.0.1:6379>
127.0.0.1:6379> keys *
1) "age"
2) "addr"
3) "name"
127.0.0.1:6379> save
OK
What are the disadvantages of rdb? If the persistence mechanism is not triggered, the machine will crash and the data will be lost. Therefore, redis has a better aof mechanism
Records all change operation commands executed by the server (such as set del, etc.), and re-executes them when the server starts These commands are used to restore the data set
The commands in the AOF file are all saved in the redis protocol format, and new commands are appended to the end of the file.
Advantages: Ensure that data is not lost to the greatest extent
Disadvantages: The log record is very large
redis-client 写入数据 > redis-server 同步命令 > AOF文件
vim  s25_aof_redis.conf

AOF持久化配置,两条参数

appendonly yes
appendfsync  always    总是修改类的操作
             everysec   每秒做一次持久化
             no     依赖于系统自带的缓存大小机制
daemonize yes
port 6379logfile /data/6379aof/redis.logdir /data/6379dbfilename  dbmp.rdb
requirepass redhat
save 900 1save 300 10save 60  10000appendonly yes
appendfsync everysec
mkdir -p /data/6379aof
redis-server s25_aof_redis.conf
[root@s25linux 6379aof]# lsappendonly.aof redis.log
The configuration has been completed now. The following are the experimental steps
[root@s25linux s25redis]# redis-cli127.0.0.1:6379>127.0.0.1:6379>127.0.0.1:6379> keys *(empty list or set)127.0.0.1:6379> set  name zhunbeixiakechifan
OK127.0.0.1:6379> set  name2  xinkudajiale
OK127.0.0.1:6379> keys *1) "name2"2) "name"
[root@s25linux s25redis]# pkill -9 redis[root@s25linux s25redis]# redis-server s25_aof_redis.conf
什么是多实例
就是机器上运行了多个redis相互独立的进程
互不干扰的独立的数据库
叫做多个redis数据库的实例,基于配置文件区分即可
port 6379  # 端口
daemonize yes  # 后台运行
pidfile /s25/6379/redis.pid  #
loglevel notice
logfile "/s25/6379/redis.log"  # 日志存放目录
dbfilename dump.rdb  # 持久化文件名
dir /s25/6379  # 数据文件保存的路径
protected-mode no  # 打开安全模式
port 6389
daemonize yes
pidfile /s25/6389/redis.pid
loglevel notice
logfile "/s25/6389/redis.log"
dbfilename dump.rdb
dir /s25/6389
protected-mode no
# 可以直接在配置文件中,定义好复制关系,启动后,立即就会建立复制
slaveof  127.0.0.1  6379
mkdir -p /s25/{6379,6389}分别启动2个redis数据库。
[root@s25linux s25redis]# redis-server s25-master-redis.conf
[root@s25linux s25redis]#
[root@s25linux s25redis]#
[root@s25linux s25redis]# redis-server s25-slave-redis.conf
分别检查他们的进程,以及复制关系
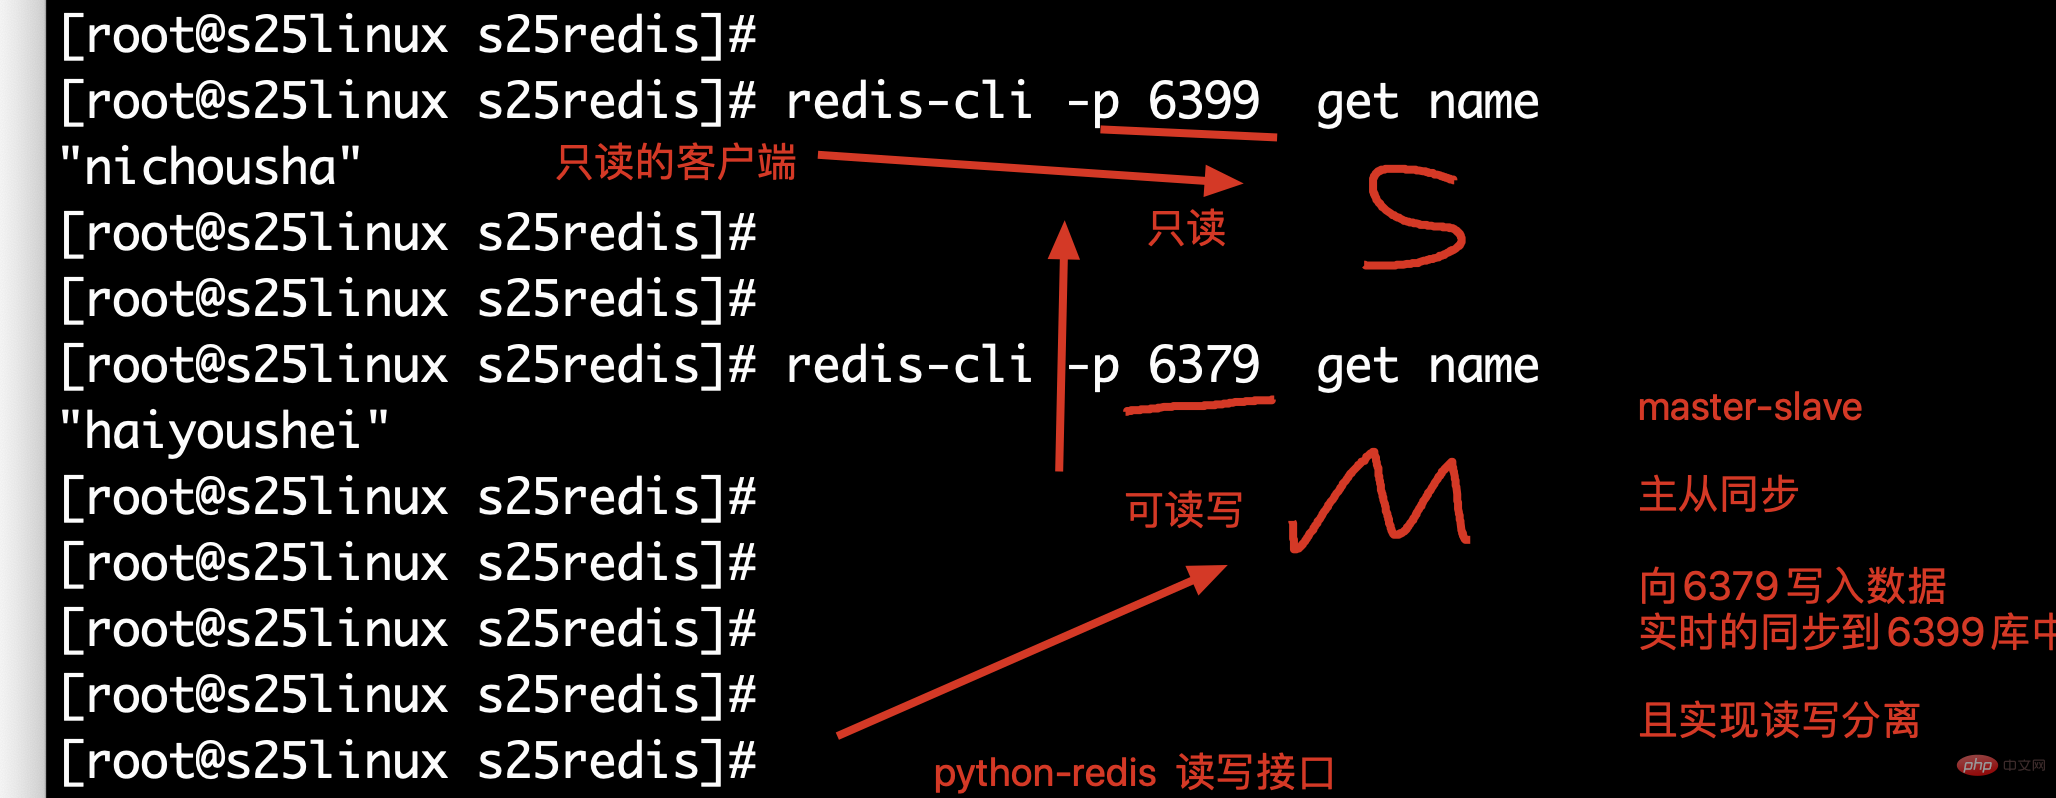
[root@s25linux s25redis]# redis-cli -p 6379  info replication
[root@s25linux s25redis]# redis-cli -p 6389  info replication
# 通过一条命令,配置他们的复制关系,注意,这个命令只是临时配置redis的复制关系,
# 想要永久修改,还得修改配置文件
redis-cli -p  6389  slaveof  127.0.0.1 6379
配置完毕说明
此时
6379 ==== 主库
6389 ==== 从库
此时可以向6379中写入数据,能够同步到6389中
6389是一个只读的数据库,无法写入数据
再创建一个配置文件,port是6399,且加入到一主一从的复制关系中去
# vim  s25-salve2-redis.conf port 6399daemonize yes
pidfile /s25/6399/redis.pid
loglevel notice
logfile "/s25/6399/redis.log"dbfilename dump.rdbdir /s25/6399protected-mode no
slaveof  127.0.0.1  6379
创建数据文件夹
mkdir -p /s25/6399
此时可以启动6399的数据库,查看他的身份复制关系
[root@s25linux s25redis]# redis-cli -p 6399 info replication
故障模拟
环境准备,准备3个redis的数据库实例,分别是 6379(主)、6389(从1)、6399(从2),配置好一主两从的关系
[root@s25linux s25redis]# ps -ef|grep redis
root      11294      1  0 15:19 ?        00:00:01 redis-server *:6379
root      11310      1  0 15:19 ?        00:00:01 redis-server *:6389
root      11620      1  0 15:33 ?        00:00:00 redis-server *:6399
分别查看复制关系
[root@s25linux s25redis]# redis-cli -p 6379 info replication
# Replication
role:master
connected_slaves:2
slave0:ip=127.0.0.1,port=6389,state=online,offset=1883,lag=1
slave1:ip=127.0.0.1,port=6399,state=online,offset=1883,lag=1
此时模拟故障,直接kill掉主库
kill -9 11294
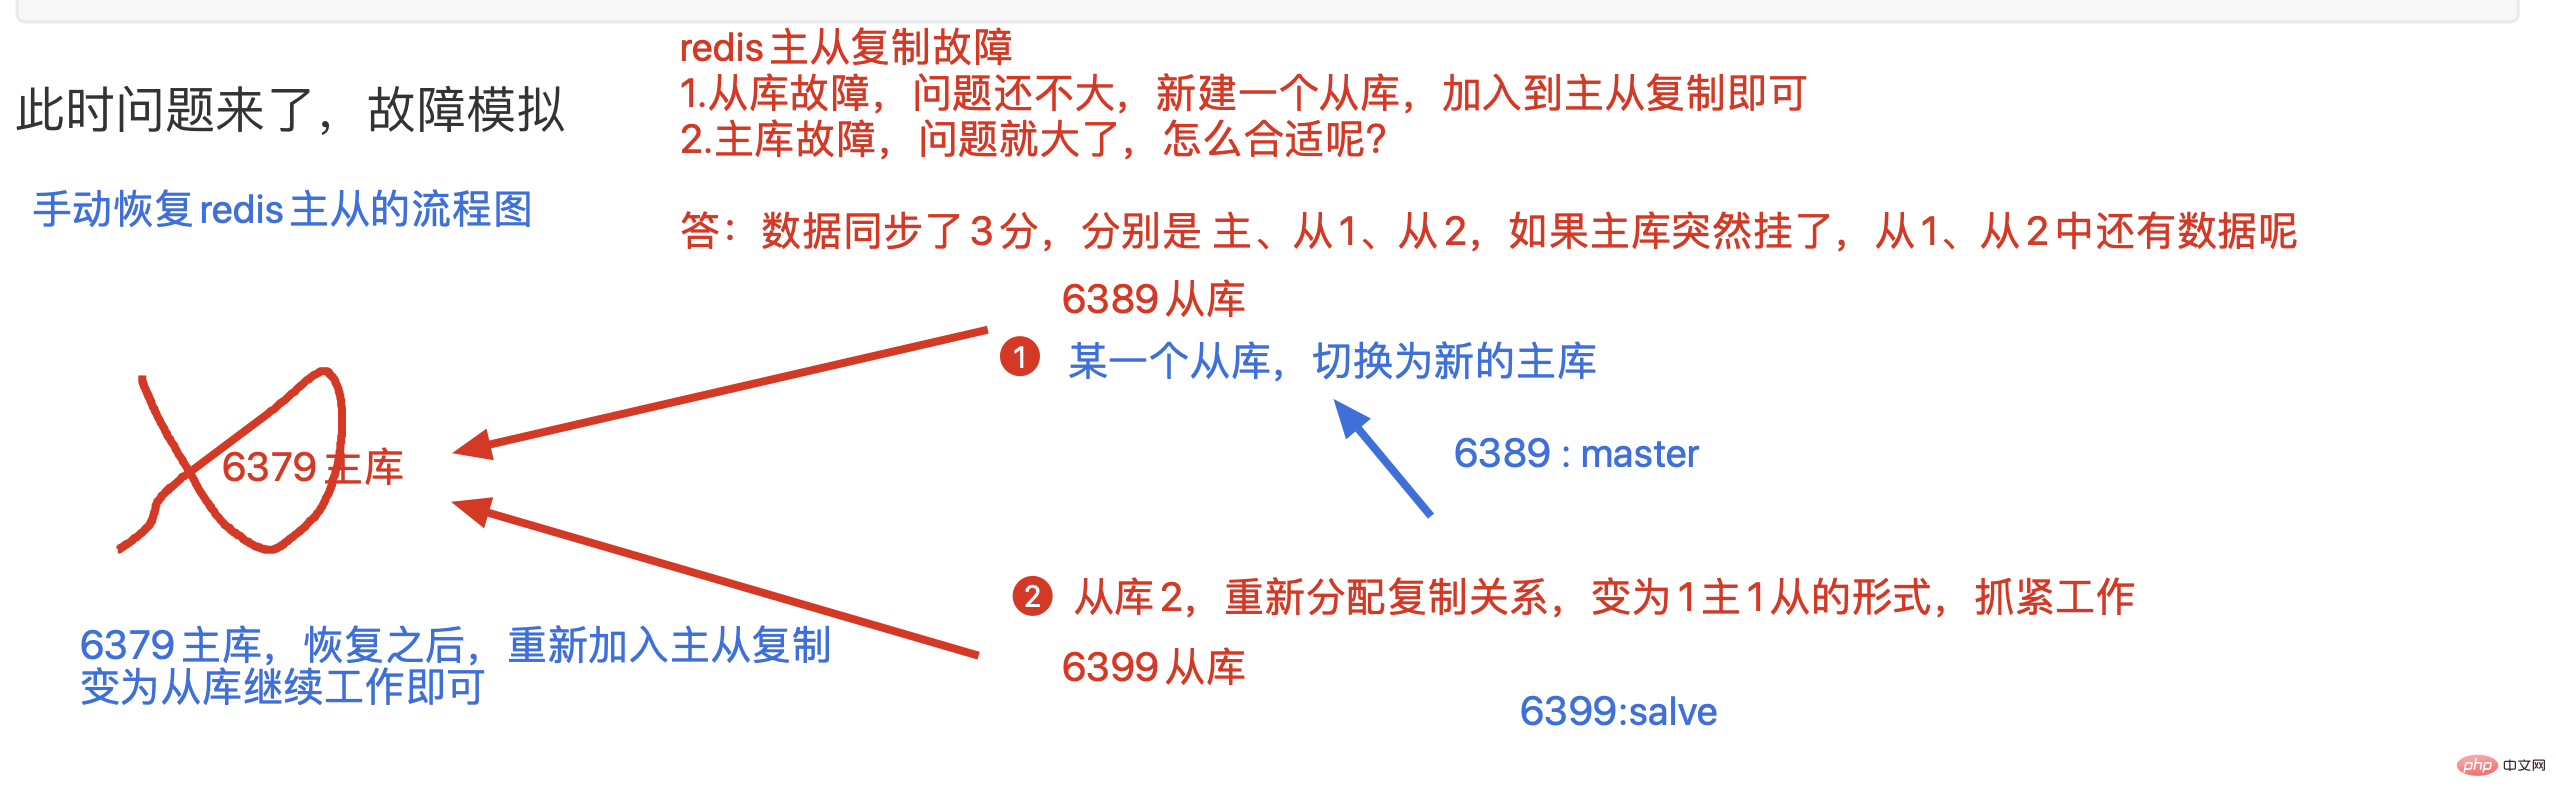
此时留下2个孤零零的从库,没有了主人,还没发写入数据,很难受
此时一位从库(6399),不乐意了,翻身农奴做主人,去掉自己的从库身份,
没有这个从库的枷锁,我就是我自己的主人
[root@s25linux s25redis]# redis-cli -p 6399 slaveof no one
此时6399已然是主库了,修改6389的复制信息,改为6399即可
[root@s25linux s25redis]# redis-cli -p 6389 slaveof 127.0.0.1 6399
此时检查他们的复制关系
[root@s25linux s25redis]# redis-cli -p 6389 info replication[root@s25linux s25redis]# redis-cli -p 6399 info replication
此时可以向主库6399写入数据,6389查看数据即可
主库不挂,从库挂掉的场景
从库挂掉,无所谓,重新再建立一个从库,加入主从复制即可,。,。
你会发现,如此的手动切换复制关系,其实是很难受的,如果在夜里凌晨四点,redis主库突然挂了,你该怎么办?你媳妇愿意让你起来干活吗?
因此你该咋办?是不是得学点别的技术?你希望有什么东西能帮你不?
配置好redis的哨兵进程,一般都是使用3个哨兵(保安)
哨兵的作用是盯着redis主库,不断询问它是否存活,如果超过30s(设置的时间阈值)都没有回应,3个哨兵会判断主库宕机,谈话进行投票机制,
因为3个哨兵,要自动的去选择从库为新的主库,每个哨兵的意见可能不一样,因此引出投票机制,少数服从多数。
当多个哨兵达成一致,选择某一个从库阶段,自动的修改他们的配置文件,切换新的主库
此时如果宕机的主库,恢复后,哨兵也会自动将其加入集群,且自动分配为新的从库
这一些都是自动化,无需人为干预,贼牛屁
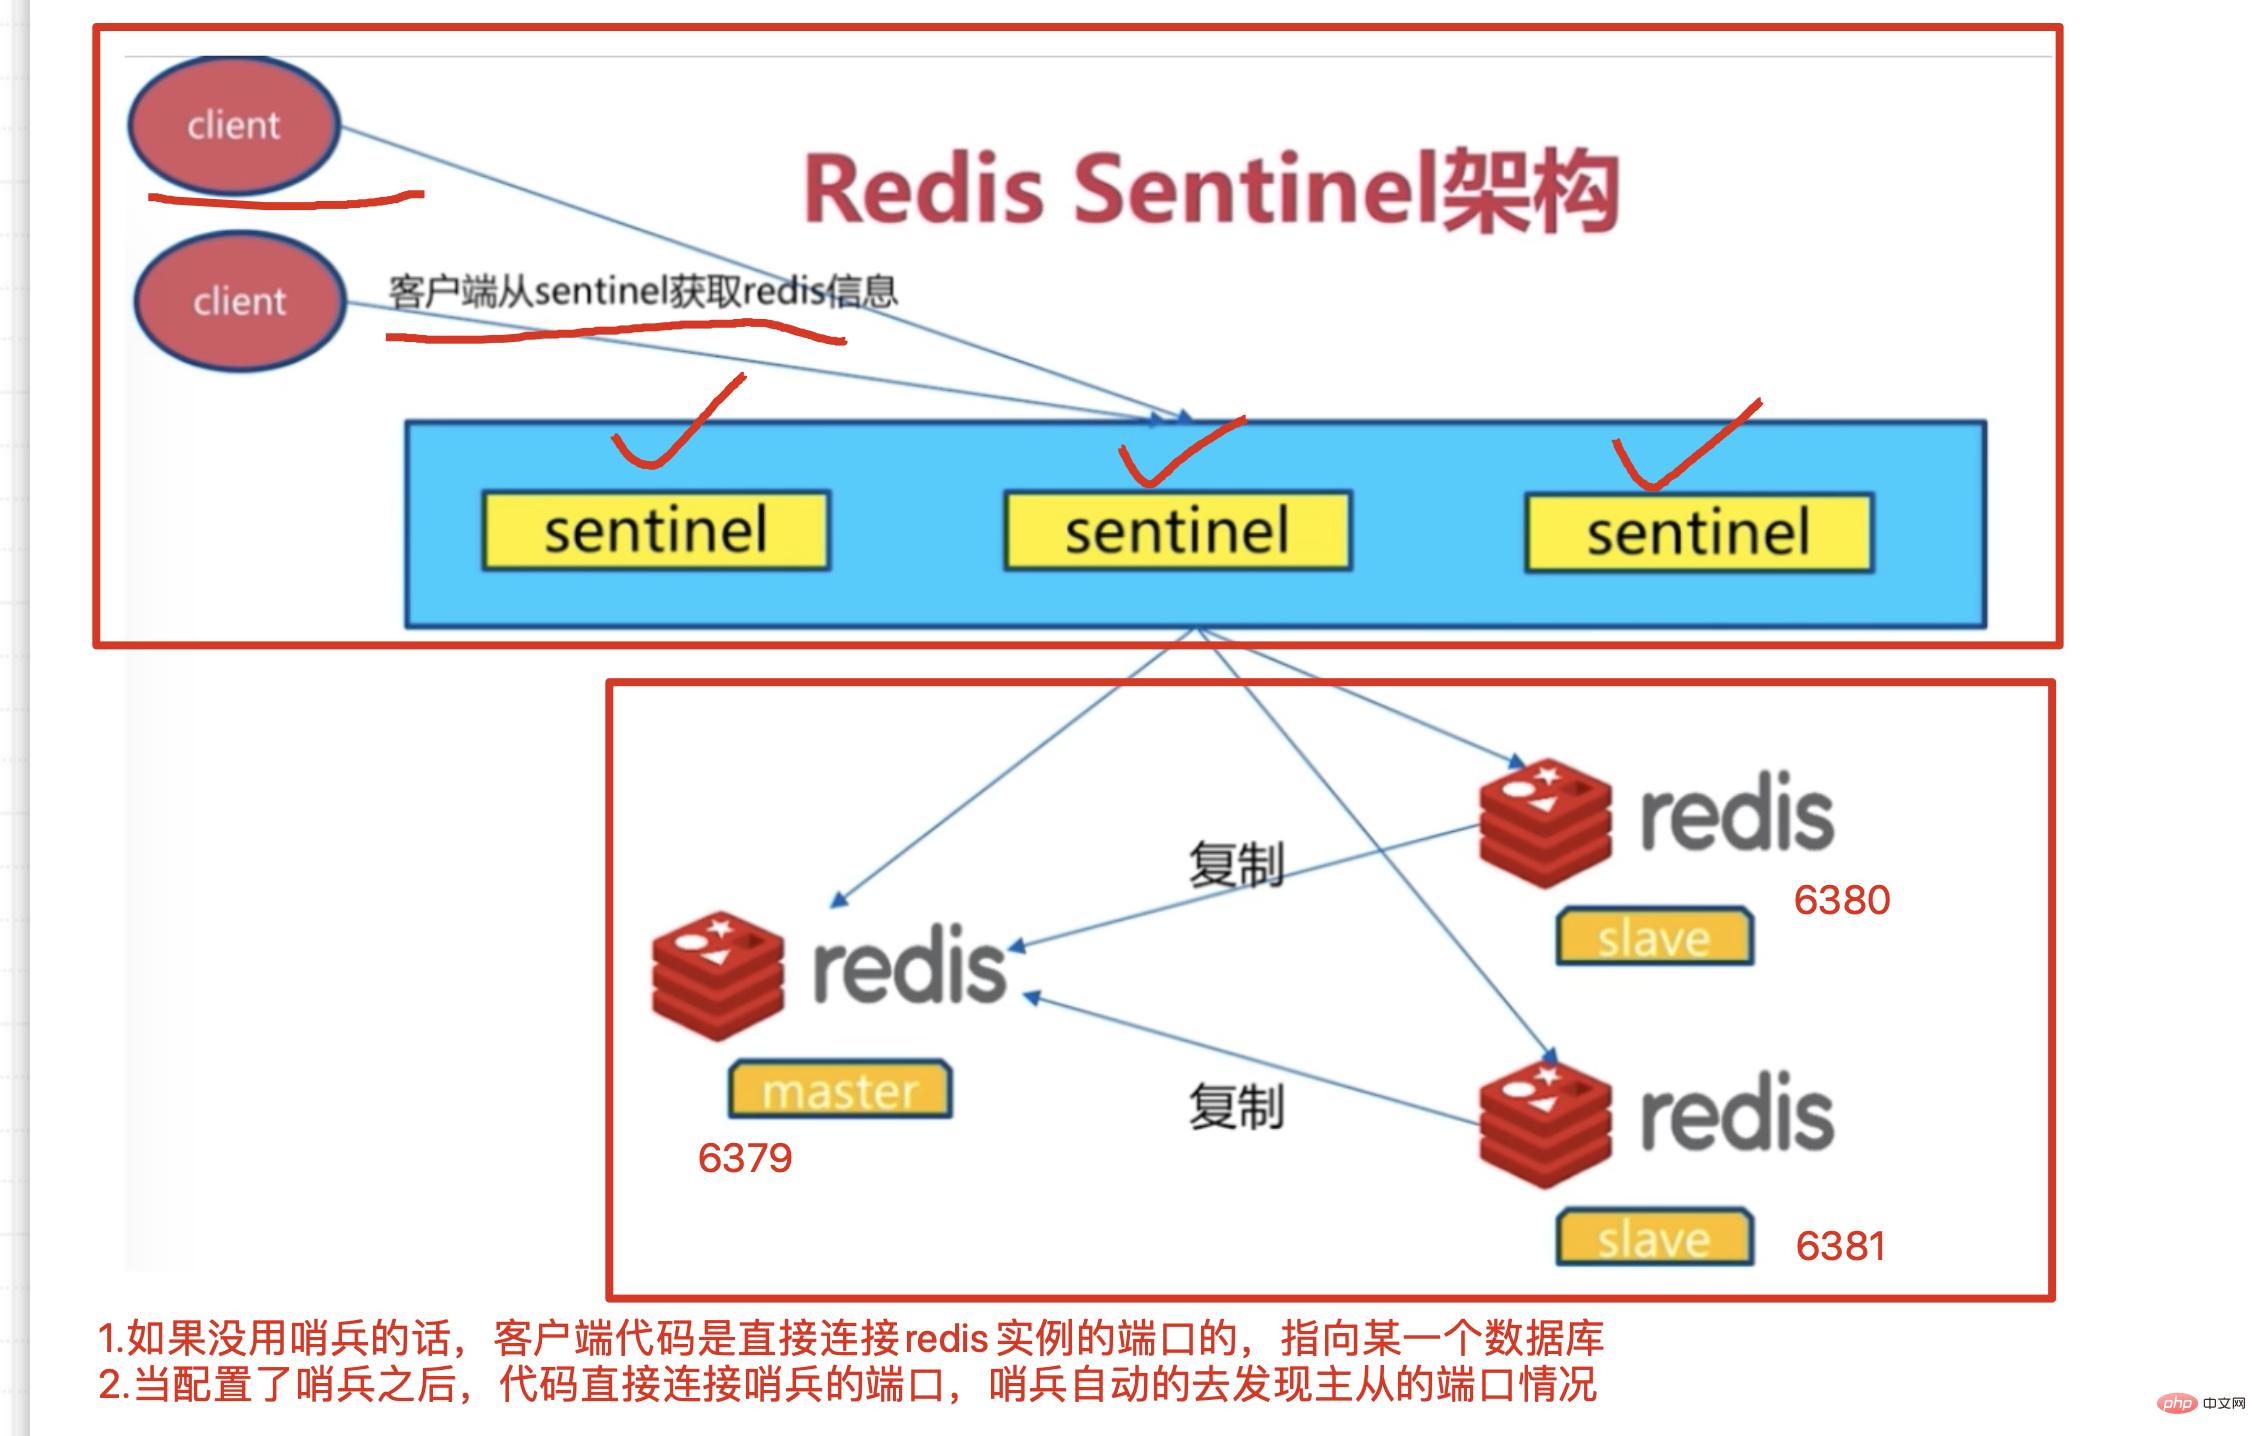
准备3个redis节点,1主2从的redis集群
# redis支持多实例-------基于多个配置文件,运行处多个redis相互独立的进程

s25-redis-6379.conf    -----主

port 6379
daemonize yes
logfile "6379.log"
dbfilename "dump-6379.rdb"
dir "/var/redis/data/"


s25-redis-6380.conf------从1
port 6380
daemonize yes
logfile "6380.log"
dbfilename "dump-6380.rdb"
dir "/var/redis/data/"
slaveof 127.0.0.1 6379


s25-redis-6381.conf-----从2
port 6381
daemonize yes
logfile "6381.log"
dbfilename "dump-6381.rdb"
dir "/var/redis/data/"
slaveof 127.0.0.1 6379

# 查看3个配置文件,准备分别启动该进程
[root@s25linux s25sentinel]# ls
s25-redis-6379.conf  s25-redis-6380.conf  s25-redis-6381.conf
创建数据存储文件夹
mkdir /etc/redis/data
分别启动3个进程后,检查进程情况
[root@s25linux s25sentinel]# redis-server s25-redis-6379.conf
[root@s25linux s25sentinel]# redis-server s25-redis-6380.conf
[root@s25linux s25sentinel]# redis-server s25-redis-6381.conf
[root@s25linux s25sentinel]# ps -ef|grep redis
root      20413      1  0 08:45 ?        00:00:00 redis-server *:6379
root      20417      1  0 08:45 ?        00:00:00 redis-server *:6380
root      20422      1  0 08:45 ?        00:00:00 redis-server *:6381
确定3个库的主从关系
[root@s25linux s25sentinel]# redis-cli -p 6379 info  replication
# Replication
role:master
connected_slaves:2
slave0:ip=127.0.0.1,port=6380,state=online,offset=183,lag=1
slave1:ip=127.0.0.1,port=6381,state=online,offset=183,lag=1
分别准备3个哨兵的配置文件,修改如下,三个哨兵的配置文件,仅仅是端口号的不同
# vim s25-sentinel-26379.conf
port 26379
dir /var/redis/data/
logfile "26379.log"
// 当前Sentinel节点监控 192.168.119.10:6379 这个主节点
// 2代表判断主节点失败至少需要2个Sentinel节点节点同意
// mymaster是主节点的别名
sentinel monitor mymaster 127.0.0.1 6379 2
// 每个Sentinel节点都要定期PING命令来判断Redis数据节点和其余Sentinel节点是否可达,
// 如果超过30000毫秒30s且没有回复,则判定不可达
sentinel down-after-milliseconds s25msredis 30000
// 当Sentinel节点集合对主节点故障判定达成一致时,Sentinel领导者节点会做故障转移操作,选出新的主节点,
// 原来的从节点会向新的主节点发起复制操作,限制每次向新的主节点发起复制操作的从节点个数为1
sentinel parallel-syncs mymaster 1
//故障转移超时时间为180000毫秒
sentinel failover-timeout mymaster 180000
daemonize yes

# ========================================================================
# vim s25-sentinel-26380.conf
port 26380
dir /var/redis/data/
logfile "26380.log"
sentinel monitor mymaster 127.0.0.1 6379 2
sentinel down-after-milliseconds mymaster 30000
sentinel parallel-syncs mymaster 1
sentinel failover-timeout mymaster 180000
daemonize yes

# ========================================================================
# s25-sentinel-26381.conf
port 26381
dir /var/redis/data/
logfile "26381.log"
sentinel monitor mymaster 127.0.0.1 6379 2
sentinel down-after-milliseconds mymaster 30000
sentinel parallel-syncs mymaster 1
sentinel failover-timeout mymaster 180000
daemonize yes
分别启动3个哨兵进程,以及查看进程信息
# 1.启动哨兵进程
[root@s25linux s25sentinel]# redis-sentinel s25-sentinel-26379.conf
[root@s25linux s25sentinel]# redis-sentinel s25-sentinel-26380.conf
[root@s25linux s25sentinel]# redis-sentinel s25-sentinel-26381.conf

# 2.查看进程信息
[root@s25linux s25sentinel]# ps -ef|grep redis
root      20413      1  0 08:45 ?        00:00:00 redis-server *:6379
root      20417      1  0 08:45 ?        00:00:00 redis-server *:6380
root      20422      1  0 08:45 ?        00:00:00 redis-server *:6381
root      20614      1  0 08:55 ?        00:00:00 redis-sentinel *:26379 [sentinel]
root      20618      1  0 08:55 ?        00:00:00 redis-sentinel *:26380 [sentinel]
root      20622      1  0 08:55 ?        00:00:00 redis-sentinel *:26381 [sentinel]
可以检查哨兵的配置文件,以及哨兵的状态
[root@s25linux s25sentinel]# redis-cli -p 26379 info sentinel
# Sentinel
sentinel_masters:1
sentinel_tilt:0
sentinel_running_scripts:0
sentinel_scripts_queue_length:0
sentinel_simulate_failure_flags:0
master0:name=s25msredis,status=ok,address=127.0.0.1:6379,slaves=2,sentinels=3
在哨兵搭建好了之后,模拟干掉主库,然后等待主从的一个自动化切换
检查6379的进程,杀死后,哨兵能够自动的,进行投票选举,
剩下来的一个slave为新的master,然后重新分配主从关系
故障的修复,修复6379这个redis数据库,且检查它的一个复制关系
6379数据库会重新假如到主从复制,且变为一个新的从库
如果你想恢复他们的主从关系,全部kill掉,重新启动,默认就会以配置文件分配主从关系了
准备好6匹马儿,也就是6个redis节点,也就是6个配置文件,redis集群节点最少是使用6个
这6个配置文件,仅仅是端口号的不同而已
根目录下创建 s25rediscluster 文件夹用于实验
mkdir /s25rediscluster
s25-redis-7000.conf
port 7000
daemonize yes
dir "/opt/redis/data"
logfile "7000.log"
dbfilename "dump-7000.rdb"
cluster-enabled yes   #开启集群模式
cluster-config-file nodes-7000.conf  #集群内部的配置文件
# redis cluster需要16384个slot都正常的时候才能对外提供服务,
# 换句话说,只要任何一个slot异常那么整个cluster不对外提供服务。 因此生产环境一般为no
cluster-require-full-coverage no
使用sed命令快捷生成其他的配置文件
# s25-redis-7001.conf
# s25-redis-7002.conf
# s25-redis-7003.conf
# s25-redis-7004.conf
# s25-redis-7005.conf

# 使用以下命令快捷创建
sed 's/7000/7001/g' s25-redis-7000.conf > s25-redis-7001.conf
sed 's/7000/7002/g' s25-redis-7000.conf > s25-redis-7002.conf
sed 's/7000/7003/g' s25-redis-7000.conf > s25-redis-7003.conf
sed 's/7000/7004/g' s25-redis-7000.conf > s25-redis-7004.conf
sed 's/7000/7005/g' s25-redis-7000.conf > s25-redis-7005.conf
创建数据文件夹
mkdir -p "/opt/redis/data"
分别启动6个redis节点,且检查进程
redis-server s25-redis-7000.conf
redis-server s25-redis-7001.conf
redis-server s25-redis-7002.conf
redis-server s25-redis-7003.conf
redis-server s25-redis-7004.conf
redis-server s25-redis-7005.conf
此时是不能写入数据的
# 此时你尝试着写入数据,看一看是否能写进去,不能写入数据,还没有分配虚拟槽# 我们仅仅是启动了6个redis节点,准备好了6匹马儿,马儿身上的筐还没分配,你想
直接yum安装ruby解释器ruby和python一样是一个解释性编程语言,日本大神开发的
# gem是ruby的包管理工具
# ruby ===== python
# gem  ===== pip3
# 方法1:yum安装:
yum install ruby -y

# 方法2:编译安装的话使用:
wget  ....
tar   ....
./configure --prefix=/opt/ruby/
make && make install
检查ruby和gem的环境
[root@s25linux s25rediscluster]# ruby -v
ruby 2.0.0p648 (2015-12-16) [x86_64-linux]

[root@s25linux s25rediscluster]# gem -v
2.0.14.1
下载ruby操作redis的模块,用于创建集群
wget http://rubygems.org/downloads/redis-3.3.0.gem
用gem安装此模块,ruby就可以操作redis数据库了
gem install -l redis-3.3.0.gem
#就如同python的 pip3 install xxxx,不难理解

#可以查看gem有哪些包
gem list -- check redis gem
搜索ruby创建redis集群的脚本,然后将其加入到环境变量中
# redis-trib.rb 如何知道它的绝对路径?
# which 是搜索PATH环境变量中的命令的绝对路径!
# find 才是搜索系统上的文件路径!!
find / -name "redis-trib.rb"
#默认会在redis数据库的编译安装路径下

# 将创建集群的脚本加入到环境变量,比方说你的脚本位置在 /opt/redis/src/redis-trib.rb,然后将其复制到任一环境变量中。
cp /opt/redis/src/redis-trib.rb /usr/local/bin/
一键创建集群,且自动分配槽位,可以写入数据了。集群会自动分配主从关系。
# 每个主节点,有一个从节点,代表--replicas 1
redis-trib.rb create --replicas 1 127.0.0.1:7000 127.0.0.1:7001 127.0.0.1:7002 127.0.0.1:7003 127.0.0.1:7004 127.0.0.1:7005
此时可以查看及检查下集群的状态
查看状态
redis-cli -p 7000 cluster info

redis-cli -p 7000 cluster nodes  #等同于查看nodes-7000.conf文件节点信息

# 集群主节点状态
redis-cli -p 7000 cluster nodes | grep master
# 集群从节点状态
redis-cli -p 7000 cluster nodes | grep slave
检查状态
[root@yugo /opt/redis/src 18:42:14]#redis-cli -p 7000 cluster info
cluster_state:ok
cluster_slots_assigned:16384
cluster_slots_ok:16384
cluster_slots_pfail:0
cluster_slots_fail:0
cluster_known_nodes:6
cluster_size:3
cluster_current_epoch:6
cluster_my_epoch:1
cluster_stats_messages_ping_sent:10468
cluster_stats_messages_pong_sent:10558
cluster_stats_messages_sent:21026
cluster_stats_messages_ping_received:10553
cluster_stats_messages_pong_received:10468
cluster_stats_messages_meet_received:5
cluster_stats_messages_received:21026
进入集群写入数据,查看数据重定向
# 测试写入集群数据,登录集群必须使用redis-cli -c -p 7000必须加上-c参数
redis-cli -c -p 7000

127.0.0.1:7000> set name chao
-> Redirected to slot [5798] located at 127.0.0.1:7001
OK
127.0.0.1:7001> exit
[root@yugo /opt/redis/src 18:46:07]#redis-cli -c -p 7000
127.0.0.1:7000> ping
PONG
127.0.0.1:7000> keys *
(empty list or set)
127.0.0.1:7000> get name
-> Redirected to slot [5798] located at 127.0.0.1:7001
"chao"
工作原理:
redis客户端任意访问一个redis实例,如果数据不在该实例中,通过重定向引导客户端访问所需要的redis实例
以上内容大部分来源于路飞学城于超老师博客,个人做了精简与完善,如有侵权请联系。
推荐学习:Redis视频教程
The above is the detailed content of Basic detailed explanation of the use of Redis. For more information, please follow other related articles on the PHP Chinese website!
 Commonly used database software
 What are the in-memory databases?
 Which one has faster reading speed, mongodb or redis?
 How to use redis as a cache server
 How redis solves data consistency
 How do mysql and redis ensure double-write consistency?
 What data does redis cache generally store?
 What are the 8 data types of redis


![[Web front-end] Node.js quick start](https://img.php.cn/upload/course/000/000/067/662b5d34ba7c0227.png)


