

This article brings you relevant knowledge about Redis, which mainly introduces the bitmap problem. Redis provides us with the bitmap data structure. The bitmap data structure is not actually a A brand new thing, we can simply think of it as an array, but the content inside can only be 0 or 1. I hope it will be helpful to everyone.

Recommended learning: Redis video tutorial
What if we need to record whether a user logs into our system every day for a year? If KV storage is used, each user needs to record 365 records. When the number of users reaches hundreds of millions, the storage space required is staggering.
Redis provides us with the bitmap data structure. Each user's daily login record only occupies one bit. 365 days equals 365 bits. It only requires 46 bytes to store, which greatly improves the data structure. Saves storage space.

The bitmap data structure is actually not a brand new thing. We can simply think of it as an array, but the content inside is only It can only be 0 or 1 (binary bit array).
Redis provides SETBIT, GETBIT, BITCOUNT,BITOPFour common commands are used to process binary bit arrays.
SETBIT: Specify the binary bit setting value at the offset of the bit array. The offset starts counting from 0, and the value of the binary bit can only be 0. or 1. Returns the original position value.GETBIT: Get the value of the binary bit at the specified offset.BITCOUNT: Counts the number of binary bits with a value of 1 in the bit array.BITOP: Perform bitwise AND, OR, and XOR operations on multiple bit arrays.
127.0.0.1:6379> SETBIT first 0 1    # 0000 0001
(integer) 0
127.0.0.1:6379> SETBIT first 3 1    # 0000 1001
(integer) 0
127.0.0.1:6379> SETBIT first 0 0    # 0000 1000
(integer) 1

127.0.0.1:6379> GETBIT first 0
(integer) 0
127.0.0.1:6379> GETBIT first 3
(integer) 1

127.0.0.1:6379> BITCOUNT first      # 0000 1000
(integer) 1
127.0.0.1:6379> SETBIT first 0 1    # 0000 1001
(integer) 0
127.0.0.1:6379> BITCOUNT first      # 0000 1001
(integer) 2
127.0.0.1:6379> SETBIT first 1 1    # 0000 1011
(integer) 0
127.0.0.1:6379> BITCOUNT first      # 0000 1011
(integer) 3

127.0.0.1:6379> SETBIT x 3 1
(integer) 0
127.0.0.1:6379> SETBIT x 1 1
(integer) 0
127.0.0.1:6379> SETBIT x 0 1        # 0000 1011
(integer) 0
127.0.0.1:6379> SETBIT y 2 1
(integer) 0
127.0.0.1:6379> SETBIT y 1 1        # 0000 0110
(integer) 0
127.0.0.1:6379> SETBIT z 2 1
(integer) 0
127.0.0.1:6379> SETBIT z 0 1        # 0000 0101
(integer) 0

127.0.0.1:6379> BITOP AND andRes x y z    #0000 0000
(integer) 1
127.0.0.1:6379> BITOP OR orRes x y z      #0000 1111
(integer) 1
127.0.0.1:6379> BITOP XOR x y z           #0000 1000
(integer) 1

# 对给定的位数组进行按位取反
127.0.0.1:6379> SETBIT value 0 1
(integer) 0
127.0.0.1:6379> SETBIT value 3 1            #0000 1001
(integer) 0
127.0.0.1:6379> BITOP NOT notValue value    #1111 0110
(integer) 1
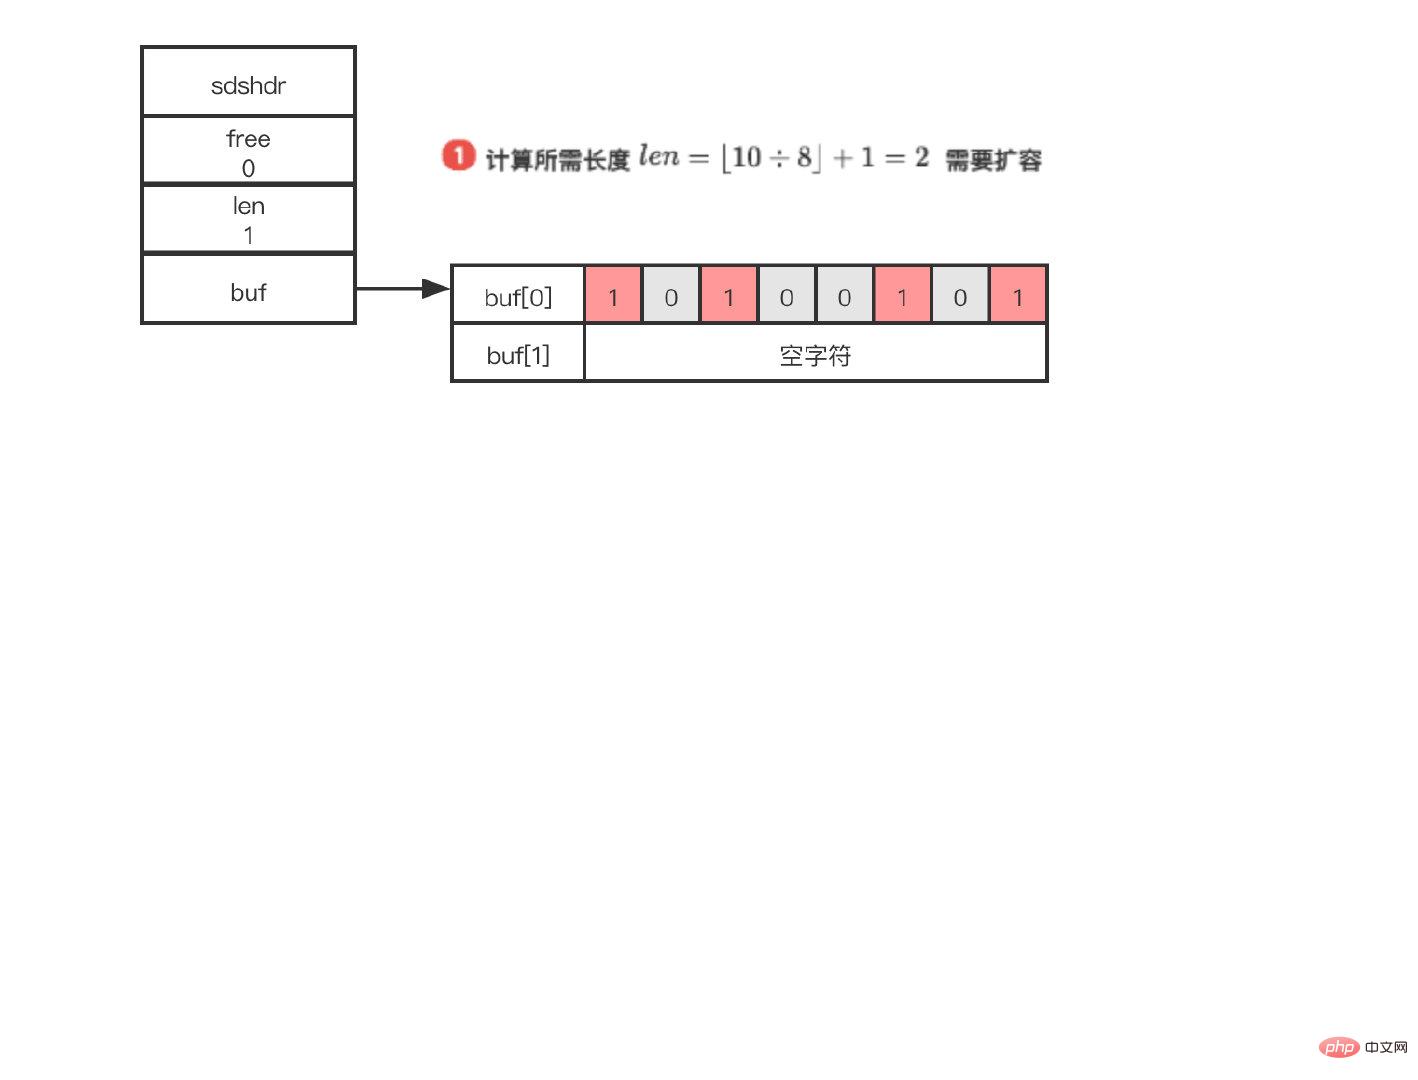
The following shows a one-byte (8-bit) length represented by SDS Bitmap:
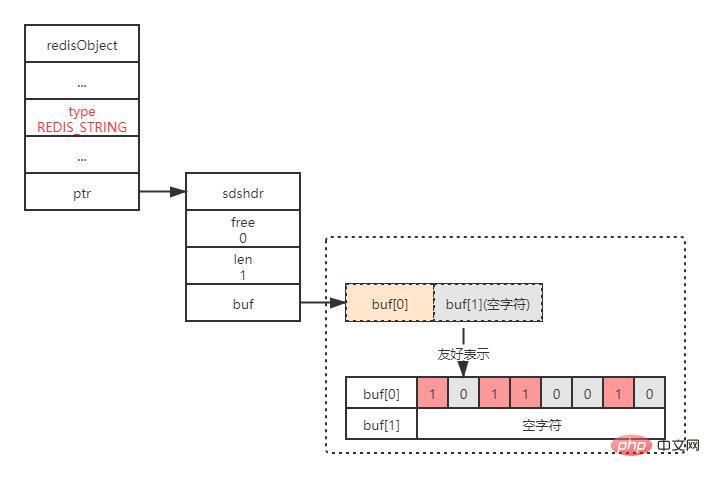
Extension: Each object in Redis is represented by a redisObject structure. The value of
typedef struct redisObject {
// 类型
unsigned type:4;
// 编码
unsigned encoding:4;
unsigned lru:REDIS_LRU_BITS; /* lru time (relative to server.lruclock) */
// 引用计数
int refcount;
// 执行底层实现的数据结构的指针
void *ptr;
} robj;
Copy after login
type is REDIS_STRING indicating that this is a string objectsdshdr The value of .len is 1, indicating that this SDS saves a 1-byte bit arraybuf[0] in the buf array actually saves the bit array in the buf array is the automatically appended \0 character In order to facilitate our observation, the buf array Each byte is represented by a line, buf[i] means that this is the i-th byte of the buf array, and the 8 grids after buf[i] represent the 8 bits on this byte.
To gather everyone's thoughts again, another bit array is shown as follows:
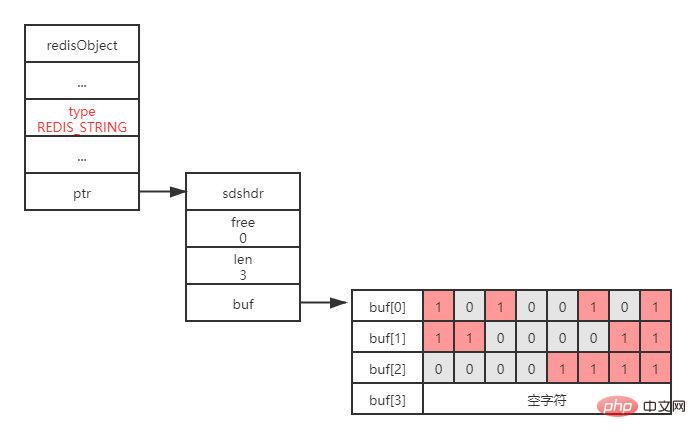
##3.2 GETBITThe bit array is composed of buf[ 0], buf[1] and buf[2] are stored in three bytes. The real data is
1111 0000 1100 0011 1010 0101
GETBIT is used to return the binary bit value of the bit array at the offset. It is worth noting that the time complexity of GETBIT is O(1).
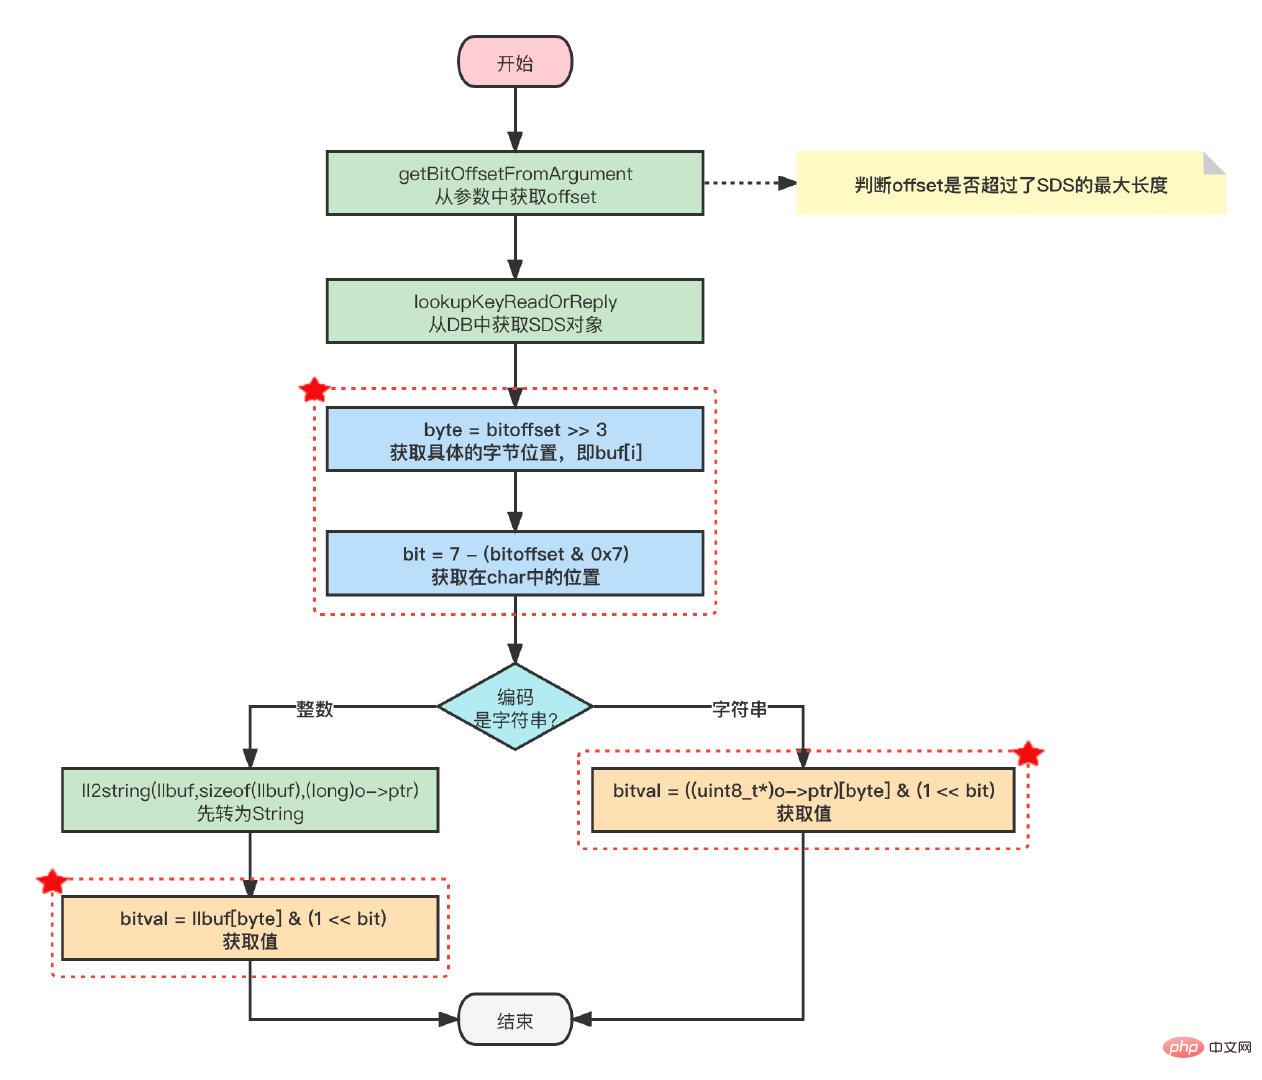
GETBITThe execution process of the command is as follows:
>>3), the byte value represents the specified
o
f
f
s
e
t
Offset
offse Which byte of the bit array t is located in (calculated at which row); GETBIT命令源码如下所示:
void getbitCommand(client *c) {
    robj *o;
    char llbuf[32];
    uint64_t bitoffset;
    size_t byte, bit;
    size_t bitval = 0;
    // 获取offset
    if (getBitOffsetFromArgument(c,c->argv[2],&bitoffset,0,0) != C_OK)
        return;
    // 查找对应的位图对象
    if ((o = lookupKeyReadOrReply(c,c->argv[1],shared.czero)) == NULL ||
        checkType(c,o,OBJ_STRING)) return;
		// 计算offset位于位数组的哪一行
    byte = bitoffset >> 3;
    // 计算offset在一行中的第几位,等同于取模
    bit = 7 - (bitoffset & 0x7);
    // #define sdsEncodedObject(objptr) (objptr->encoding == OBJ_ENCODING_RAW || objptr->encoding == OBJ_ENCODING_EMBSTR)
    if (sdsEncodedObject(o)) {
        // SDS 是RAW 或者 EMBSTR类型
        if (byte < sdslen(o->ptr))
            // 获取指定位置的值
            // 注意它不是真正的一个二维数组不能用((uint8_t*)o->ptr)[byte][bit]去获取呀~
            bitval = ((uint8_t*)o->ptr)[byte] & (1 << bit);
    } else {
        //  SDS 是 REDIS_ENCODING_INT 类型的整数,先转为String
        if (byte < (size_t)ll2string(llbuf,sizeof(llbuf),(long)o->ptr))
            bitval = llbuf[byte] & (1 << bit);
    }

    addReply(c, bitval ? shared.cone : shared.czero);
}
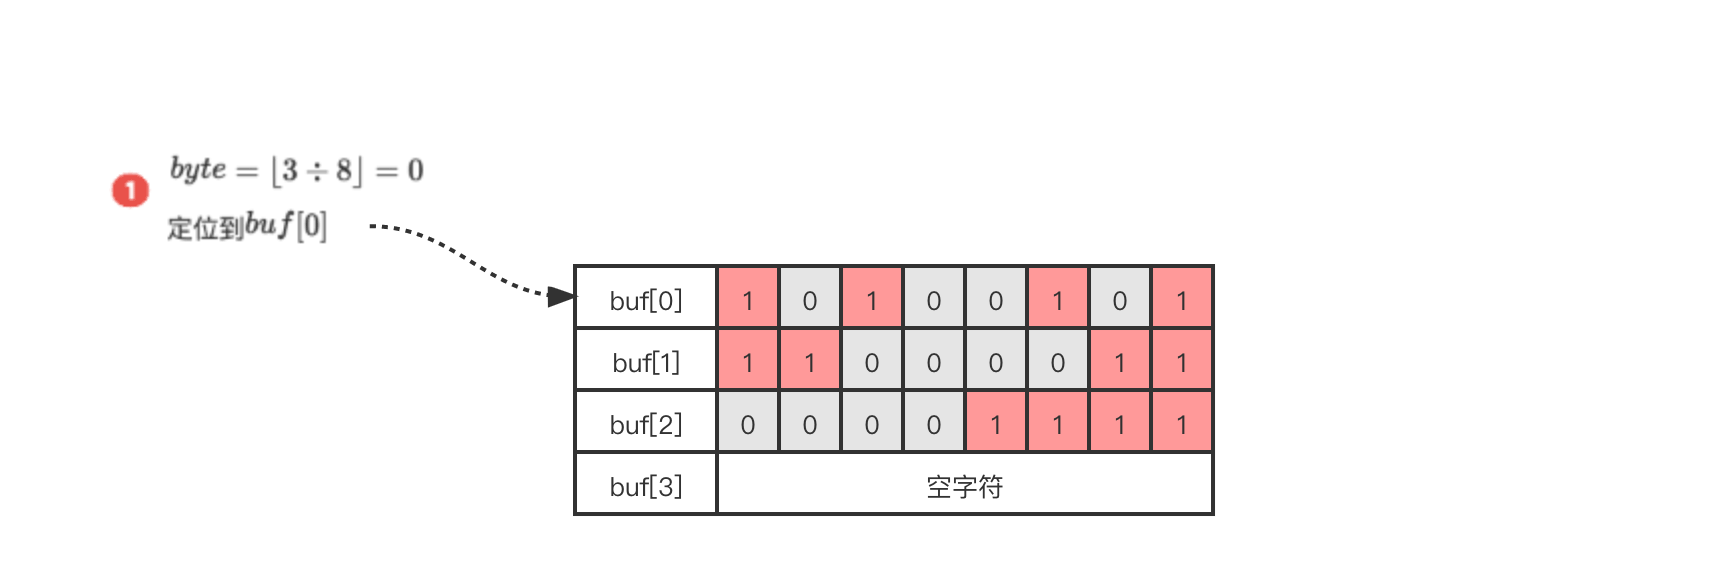
以GETBIT array 3为例,array表示上图中三个字节的位数组。
1. $byte = \lfloor 3 \p8 \rfloor$ 得到值为0,说明在 $buf[0]$ 上
2. $bit = (3\ mod\ 8 ) + 1$得到值为4
3. 定位到 $buf[0]$ 字节的从左至右第4个位置上
因为 GETBIT 命令执行的所有操作都可以在常数时间内完成,所以该命令的算法复杂度为O(1)。
SETBIT用于将位数组在偏移量的二进制位的值设为value,并向客户端返回旧值。
SITBIT命令的执行过程如下:
因为SETBIT命令执行的所有操作都可以在常数时间内完成,所以该命令的算法复杂度为O(1)。
SETBIT命令源码如下所示:
void setbitCommand(client *c) {
    robj *o;
    char *err = "bit is not an integer or out of range";
    uint64_t bitoffset;
    ssize_t byte, bit;
    int byteval, bitval;
    long on;
    // 获取offset
    if (getBitOffsetFromArgument(c,c->argv[2],&bitoffset,0,0) != C_OK)
        return;
    // 获取我们需要设置的值
    if (getLongFromObjectOrReply(c,c->argv[3],&on,err) != C_OK)
        return;

    /* 判断指定值是否为0或1 */
    if (on & ~1) {
        // 设置了0和1之外的值,直接报错
        addReplyError(c,err);
        return;
    }
    // 根据key查询SDS对象(会自动扩容)
    if ((o = lookupStringForBitCommand(c,bitoffset)) == NULL) return;

    /* 获得当前值 */
    byte = bitoffset >> 3;
    byteval = ((uint8_t*)o->ptr)[byte];
    bit = 7 - (bitoffset & 0x7);
    bitval = byteval & (1 << bit);

    /* 更新值并返回旧值 */
    byteval &= ~(1 << bit);
    byteval |= ((on & 0x1) << bit);
    ((uint8_t*)o->ptr)[byte] = byteval;
    // 发送数据修改通知
    signalModifiedKey(c,c->db,c->argv[1]);
    notifyKeyspaceEvent(NOTIFY_STRING,"setbit",c->argv[1],c->db->id);
    server.dirty++;
    addReply(c, bitval ? shared.cone : shared.czero);
}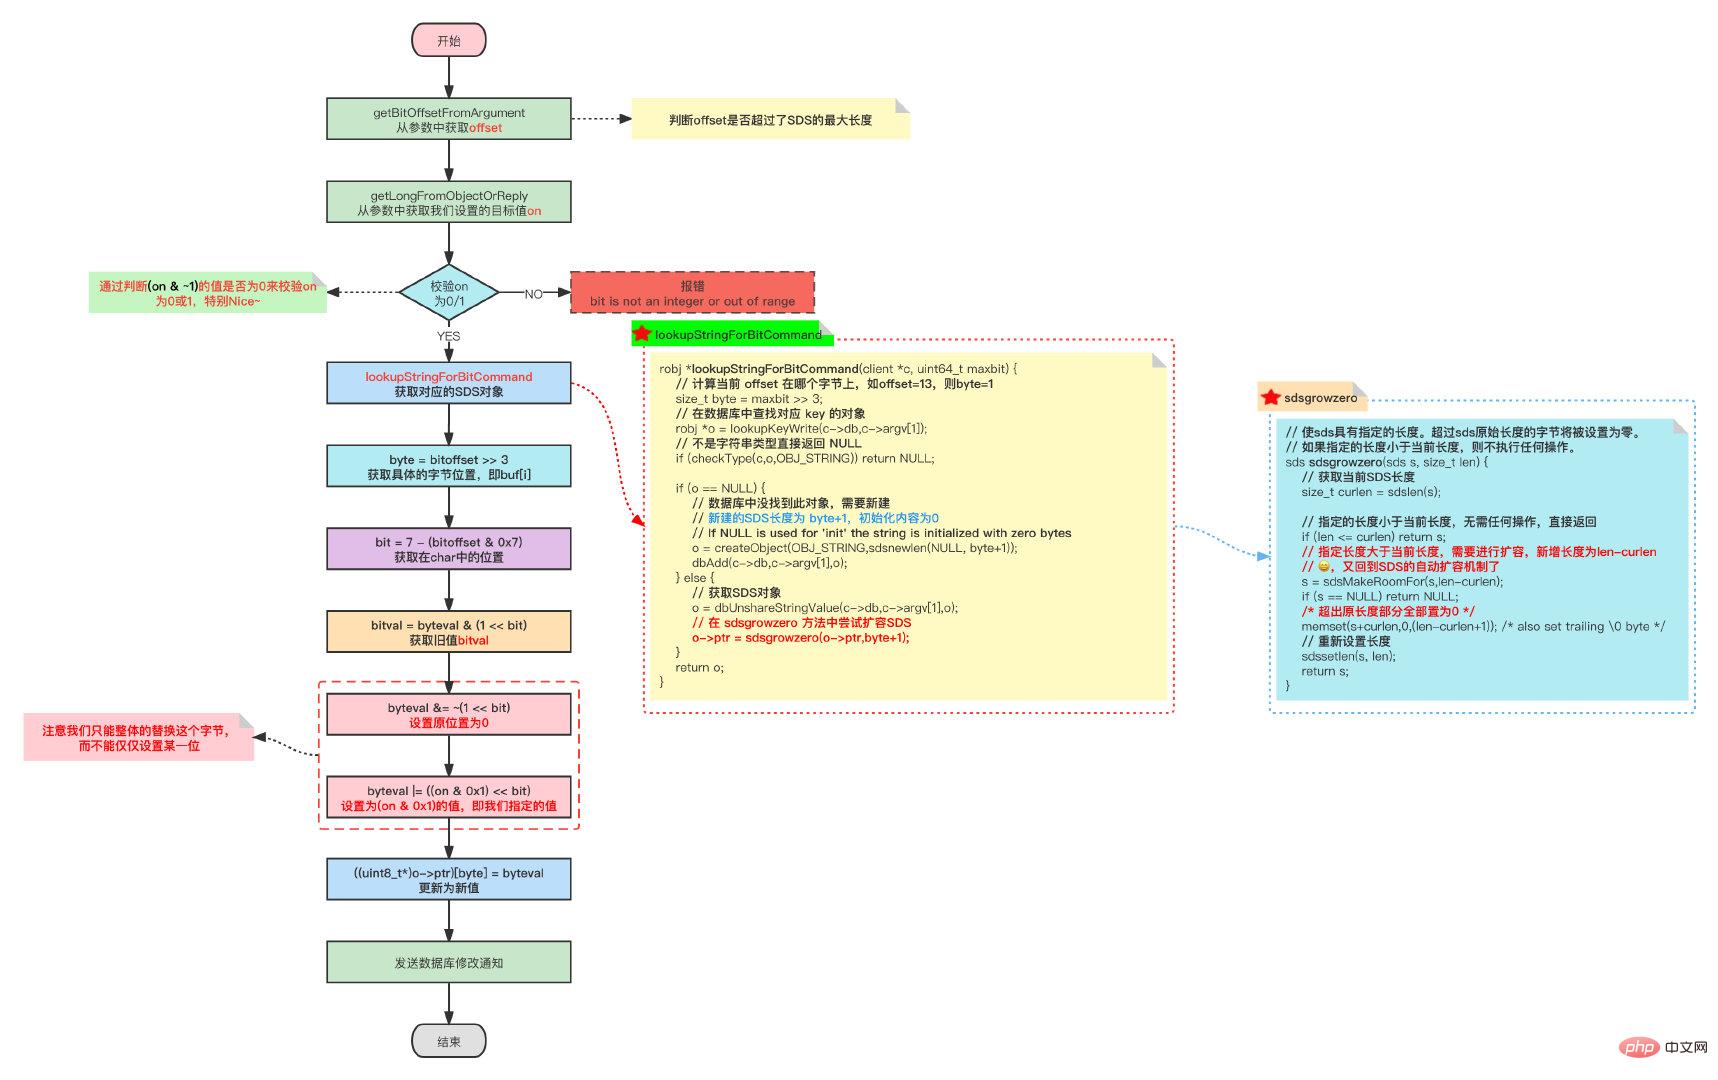
array represents the three-byte array in the above figure. Take SETBIT array 10 1 as an example:
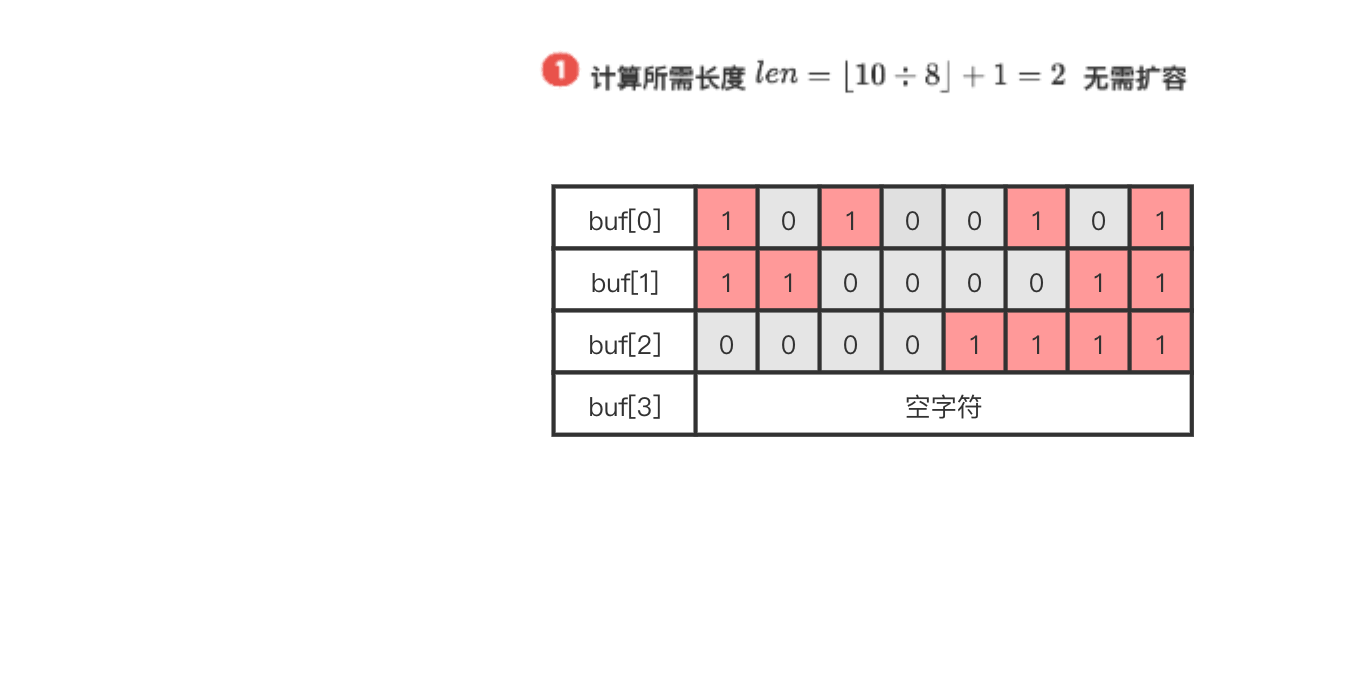
SETBIT array 12 1, execute as follows:
BITCOUNT command is used to count the number of binary bits with a value of 1 in a given bit array. The function does not seem complicated, but in fact it is not easy to implement this command efficiently and requires the use of some sophisticated algorithms.
3.4.1 Violent traversalThe simplest and most direct way to implement theCounting the number of non-zero binary bits in a bit array is mathematically called "calculating the Hamming weight".
BITCOUNT command is to traverse each binary bit in the bit array, and Increment the counter by 1 when a binary bit with a value of 1 is encountered.
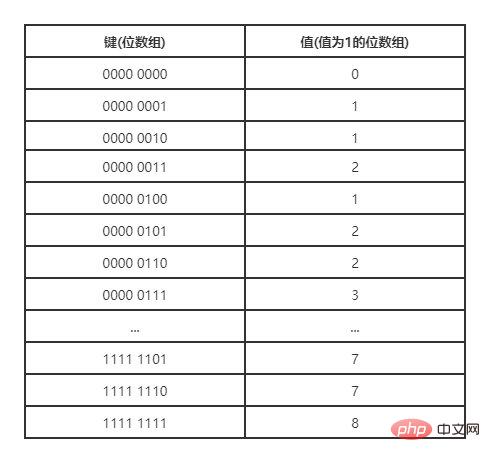
3.4.2 Look-up table methodFor a For a finite set, the arrangement of the set elements is limited, and for a finite-length bit array, the binary bit arrangements it can represent are also limited. Based on this principle, we can create a table, the key of the table is a certain arrangement of bit arrays, and the value of the table is the number of binary bits with a value of 1 in the corresponding bit array. For an 8-bit long bit array, we can create the following table. Through this table, we can read 8 bits from the bit array at a time, and then look up the table based on the value of these 8 bits to know directly How many 1's does this value contain?Small data volume is okay, large data volume is directly PASS!
Unfortunately, the table lookup method consumes memory!
目前已知效率最好的通用算法为variable-precision SWAR算法,该算法通过一系列位移和位运算操作,可以在常数时间(这就很牛逼了)内计算多个字节的汉明重量,并且不需要使用任何额外的内存。
SWAR算法代码如下所示:
uint32_t swar(uint32_t i) {
    // 5的二进制:0101
    i = (i & 0x55555555) + ((i >> 1) & 0x55555555);
    // 3的二进制:0011
    i = (i & 0x33333333) + ((i >> 2) & 0x33333333);
    i = (i & 0x0F0F0F0F) + ((i >> 4) & 0x0F0F0F0F);
    i = (i*(0x01010101) >> 24);
    return i;

    i = i - ((i >> 1) & 0x55555555);
    i = (i & 0x33333333) + ((i >> 2) & 0x33333333);
    return (((i + (i >> 4)) & 0x0F0F0F0F) * 0x01010101) >> 24;
}下面描述一下这几步都干了啥:
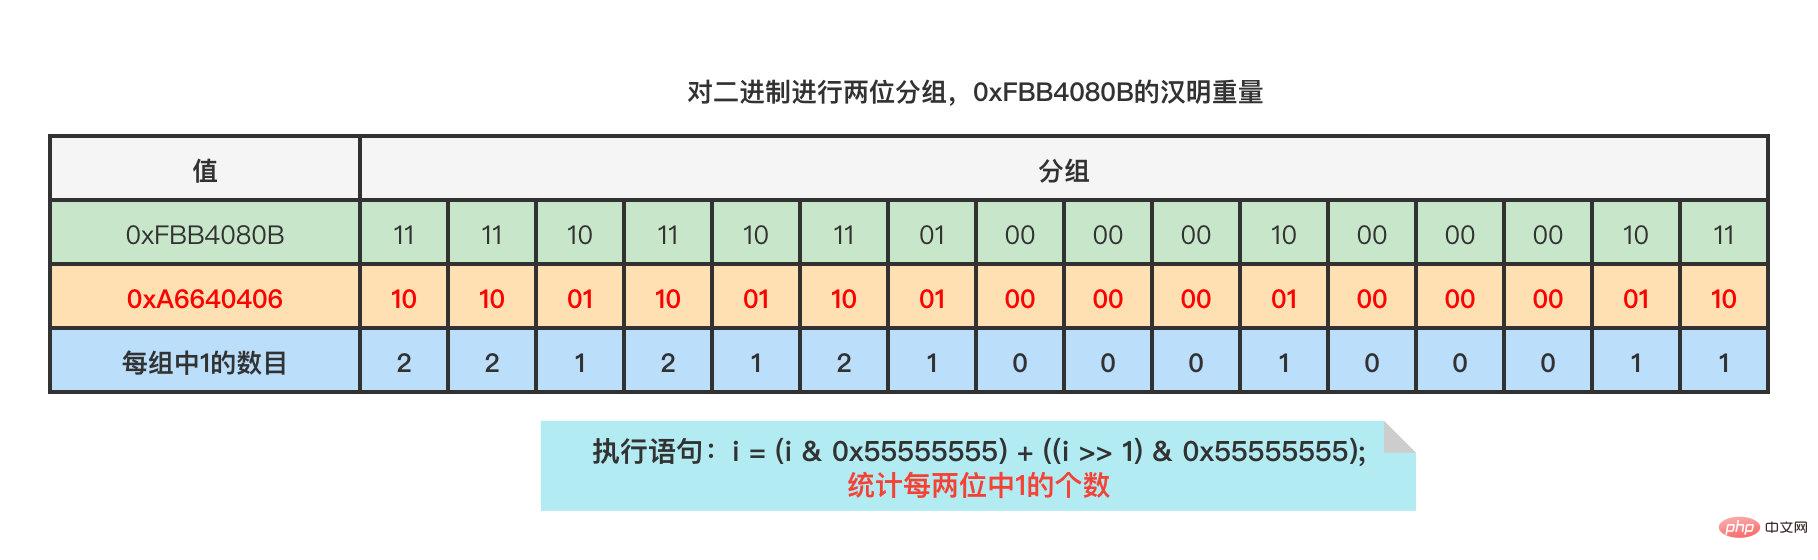
- 步骤一计算出的值i的二进制表示可以按每两个二进制位为一组进行分组,各组的十进制表示就是该组的1的数量;
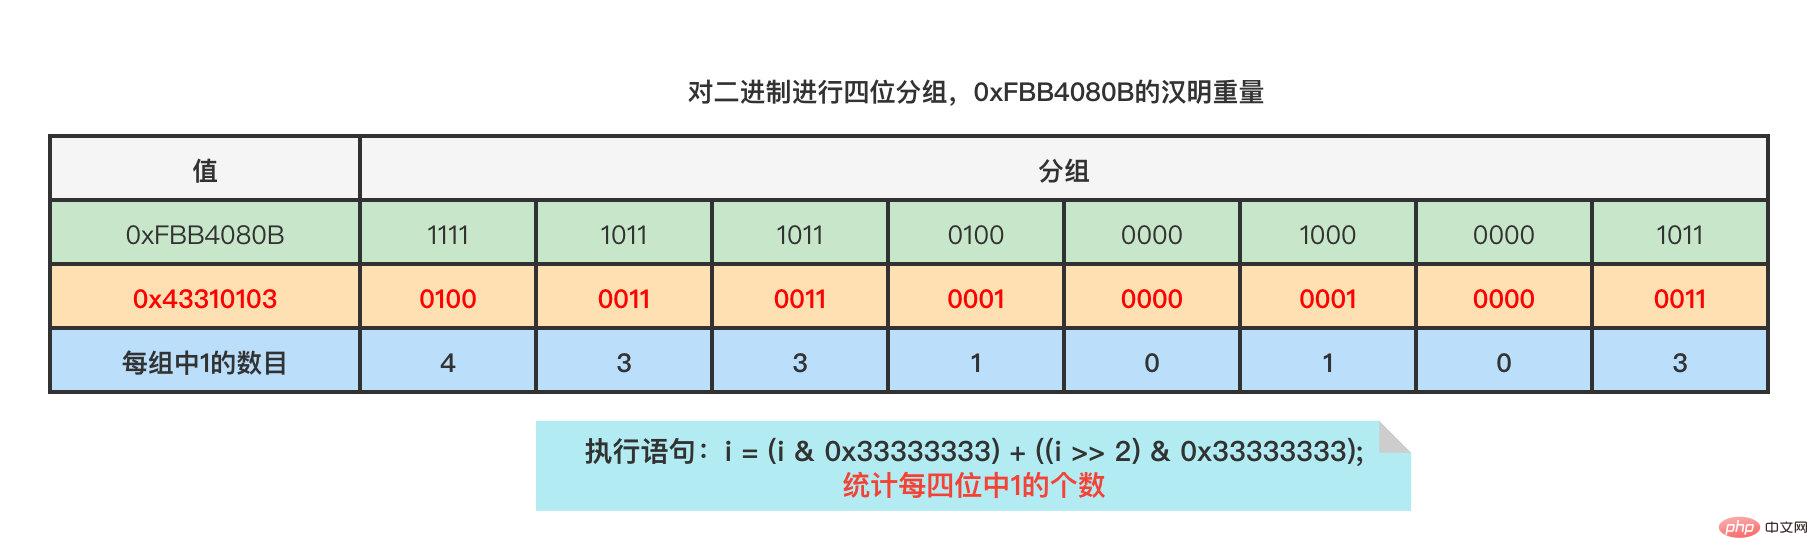
- 步骤二计算出的值i的二进制表示可以按每四个二进制位为一组进行分组,各组的十进制表示就是该组的1的数量;
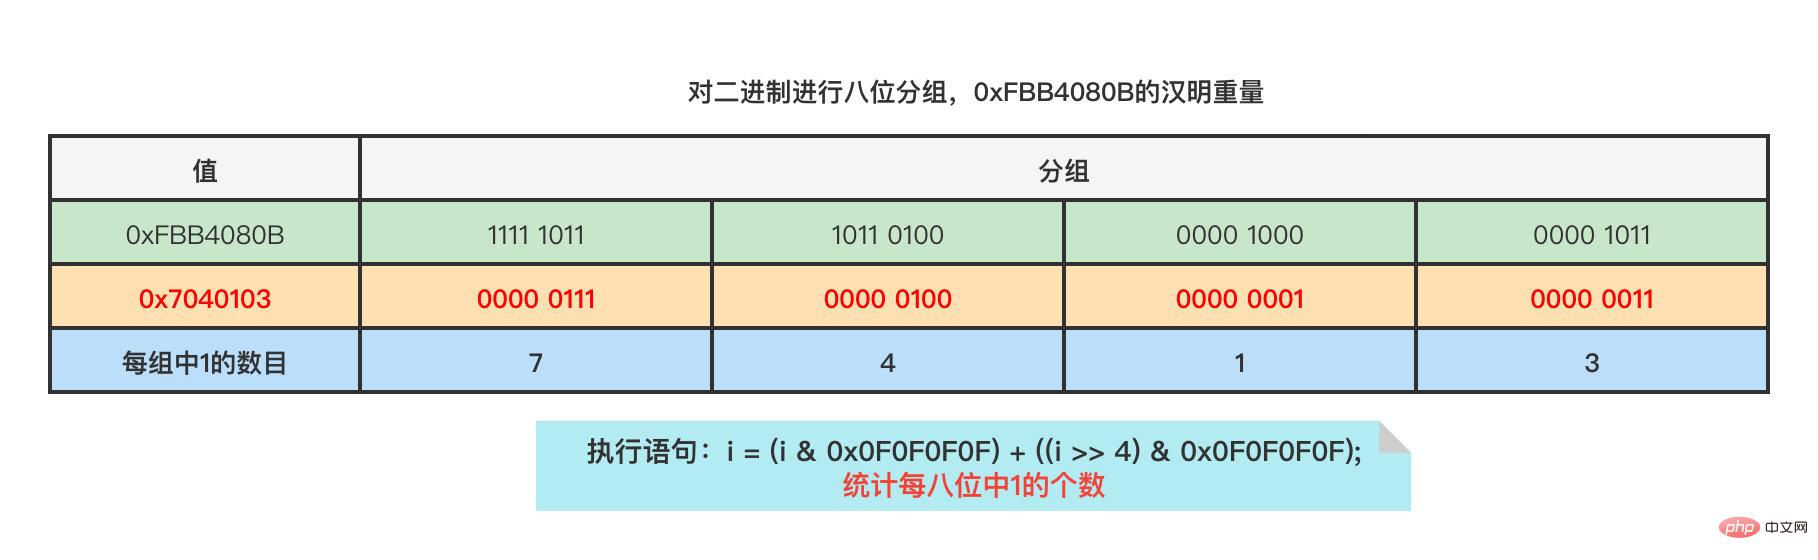
- 步骤三计算出的值i的二进制表示可以按每八个二进制位为一组进行分组,各组的十进制表示就是该组的1的数量;
- 步骤四的
i*0x01010101语句计算出bitarray中1的数量并记录在二进制位的最高八位,而>>24语句则通过右移运算,将bitarray的汉明重量移动到最低八位,得出的结果就是bitarray的汉明重量。
对于调用swar(0xFBB4080B),步骤一将计算出值0xA6640406,这个值表的每两个二进制位的十进制表示记录了0xFBB4080B每两个二进制位的汉明重量。
步骤二将计算出值0x43310103,这个值表的每四个二进制位的十进制表示记录了0xFBB4080B每四个二进制位的汉明重量。
步骤三将计算出值0x7040103,这个值表的每八个二进制位的十进制表示记录了0xFBB4080B每八个二进制位的汉明重量。
步骤四首先计算0x7040103 * 0x01010101 = 0xF080403,将汉明重量聚集到二进制位的最高八位。

之后计算0xF080403 >> 24,将汉明重量移动到低八位,得到最终值0x1111,即十进制15。
如果您是Java程序员,可以去看看Integer.bitCount方法,也是基于SWAR算法的思想哦!
大家也可以看看StackFlow上大神对它的讲解:[How does this algorithm to count the number of set bits in a 32-bit integer work?](https://stackoverflow.com/questions/22081738/how-does-this-algorithm-to-count-the-number-of-set-bits-in-a-32-bit-integer-work)3.4.4 源码分析
Redis 中通过调用redisPopcount方法统计汉明重量,源码如下所示:
long long redisPopcount(void *s, long count) {
    long long bits = 0;
    unsigned char *p = s;
    uint32_t *p4;
    // 为查表法准备的表
    static const unsigned char bitsinbyte[256] = {0,1,1,2,1,2,2,3,1,2,2,3,2,3,3,4,1,2,2,3,2,3,3,4,2,3,3,4,3,4,4,5,1,2,2,3,2,3,3,4,2,3,3,4,3,4,4,5,2,3,3,4,3,4,4,5,3,4,4,5,4,5,5,6,1,2,2,3,2,3,3,4,2,3,3,4,3,4,4,5,2,3,3,4,3,4,4,5,3,4,4,5,4,5,5,6,2,3,3,4,3,4,4,5,3,4,4,5,4,5,5,6,3,4,4,5,4,5,5,6,4,5,5,6,5,6,6,7,1,2,2,3,2,3,3,4,2,3,3,4,3,4,4,5,2,3,3,4,3,4,4,5,3,4,4,5,4,5,5,6,2,3,3,4,3,4,4,5,3,4,4,5,4,5,5,6,3,4,4,5,4,5,5,6,4,5,5,6,5,6,6,7,2,3,3,4,3,4,4,5,3,4,4,5,4,5,5,6,3,4,4,5,4,5,5,6,4,5,5,6,5,6,6,7,3,4,4,5,4,5,5,6,4,5,5,6,5,6,6,7,4,5,5,6,5,6,6,7,5,6,6,7,6,7,7,8};
    // CPU一次性读取8个字节,如果4字节跨了两个8字节,需要读取两次才行
    // 所以考虑4字节对齐,只需读取一次就可以读取完毕
    while((unsigned long)p & 3 && count) {
        bits += bitsinbyte[*p++];
        count--;
    }

    // 一次性处理28字节,单独看一个aux就容易理解了,其实就是SWAR算法
    // uint32_t:4字节
    p4 = (uint32_t*)p;
    while(count>=28) {
        uint32_t aux1, aux2, aux3, aux4, aux5, aux6, aux7;

        aux1 = *p4++;// 一次性读取4字节
        aux2 = *p4++;
        aux3 = *p4++;
        aux4 = *p4++;
        aux5 = *p4++;
        aux6 = *p4++;
        aux7 = *p4++;
        count -= 28;// 共处理了4*7=28个字节,所以count需要减去28

        aux1 = aux1 - ((aux1 >> 1) & 0x55555555);
        aux1 = (aux1 & 0x33333333) + ((aux1 >> 2) & 0x33333333);
        aux2 = aux2 - ((aux2 >> 1) & 0x55555555);
        aux2 = (aux2 & 0x33333333) + ((aux2 >> 2) & 0x33333333);
        aux3 = aux3 - ((aux3 >> 1) & 0x55555555);
        aux3 = (aux3 & 0x33333333) + ((aux3 >> 2) & 0x33333333);
        aux4 = aux4 - ((aux4 >> 1) & 0x55555555);
        aux4 = (aux4 & 0x33333333) + ((aux4 >> 2) & 0x33333333);
        aux5 = aux5 - ((aux5 >> 1) & 0x55555555);
        aux5 = (aux5 & 0x33333333) + ((aux5 >> 2) & 0x33333333);
        aux6 = aux6 - ((aux6 >> 1) & 0x55555555);
        aux6 = (aux6 & 0x33333333) + ((aux6 >> 2) & 0x33333333);
        aux7 = aux7 - ((aux7 >> 1) & 0x55555555);
        aux7 = (aux7 & 0x33333333) + ((aux7 >> 2) & 0x33333333);
        bits += ((((aux1 + (aux1 >> 4)) & 0x0F0F0F0F) +
                    ((aux2 + (aux2 >> 4)) & 0x0F0F0F0F) +
                    ((aux3 + (aux3 >> 4)) & 0x0F0F0F0F) +
                    ((aux4 + (aux4 >> 4)) & 0x0F0F0F0F) +
                    ((aux5 + (aux5 >> 4)) & 0x0F0F0F0F) +
                    ((aux6 + (aux6 >> 4)) & 0x0F0F0F0F) +
                    ((aux7 + (aux7 >> 4)) & 0x0F0F0F0F))* 0x01010101) >> 24;
    }
    /* 剩余的不足28字节,使用查表法统计 */
    p = (unsigned char*)p4;
    while(count--) bits += bitsinbyte[*p++];
    return bits;
}不难发现 Redis 中同时运用了查表法和SWAR算法完成BITCOUNT功能。
如果没有1GB的内存限制,我们可以使用排序和Set完成这个算法:
这样回答是要GG的节奏呀!
对40亿个QQ号进行排序需要多少时间?这个存储了40亿QQ号的数组容量已经超过1GB了,同理Set集合存储这么多的QQ号也导致内存超限了。
**这不巧了么~我们可以使用刚刚学的BITMAP来去重呀!**一个字节可以记录8个数是否存在(类似于计数排序),将QQ号对应的offset的值设置为1表示此数存在,遍历完40亿个QQ号后直接统计BITMAP上值为1的offset即可完成QQ号的去重。
如果是对40亿个QQ号进行排序也是可以用位图完成的哦~一样的思想
既然我们深入了解了BITMAP,那不进行个实战项目可说不过去呀!
我们使用
BITMAP实现GITHUB中统计每天提交次数的这个小功能,基于SpringBoot+Echarts实现
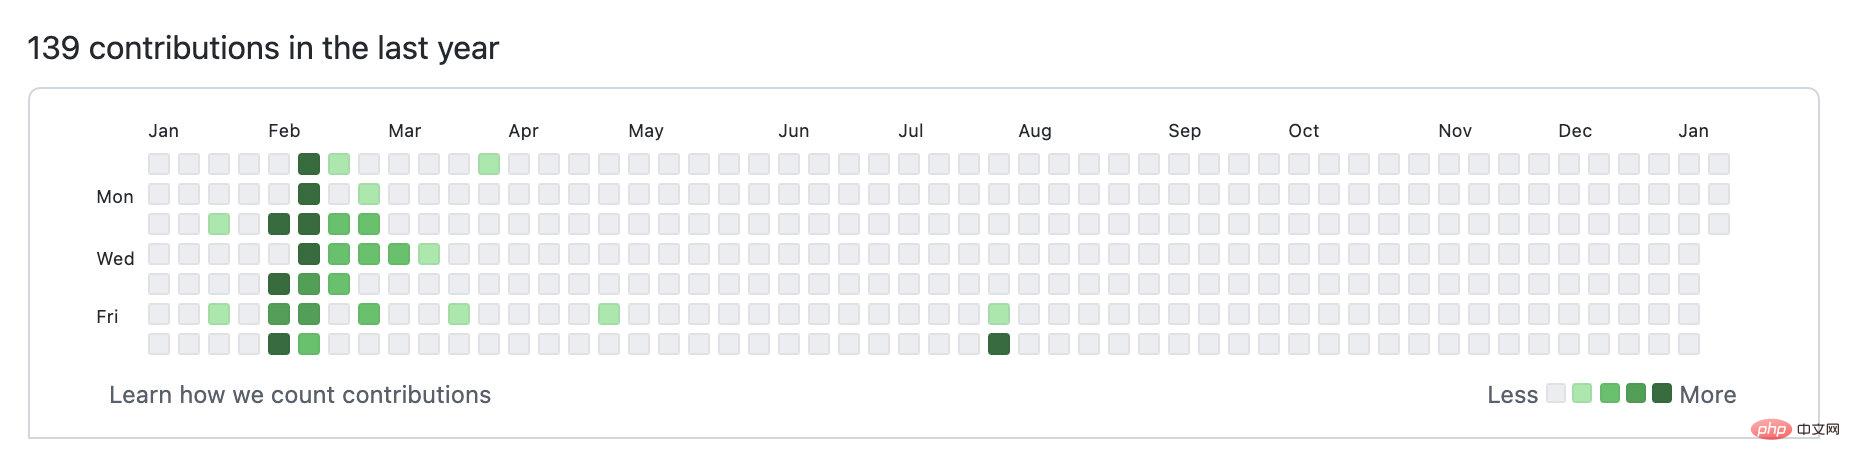
如果是记录登录状态我们可以很方便的使用0和1记录,如果是记录提交次数就显得BITMAP无用了,没关系,我们可以使用一个字节来记录提交次数,只是在业务上需要处理好十进制和二进制直接的转换而已。
public void genTestData() {
    if(redisUtils.isExist(CommonConstant.KEY)){
        return;
    }
    // 获取当前年的总天数
    int days = getDays();
    for (int i = 0; i < days; i++) {
        int random = ThreadLocalRandom.current().nextInt(64);
        // 生成随机数表示每天的PR次数
        String binaryString = Integer.toBinaryString(random);
        if (binaryString.length() < 8) {
            // 填充0
            if(binaryString.length() == 0){binaryString = "00000000";}
            else if(binaryString.length() == 1){binaryString = "0000000"+binaryString;}
            else if(binaryString.length() == 2){binaryString = "000000"+binaryString;}
            else if(binaryString.length() == 3){binaryString = "00000"+binaryString;}
            else if(binaryString.length() == 4){binaryString = "0000"+binaryString;}
            else if(binaryString.length() == 5){binaryString = "000"+binaryString;}
            else if(binaryString.length() == 6){binaryString = "00"+binaryString;}
            else if(binaryString.length() == 7){binaryString = "0"+binaryString;}
        }
        char[] chars = binaryString.toCharArray();
        for (int j = 0; j < chars.length; j++) {
            // 设置BitMap
            redisUtils.setBit(CommonConstant.KEY,i*8+j,chars[j]);
        }
    }}/**
 * 获取当前年的总天数
 * @return days 总天数
 */private int getDays(){
    Calendar calOne = Calendar.getInstance();
    int year = calOne.get(Calendar.YEAR);
    System.out.println(year);
    Calendar calTwo = new GregorianCalendar(year, 11, 31);
return calTwo.get(Calendar.DAY_OF_YEAR);}public List<String> getPushData() {
List<String> res = new ArrayList<>(366);
// 没有数据就先造数据
genTestData();
int days = getDays();
for(long i=0;i<days;i++){
StringBuilder sb = new StringBuilder();
for (int j = 0; j < 8; j++) {
String bit = redisUtils.getBit(CommonConstant.KEY, i * 8 + j);
sb.append(bit);
}
// 直接返回二进制串,前端转换为十进制
res.add(sb.toString());
}
return res;}这里觉得可以直接将所有的bit统统返回,在前端进行分割处理
<script type="text/javascript">
var chartDom = document.getElementById('main');
var myChart = echarts.init(chartDom);
var option;
function getVirtulData(year) {
var date = +echarts.number.parseDate(year + '-01-01');
var end = +echarts.number.parseDate(+year + 1 + '-01-01');
var dayTime = 3600 * 24 * 1000;
var data = [];
$.ajax({
"url":'http://localhost:8080/test/getPushData',
"async":false, // ajax同步获取
success:function (res){
for (let time = date,k=0; time < end && k < res.data.length; time += dayTime,k++) {
data.push([
echarts.format.formatTime('yyyy-MM-dd', time),
parseInt(res.data[k],2)//客户端完成进制转换,不放在服务端完成
]);
}
}
})
return data;
}
option = {
title: {
top: 30,
left: 'left',
text: 'BitMap Demo'
},
tooltip: {},
visualMap: {
min: 0,
max: 32,
type: 'piecewise',
orient: 'horizontal',
left: 'right',
top: 220,
pieces: [
{min: 0, max: 0,label:"less"},
{min: 1, max: 10,label:" "},
{min: 1, max: 20,label:" "},
{min: 21, max: 40,label:" "},
{min: 41, max: 64,label:"more"},
],
inRange: {
color: [ '#EAEDF0', '#9AE9A8', '#41C363', '#31A14E', '#206D38' ],//颜色设置
colorAlpha: 0.9,//透明度
}
},
calendar: {
top: 120,
left: 30,
right: 30,
cellSize: 13,
range: '2022',
splitLine: { show: false },//不展示边线
itemStyle: {
borderWidth: 0.5
},
yearLabel: { show: false }
},
series: {
type: 'heatmap',
coordinateSystem: 'calendar',
data: getVirtulData('2022')
}
};
option && myChart.setOption(option);</script>推荐学习:Redis视频教程
The above is the detailed content of Understand the bitmap of redis in one article. For more information, please follow other related articles on the PHP Chinese website!
 Commonly used database software
 What are the in-memory databases?
 Which one has faster reading speed, mongodb or redis?
 How to use redis as a cache server
 How redis solves data consistency
 How do mysql and redis ensure double-write consistency?
 What data does redis cache generally store?
 What are the 8 data types of redis


![[Web front-end] Node.js quick start](https://img.php.cn/upload/course/000/000/067/662b5d34ba7c0227.png)


