This article brings you relevant knowledge about redis, which mainly introduces issues related to cluster deployment, including master-slave architecture, sentry high-availability architecture, high-availability clusters, etc. I hope it will be helpful to everyone.

Recommended learning: Redis tutorial

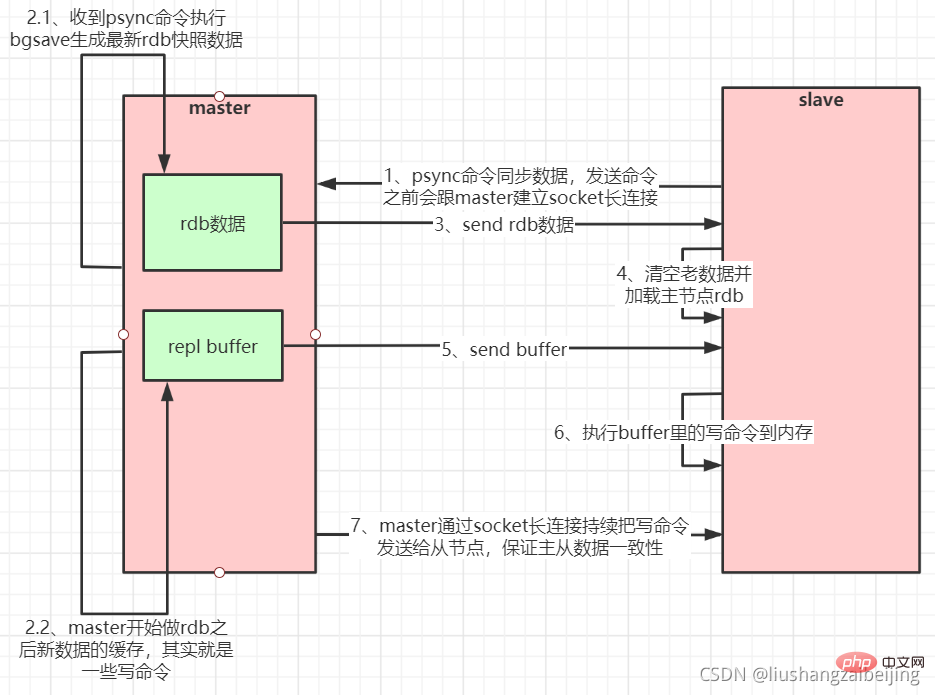
The slave server connects to the master server and sends the PSYNC command;
After the main server receives the PSYNC naming, it starts executing the BGSAVE command to generate an RDB file and uses the buffer to record all write commands executed thereafter;
After the main server BGSAVE is executed , send snapshot files to all slave servers, and continue to record executed write commands during the sending period;
After receiving the snapshot file from the server, discard all old data and load the received Snapshot;
After the master server snapshot is sent, it starts sending the write command in the buffer to the slave server;
The slave server completes the processing of the snapshot Load, start receiving command requests, and execute write commands from the master server buffer; (slave server initialization completed)
The master server will send a write command to the slave server every time it executes a write command The same write command, receive and execute the received write command from the server (the operation after the slave server initialization is completed)
When the connection between the master and the slave is disconnected for some reason When turned on, the slave can automatically reconnect to the master. If the master receives multiple concurrent connection requests from the slave, it will only perform persistence once, instead of connecting once, and then send this persistent data to multiple concurrent connections. The connected slave.
Advantages:
Disadvantages:
#1、 创建目录 conf/master-slave-cluster 存放对应集群的配置信息mkdir -p conf/master-slave-cluster# 创建目录 data 存放对应集群对应的数据信息(数据目录)mkdir -p /usr/local/redis/data/6380
mkdir -p /usr/local/redis/data/6381
mkdir -p /usr/local/redis/data/6382
#复制一份redis.conf文件 重命名redis-6381.conf# 2、将相关配置修改为如下值:# 修改端口号port 6381# 把pid进程号写入pidfile配置的文件pidfile /var/run/redis_6381.pid
# 指定日志存放目录logfile "6381.log"# 指定数据存放目录dir /usr/local/redis-5.0.3/data/6381

# 需要注释掉bind# bind 127.0.0.1(bind绑定的是自己机器网卡的ip,如果有多块网卡可以配多个ip,代表允许客户端通过机器的哪些网卡ip去访问,内网一般可以不配置bind,注释掉即可)# 3、配置主从复制(6380是master不需要配置如下 只需给6381和6382配置如下属性)# 从本机6379的redis实例复制数据,Redis 5.0之前使用slaveofreplicaof xxx.xxx.xxx.xxx 6380  # 配置从节点只读replica-read-only yes  #4、启动从节点redis-server redis-6381.conf5、连接从节点
redis-cli -p 63816、测试在6380实例上写数据,6381实例是否能及时同步新修改数据7、同样的方法再配置一个6382的从节点
View the redis master-slave cluster
master operation
# 连接master[root@ip redis]# src/redis-cli -p 6380127.0.0.1:6380> auth xiu123
OK127.0.0.1:6380> set name "zhangsan"OK127.0.0.1:6380> get name
"zhangsan"

slave operation
# 连接slavesrc/redis-cli -p 6381127.0.0.1:6381> get name "zhangsan"#从节点只能进行读操作127.0.0.1:6381> set name lisi(error) READONLY You can't write against a read only replica.127.0.0.1:6381> 

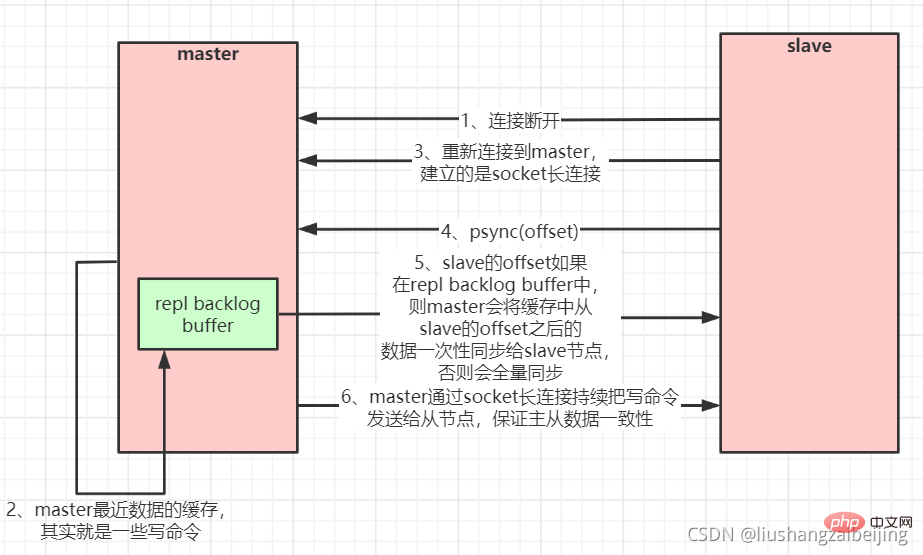
Breakpoint Resume).
The master will create a cache queue for copying data in its memory to cache the data for the most recent period. The master and all its slaves maintain the copied data subscript offset and the master's process id, so , when the network connection is disconnected, the slave will request the master to continue the unfinished replication, starting from the recorded data index. If the master process ID changes, or the slave node data offset is too old and is no longer in the master's cache queue, then a full data copy will be performed.Master-slave replication (partial replication, breakpoint resume) flow chart:
如果有很多从节点,为了缓解主从复制风暴**(多个从节点同时复制主节点导致主节点压力过大),可以做如下架构,让部分从节点与从节点(与主节点同步)同步数据
2、Redis哨兵高可用架构
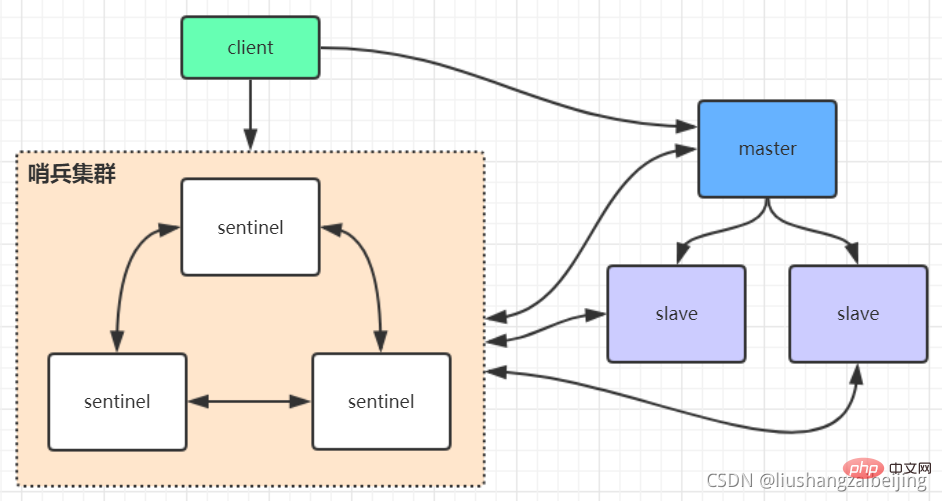
sentinel哨兵是特殊的redis服务,不提供读写服务,主要用来监控redis实例节点。哨兵的作用就是监控Redis系统的运行状况。它的功能包括以下两个
(1)监控主服务器和从服务器是否正常运行。
(2)主服务器出现故障时自动将从服务器转换为主服务器。
三个定时任务
sentinel在内部有3个定时任务
1)每10秒每个sentinel会对master和slave执行info命令,这个任务达到两个目的:
a)发现slave节点
b)确认主从关系
2)每2秒每个sentinel通过master节点的channel交换信息(pub/sub)。master节点上有一个发布订阅的频道(sentinel:hello)。sentinel节点通过__sentinel__:hello频道进行信息交换(对节点的"看法"和自身的信息),达成共识。
3)每1秒每个sentinel对其他sentinel和redis节点执行ping操作(相互监控),这个其实是一个心跳检测,是失败判定的依据。
优点:
哨兵模式是基于主从模式的,所有主从的优点,哨兵模式都具有。
主从可以自动切换,系统更健壮,可用性更高。
缺点:
Redis较难支持在线扩容,在集群容量达到上限时在线扩容会变得很复杂。
# 1、复制一份sentinel.conf文件mkdir sentinelcp sentinel.conf sentinel-26380.conf
# 保护模式protected-mode no
# 端口号port 26380# 是否静默启动daemonize yes
# pid进程号pidfile "/var/run/redis-sentinel-26380.pid"
# 日志文件logfile "/usr/local/redis/data/6380/sentinel.log"
# 哨兵服务数据存储dir "/usr/local/redis/data"
# 哨兵监控 sentinel monitor <mastername> <maste> <num>
# 故障转移后  master节点ip会发生变化sentinel monitor mymaster 182.92.189.235 6380 2
# 连接master节点 密码# 设置连接master和slave时的密码,注意的是sentinel不能分别为master和slave设置不同的密码,因此master和slave的密码应该设置相同。sentinel auth-pass mymaster xiu123#sentinel config-epoch mymaster 9#sentinel leader-epoch mymaster 9# 自动生成 从节点信息 但是此处没有自动生成sentinel known-slave mymaster 182.92.189.235 6381sentinel known-slave mymaster 182.92.189.235 6382
# 自动生成配置 启动回自动生成一些配置</num></maste></mastername>
#启动sentinel哨兵实例src/redis-sentinel sentinel-26380.conf
#查看sentinel的info信息src/redis-cli -p 26379127.0.0.1:26379>info
#可以看到Sentinel的info里已经识别出了redis的主从
#同理再次添加两个sentinel,端口26381和26382 并同理启动,注意上述配置文件里的对应数字都要修改

sentinel集群都启动完毕后,会将哨兵集群的元数据信息写入所有sentinel的配置文件里去(追加在文件的最下面),我们查看下如下配置文件sentinel-26380.conf,如下所示:
"shell
# 1、查看当前redis 集群服务 一主两从三哨兵
[root@iZ2ze505h9bgsa1t9twojyZ redis]# ps -ef | grep redis
root      1166 30926  0 22:43 pts/2    00:00:00 grep --color=auto redis
root     28998     1  0 21:12 ?        00:00:06 src/redis-server *:6380
root     29010     1  0 21:12 ?        00:00:06 src/redis-server *:6381
root     29020     1  0 21:12 ?        00:00:06 src/redis-server *:6382
root     31686     1  0 22:05 ?        00:00:05 src/redis-sentinel *:26380 [sentinel]
root     32553     1  0 22:22 ?        00:00:03 src/redis-sentinel *:26381 [sentinel]
root     32562     1  0 22:22 ?        00:00:03 src/redis-sentinel *:26382 [sentinel]
[root@iZ2ze505h9bgsa1t9twojyZ redis]# src/redis-cli -p 6380
127.0.0.1:6380> auth xiu123
OK
127.0.0.1:6380> info replication
# Replication
role:master
connected_slaves:2
slave0:ip=182.92.189.235,port=6381,state=online,offset=261525,lag=0
slave1:ip=182.92.189.235,port=6382,state=online,offset=261525,lag=1
... 省略部分代码

127.0.0.1:6380> quit

# 杀掉 redis
[root@iZ2ze505h9bgsa1t9twojyZ redis]# kill -9 28998
# 查看日志
[root@iZ2ze505h9bgsa1t9twojyZ redis]# tail -f data/6380/sentinel.log
# 该哨兵认为主观下线
31686:X 12 Nov 2021 22:45:40.110 # +sdown master mymaster 182.92.189.235 6382
# 到达主观下线阙值 则客观下线
31686:X 12 Nov 2021 22:45:40.181 # +odown master mymaster 182.92.189.235 6382 #quorum 2/2
31686:X 12 Nov 2021 22:45:40.181 # +new-epoch 18
# 尝试故障转移
31686:X 12 Nov 2021 22:45:40.181 # +try-failover master mymaster 182.92.189.235 6382
# 投票选举主节点
31686:X 12 Nov 2021 22:45:40.189 # +vote-for-leader ba9eed52de8664c3fd8d76d9728b42a309c3401b 18
# 选择主节点 6381
31686:X 12 Nov 2021 22:45:41.362 # +switch-master mymaster 182.92.189.235 6382 182.92.189.235 6381

#查看新的主从节点信息 主节点6381 从节点6382
[root@iZ2ze505h9bgsa1t9twojyZ redis]# src/redis-cli -p 6381
127.0.0.1:6381> auth xiu123
OK
127.0.0.1:6381> info replication
# Replication
role:master
connected_slaves:1
slave0:ip=182.92.189.235,port=6382,state=online,offset=469749,lag=0

"
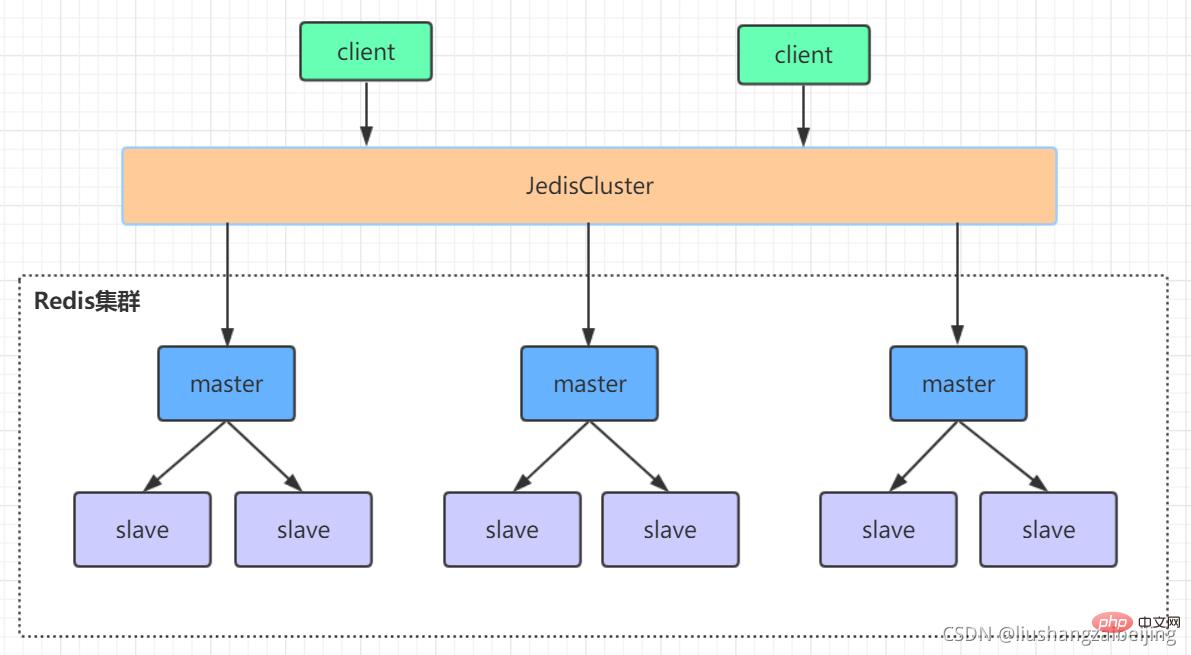
redis的哨兵模式基本已经可以实现高可用,读写分离 ,但是在这种模式下每台redis服务器都存储相同的数据,很浪费内存,所以在redis3.0上加入了cluster模式,实现的redis的分布式存储,也就是说每台redis节点上存储不同的内容。
Redis-Cluster采用无中心结构,它的特点如下:
所有的redis节点彼此互联(PING-PONG机制),内部使用二进制协议优化传输速度和带宽。
节点的fail是通过集群中超过半数的节点检测失效时才生效。
客户端与redis节点直连,不需要中间代理层.客户端不需要连接集群所有节点,连接集群中任何一个可用节点即可。
工作方式:
在redis的每一个节点上,都有这么两个东西,一个是插槽(slot),它的的取值范围是:0-16383。还有一个就是cluster,可以理解为是一个集群管理的插件。当我们的存取的key到达的时候,redis会根据crc16的算法得出一个结果(hash函数),然后把结果对 16384 求余数,这样每个 key 都会对应一个编号在 0-16383 之间的哈希槽,通过这个值,去找到对应的插槽所对应的节点,然后直接自动跳转到这个对应的节点上进行存取操作。
为了保证高可用,redis-cluster集群引入了主从模式,一个主节点对应一个或者多个从节点,当主节点宕机的时候,就会启用从节点。当其它主节点ping一个主节点A时,如果半数以上的主节点与A通信超时,那么认为主节点A宕机了。如果主节点A和它的从节点A1都宕机了,那么该集群就无法再提供服务了。
redis集群是一个由多个主从节点群组成的分布式服务器群,它具有复制、高可用和分片特性。Redis集群不需要sentinel哨兵·也能完成节点移除和故障转移的功能。需要将每个节点设置成集群模式,这种集群模式没有中心节点,可水平扩展,据官方文档称可以线性扩展到上万个节点(官方推荐不超过1000个节点)。redis集群的性能和高可用性均优于之前版本的哨兵模式,且集群配置非常简单
redis集群需要至少三个master节点,我们这里搭建三个master节点,并且给每个master再搭建一个slave节点,总共6个redis节点,这里用三台机器部署6个redis实例,每台机器一主一从,搭建集群的步骤如下:
6383(主) 6384(从)
6385(主) 6386(从)
6387(主) 6388(从)
# 是否静默启动
daemonize yes
#端口号
port 6383

# pid进程文件
pidfile /var/run/redis_6383.pid
#数据存储
dir /usr/local/redis/data/redis-cluster/6383/

# 指定日志存放目录
logfile "/usr/local/redis/data/cluster-6383.log"


#是否启动集群模式
cluster-enabled yes

#(集群节点信息文件,这里最好和port对应上)
cluster-config-file nodes-6383.conf
cluster-node-timeout 10000

# 关闭保护模式
protected-mode  no
redis集群配置好后,在5.X版本之前需要需要使用ruby脚本去创建集群,但是5.x之后可以通过redis-cli 执行创建集群命令即可
# 分别启动redis实例
src/redis-server conf/cluster/638*/redis.conf

# 下面命令里的1代表为每个创建的主服务器节点创建一个从服务器节点
# 执行这条命令需要确认三台机器之间的redis实例要能相互访问,可以先简单把所有机器防火墙关掉,如果不关闭防火墙则需要打开redis服务端口和集群节点gossip通信端口16379(默认是在redis端口号上加1W)
# 关闭防火墙
# systemctl stop firewalld # 临时关闭防火墙
# systemctl disable firewalld # 禁止开机启动
# 注意:下面这条创建集群的命令大家不要直接复制,里面的空格编码可能有问题导致创建集群不成功
# 本次测试不远程连接 使用127.0.0.1 如果涉及远程连接需要设置真实公网ip


# -a 密码。  -- cluster create创建集群  --cluster-replicas 1 每一个master建立一个从节点 6个实例 中选择3个作为另外3个主节点的从节点,最终变成3主3从
src/redis-cli -a password --cluster create --cluster-replicas 1 127.0.0.1:6383 127.0.0.1:6384 127.0.0.1:6385 127.0.0.1:6386 127.0.0.1:6387 127.0.0.1:6388
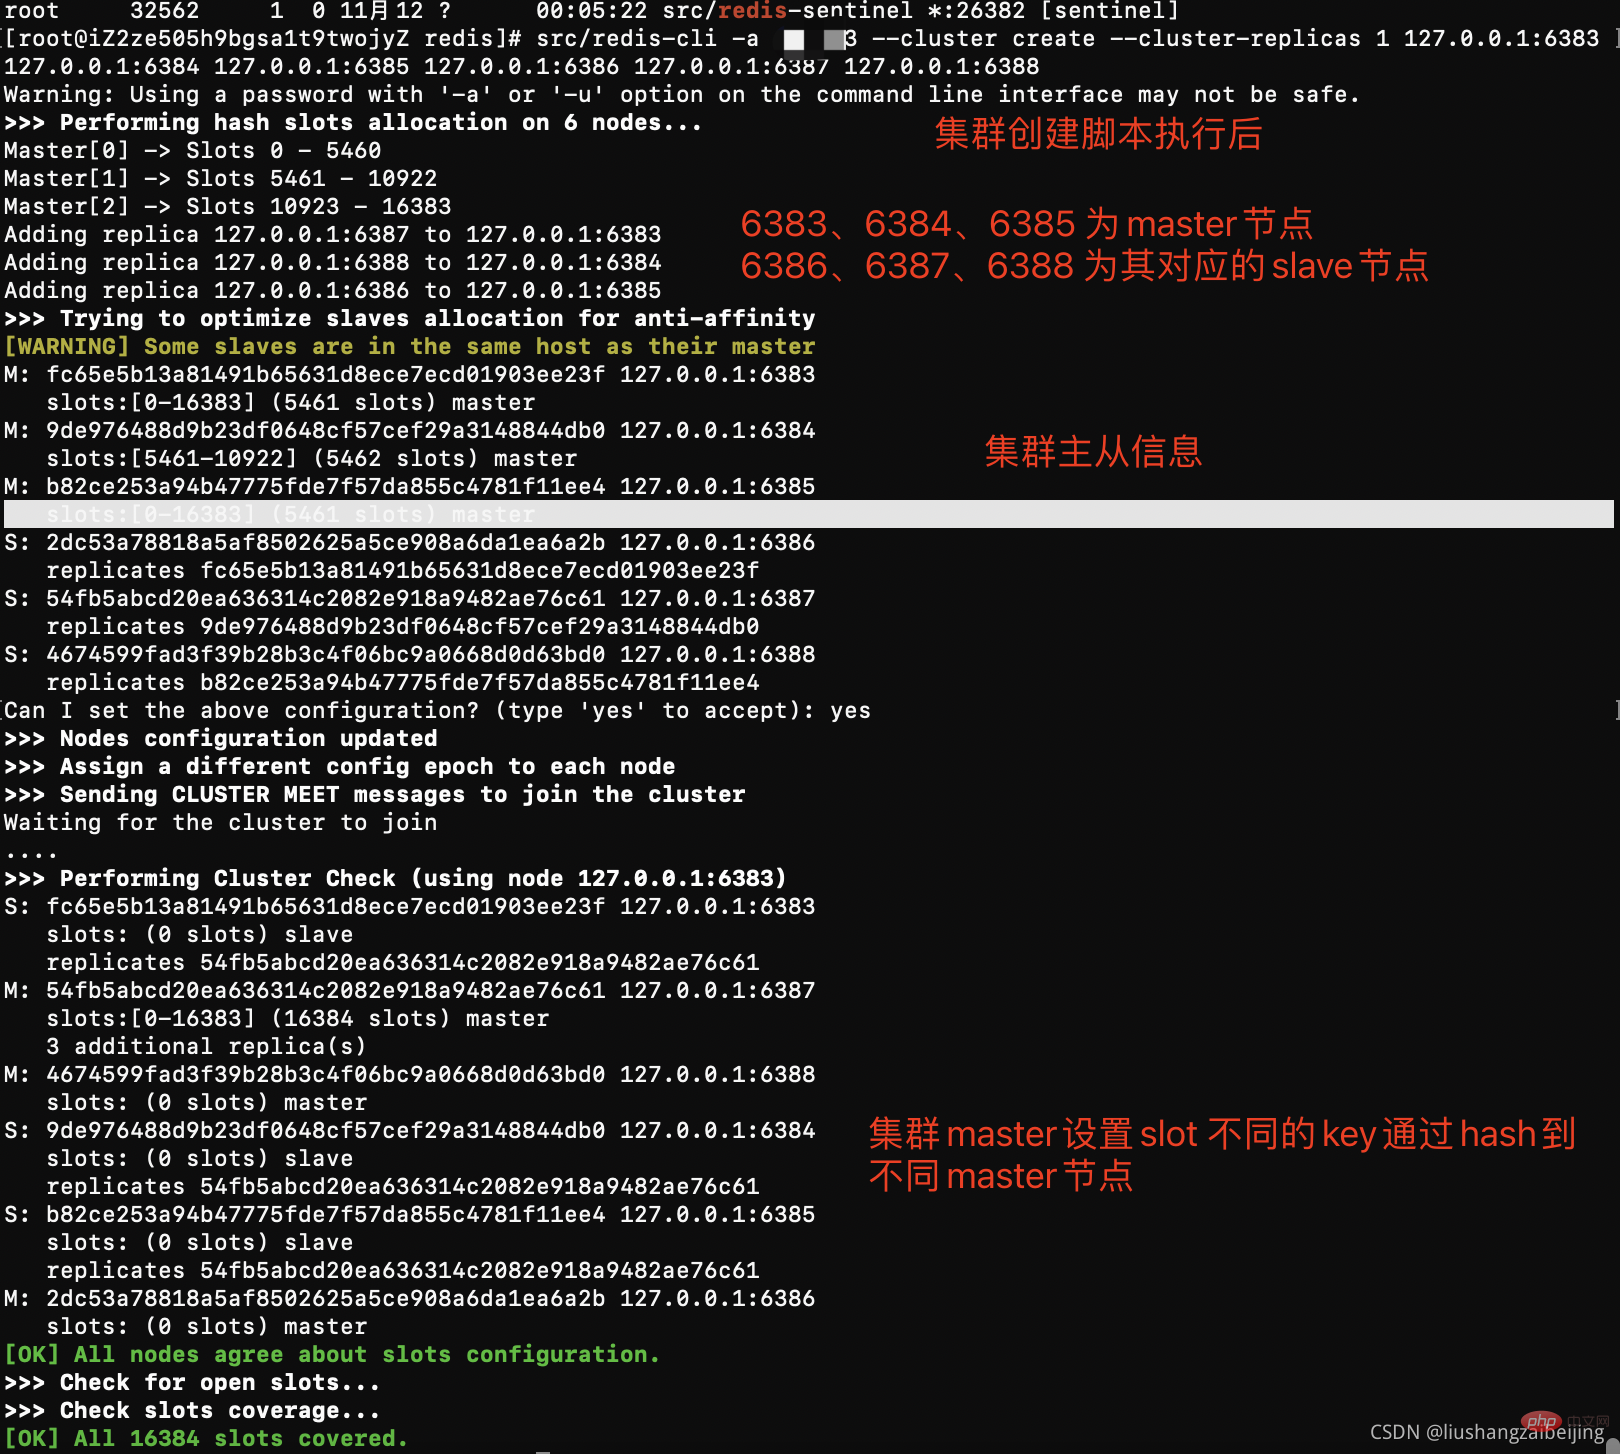
问题:
#1、这是由于创建集群中的某一个服务中曾经插入过数据,并且已经产生了持久化文件,重新再进行创建集群 此时需要flushall命令清空所有数据
[ERR] Node 127.0.0.1:6383 is not empty. Either the node already knows other nodes (check with CLUSTER NODES) or contains some key in database 0

#测试使用flush不好使用 只要找到配置文件对应数据存储目录 暴力rm删除

# 2、登陆某个集群出现 出现CLUSTERDOWN Hash slot not served 原因 启动集群实例后没有执行集群创建
读写key需要 对key进行hash 不使用集群模式登陆客户端,则我们只访问单独会提示让我们去对应的节点上进行操作
集群登陆
# 连接任意一个客户端即可:./redis-cli -c -h -p (-a访问服务端密码,-c表示集群模式,指定ip地址和端口号)
# -a 密码 -c 集群模式  -h ip -p port
src/redis-cli -a password -c -h 127.0.0.1 -p 6383

#进行验证: cluster info(查看集群信息)、cluster nodes(查看节点列表)
#进行数据操作验证
#关闭集群则需要逐个进行关闭,使用命令:
src/redis-cli -a password -c -h 127.0.0.1 -p 638* shutdown
上述集群三主三从 。6386、6387、6388分别对应主节点6383、6384、6385的从,如果某个主节点宕机,则从节点会自动被选举为主节点继续对外提供服务,一定的容错机制保证高可用。注意存在从节点的情况下,主从节点不具备读写分离,读写都使用主节点
# 模拟redis的故障转移

#登陆节点 发现 name这个key在6384上  age这个key在6383上 wdih这个key在6385上
[root@iZ2ze505h9bgsa1t9twojyZ redis]# src/redis-cli -a xiu123 -c -h 127.0.0.1 -p 6383
127.0.0.1:6384> get name
-> Redirected to slot [5798] located at 127.0.0.1:6384
(nil)
127.0.0.1:6384> get age
-> Redirected to slot [741] located at 127.0.0.1:6383
"12"
127.0.0.1:6383> get width
-> Redirected to slot [15983] located at 127.0.0.1:6385
"110"
127.0.0.1:6385> quit

## 杀掉 6385这个主节点
[root@iZ2ze505h9bgsa1t9twojyZ redis]# kill -9 14187

# 重新登陆集群 获取 age、name 还是原来的节点 获取width 由6385转移到了6388  查看6380节点信息发现其变为了主节点
[root@iZ2ze505h9bgsa1t9twojyZ redis]# src/redis-cli -a xiu123 -c -h 127.0.0.1 -p 6383
127.0.0.1:6383> get age
"12"
# 这里因该是在选举master节点 导致集群短暂不可用(猜测)
127.0.0.1:6383> get name
(error) CLUSTERDOWN The cluster is down
127.0.0.1:6383> get name
-> Redirected to slot [5798] located at 127.0.0.1:6384
"xieqx"

127.0.0.1:6384> get width
-> Redirected to slot [15983] located at 127.0.0.1:6388
"110"
127.0.0.1:6388> info replication
# Replication
role:master

# 杀掉 6388 则整个集群服务都不可用
127.0.0.1:6383> get name
(error) CLUSTERDOWN The cluster is down
#复制之前6383节点配置 创建6389、6390节点 并启动实例

--- 集群扩容 ----

#1、 添加master节点
## add-node: 后面的分别跟着新加入的***master和集群的某个节点 NODE_ID***
src/redis-cli --cluster add-node 127.0.0.1:6389 127.0.0.1:6383 -a password
# 2、为增加的主节点添加从节点
#--cluster-slave 表明添加的是slave节点
## add-node: 后面的分别跟着新加入的****slave和slave对应的master NODE_ID***
#--cluster-master-id:表示slave对应的master的node ID
src/redis-cli --cluster add-node 127.0.0.1:6390 127.0.0.1:6389 --cluster-slave --cluster-master-id 353662f6868b187ad15bad9b7271b8f0848adf10 -a password

# 3、 重新分片slot
#-cluster-from:表示slot目前所在的节点的node ID,多个ID用逗号分隔
#--cluster-to:表示需要新分配节点的node ID(貌似每次只能分配一个)
# --cluster-slots:分配的slot数量
src/redis-cli --cluster reshard 127.0.0.1:6389 --cluster-from 47318cef1195f4281b7815bf66a41e31d68b6d16,0dbea2fff1554a3bbca70d28b81911e60c5bee6d,2fd29d61e867cb85e2e368ee62aebef33e7aaeb3 --cluster-to 353662f6868b187ad15bad9b7271b8f0848adf10 --cluster-slots 1024 -a password

#查看集群信息

 --- 集群缩容 ----

#下线节点127.0.0.1:6389(master)/127.0.0.1:6390(slave)

#(1)首先删除master对应的slave
#del-node后面跟着slave节点的 ip:port 和node ID
src/redis-cli --cluster del-node 127.0.0.1:6390 353662f6868b187ad15bad9b7271b8f0848adf10 -a password

#(2)清空master的slot 将一个下线的节点的slot重新分配到其他三个节点中
#reshard子命令前面已经介绍过了,这里需要注意的一点是,由于我们的集群一共有四个主节点,而每次reshard只能写一个目的节点,因此以上命令需要执行三次(--cluster-to对应不同的目的节点)。
#--cluster-yes:不回显需要迁移的slot,直接迁移。
src/redis-cli --cluster reshard 127.0.0.1:6389 --cluster-from 353662f6868b187ad15bad9b7271b8f0848adf10 --cluster-to 0dbea2fff1554a3bbca70d28b81911e60c5bee6d --cluster-slots 1024 --cluster-yes

#(3)下线(删除)节点 主节点
src/redis-cli --cluster del-node 127.0.0.1:6389 353662f6868b187ad15bad9b7271b8f0848adf10

推荐学习:Redis教程
The above is the detailed content of Detailed example of how to deploy a redis cluster. For more information, please follow other related articles on the PHP Chinese website!
 Commonly used database software
 What are the in-memory databases?
 Which one has faster reading speed, mongodb or redis?
 How to use redis as a cache server
 How redis solves data consistency
 How do mysql and redis ensure double-write consistency?
 What data does redis cache generally store?
 What are the 8 data types of redis