

 PHP Framework
Laravel
The most comprehensive tutorial on setting up a Win10+Homestead environment [pictures and text]
PHP Framework
Laravel
The most comprehensive tutorial on setting up a Win10+Homestead environment [pictures and text]
The most comprehensive tutorial on setting up a Win10+Homestead environment [pictures and text]

Before introducing how to build a Homestead environment, you need to understand several important concepts. You can read this article "Explaining the Concepts of Homestead, Vagrant and Virtual Machines" to learn more.
The following officially introduces the detailed steps to build a Homestead environment under Windows 10:
Step 1: Install VirtualBox
Install VirtualBox virtual machine Software:
Download link of this site:VirtualBox Win system 6.1.30 version
- ##Official download address:
![The most comprehensive tutorial on setting up a Win10+Homestead environment [pictures and text]](https://img.php.cn/upload/image/457/216/223/1640162754870283.png "1640162754870283.png")
Next. (If a VirtualBox COM object failure error occurs during the installation of the virtual machine, please refer to " Solving the problem of failure to obtain VirtualBox COM object ")
Step 2: Installation Vagrant
Install Vagrant virtual machine management software:- Download link of this site:
vagrant Win64-bit system version 2.2.19|vagrant Win32-bit system version 2.2.19
- Official download address:
![The most comprehensive tutorial on setting up a Win10+Homestead environment [pictures and text]](https://img.php.cn/upload/image/907/287/987/1640162800443976.png "1640162800443976.png")
Next.
Note: Vagrant will restart the computer after successful installation. Don’t panic if the screen suddenly turns black and shuts down~
Then you can entervagrant -- in the CMD window The version command is used to test whether Vagrant is installed successfully. Displaying the version number means the installation is successful, and be sure to run it as administrator~
![The most comprehensive tutorial on setting up a Win10+Homestead environment [pictures and text]](https://img.php.cn/upload/image/681/255/111/1640163367481339.png "1640163367481339.png")
Step 3: Install Homestead
1. Install homestead.box
vagrant box add laravel/homestead command; then select the corresponding virtual machine to use machine, such as virtualbox, enter 3 and press Enter to select as shown below.
![The most comprehensive tutorial on setting up a Win10+Homestead environment [pictures and text]](https://img.php.cn/upload/image/700/510/790/1640242884602540.png "1640242884602540.png")
homestead.box":
![The most comprehensive tutorial on setting up a Win10+Homestead environment [pictures and text]](https://img.php.cn/upload/image/729/839/908/1640229370731619.png "1640229370731619.png")
![The most comprehensive tutorial on setting up a Win10+Homestead environment [pictures and text]](https://img.php.cn/upload/image/423/834/253/1640164459124562.png "1640164459124562.png")
![The most comprehensive tutorial on setting up a Win10+Homestead environment [pictures and text]](https://img.php.cn/upload/image/505/476/152/1640164464180302.png "1640164464180302.png") ##Then drag the homestead.box file directly to the
##Then drag the homestead.box file directly to the
command and wait for the installation to complete<div class="code" style="position:relative; padding:0px; margin:0px;"><pre class='brush:php;toolbar:false;'>vagrant box add laravel/homestead [box文件绝对路径]
<!--
例:
vagrant box add laravel/homestead c:\tools\homestead.box
--></pre><div class="contentsignin">Copy after login</div></div>
![The most comprehensive tutorial on setting up a Win10+Homestead environment [pictures and text]](https://img.php.cn/upload/image/350/100/326/1640164737239787.png "1640164737239787.png") Then you can use the
Then you can use the
command to check whether the installation is successful, and at the same time check the version number (the version number shown here is 0)
注意:手动安装homestead.box文件时,一定要把该文件放到英文目录中,并且由于本地安装homestead.box版本号为0,还要更改一下配置文件(自动安装box的则不需要设置),下文会介绍到。
2、下载homestead配置文件
点击配置文件下载地址:https://github.com/laravel/homestead,这里有两种方式下载:
(1)通过git克隆:git clone https://github.com/laravel/homestead.git
(2)点击Download ZIP直接下载压缩包。
注:克隆和下载选任意一个即可
![The most comprehensive tutorial on setting up a Win10+Homestead environment [pictures and text]](https://img.php.cn/upload/image/331/444/620/1640165399943057.png "1640165399943057.png")
3、配置homestead配置文件
将上一步下载的zip文件解压并放入到用户的家目录中并更名为Homestead:
![The most comprehensive tutorial on setting up a Win10+Homestead environment [pictures and text]](https://img.php.cn/upload/image/571/775/972/1640166424209062.png "1640166424209062.png")
![The most comprehensive tutorial on setting up a Win10+Homestead environment [pictures and text]](https://img.php.cn/upload/image/472/316/305/1640166494784163.png "1640166494784163.png")
![The most comprehensive tutorial on setting up a Win10+Homestead environment [pictures and text]](https://img.php.cn/upload/image/183/307/912/1640166503237159.png "1640166503237159.png")
![The most comprehensive tutorial on setting up a Win10+Homestead environment [pictures and text]](https://img.php.cn/upload/image/657/922/179/1640166510227999.png "1640166510227999.png")
注意:Administrator为我目录名称,你的有可能不一样。
双击运行文件中(windows下是:
init.bat) (linux下是:init.sh)来获取配置文件homestead.yaml
![The most comprehensive tutorial on setting up a Win10+Homestead environment [pictures and text]](https://img.php.cn/upload/image/625/940/361/1640166693446963.png "1640166693446963.png")
配置homestead配置文件
homestead.yaml
因为我们是手动安装homestead.box的,默认版本号为0,所以要先来修改下配置,将查找的版本号设置>=0即可,自动安装box的则不需要设置。
找到如下图所示的homestead.rb文件并打开:
![The most comprehensive tutorial on setting up a Win10+Homestead environment [pictures and text]](https://img.php.cn/upload/image/244/375/541/1640223431926931.png "1640223431926931.png")
然后设置config.vm.box_version = settings['version'] ||= '>= 0',如下所示:
![The most comprehensive tutorial on setting up a Win10+Homestead environment [pictures and text]](https://img.php.cn/upload/image/843/196/960/1640223558877115.png "1640223558877115.png")
接着我们要来配置同步的目录,找到homestead.yaml文件并打开
![The most comprehensive tutorial on setting up a Win10+Homestead environment [pictures and text]](https://img.php.cn/upload/image/570/341/487/1640223746132073.png "1640223746132073.png")
//同步的目录
folders:
    - map: C:\Users\Administrator\marriage //宿主机位置
      to: /home/vagrant/code  //同步虚拟主机位置
//表示将win下的marriage目录同步到虚拟机下的code目录,也就是说无论在这两个哪个目录中修改内容都可以同步到另一个目录中。用绝对路径或相对路径设置都可以(~代表家目录)
相对路径如下:
![The most comprehensive tutorial on setting up a Win10+Homestead environment [pictures and text]](https://img.php.cn/upload/image/697/458/708/1640224119573280.png "1640224119573280.png")
绝对路径如下:
![The most comprehensive tutorial on setting up a Win10+Homestead environment [pictures and text]](https://img.php.cn/upload/image/923/670/218/1640223893703385.png "1640223893703385.png")
我这里选择用绝对路径设置,设置完记得要保存文件~
4、获取公钥
获取公钥是为了方便每次登录输入用户名密码。
如下所示执行ssh-keygen命令生成秘钥。
注意:win10自动开启SSH命令,但是win7就是需要安装ssh(可参考:《Windows7安装OpenSSH服务的步骤详解(亲测有效)》)。
![The most comprehensive tutorial on setting up a Win10+Homestead environment [pictures and text]](https://img.php.cn/upload/image/845/342/938/1640224554329358.png "1640224554329358.png")
5、启动虚拟机主机
先通过执行cd Homestead命令切换到Homestead目录,然后执行vagrant up命令来启动虚拟机主机
![The most comprehensive tutorial on setting up a Win10+Homestead environment [pictures and text]](https://img.php.cn/upload/image/157/428/450/1640224875223722.png "1640224875223722.png")
![The most comprehensive tutorial on setting up a Win10+Homestead environment [pictures and text]](https://img.php.cn/upload/image/559/520/884/1640225220138543.png "1640225220138543.png")
虚拟机启动成功,界面如下所示(不需要经常开启这个界面,直接使用vagrant来管理即可)
![The most comprehensive tutorial on setting up a Win10+Homestead environment [pictures and text]](https://img.php.cn/upload/image/840/499/612/1640224995180582.png "1640224995180582.png")
接着使用密钥连接登录虚拟机,在命令行执行vagrant ssh命令即可(一定要在homestead目录下执行该命令)
![The most comprehensive tutorial on setting up a Win10+Homestead environment [pictures and text]](https://img.php.cn/upload/image/385/904/298/1640225560111363.png "1640225560111363.png")
注意:
如果SSH认真失败,删除insecure_private_key文件,该文件可以通过以下路径找到:
C:\user\Administrator\.vagrant.d\insecure_private_key 文件
重新生成vagrant密钥
ssh-keygen -f /User/Administrator(你的用户)/.vagrant.d/insecure_private_key
启动虚拟机也可不使用密钥进入,手动输入用户名和密码
用户名:vagrant
密码: vagrant
默认数据库用户名及密码
UserName:homestead
PassWord:secret
至此,Win10下homestead环境就搭建好了!
在《Homestead安装运行laravel项目的步骤详解【图文】》文章中继续给大家介绍了怎么在homestead环境里安装Laravel并运行!
The above is the detailed content of The most comprehensive tutorial on setting up a Win10+Homestead environment [pictures and text]. For more information, please follow other related articles on the PHP Chinese website!

Hot AI Tools

Undresser.AI Undress
AI-powered app for creating realistic nude photos

AI Clothes Remover
Online AI tool for removing clothes from photos.

Undress AI Tool
Undress images for free

Clothoff.io
AI clothes remover

AI Hentai Generator
Generate AI Hentai for free.

Hot Article
Hot Tools

Notepad++7.3.1
Easy-to-use and free code editor

SublimeText3 Chinese version
Chinese version, very easy to use

Zend Studio 13.0.1
Powerful PHP integrated development environment

Dreamweaver CS6
Visual web development tools

SublimeText3 Mac version
God-level code editing software (SublimeText3)
Hot Topics
 1378
1378
 52
52

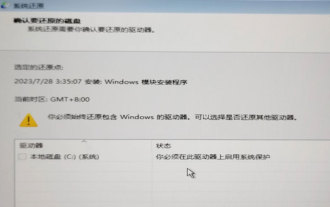 System Restore prompts that you must enable system protection on this drive
Jun 19, 2024 pm 12:23 PM
System Restore prompts that you must enable system protection on this drive
Jun 19, 2024 pm 12:23 PM
The computer has a restore point, and when the system is restored, it prompts "You must enable system protection on this drive." This usually means that the system protection function is not turned on. System protection is a feature provided by the Windows operating system that can create system restore points to back up system files and settings. That way, if something goes wrong, you can revert to a previous state. When the system fails and you cannot enter the desktop to start it, you can only try the following method: Troubleshooting-Advanced Options-Command Prompt Command 1 netstartvssrstrui.exe/offline:C:\windows=active Command 2 cd%windir%\system32 \configrenSYSTEMsy
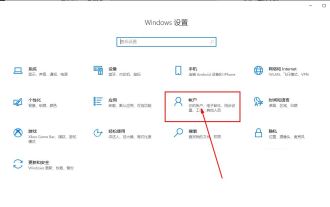 What should I do if win10 does not switch users? Win10 login interface does not have the option to switch users. Solution
Jun 25, 2024 pm 05:21 PM
What should I do if win10 does not switch users? Win10 login interface does not have the option to switch users. Solution
Jun 25, 2024 pm 05:21 PM
A problem that Windows 10 users may encounter is that they cannot find the switch user option on the login interface. So what should I do if there is no switch user option on the win10 login interface? Let this site give users a detailed explanation of the problem of not switching user options in the win10 login interface. Detailed solution to the problem of switching user options on the Win10 login interface: Check user account settings: First, make sure you have multiple user accounts on your computer and that these accounts are enabled. You can check and enable the account by following these steps: a. Press Win+I keys to open Settings and select "Accounts". b. Select "Family & Others" or &ld in the left navigation bar
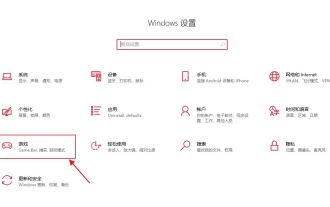
 How to permanently turn off real-time protection in win10? How to disable real-time protection function in win10 computer 0
Jun 05, 2024 pm 09:46 PM
How to permanently turn off real-time protection in win10? How to disable real-time protection function in win10 computer 0
Jun 05, 2024 pm 09:46 PM
Although the comprehensive anti-virus software that comes with Windows 10 system can continuously protect the security of your personal computer, sometimes it may also affect certain downloaded files. For some users, it may be more appropriate to temporarily turn off the real-time protection function. But many users don’t know how to permanently turn off the real-time protection feature on win10 system. 1. First, press the "Win+R" keys to open the run window, enter the "gpedit.msc" command to open the local Group Policy Editor interface; 2. Then, in the opened interface, click "Computer Configuration/Administrative Templates/ Windows Components/MicrosoftDef
 How to restore the default wallpaper in win10? One trick to quickly restore the default wallpaper in Windows 10 system
Jun 02, 2024 pm 02:07 PM
How to restore the default wallpaper in win10? One trick to quickly restore the default wallpaper in Windows 10 system
Jun 02, 2024 pm 02:07 PM
In Windows 10 system, if you want to return to the system default wallpaper, you can follow the following steps: 1. Right-click a blank space on the desktop and select Personalize in the pop-up menu. 2. This will open the Personalization window in Settings. In the left menu, click Background. 3. Under the "Background" settings, find and click the drop-down menu next to "Choosepicture", and then select Windows Default (Windows Default) or directly select a picture that looks like the default wallpaper in the picture preview below ( if there are multiple options). 4. If your system has multiple versions
 What should I do if Win10 takes a screenshot and crashes? How to solve the problem of Win10 flashing and then disappearing after taking a screenshot?
Jun 02, 2024 pm 12:48 PM
What should I do if Win10 takes a screenshot and crashes? How to solve the problem of Win10 flashing and then disappearing after taking a screenshot?
Jun 02, 2024 pm 12:48 PM
There are many reasons why the screenshot disappears after taking a screenshot in Win10. Users can first check the screenshot save location or adjust the screenshot settings, or check the animation effect to check it. If it really doesn't work, you can also choose to update the driver and operating system to perform the operation. Let this website carefully introduce to users the analysis of the problem of Win10 disappearing after taking a screenshot. Analysis of the problem after win10 takes a picture and it flashes and disappears 1. Check where the screenshot is saved: When you use the Win+PrtSc (PrintScreen) key combination to take a screenshot, the screenshot is usually saved in the C:\Users\YourUsername\Pictures\Screenshots folder. please
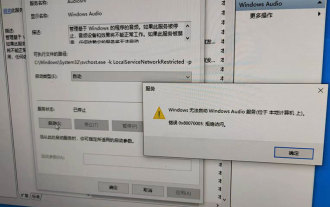 Windows cannot start the Windows Audio service Error 0x80070005
Jun 19, 2024 pm 01:08 PM
Windows cannot start the Windows Audio service Error 0x80070005
Jun 19, 2024 pm 01:08 PM
The guy's computer appears: Windows cannot start the WindowsAudio service (located on the local computer). Error 0x8007005: Access denied. This situation is usually caused by user permissions. You can try the following methods to fix it. Method 1: Modify the registry to add permissions through batch processing, create a new text document on the desktop, save it as .bat, and right-click the administrator to go far. Echo==========================EchoProcessingRegistryPermission.Pleasewait...Echo================== ========subinacl/subkey
 What to do if the Win10 Task Manager crashes? How to fix the Win10 Task Manager crash?
Jun 25, 2024 pm 04:31 PM
What to do if the Win10 Task Manager crashes? How to fix the Win10 Task Manager crash?
Jun 25, 2024 pm 04:31 PM
Hello everyone, have you ever encountered the situation where the Windows 10 Task Manager keeps crashing? This function helps us a lot, allowing us to quickly see all running tasks, which is very convenient to use, right? However, some friends said that they encountered this problem and didn’t know how to solve it, so let me share with you the specific solution! Solution to Win10 Task Manager crash 1. First, press and hold the "Win" + "R" keys on the keyboard to open Run, enter "regedit" and press the Enter key. 2. Expand the folders and find "HKEY_CURRENT_USERSoftwareMicros
 How to turn off popular searches in Windows 10 system? List of methods to close popular searches in Windows 10 system
Jun 03, 2024 pm 08:46 PM
How to turn off popular searches in Windows 10 system? List of methods to close popular searches in Windows 10 system
Jun 03, 2024 pm 08:46 PM
In win10 system, hot search is one of the more practical methods, but sometimes it can cause certain troubles. So how to turn off hot search? Let’s take a look below! Step 1: Open the Settings app First, click on the Windows icon in the lower left corner of the screen and select the Settings app. Step 2: Enter "Personalization" settings In the "Settings" app, click the "Personalization" option. Step 3: Select the “Search” option In the “Personalization” settings, select the “Search” option. Step 4: Turn off popular searches. In the "Search" option, find the option "Show popular searches in search" and turn it off. Professional Tool Recommendation 1. Xiaozhi Soso Xiaozhi Soso—Quick Search and One-Click Positioning—Professional Computer Search Tool
