
The example in this article shares with you the specific code for implementing the carousel effect using JS for your reference. The specific content is as follows
Knowledge Points

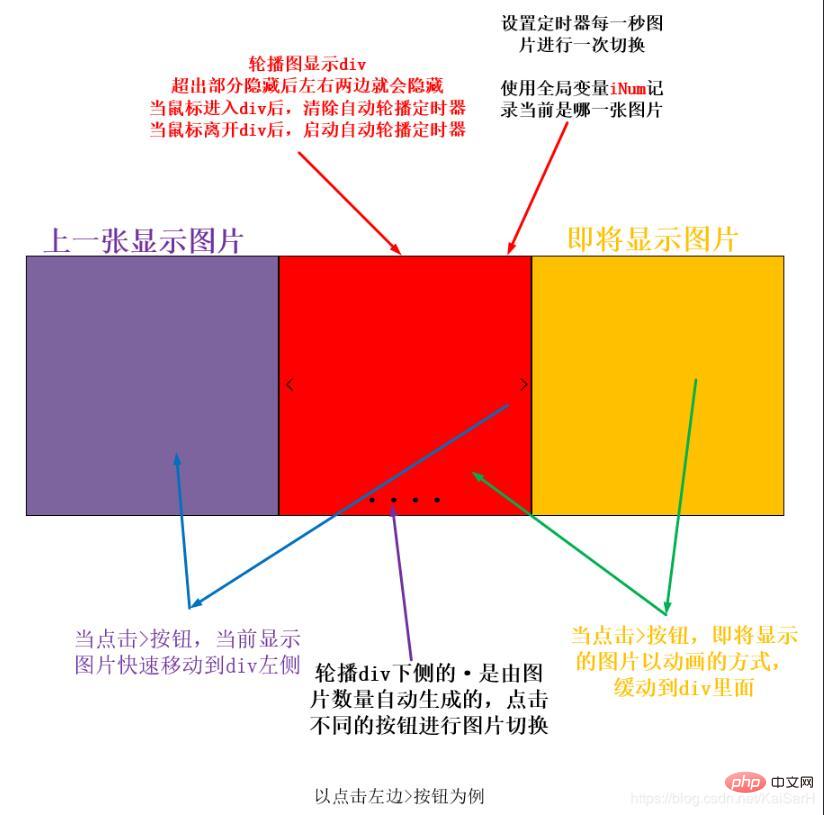
Carousel picture idea:
① Create a global variable index and always mark the currently displayed picture.
② Dynamically create the ●picture indicator below based on the current number of pictures.
③ The initial state of the carousel image is that the first image is in the middle, and all the remaining images are placed at the position where the image will be displayed.
④ When > is clicked, the current picture calls the animation movement function to move to the left. At the same time, the new picture calls the animation function to move into p, and the next displayed picture will be moved to the right of p. side.
⑤ Boundary judgment needs to be performed. If the current picture is greater than the number of pictures or less than or equal to 0, reassign the index.
⑥ When clicking on the picture indicator, first determine the positional relationship between the click and the index, and then perform animation movement.
⑦ Add a timer to p to automatically move pictures. When the mouse enters p, the timer is deleted. When the mouse moves out of p, the timer is set.
Running effect
1.Automatic carousel
2.Click left and right to switch pictures
3.Click the picture indicator below to switch pictures

Code
Introducing the MyTools.js library
1.html
2.css
*{margin: 0;padding: 0;} a{ color: #999; text-decoration: none; position: absolute; top: 50%; transform: translateY(-50%); background-color: rgba(0, 0, 0, .4); } a:hover{ color: #f8b62b; } i{ font-size: 50px; font-family: "Helvetica Neue", Helvetica, Arial, sans-serif; } #box{ height: 482px; width: 830px; background-color: red; position: absolute; left: 50%; top: 50%; transform: translate(-50%,-50%); overflow: hidden; } #box_content{ height: 100%; width: 100%; cursor: pointer; } #box_content img{ position: absolute; vertical-align: top; height: 100%; width: 100%; /*left: 830px;*/ } .box_img{ width: 100%; height: 100%; position: absolute;} .box_control_right{ position: absolute; right: 0; } .box_control_left{ position: absolute; left: 0; } ul{ position: absolute; bottom: 30px; left: 50%; transform: translateX(-50%); display: flex; justify-content:space-evenly; } ul>li{ list-style: none; width: 16px; height: 16px; background-color: #fff; margin: 0 3px; border-radius: 50%; cursor: pointer; } ul>li.current{ background-color: darkorange; }
3.js
window.addEventListener('load',function (ev) { // 轮播图 (function () { // 1. 获取需要标签 var boxContent = myTool.$('box_content'); var contentImg = boxContent.children; var boxControl = myTool.$('box_control'); var controlBottom = boxControl.children[2]; // 2. 全局索引 var iNow = 0; // 3. 根据图片个数动态添加下方图片指示器 for (var i = 0; i < contentImg.length; i++) { var li = document.createElement('li'); controlBottom.insertBefore(li,controlBottom.children[0]); } // 4. 让第一个图片指示器选中 controlBottom.children[0].className = 'current'; // 5. 让除了第一张图片以外所有图片进入待显示区域 var scrollImgWidth = boxContent.offsetWidth; for (var j = 1; j < contentImg.length; j++) { contentImg[j].style.left = scrollImgWidth + 'px'; } // 6. 处理左右两侧点击 var cPrev = boxControl.children[0]; var cNext = boxControl.children[1]; // 6.1 点击左边 cPrev.addEventListener('click',function (evt) { // 1. 当前可视区域图片快速右移 // 2. 上一张幻灯片出现在可视区域左侧 // 3. 让这张幻灯片做动画进入 myTool.slowMoving(contentImg[iNow],{'left':scrollImgWidth},null); iNow--; // 边界处理 if (iNow < 0){ iNow = contentImg.length - 1; } contentImg[iNow].style.left = -scrollImgWidth + 'px'; myTool.slowMoving(contentImg[iNow],{'left':0},null); // 切换索引 changeIndex(); },false); // 6.2 点击右边 cNext.addEventListener('click',function (evt) { autoPlay(); },false); // 7. 下侧图片指示器操作 for (var k = 0; k < controlBottom.children.length; k++) { // 取出单个li标签 var bottomLi = controlBottom.children[k]; // 监听鼠标进入 (function (index) { bottomLi.addEventListener('mouseover',function (evt) { // 比较当前索引和点击指示器位置关系 if (index > iNow){ myTool.slowMoving(contentImg[iNow],{'left':-scrollImgWidth},null); contentImg[index].style.left = scrollImgWidth + 'px'; }else if(index < iNow){ myTool.slowMoving(contentImg[iNow],{'left':scrollImgWidth},null); contentImg[index].style.left = -scrollImgWidth + 'px'; } iNow = index; myTool.slowMoving(contentImg[iNow],{'left':0}); // 切换索引 changeIndex(); },false); })(k) } /** * 切换索引操作 */ function changeIndex() { for (var i = 0; i < controlBottom.children.length; i++) { controlBottom.children[i].className = ''; } // 当前的被选中 controlBottom.children[iNow].className = 'current'; } /** * 点击右侧和图片自动运动操作 */ function autoPlay(){ // 1. 当前可视区域图片快速左移 // 2. 下一张图片出现在可视区域右侧 // 3. 让这张图片做动画进入 myTool.slowMoving(contentImg[iNow],{'left':-scrollImgWidth},null); iNow++; // 边界处理 if (iNow >= contentImg.length) { iNow = 0; } contentImg[iNow].style.left = scrollImgWidth + 'px'; myTool.slowMoving(contentImg[iNow], {"left": 0},null); // 切换索引 changeIndex(); } // 8. 设置定时器 var timerId = setInterval(autoPlay,2000); // 9. 鼠标进入图片p后设置和清除定时器 myTool.$('box').addEventListener('mouseover',function () { clearInterval(timerId); }); myTool.$('box').addEventListener('mouseout',function () { timerId = setInterval(autoPlay,2000); }); })(); },false);
For more js special effects, please move to thejs special effects downloadcolumn.
The above is the detailed content of How to implement simple carousel effects with JS? (Detailed explanation with pictures and text). For more information, please follow other related articles on the PHP Chinese website!